
1. disclaimer
I'm sharing what I have been doing as an artist, this drawing tips in no way dictate how you should be drawing your art. Take the advice that works for you and your art.
Hopefully this article would be helpful to your art journey!
2. Introduction and Basic Anatomy
First of all, let's start from the basic: Anatomy.
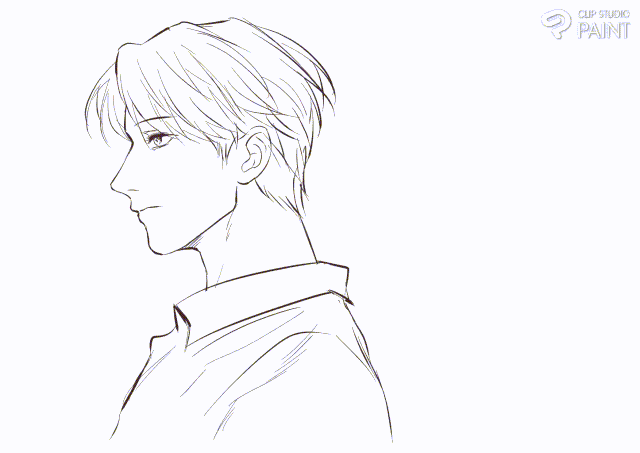
To understand how face looks from the side profile, let's start with how it looks in a frontal view!
I usually start with a simple guidelines like this: the lines marked in red is important to note
Applying the same principles and adding variety of facial features will give you a lot of unique faces. Here are some examples I made using the same guide (red lines).
Keep in mind to not strictly limit yourself to the guidelines.
I know a lot of people struggles around the eye and mouth parts when drawing side profile, so let's take a closer look at them in the next section.
3. Side Profile of Eyes and Lips
Important focal point that helps you as a guide here is the eyebrow bone / brow bridge / supra orbital torus. When viewing a face from the side profile, it is important to observe and see how it correlates to the eyeball.
Another important aspect is how the nose bridge starts around the same level as the corner of the eye, whether the nose bridge is prominent or not. As the nose ends, it met with philtrum and the lips.
When drawing eyes from the side, you have to keep in mind that it is a ball with skin wrapping around it. As you turn the eye sideways, the eyeball itself became less prominent and only the corner of the eye is visible.
To simplify it down, usually i use triangular shape eye as a guide, like the example below.
When drawing lips keep in mind of the curvature of the lips. Upper lips usually have upward curvature and bottom lips have downward curvature to it. The thickness of it also play on how it looks when viewed from the side.
4. Using 3D model head
Using 3D model head could help your workflow, especially if you draw in tight deadlines or just too lazy to sketch the head from scratch. It is a good starting point and make it easier to keep consistency of your character facial features.
CLIP STUDIO PAINT version 2.0 and forward came with a built-in 3D head model. You can check the official article about it here:
You can also make custom head model of your characters, OR you could also look for other people's 3D head models creation here:
That being said, I currently only have license for the CLIP STUDIO PAINT version 1.X, so the demonstration below is made with older 3D model asset available on CLIP STUDIO ASSET.
link of the 3D head model used in this demonstration :
Important thing to note when you use 3D head model as direct guideline is to periodically check how the line art looks without the 3D head model. Especially when you aren't using 3D head tailored to your character's facial features, it is best in my opinion to use it as general placement guide and adjust accordingly depending on your art style.
I do think the new 3D head model is wonderful and would work better as you can customize it yourself within the CSP app. Additionally tailor made 3D head models with specific facial features would help you visualize them better in different angle.
5. Adding Movements and Expressions
jaw movement
After learning how to draw static side profile, let’s explore on how to add movements and expressions into the mix.
First off, it’s important to remember that upper jaw is fixed, thus the upper teeth doesn’t move. The only parts doing the movement is the lower jaw going down. Muscles are pliable but bones are not, so the only part that’s creating movement in the upper mouth is the lips.
From the side the movement became more apparent.
Here is simple a drawing demonstrating it.
The more extreme the mouth opening is, the more you could see visible line forming between the nostril and the corner of the mouth in real life. So in a simplified drawing, you could try adding that detail in.
portraying expression : anger
In this article, we will take a quick look at how to portray anger from the side profile. To portray expressions from the side profile, pay attention to these area.
First off, the eyebrows and eyes. When someone is angry, their face tends to bunch up in the center. Eyes glaring and eyebrows narrow down closer to the eyes. This action will create wrinkles on the face. It is visible from the side view as well. Then on the nose and buccal / cheeks area, the nasolabial folds are usually more prominent. Adding nostrils movement helps creating a more dynamic facial expression as well. Lastly, you can amplify the emotion by making the character screams.
Here is my step-by-step demonstration.
Same principle applies to other expressions as well.
6. Stylization: Introduction
Now that we have introduced some of the guides, it's time to break it up a bit.
In this article, we will focus on 2 common stylization : "Anime" art style and "Chibi" art style.
"Anime" art style here refer to anime / manga art style that typically (but not limited to) exaggerated proportion of the eyes and head. Meanwhile "Chibi" art style here refer to super deformed version of character, with oversized head and smaller body.
Here's a quick visualization on how the proportion compares to each other.
Realistic and semi realistic proportion of the human body, it typically consist of 8-7 heads unit high. A more cartoonish / manga art style, typically it would have less since the head is bigger. Chibi / super deformed art style, it typically ranges form 2 to 4 heads high, depending on how deformed it is.
In this article, we will focus on the side profile aspect of the stylization.
7. Stylization: Anime / Manga Style
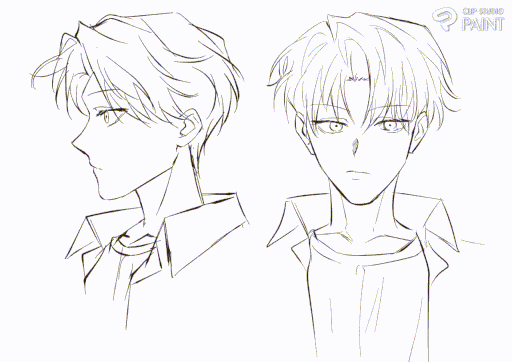
First, we will use the earlier character. I have drawn a quick front profile face of the character as a comparison to the side profile. While arguably it's already stylized to some degree, but you could exaggerate the eye size even more often with simpler shape.
Here's my attempt to stylize the character to a more cartoonish / manga art style.
Here you can see the change in proportion, but it still adheres to some of the basic guides.
Now to draw it in side profile:
If you are confused with the change of proportion, try adding back the guide on top of the finished drawing. So when we turn the character sideways, we have the guide to see how big the individual proportion was.
You can try marking it down like this and use it as size guide. Here is my drawing process of it; you can see I used the same basic anatomy principles. I also adjusted the eye size afterwards because I feel it is not big enough.
Remember that stylization is boundless and this is just one example out of many out there ( ^ ^ )
8. Stylization : Chibi Style
Here below, I have made a chibi version of the character...
We will use the same principle as the previous example when drawing the character from the side. The red lines mark the hairline, the top and bottom of the eye.
Here's the guideline on top of the finished chibi viewed from the side.
Important point to note here when drawing chibi, the nose often less pointed and became rounded. Almost to a blob. The eye became the main focus of the face and you can apply some of the fundamentals when drawing chibified eye from the side.
9. End of Tutorial
Here are the completed drawings from today's tutorial side by side.
I made this tutorial out of a whim one day, it was fun to write and compile. I learned something new while researching it as well. So hopefully you find it enjoyable to read as well. I hope you find this article helpful to your art journey!
Happy creating and learning!
この投稿を「いいね!」したユーザー


コメント