HOW TO DRAW: Profiles for Beginners
Hi!
Hi! I’m Gabi and this is a tutorial for beginners on how to draw side faces! My 9-year-old brother tested and approved this tutorial, so I’m confident that anyone can do it!! (And just to make things clear, he’s not the average stick figure kid, and he has been drawing since I could teach him, so he’s quite good already).
There are many art styles out there, but in this tutorial I will be taking a more semi-realistic/realistic approach and from there, show you how you can modify this knowledge to be applied to different art styles. I will try different anime styles and chibi.
A face profile can be quite hard, but it’s great to learn it to fully understand the tridimensionality of the face, which is essential for any artist to know. And we will first start with some basic guidelines.
These guidelines are not that easy to remember step-by-step from memory since is mostly composed by drawing straight lines from one side to the other, so I suggest you follow along because it can be confusing at first.
REFERENCES
The first thing we need to do is to get some references, you can pick any photograph that you like, but allow me to show an extremely useful tool that exists in Clip Studio Paint, that is the 3D assets! There you can find a variety of 3D heads that you can use as references, and they are great to use because they allow you to change the light source so you can see the different ways that light and shadow behave in a profile face.

How to add one:
If you’re not interested in downloading a new one and will just be using one that comes with the software jump to Part 2
With CLIP STUDIO main page open, click on “CLIP STUDIO ASSETS” on the left side of the page.
Once it’s open, type on the search bar “type:3dhead”
Choose your favorite!
Download it and open CLIP STUDIO PAINT
Part 2
With Clip Studio Paint open
1 - Expand the materials tab
2 - Click on the icon with mutliple dots to open “All Materials”
3 - Find you model (it will probably be the first one), click and drag it to you canvas.
If you’re using a CSP official model, it is easier to find the under “3D”, then drag them to you canvas.
To turn the head into a exact profile position:
1 - Select you model, under “Tool Propert: Object” on the left, find the “Angle” option, then clikc on “Presets” on it’s side.
2 - A new window will open with multiple options of head angles, choose a profile one.
Three Main Forms
FIRST
In order to draw any face, we need to understand its principal forms and proportions. A profile has three main essential forms. The first one is an egg-like shape that represents the skull.
A tip for making it as oval as it needs to be is to have in mind that it will hold a brain inside, so imagine that egg shape as a cover that has enough space for a brain.

SECOND
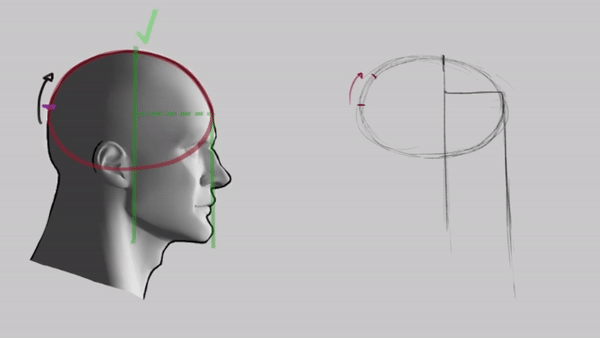
The second main form is a rectangular one, which you can imagine as a paper being placed in front of that egg shape. This represents the face and it’s where all the features are. I will be calling this part the face mask from now on.
In order to get the correct proportions of this face mask, start by making a point marking the middle of the egg. From this middle, go a bit to the side. So it’s not exactly in the middle, but it’s not too far out either, something subtle but that you can still see it.
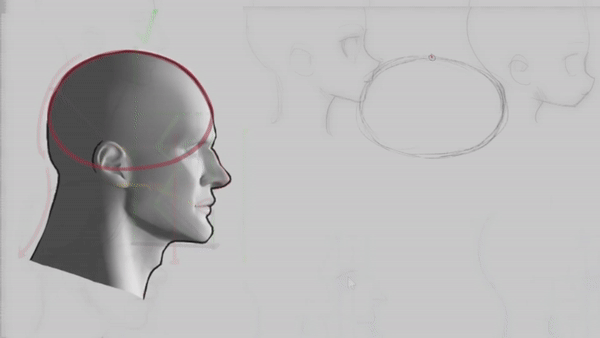
From this “side point” trace a line downwards, and then a parallel line that is aligned with the front of the egg.
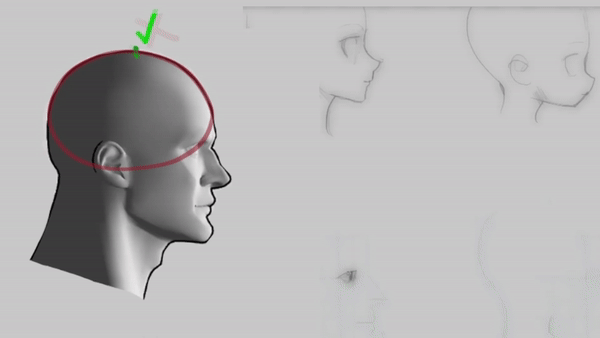
Also, don’t forget to close the face mask on the top side! It can be quite hard to know where exactly the “paper” would end, but imagine you’re dividing the egg into thirds. It will be about the size of one of those parts.

To get the bottom of the face mask, start by making a point in the back of the egg, but now go a little bit upwards, just like we did before.

From this new point, trace a line that ends in this highlighted area where the egg bottom meets the back line of the face mask, and from there make another line following the same flow and direction until this line gets to the front part of the face mask. Then close the face mask by making a straight line that ends at the back part.
THIRD
The third form is another egg-like shape for the ear. The only thing to keep in mind when making the ear is to make the bottom of the skull-egg in the middle of the ear. So it doesn’t have to be exactly like an ear, but the middle has to be at the bottom of the skull-egg!

From the top and the bottom of the ear, trace straight lines that end in the front of the face mask. These lines are extremely important for the rest of the process!

Big Shape
Now that we drew the main forms, we must draw this big shape that comes from the forehead to the jawline, since the forehead, cheekbones, cheek, and the jawline are the most important elements when drawing a profile, because they are essentially the main thing that shows us the tridimensionality of that face, and this shape allows us to know the proportions of these parts, and accentuate the ones that we want, so if you want a character with strong, sharp cheekbones, this Big Shape will allow you to draw that already knowing where that part is on the face
In order to draw it, we are going to make a “zig-zag” movement. Start by drawing a point in the middle of the top of the face mask.
From there, you trace a line downwards that goes a little bit to the side.
Then you trace another line downwards, going back to the middle, BUT this line does not stop at the bottom line of the ear, it stops about where the middle of the ear is.
Now another line down to the side again, and finish it by joining it to the chin tip.
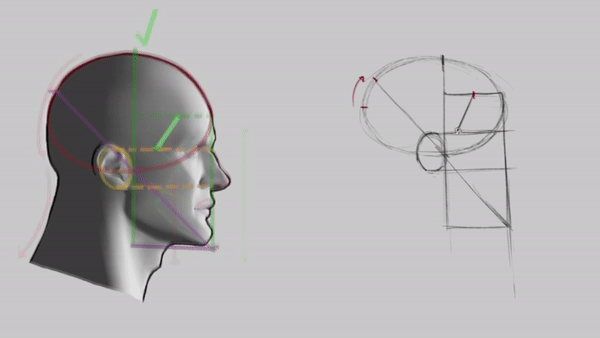
We finished the basic sketch for the profile and we can now move the features! Let’s start with the eyes!
Eyes
They are one of the trickiest parts to get your proportions correctly, and where I see most beginners committing mistakes, I myself took ages to actually learn how to make the eyes on a profile so I personally understand the struggle. Most people will not know exactly where the eye sits and the format that it has, so I will show you a somewhat precise position.
We start by dividing the face mask in the middle, creating two big rectangles/strips.
And the rectangle that is supposed to be the face we divide it in the middle again. This second strip/rectangle is where the eyeball will be.

To get the correct “height” of where the eye will be, base yourself on the line that comes from the top of the ear. That line is about where the middle of the eyeball is. So there draw a circle that is cut in the middle by the top line of the ear.
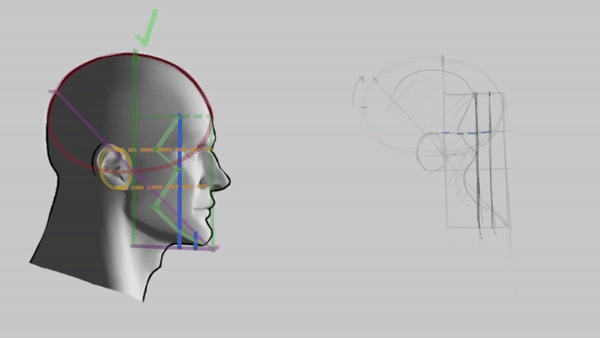
Now that we got the eyeball, draw an opening of 45 degrees that starts from the middle. And I don’t say this to sound technical, but in my personal experience is something that I believe most people will be familiar with, from their school days. It doesn’t have to be exactly 45 degrees, so don’t worry about making it perfect.

Nose
Once the eyes are finished, we can start working on the nose. Noses can be very different, and they are most of the time, so after the sketch you can play along with the details of how you want it to be!
From the middle line of the ear trace a straight line. This will be the tip of the nose, so draw that line off the face mask with a length (after passing the face mask) similar to that of the strips we just did.

Now we create a diamond-like shape to use as a base for the nose. From the tip of the nose, make a line towards the front of the face mask that ends at the same height as the top line of the ear.
And then another way smaller line to finish the form. This one can be hard to get, but imagine you’re making a half diamond upside down

Mouth
The mouth is probably the easiest part! the mouth/chin combo usually goes backwards, but it can be straight (following the face mask direction) or even forward! But here I will be going slightly backwards.
From the bottom part of the ear you will trace a straight line towards the face mask but going down a little bit. This will give us the middle of the mouth.

Now we use the heart trick, that consists of drawing a heart with the line you just made being the middle, and from this you can give it the shape you want!

You can see that the chin and the jawline guidelines are a bit longer than they usually are, so if you want to change that, start by coming from the bottom of the bottom lip and make a circle that is about the same size as the mouth!

Then, complete with the jawline, it’s basically a connection between ears and chin, so make a 90 degree line, like an “L” but rotate just enough so it looks more natural.

Neck
The neck is really the most “freestyle-ish” part in this tutorial
The front line of the neck often starts about where the facial features end, and will usually go back just a little (depending on the characters posture). It’s usually about half of the face in height, so you stop when you feel like you’ve reached a good size in comparison to the face
.

Necks’ back line follows the curvature of the skull but going the opposite direction and slightly bigger. Don’t do it too curved or straight, just try to follow the skull curvature.

Now we finished the sketch, and we can start working on the features! For this part, there aren’t really specific guidelines like the sketch, specially because people are so diverse and there are so many different art styles, that I just think the best way to actually learn it is by trying out different types of faces and styles using this base. Once you’re used to the proportions, especially by experimenting and drawing different faces, you will be drawing profiles without even thinking about these guidelines, like a pro.
And just as a side note, I suggest you to also not get attached to the guidelines either, start skipping some steps of it as you grow confident of your eye perception to catch wrong proportions!
Quick Look on Facial Features
Again, I don’t believe that there are guidelines for facial features, since they come in so many ways, but something that I can do that I believe is extremely helpful for beginners is to go from that sketch to a semirealistic drawing, anime style, and chibi and show to you this process and give you some tips on what I think when drawing them.
Let's start by closely examining our reference.
Take a look at the forehead of the first character, which is rounder compared to the second one. While the difference is subtle, the second character's forehead is slightly straighter with a small bump at the end.
FOREHEAD
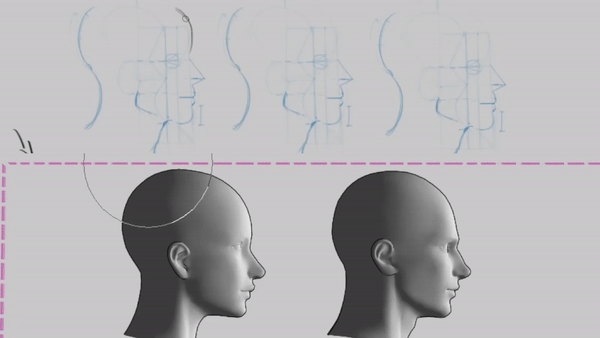
Remember, no feature exists in isolation. When drawing any part of the face, consider how it relates to the surrounding elements. For instance, pay attention to the size of the division between the brow bridge and the nose.
NOSES
The noses are quite similar, straight with a rounder bottom tip. The main distinction is the bump in the nose of the second model and the shape of their nostrils. The first model has a rounder nostril, while the second one has a straighter nostril. Again, keep in mind the overall balance and proportion of the nose in relation to the rest of the face.
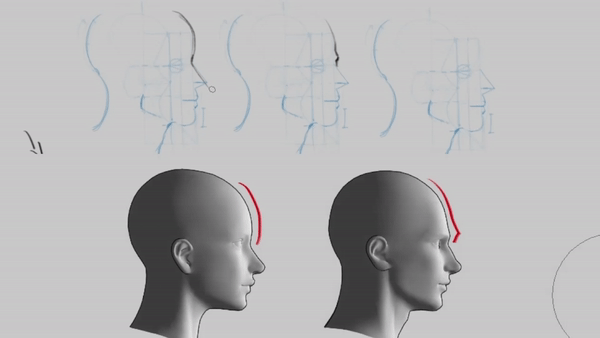
MOUTH AND CHIN
Moving on to the lips, they are also similar, although the first model's lips appear slightly more "pouty." It's important to note that the lips typically end where the eye begins. Remember, the face is more than just individual features placed on top of a head; they must harmonize and be well-balanced within the face.
Now let's observe the chin. The first model has a rounder, forward-projecting chin, while the second model has a squarer tip, creating the impression that the lower part of their face recedes. The first model's chin has a curved, half-moon shape, while the second model's chin is more of a straight line.
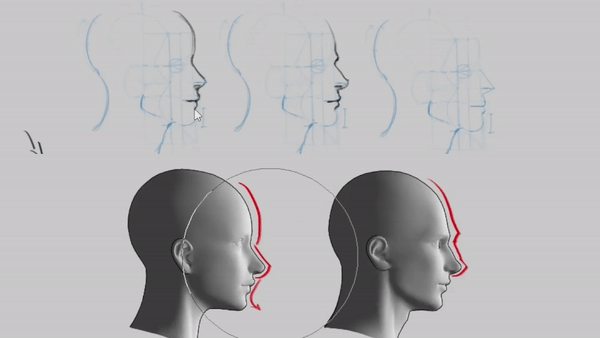
JAWLINE
Although the second model's jawline appears stronger, this is mainly expressed through shading. If you were to blur the second jawline, you'd likely end up with a result remarkably similar to that of the first model.

Starting to Apply this knowledge on Anime and Chibi
I encourage you to go beyond your comfort zone and explore multiple art styles, including anime and chibi. But keep in mind that the following topic is not an extensive tutorial, it more a collection of tips to help you get started with drawing these styles based on the sketch we just learned.
You can see that the anime-style references and the sketch aren’t the most exact match!

LIQUIFY METHOD
From here we have two options: use the liquify tool to change the sketch and make it similar in proportions to your reference. This can be quite helpful if you want to just study the facial features!
LIQUIFY


LINEART


ANIME GUIDELINES/SKETCH
Or you can recreate the guidelines based on your reference if you want to study the proportions of the face. If you’re interested in drawing the guidelines from scratch, here’s a summarized image of everything that is different from the original guidelines.
The guidelines for drawing anime heads are quite similar to semi-realistic ones. The main differences lie in a few key points that are connected in different places:
The first form, resembling an egg shape, remains the same.
For the second form, known as the paper mask, it closes right in the middle of the skull:


In the first model, create a point at the back and go way upwards.
In the second model, the point remains in the middle:

From both points, trace lines that converge at the highlighted intersection, and another line following the same flow until it meets the face mask.
The ears are similar to the original guideline:

The big shape of the head is also similar in both models:

In the first model, the eyes are cut in the middle by the two lines originating from the top of the face mask, with the ear line on top of them. The 45-degree opening of the eyes is rotated in a way that makes the top eyelid appear flatter:
In the second model, the eyeball slightly surpasses the two lines from the top of the face model. They also occupy around 2/3 of the space within the rectangle formed by the top and bottom lines of the ear:
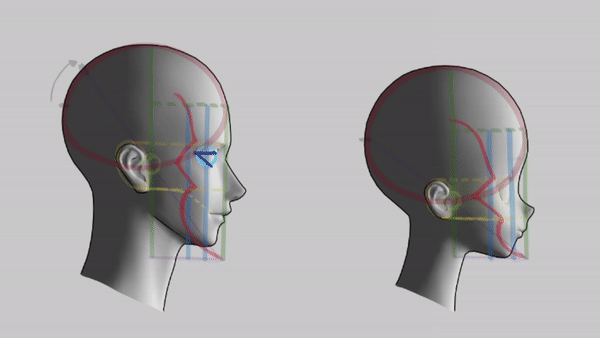
Both noses follow the original guidelines, with the tip of each aligned with the line originating from the bottom of the ears. However, the second model's nose is significantly smaller. Additionally, in the second model, you can rotate the nose to point upwards:

The mouth, chin, and jaw remain mostly the same, but they are typically smaller and have a stronger pushback:

Shadows, Lights and Rendering
I won’t go in depth about rendering and painting, shadow lights all that stuff, since this is a tutorial for beginners, but I will give you three great tips for start taking the first steps for this part of the process: What parts you should always think when painting the face, the 3D models that I mentioned earlier, and the Shading Assist from CLIP STUDIO.
MAIN PARTS TO CONSIDER
Here are the key parts of the face to consider:
The Big Shape: It forms the foundation of the face, there’s so much that goes on in that big area in terms of shadows and lights that it truly deserves every artist’s attention.
Forehead's Shadow: Adds depth to the face and specially the eyes, it makes the eyes feel connected to the face and not just placed in there.
The Nose: A defining feature, creates different types of shade for every part of the face.
Frontal Lighting Triangle: Illuminates and highlights the face, helps to avoid faces looking flat.

To demonstrate their importance, let's focus on sharpening the features of our first character. By tweaking the big shape alone, you'll notice a significant change in the overall appearance:

3D MODELS
The 3D models are pretty easy to use, and they make your studies easy. I showed you earlier how to add one, but to play around with the light source, you just select your model, and under “Tool Property: Object”, click on the little spanner icon, then click on Light Source, and you are ready to start exploring how shadows and light behave in a profile.
Here’s a demonstration of it being used:

SHADING ASSIST
The Shading Assist can also be great, especially for different scenarios, like morning or night light. First set your lineart reference as a reference layer by clicking on this icon, then create color layers with only flat colors, and finally select all the color layers and then click on Edit>Shadow Assist and you can start working around to get the base for your artwork that you’re looking for.
Look at this demonstration:

Well, that’s it for this tutorial! Don’t forget your proportions and to experiment with your art as much as you can, hope you enjoyed the content and thank you so much for your time.
Bye bye :}


댓글