Cool animation tricks for beginner!
Introduction
Hello everyone! In this guide I’ll show you how to create some cool animations to make your illustration moving. The moving illustration below mostly uses keyframes!

Before jumping into the tutorial how to animate in Clip Studio Paint, it’s better to get to know the features which are useful to make animation in Clip Studio Paint and the difference between animating in Clip Studio Paint PRO with Clip Studio Paint EX.
Start up
I. Features and tools to animate in CSP
There are two windows that is helpful for animation: Animation Cels and Timeline. To activate both of them you simply click window>timeline/animation cels.
For beginner, I recommend to simply activate timeline and it’s good enough to animate with it.
There are useful tools in timeline, I’ll explain simply tools that will be used very often in this tutorial.
New timeline: to create different timeline and with different animation.
Zoom in/out: To zoom in/out the timeline
Play/Stop: To start/stop the animation
New animation folder: to create animation folder.
New animation cel: to create another cel of animation, this tool specifically used cel to cel animation.
Enable onion skin: tools to make it easier drawing next cel of animation.
Enable keyframes on this layer: this tool is very useful to make smooth slide/zoom/ transition animation on the layer. In fact, the illustration I made mostly animated using this feature.
Add keyframe: it adds dot on the timeline to as to save the position/visual of the layer. In this tutorial I mostly use smooth interpolation to create smooth transition from previous keyframe to next keyframe.
II. The difference between CSP PRO and CSP EX in animation
As CSP PRO features prioritize on making comics or illustration, there are some limited features to animate in CSP PRO. Maximum frames in CSP PRO is 24 frames that means either 1 second with 24 fps or 3 seconds with 8 fps. In CSP EX there are no limitation how many frames you make within 1 second so I recommend to use CSP EX if you’re interested to make lots of animations. Though with such limitation, it doesn’t mean you can’t animate more than 1 second in CSP PRO. I used CSP PRO to create the animation so CSP PRO user can try to make animation too!
III. Before start
To create new animation file, choose the animation one. It’s a different canvas compared to illustration one. In animation canvas there’s a blank space and there’s option of frame rate. You can choose up to 60 fps if you use EX and 24 fps for PRO. If by chance you start on illustration canvas, you simply just activate new timeline then create new animation folder.
Another tips is if you’re comfortable with making separate colored layer from lineart, you can simply create new folder inside animation folder and put them together in it when you animate it. As it’s newly moved inside animation folder, it usually starts as hidden.
To make it appear you can right click on the timeline and choose the layer. This is also a good use for hand drawn animation you can simply insert or delete layer without truly delete the layer from the file.
Pre-animating part
You can start sketching what kind of illustration you have in mind and planning the length of animation. For my illustration, I plan to create 7 secs 24 fps animation with each second movement based on spotlight:
1. spotlight appears
2. spotlight descent slowly
3. Spotlight adjusts on middle
4. Spotlight stops
5. Spotlight starts descending again slowly
6. Spotlight descends until disappear
7. No more spotlight
Beside those, I started planning which part will get animated and make sure the layer is separated from stand still layers:
1. Eyes (cel)
2. Black line (cel)
3. Eyeball (keyframe)
4. Liquid (keyframe)
5. Butterfly (keyframe)
6. Spotlight (keyframe)
7. Highlight on eyes (keyframe)
Coloring on cel animation part (Eyes and black line)
As I made the illustration by painting rather than using vector line/cel shading that often used for animation, it takes time to paint each cel of animation. I put the colored layer under the lineart I drew, following the sketch of animation. The eyes part divided in 4 cels: Fully opened, almost closed, fully closed, and almost fully opened. You can adjust the pace the blink animation with using almost closed and almost fully opened as in between cel of fully opened and fully closed. To make sure the color sticks with the cel, I put each cel into different folder within animation folder.
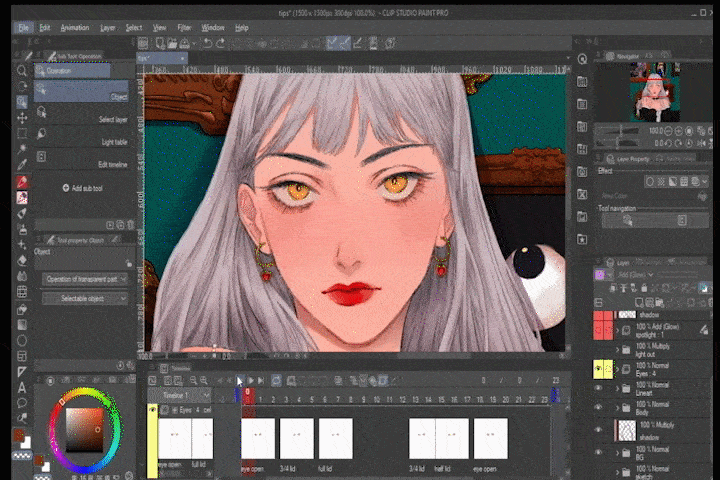
As for black line I simply scribble random 4 lines and putting each cel in random order.
Animating with Keyframe
I. Animate Eyeball with keyframe
To make the eyeball looks moving, I make the pupil moving with keyframe. Before start animating it with keyframe, you should convert the layer into image material layer by right click the layer> convert layer and on the convert layer window choose image material layer.
Click enable keyframes on this layer then click add keyframe on start point. When you move to other frame and moving the layer, it automatically registers a keyframe.
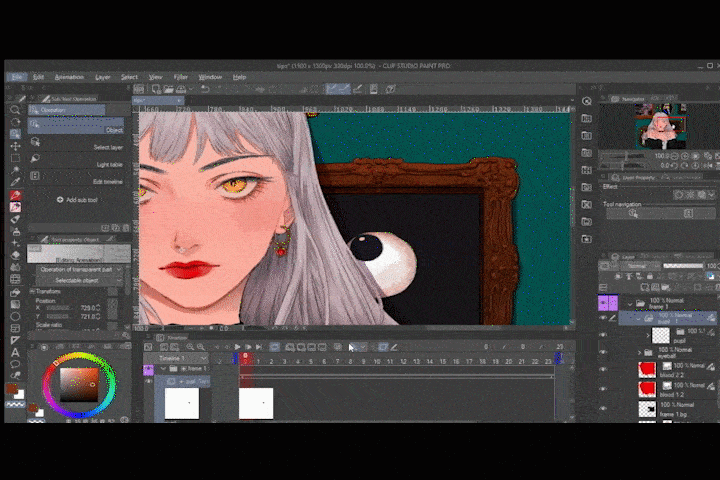
To make sure it moves differently within 7 seconds, I made the same plan with how I decided with spotlight. Using CSP EX, you can simply make different keyframe smoothly to another second. As for CSP PRO user, you need to create new timeline then you need to copy the last point keyframe and paste it on the start of new timeline.
This is a way to make animation longer than 1 second with 24 fps in CSP PRO. The disadvantage on PRO is there’s some awkward fast pause in between second when you render it because it takes precise and similar pacing to making it flow smoothly unless you can calculate the pace.
II. Animate liquid with keyframe
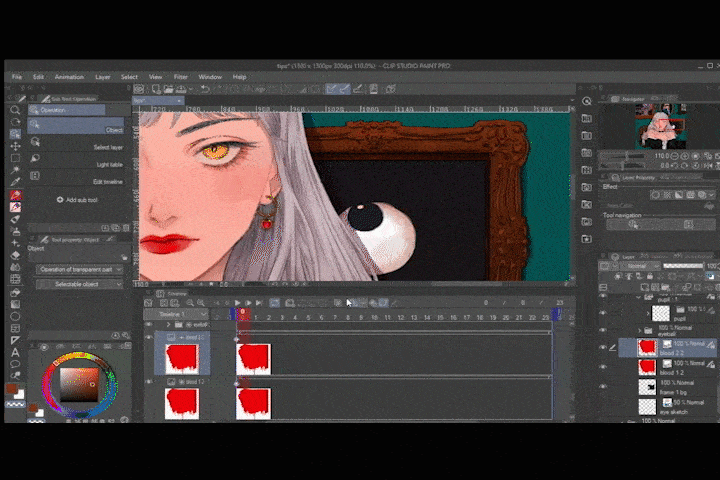
If you look closely, there are some liquids that flow faster/slower than others. The trick is I made 2 layers of liquid and control the pace of flow using keyframe. To make sure the liquid outside the frame hidden, I make sure the wallpaper covers it so it looks like it starts coming out from the frame! Using same method of eyeball, I created different pace within seconds with 1 timeline per second on CSP PRO. I made liquid layer (1) comes out first then liquid layer (2) slowly comes out. Then on another second (timeline in CSP PRO) liquid layer (2) flow faster than liquid layer (1).
III. Animate butterfly wings
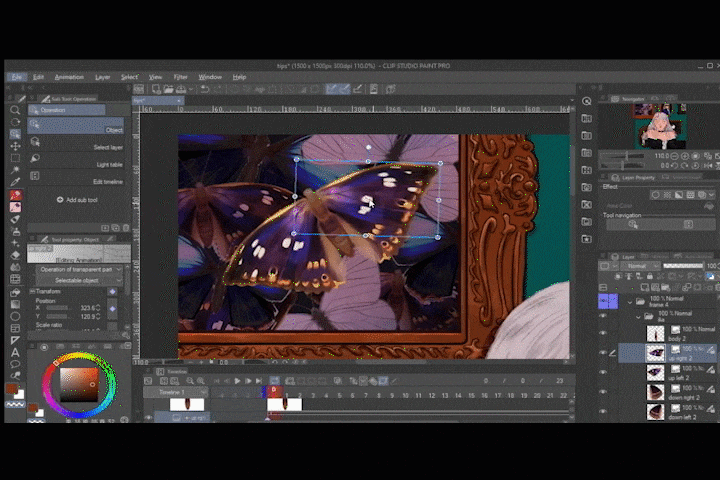
To create each moving as separate parts, I create each wing asset. You can try animating the butterfly with my asset here.
To make sure the wings rotate like they attach on the body, you need to move the control point to the tip of the wing that is hidden under the body layer. Now you can make each keyframe of wing rotate while attached to body.
IV. Animate the spotlight
Before making the spotlight, you need to create the illustration looks darker by blocking the drawing with dark color, preferably cool hue, and set the layer to multiply. Draw a circle with ellipse tool and choose the fill option. You can adjust the intensity of the circle by either drawing it with half opacity or adjusting the layer opacity. Select Add (Glow) or Overlay depending on the saturation.
Bold color preferably chooses Add (Glow) Option while pale color better use Overlay. If the color is still too bright you can adjust the opacity before convert the layer into image material layer. You can start animate the spotlight simply using keyframe.
Adding details based on lighting
I. Animate shadow + highlight based on when spotlight present
With using close up light source, you need to add some highlight and shadow when there’s light. The simplest method is making shadow layer and highlight layer clipped on the spotlight folder.
Since it’s clipped onto spotlight layer, they will only appear when the spotlight covers the area.

II. Animate eye highlight
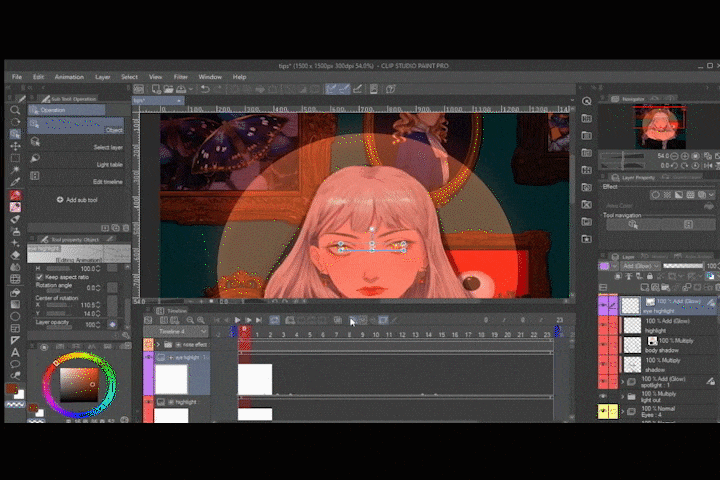
Draw highlight and make sure the layer is Add (Glow). To make sure the highlight only appears when eyes open and spotlight covers it, add keyframe with 0% opacity when eyes close/no spotlight. And when eyes open/spotlight appears, you can set opacity back to 100% and register it on new keyframe. Be careful with the keyframe type as smooth interpolation make the opacity fade not in an instant from previous keyframe to next keyframe. You might want to check each frame’s opacity.
Bonus: Moving Noise effect
So, I created 2 styles while making this illustration. One with noise effect to make it feels like old documented video and one with spotlight. If you notice the noise looks shaky. The method is simple. First, create noise effect or use noise layer asset. I use this asset to create the noise effect.
Set the layer type into either multiply or screen and adjust the intensity based on your preference. After that, as it sets as image material layer, you need to move the object outside the drawing. Make sure to register the keyframe on start animation. On next frame not so far, make it moving to other’s spot slightly.
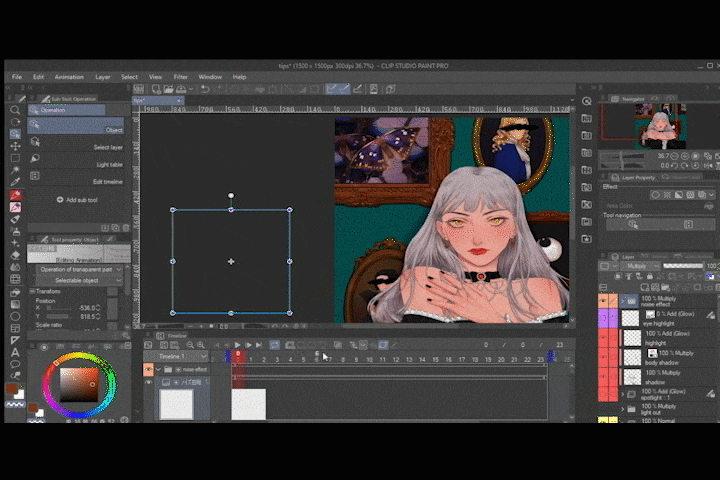
Now you have 2 keyframes on timeline, select both> right click > copy then paste them on next close frame. Multiply it by select all then copy and paste again until the finish time.
Now your illustration has moving noise effect.


Closing the guide: Export the animation
If you use CSP EX, you can simply click File> Export animation and choose any type of file you want. For CSP PRO user, there’s limitation as the export only count 1 timeline. So, to be able to export the animation, click File> Export animation each timeline.
In example: I export into image sequence and it will render timeline 1. After it’s finished, choose another timeline and export it. Repeat until the last timeline. After getting all the timeline, you might need a third-party software/website to merge all timeline.

And now the animation is finished! This is my first time making a guide, so thank you very much for coming to my guide! Hope you having fun experimenting on animation!







留言