10 TIME SAVING HACKS
hey guys in this tutorial im gonna taking about 10 save saving hacks and feature in clip studio paint that will make your process of creating art much easier and time efficient so lets start
--------------------------WATCH THE VIDEO FOR VISUAL EXPLANANTION ----------------------
1. EASY POSE
You might have found a reference for the pose you want to draw And if you like to use 3d models in your artwork here’s how you can imitate the pose from the reference into you're 3d model .
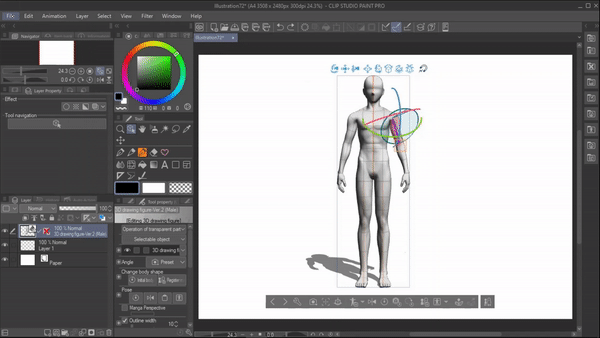
For example : let's say I want this particular pose on my 3d model .
[Note : You can literally use any picture not just drawings as long as picture has a proper pose in it .]
instead of searching for a similar pose in csp assets or remaking it by yourself, save some time by using pose scanner.
once you have you're 3d model in the canvas . Go to file > import > pose scanner > select the reference image .
It will now replicate the pose from the reference image into the 3d model in a few secs.
[NOTE : you need internet for this process ]
-------------------------------------------------------------
2. COMPANION MODE .
This is such an efficient hack especially if you're a comic artist .
I often face this problem where if I have to preview my webtoon in phone format, I have to first save and send the file to my phone . which took a lot of my time . If I find any mistakes to correct, I have correct it and send it back to my phone once again . This is where the clip studio companion mode comes in as the perfect solution
To use the companion mode we have to first connect our mobile with computer/main device
For that ,
>All you have to do is download the clip studio app on your phone. >then Open the app , select get started . >once the Manage works screen appears on the top you can see " companion mode "icon click on it > and select scan qr.
At the same time on your desktop/main device, make sure you have your clip studio paint open.
[ NOTE : ensure both your phone and desktop are connected to the same wi-fi/internet router. ]
>On the top your main device/computer window you will find the same " companion mode " icon in the Command Bar . >click on it to generate a QR code, which you're gonna scan with your phone.
>Once you have scanned the QR code , Finally your desktop and phone are now connected .
>you can now see the different modes available below on your phone
1 . quick access :
Quick access contains frequently used tools in a palette so that you can access them easily . You create your own new new set of quick access tool by clicking on "Quick access setting " or you change which tools to be shown on your companion mode
2. color wheel
You can use this as a regular color wheel to pick colors from .
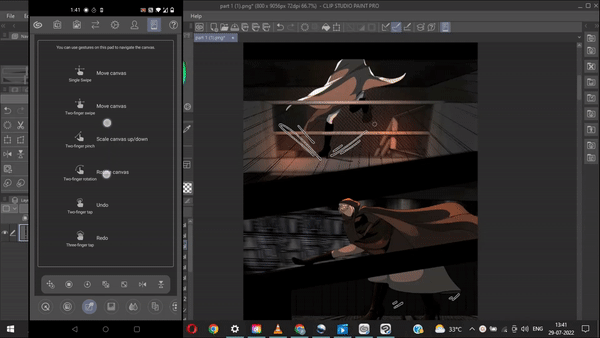
3. Gesture pad :
Using the gesture pad we can move canvas , scale the canvas , redo and undo . its best to control the gesture pad on your none dominant hand while you draw using dominant hand . It even has on -screen instructions to help you on how to use it .
4. sub -view palette
you can import image here to use it as a reference or to pick colors from .
Below we have some icons which contains colors picked from the image .
5. color mixing
As the name suggest , you can use this area to mix colors using the paint brush and blur .Once you're done you can select the color using eyedropper to use .

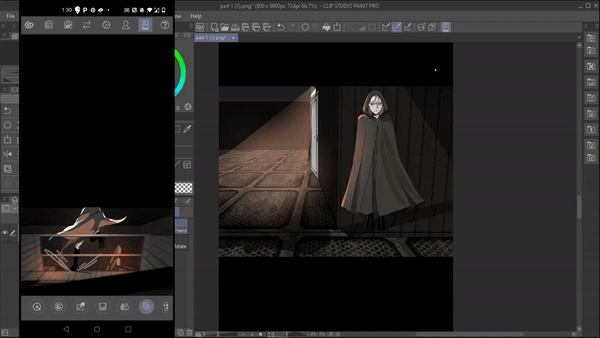
6.This one is the webtoon preview using which you can see how your webtoon will look on a smartphone. If you make any change in the main device it will reflect on your smartphone too.
7. Mode switch :
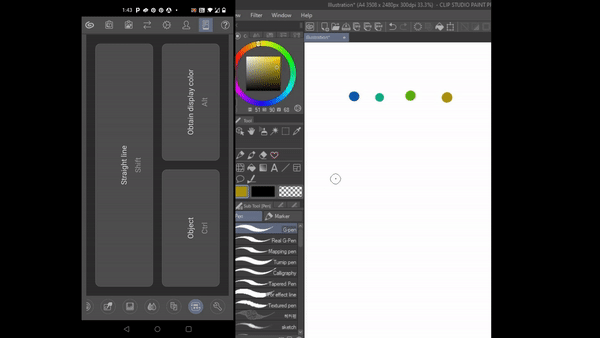
Using this mode, you will be able to assign functionalities such as ( drawing a square shape, picking a color etc ) to shift , alt/option and ctrl/command keys on your keyboard.
Once you pick your tool, the mode will display what functions are available for each key.
To perform the displayed functionality , just hold the corresponding key.
This feature is as convenient as hotkeys and moreover by holding two keys together ( shift+alt , ctrl+ alt) it has more functions to offer.
8. Settings
Here you can change mode button layout , quick access set list and more
So this basically how companion mode works Now you can connect your phone to your computer and use them as a handheld controller . how efficient is that . so do try it out yourself
-----------------------------------------------------------------
3. PICKING COLORS FROM OUTSIDE
If you want to pick a color outside of clip studio paint that you want to use in you're artwork , here's a cool hack you can do .
Let's say I want to pick a color from this artwork .Instead of downloading and opening an image in csp just to pick colors from it…..here's an easier and quicker way you can do that.
Go to [menu] Edit > hide window and pick screen color .
It will hide the clip studio window and will let you pick screen color from the window below .
Once you have picked your colors the csp window will open up automatically
and you can use the picked colors.

----------------------------------------------------
4. SEPARATING LAYERS
Using the feature I'm about to tell you , you can filter out and see a specific type of layer that you want in a palette.
For example : let's say I want to change the font of all of the text I have used in this comic . instead of searching for each text layer in these 100s of layers .
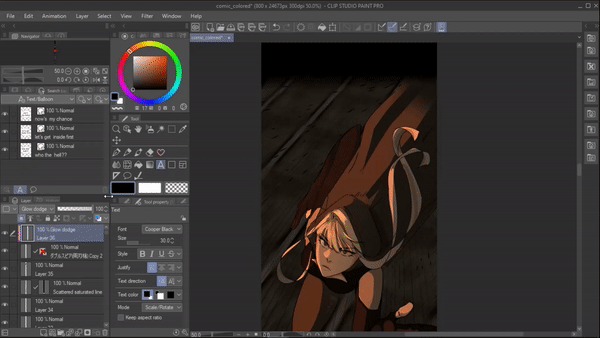
I can just go to the "search layer " and select text /balloon and it will filter out and show us all the text layers in the search layer palette .
[ note : If you don't have search layer . Go to window(menu)> search layer ]
Now I can edit them easily and even delete them.
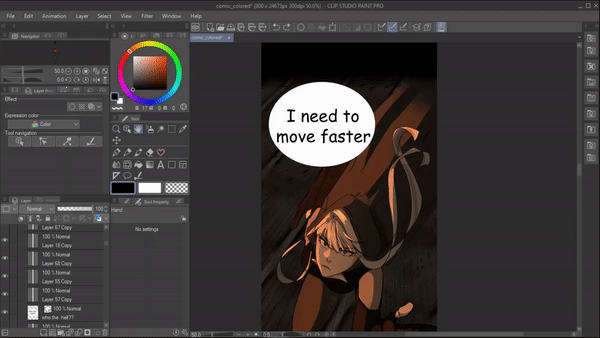
Similarly there are many different types of layer that you can choose .
you can even select multiple types of layers at once and all those layers will be displayed .
----------------------------------------------------------
5. MAKING CHANGES WITHOUT REDRAWING
When you want to make changes in your art without actually redrawing it or if you just want to do some quick fixes, use the liquify tool. It has different modes which we can use for different purposes It saves you time and you can effortlessly make changes .
For example : here I want to change the size of the eye in this character . For that i can use the expand and pinch liquify to aptly adjust the proportions of my drawing.
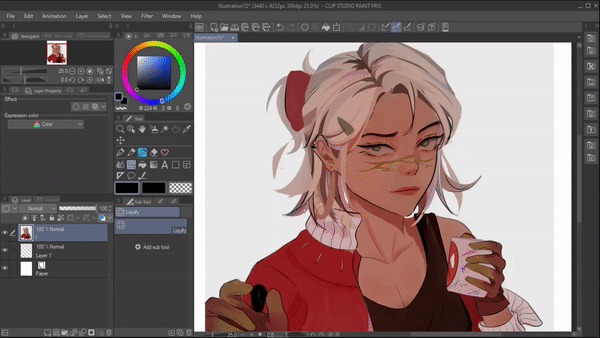
Not only that Using the push mode you can change facial expressions or even do some small fixes easily saving a lot of time

The liquify tool is such an effortless hack to swiftly make changes to correct mistakes and save some valuable time .To learn more about liquify tool ,its modes and tool property read the article below.
------------------------------------------------
6. SYMMENTRY
When you are attempting symmetric drawings, work smartly/efficiently by using the symmetry ruler
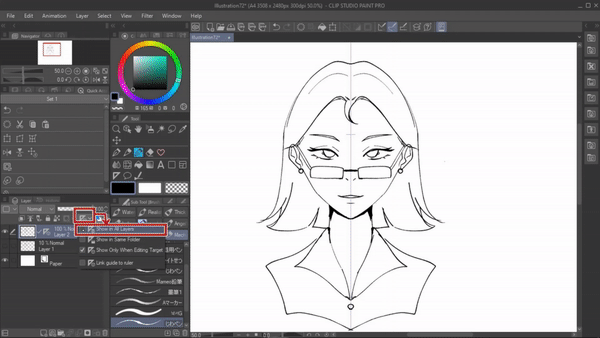
Go to "create ruler" tool where you can find the symmetry ruler .
Draw the symmetry ruler right where your drawing is going to be centered so that you have two perfect halves of your art
Now start drawing , whatever you draw on one side will be replicated simultaneously on the other side . Which saves you a tone of time.

One more time-saving hack you can do with a symmetry ruler is , once done with the line art , change its ruler range to "show in all layers" .
create a layer below for coloring and Now when you try to color , it will both sides at the same time. Making you're process of line art and coloring much quicker.
--------------------------------------------------------------------
7. AUTOMATIC COLORING
This is such a time saving feature especially when you're in a hurry to color your artwork . Clip studio offers this amazing feature called " colorize " that colors for you.
To do that ,
set your line art layer as the "reference layer" then create a layer below the line art and just throw in some hint colors

then go to [menu]Edit > Colorize > use hint image and colorize .
using the hint colors the AI will automatically color the image. Just add in some final touches and you are done .
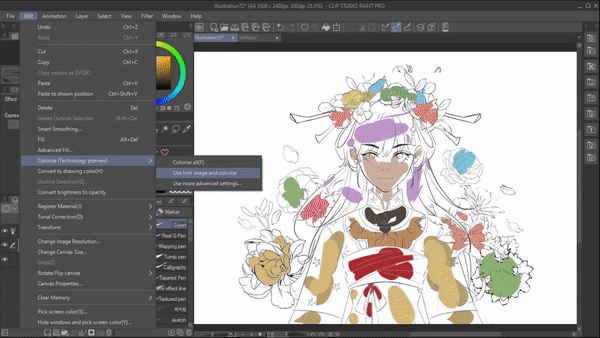
But let's say you're struggling to pick a proper color palette and you’re in a hurry then
Make sure you're on the line art layer and it is set as a reference layer .
then go to [menu] Edit > colorize > colorize .
This will colorize the artwork without any color hints .
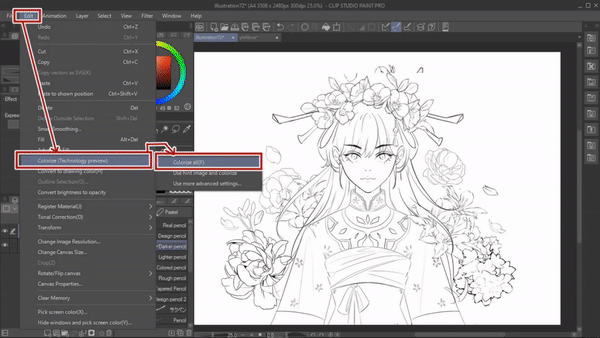
I think this is such a cool feature because it introduces you to a new color palette and pushes you're comfort zone . So do try it out yourself .
------------------------------------------------------------
8. KEEPING LAYERS TO MINIMUM USING FILE OBJECT
I personally love this feature because it is definitely a time efficient feature And also helps cut down on the number of layers .
To convert a layer into a file object , make sure you're on the layer that you want to convert into a file object.
Then go to [menu]layer >file object> convert to file object . And save the file .
now using the transformation tool im gonna adjust the lineart according to the sketch .
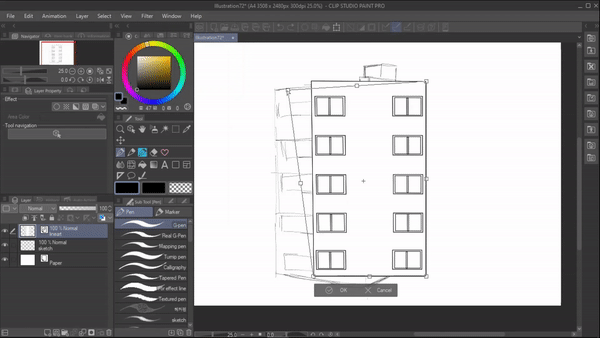
Now go to file > open and open the file object that we just saved . a new canvas window with the layer we just saved will appear .

Here whatever changes that are made and once saved will immediately reflect on the original window.
For example
Here if I erase anything on the reference file , it will be reflected on the original file after saving.
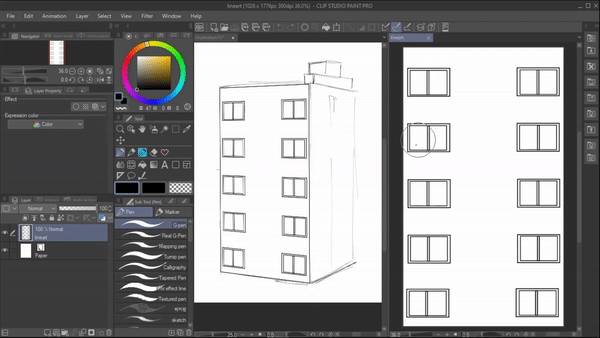
Likewise we can create as many layers as we want in the reference file but it will be shown as one single file object in the original file .
This helps us to keep the layers minimal and well organized .
To know indepth about file objects Read this article.
----------------------------------------------------------------------
9. 3D BACKGROUNDS
Drawing backgrounds takes up a lot of time especially if you're a comic artist drawing bgs for every panel is a tedious process and takes a lot of time .
Instead try using the 3d bag available in csp . you can find them on 3d material , you just have to drop them into your canvas .

we can move it around , zoom in and out , we can even change the light source of the 3d model by going to operation > object > tool property > light source .
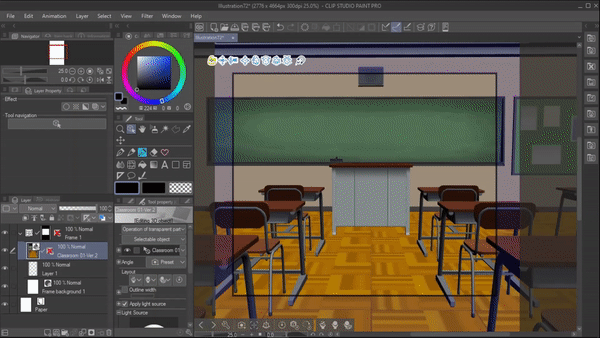
you can also change certain looks of the model .
For example in this 3d model we are given certain options like “ change the layout” in which we can change the regular chairs to wooden chairs.
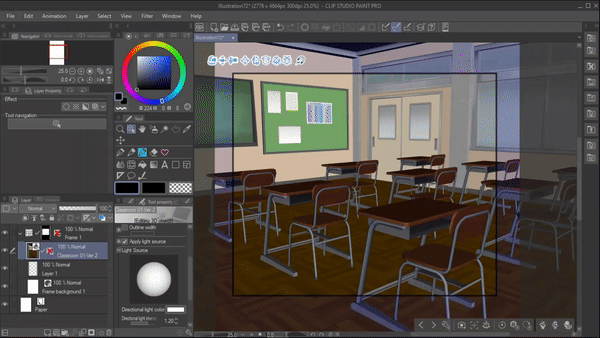
We can even move certain aspects of the material like adjusting how much open or close the door should be .
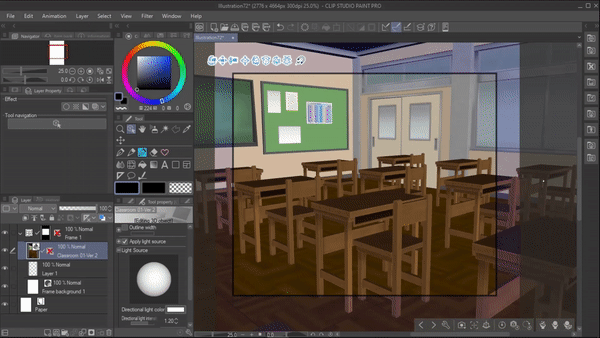
Or we can change the whole look of the classroom from a normal to luxury classroom through “ select material “
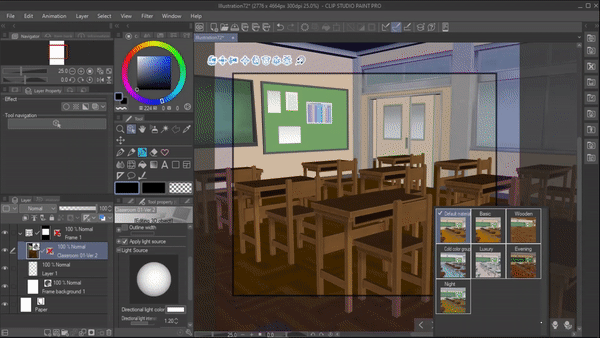
If you don't want certain things in the 3d model you can also disable that . Let's say I want to disable the floor .
then click on setting >: object list > under classroom . from here you can just disable whatever you don't want in the bg .

Basically clip studio gives us alot of creator freedom and lets us modify the 3d models to our liking . Explore the csp assets , to find more 3d models that you need, save your favorites and meddle with the features to learn more and save time
10 . AUTO ACTION
Auto action is a really cool feature .It lets you record multiple operations and run those operations in one click .
If auto action is not shown on your screen go to window > select auto action.
In the auto action palette csp has already provided us with default auto auctions ,
if you click on [ downward arrow ] you can see what steps the auto action will execute.
To give an example on how auto action works ,
I'm currently on layer one and I'm gonna double click on “ create draft layer” auto auction to run it .
As u can see below , Within just a click the auto action implemented a three step process for me
it created a new raster layer change the layer color to blue set is as draft layer

his is auto action . So if there are certain steps that you often do, you can now simply record it and auto action will do that for you in a single click .
To create your own auto auction ,
For example : after laying out my base colors . I always create a new layer and set its mode to multiply , lower it's opacity and clip it to the layer below .
So make this process into auto action
click on “ add new auto action “ name the file then select “ record “ and start doing the process ,
Once you're done, stop the recording .
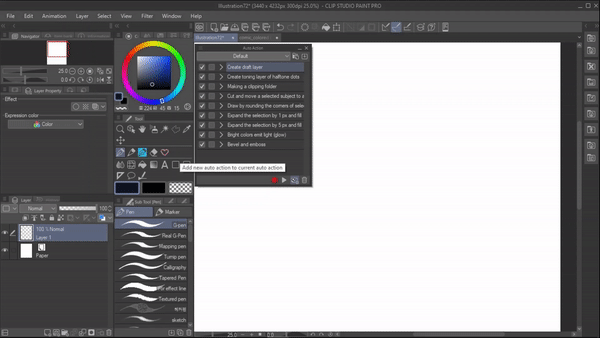
All the steps are recorded and saved so now whenever I need it I can just click this auto action will perform my four step process . So try creating your own auto action to save a ton of time

----------------------------------------------------------------------------------------------------------------------------------------------------------------------------------------------And that is all the hacks I wanted to share thank you so much for reading


Kommentar