
Hi, Welcome to the India Ink Tutorial. I am gonna show you how to make an artistic ink style that adopted the traditional technique.
I personally really love India Ink. I was painting every day with that media before meet the digital media. I bring India Ink everywhere I go, with pointed bamboo and the cutter to sharping the bamboo. So yeah, I personally understand the characteristic of the India Ink by the way. Well, let's get started...
Download The India Ink Aquarelle
The Original Clip Studio Paint Brush gives us so many various brushstrokes for India Ink. I use them all by the way. I also use a (mapping pen brush) to get the sharply pointed bamboo effect.
I add 6 brushes of special creation in order for your CSP paper coming wet. I made it in 2000px x 2000px Basic Brush Curve. So you can scale into very large brush size and get the more wet effect. I really love my brush creation, It's will help you much to get artistic wet ink effect. I also make the pressure sensitivity working here. so your pressure way will really help you much.
Download my brush set in the link below...
Understanding India Ink Wet Effects
When you wanna play India Ink in CSP, there is 3 way to get a more traditional effect.
1.) DRY BRUSH EFFECT
It's about you coming with the India Ink only without adding water. The effect gives you a solid black line. Also, you can make your brush stroke coming out.
2.) HALF WET EFFECT
It's about you coming with India Ink and add 20%-40% of water. It gives a transparent effect, not too solid but not to wet also.
3. AQUARELLE EFFECT
It's about you coming with India Ink and add 40%-65% of water. it gives you a very wet effect. Some of my brush creation will help you much with these effects.
STEP BY STEP
1. POSE
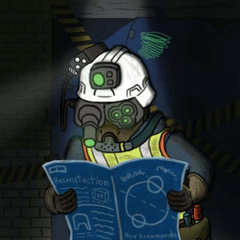
First of all, make your character pose with the background. I am personally not always draw pose at the first, but I draw pose to help you understand the structure of the object. I plan to paint a standing man bring sniper on his left hand. He stands at the top of the chaotic detritus of building.
Note: The Redline is the composition line to help me making a good composition.
2. SKETCH
I made the sketch layer separate with the pose and composition layers. I lowing the opacity of the pose layer to easier in the sketching process.
So the sketch layer is the 3rd layer. I use (Mapping Pen Brush) to sketching. I draw overall the shape of the object and imagine the result of the drawing at the end. If I full the sketch expectation, the sketch ready to the first ink.
3. CLEAN LINE
Here are the total layers until these steps. you can see the differences after I turn off the (SKETCH//COMPOSITIONS//POSE) Layers.
I made the Clean Line with (mapping pen brush) to get thick, sharp, and solid effect. It will look like pointed bamboo at traditional media. So, The Clean Line is the 4th layers. If you're done with a clean line, let's go to the next step...
4. HALF WET INK
There are 4 brushes I use to making Half Wet Ink Effect, I've attached them above. For your artistic journey, Decide to make the brush stroke getting more expressive. Decide and imagine the Half Wet Effect part of your painting and done.
O ya, Don't forget to separate the layer also. Put this layer under the Clean Line layer.
5. SOLID DARK INK
Yeah, after you get the Half Wet, now you have to turn your line into a solid line. if you ready deciding the shadow part at the painting, then come to the dark effect. Use the solid line and hit the dark part of your painting. I use 3 brushes to get this effect, I've attached them above.
After you put the dark line, you can see that your ink painting getting strong now.
This Solid Dark Ink is the 6th layer. I will show the total layer at the end of the tutorial.
I also attached the TIPS* to making wet solid dark effects below. check it out...
6. DETAILING
If you zoom in this whole steps, you will found so many improvements in every step I've mentions. Well, I detailing this ink painting with (Half Dry Aquarelle brush). It gives you a half wet and aquarelle affect both. It also gives you the artistic result in your painting.
7. WET INK EFFECTS
Ink painting is close with the wet effect, so for finishing steps, I use my own brush creation to wet the CSP paper. Use the brushes wisely. Don't too much cause it's will crack the main object line.
8. WET SKY
To get the painting coming into the strong atmosphere, I add the sky at the end. I also use (Ink Pressure 01 brush) to get this sky effect. Don't forget to separate the layer and low the opacity to get the blurry effect.
THE LAYERS
I have 10 Layers at total include signature layer. I let the (SKETCH//COMPOSITION//POSE) layers off and the others layers on.
All layers are in normal mode.
Done!! ^.^
Here's the final result of the ink painting tutorial. I suggest you zoom in this piece so you enjoy the Ink Effect deeply. Imagine that this is the Ink Painting with the large paper/canvas.
Hope you like this tutorial, don't forget to give me more feedback so I can make a better tutorial for the next. If you use these steps don't hesitate to tag me on your IG post. Be Happy to try and develop your artistic feeling into the next level.
My Instagram: @awanndus
Users who liked this post


Comment