
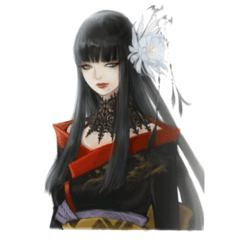
Hi! For this tutorial, I'll be walking through the drawing process of this piece of artwork, focusing more on the hair.
Lineart
First, we're going to start by sketching a base (head, face, body).
Then we're going to roughly outline where the hair is and what hairstyle we want to create. Because this is a traditional Chinese inspired illustration, the hairstyle is a bit complicated. I added a lot of loops, but if you want to stick to a simple bun or a half bun that's totally fine too!
After blocking out what you want the hair to look like, the next step is to start lining your sketch! I personally find it easier when I draw the hair last. Here I've adjusted the draft to match my line-art to make sure the proportions do not change (if i had continued drawing with the first image, the hairline would have been too high).
Once you're done with the base line-art, what we're going to do now is draw in the hair. i choose to draw individual strands, not only because it's more effective for this particular art style, but also because I think it looks much more natural.
Remember to give the hair you're drawing a direction to flow in, instead of just straight up, down, or sideways.
When drawing in the hair, remember to add some shading to create depth. Especially in this case where the hair contains many twists. The hair in the back (away from the front/light source) should always be darker than the hair in the foreground.
For more complex hairstyles or just any hairstyles with more than two layers, I like to create separate drawing layers for each section of hair. As you can see, for this particular hairstyle, I've separated the hair into 7 sections with a different layer for each section.
And our line art is complete!
Color
Once we've completed the line art, we're going to add color. Because we've already done the shading for the hair during the line art process, we only need to add a base color to the hair. I won't be walking through the coloring process for everything else.
TIP:
When coloring clothing, use the resources in Clip Studio assets! Patterns should be under the image materials category.
Something I always like to do is to airbrush the edges of any hair near the skin to create a soft effect and get rid of any hard edges.
To create the effect I use the default soft airbrush tool, and mask the the lineart layer and base color layer (this is to prevent having to clean up the excess color later). Typically, airbrushing with the lightest color you used for the skin tone should work fine, but lightly/gently erasing the area would work as well.
Add individual stray strands of hair to create a more natural look.
And we're done coloring!
Headdress
Accessories are important!
Like we did with the hair, the first step would be to block out what we want the headdress to look like and where we want the headdress to be.
We're going to lower the opacity of everything we've drawn so far, including the blocked in headdress we created in the step before. Then we're going to draw in the headdress.
Don't get intimidated! It's essentially just flowers, random lines, curves, circles and dots!
We're going to get rid of the blocked headdress, and change the color of the headdress line art to suit your needs. In this case, I wanted to create a golden headdress so I changed it to a subtle dull gold color as a base.
First, we're going to turn the opacity of the character back up to 100. Then, to give the headdress some depth, we're gong to copy the line art layer and give the copied layer a lighter/brighter shade. Then, we're going to combine the two layers, moving the lighter layer on top and slightly below the original (now darker) layer.
Next, we're going to repeat the step above, but with our layer setting on add (glow) instead of normal. We're going to color this layer with a pale yellow. After that, we're going to erase with a soft brush (eraser brush or airbrush both works), leaving only some areas glowing.
For the final touch, we're going to repeat the above set and use another glow layer. However, this time, we're going to color this layer with white instead of a pale yellow. On the add (glow) setting, the closer the color you're going is to white, the more intense/bright the glow effect.
And now we're done with the headdress!
Background
Add any background you want! Keep in mind however, that a darker colored background will let the headdress stand out much more than a lighter colored background!
Thank you for reading!
The patterns I used for the clothing!!! I believe the gradation flower is something that comes with the program, since I can't source it back to assets.
Users who liked this post


Comment