How to Create Seamless Pattern on Clip Studio Paint
Introduction
Hi! my Steele. Today I'm gonna talk about how to create Seamless Pattern on the Clip Studio Paint. In this tutorial, I'll share what I know about Seamless Pattern, How to create them in a different method and how I use them on my artwork.
Thumbnail Sketch
I always do several sketches when I am working on a new illustration,
but I find it especially useful when I’m developing a new pattern, as it helps me determine which layout will be the most successful.
Thumbnail sketches are drawing very quick, abbreviated drawings. Usually, they are done very rapidly and with no corrections - Thumbnail sketches give me an overall look and design of my pieces
If you skip thumbnailing and dive right into a piece you'll be left cleaning up lots of things along the way. The initial idea may be really cool, but you'll likely end up refining certain concepts, revamping others, and spending excess time refining some ideas to be clearer.
Selecting the right colors for your art is an important aspect of a successful artwork
Thumbnail sketches are also a great way to plan color schemes. Small but intense colors can also be noted, as these can attract the eye, but don't get bogged down with detail.
Sometimes I'll paint a lot of dot and box to see how each color reacts to one another.
Intermediate color is my favourites tool on Clip Studio Paint. This tool help me connect color and mix color together, a very handy tool if you know how to use it.
Photo : https://coolors.co
I also love to use color schemes generator websites. most of color generator websites out there is very easy to use and you can pick your favourite color palette from the community. so you guys should test it out when you can't find the right color schemes for your work.
How To Create a Seamless Pattern
as you already know I have prepared a sketch for this pattern, this thumbnail give me a lot of how overall pattern gonna looks like which help me create Illustration easier.
In order to create the illustrations, I just simply use [Figure] tool to create the illustrations for my pattern. because I want my line to be as clean as possible. but still, you can draw the illustrations by your hand it depends on preference and scenario as well.
Most of my illustrations will be created by [Polygon] with [Roundness of corner] active. I'll try to give a soft look of each illustrations and avoid sharp edge as possible.
First, I'll start creating line art of each Illustration that I'm gonna use on the pattern one by one.
I choose a classic white line and black background to help create a lot of contrast, which make my illustrations stand out even more.
I also place my color palette on the top of the canvas, prepare for the coloring process.
After finishing all the line art. I've created a new layer and fill all the color of each illustration.
After prepared illustrations. Then we need to create a new canvas for creating a seamless pattern.
First thing first, go to File > New > Create Canvas > you can use any size of the canvas but I'll recommend you to start with just a simple square. and my canvas size will be 2000 by 2000 with 300 resolution.
When you've already created the canvas. but before we begin placing our illustrations, you need to create the guideline first.
A guideline that I'm gonna use in this pattern will be a [Grid] ruler but I'm also using normal [Ruler] as a guideline as well, but I'll talk about that later in this tutorial.
In order to create [Grid] ruler go to View > Grid After that grid ruler will appear on your canvas.
but the gaps between each grid are too many, which we need to change a setting a little bit.
Go to View > Grid/Ruler Settings... and a small window will show up. look down at the bottom section and change the Grid gap to 1000 pixel and set number of divisions to 1 and click on to confirm
the grid on the canvas will only have 4 gaps. So I just mark the number on each section just in case.
Then I've changed the paper color to black color preparing for the next step.
After everything is set let's begin placing our illustration on the canvas!
First, I just simply copy and paste my illustration in the middle of the canvas. and following with the rest of my Illustrations.
Be careful though you don't want to place your illustrations on the each or too close to the edge.
The only thing we need to do now just places our illustrations in the middle. and try to keep them not too close and too far from each other, managing negative space is very important.
the same shape will never appear side by side. Leaving space between shapes also provides flexibility to go back in and draw smaller details to help bring balance to the overall image.
After the middle is filled up, Merge all Illustration layer together except for the paper layer.
Then go to Select > Select All or just simply use the shortcut [Ctrl+A] to activate the command.
and selection area with appearing on the canvas.
What you need to do is go to Layer > Right-click at the layer that I've just merged together > Convert Layer
Convert layer window will pop up and you need to change [Raster layer] to [Image material Layer] then click ok to confirm.
If you see this logo on the layer that you selected. this will tell you that your layer has already changed to Image material Layer.
After that go to [Operation] > [Object]
Then Blue frame will appear on the layer. you can scale up or down depending on the mode that you set in the tool property.
and the most important part is, got to Tool property when you using [Object] tool. next, scroll down a little bit and you will see [Tilling] option. then checked [Tilling] to active repeat pattern.
and that created a repeat pattern! but we not done yet we still have a lot of things to do to complete this seamless pattern.
what you to do is to use [Object] tool to move the pattern. then you what you want is move the centre of the layer to one of the corner of the canvas. like the GIF down below.
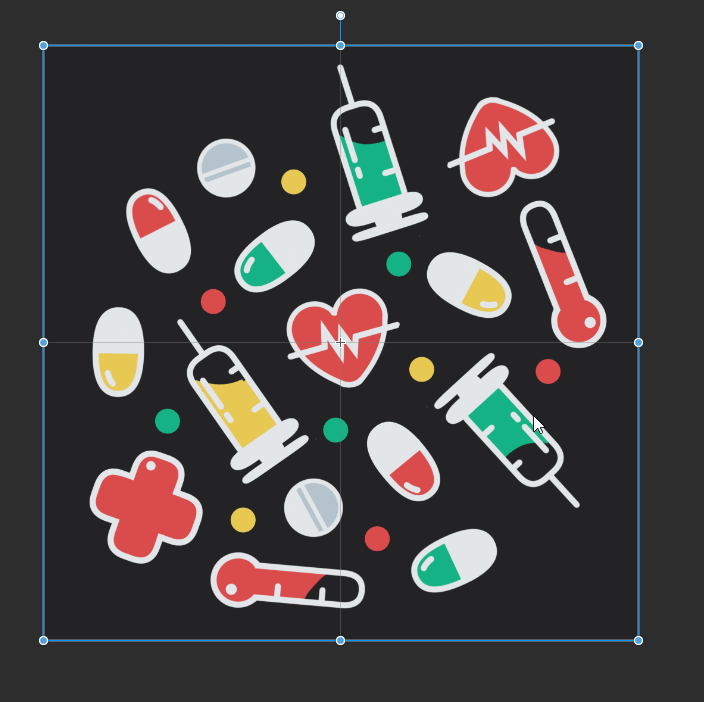
and there you can see how much I zoom into the canvas what I do is to make sure that the centre perfectly stays in place.
and don't afraid to zoom in or out! If you fail to place your centre perfectly on the corner your seamless pattern not gonna look so seamless. so make sure that everything is perfect!.
After everything is set, Right-click on the [Image material Layer] > [Rasterize] to turn the layer to normal layer.
and everything will look like this! now when you active repeat pattern all the edge on the canvas will perfectly connect to each other, which create what we called a seamless pattern or repeat pattern!
But we still a little bit of work to complete this pattern. Fill the empty space with our Ilusstation on the canvas and try to fix what part you don't like.
also, respect the negative space. Many of us feel the compulsion to fill in every last inch, but breathing room is good. When you get stuck the answer is usually to look at other people's art.
Then Merge the pattern layer with the paper layer with [Combine to layer below]
Then, do something as we did before, Convert layer to Image material layer and active the tilling option.
and now we have a seamless pattern!
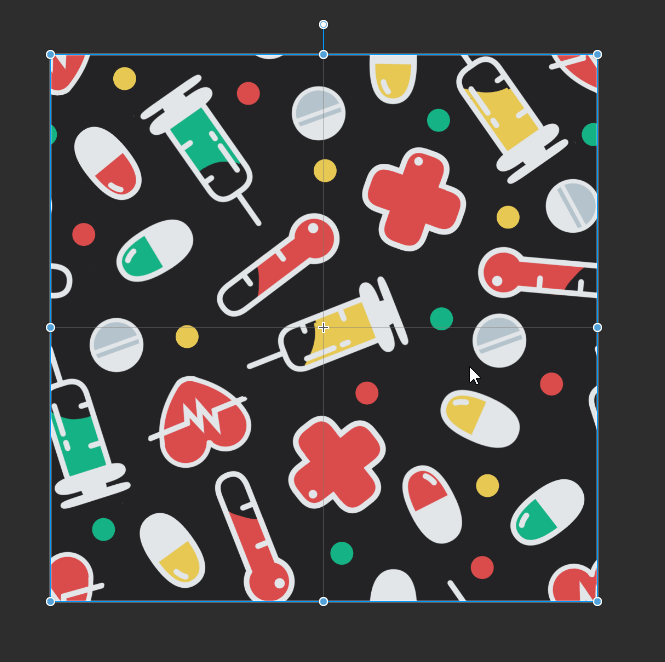
Try to pan around the pattern to look for a mistake, such as some part are not perfectly connected, which is a very common mistake. if you see any mistake try to identify what causes that problem and use [Ctrl + Z] to undo to fix that mistake.
After that, if think everything is all good and want to save this pattern for later
Go to Window > Material > Color pattern
After that, the Material window will show up somewhere. actually you save pattern anywhere you like. but I want my pattern to stay in the same folder with the default patterns that comes with the Clip Studio Paint. and you can also study pattern from these patterns which is excellent!
and to save pattern just simply drag the pattern layer to a material window to save it.
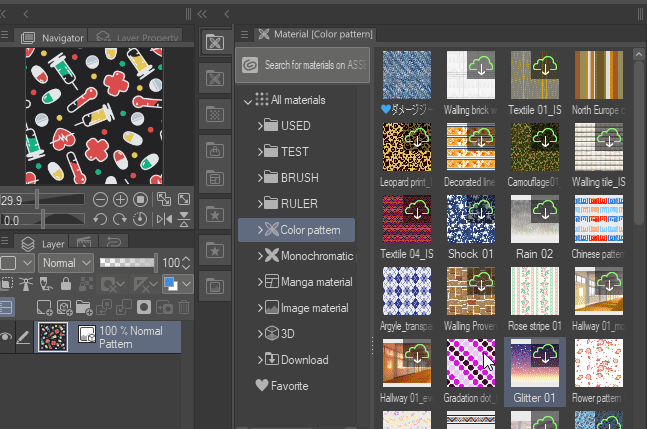
Now we already learn how to create a seamless pattern on Clip Studio Paint. Then I'll teach you a different approach on how to create a seamless pattern using a different method.
Create Diagonal Seamless Pattern
After we learn how to create a seamless pattern. now I'm gonna teach you a different approach that will help your seamless pattern looks more interest thing! which is a little a harder than the first one but just a little!
First things first, we need to prepare the illustrations that we gonna use in our pattern.
you can see I don't create new illustrations at all, all I do is just change the color of each illustrations and this just simply turn them to a new illustrations with just a little changed!
The early process is almost the same as the first one. grid, canvas size, but things will get a little different after this one.
After setting all the illustrations in place that we need in our pattern, Go to view > Snap the grid or simply use [Ctrl + 3 shortcut] and don't forget to merge all the layer into one layer!
Now everything that we draw will automatically snap to the grid that appears on the canvas. and you will understand why grid is so important in pattern maker.
Next, go to Sub Tool [Selection area] > and choose [Rectangle] with the help grid of this selection tool can make this so much easier.
This process is a little easy to confuse so I've created a simple picture that explains what I'm going to do in just a moment.
So what we are going to do now is switch the position of our canvas which explain on top. I'm already marked each section with a number.
If you still don't know what is going on, I also provide a GIF image to this tutorial which will cause less confusion.
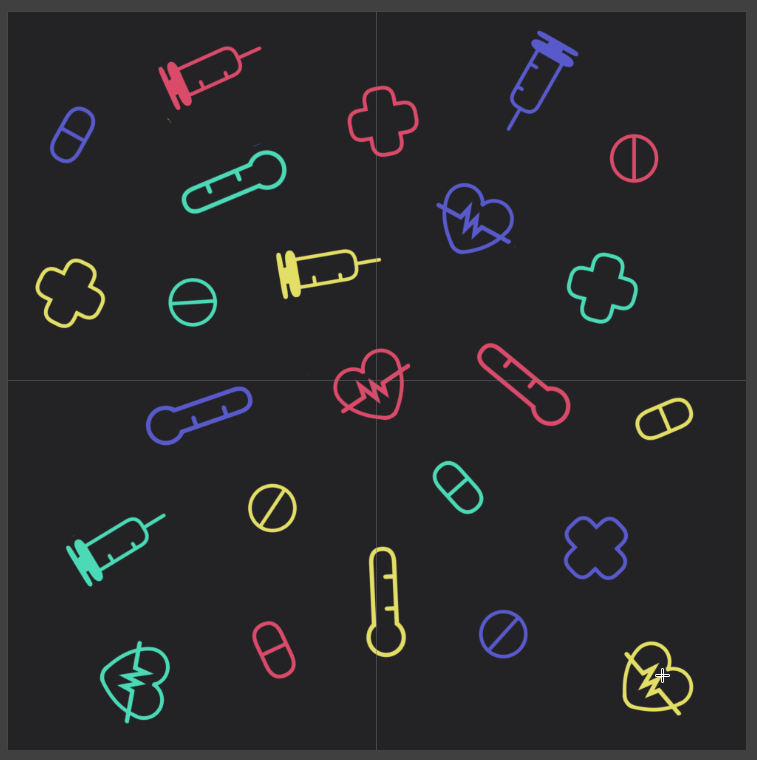
1. First, I'll start with the left side. I use [Rectangle Selection] to select the left side section, with the help of the girl which make a lot easier to select each section.
2. If you already selected left side [Ctrl + C] and [Ctrl + V] to duplicate the layer.
3. After we already have a new layer, press [Ctrl + T] to active [Scale/Rotate] command.
4. Move Section (1) and (3) to the right side. make sure that your line are perfectly line up with the grid. then click ok to confirm.
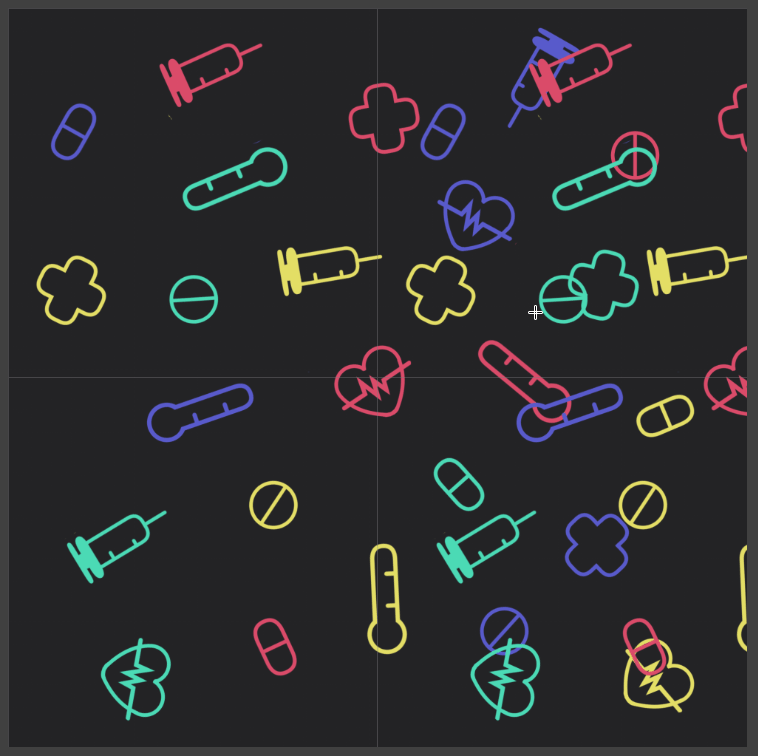
5. After that return to the base layer and repeat the same with the right side. move section (2) and (4) to the left side.
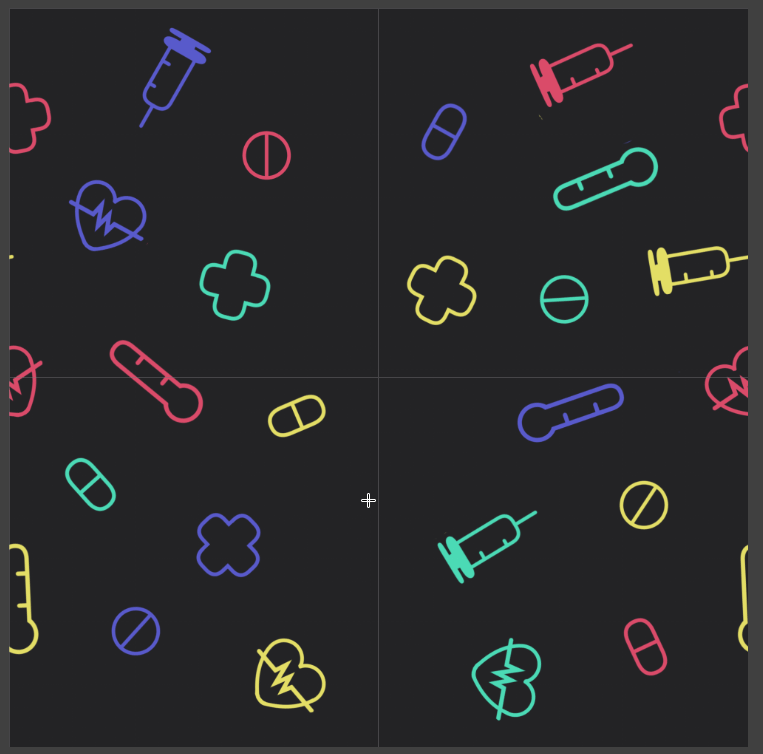
6. After you already switch the place of each side. then, the only thing left to do is switch the left bottom corner with the top corner.
After you already switch all section, don't forget to hide the original layer. and now you pass the hardest part of this technique!
then, fill the empty space of the canvas. after that, the only thing left is to activate the repeat option!
Go to Edit > Change Canvas Size and the mini window will pop up.
Increase the width of the canvas x2 of the size, and don't forget to select left middle or right middle of Reference point. Then click ok
and now you have empty space on the left side of the canvas. what you need to do is duplicate the layer and place them on each section which I separate them into 2 sections.

and now our pattern is done! and also ready to repeat!
as we did before, convert layer to image material layer and active the tiling option!
and now we have our another seamless pattern!
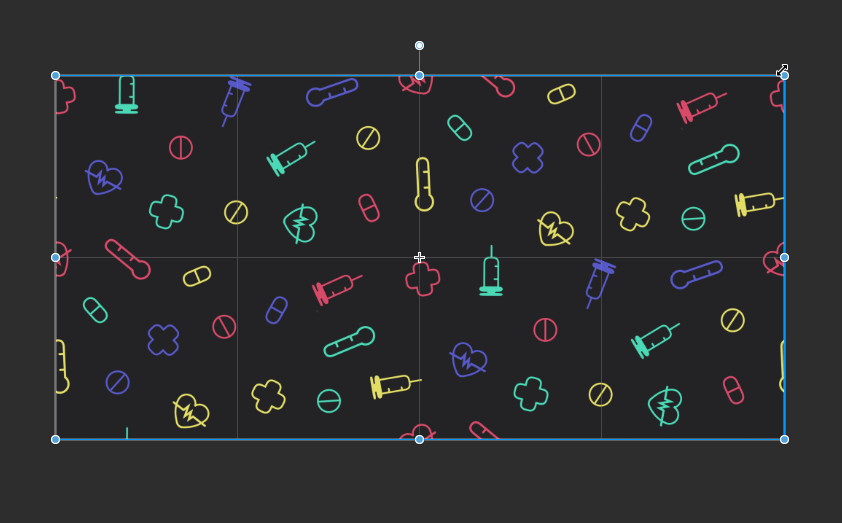
what special about this technique is instead of repeating in vertical line like the first one. this technique will repeat the object in a diagonal line like the picture below. which will help our pattern look more unique and hard to catch the pattern than the First technique.
you can see the objects is lined up in a diagonal line.
and here is the example of the same pattern but a different technique.
Create One-Side Repeat Pattern
After you have learned 2 different way on how to create a pattern. It's good to note that you can create a pattern that only repeats from on side. compare to First technique and Second technique I think this is the easier one out of 3
So let's get started!
here is a thumbnail sketch I've prepared for this piece. you can see that I'm using the same color schemes as the First and the Second one Red, Blue, Green I really love this color combination, so I don't mind if use it a lot of times.
The main Tool that I'll use in this piece will be [G-pen] with Stabilization option around ''15'' this helps me gain a lot of control when I'm drawing the lines and shapes.
The second tool that I'll use will be [Pontillism] I use this to create a texture on my illustration to give more an interesting looks.
Before jump on creating a pattern, I need to draw my illustrations that'll use on my pattern. when drawing these illustrations I don't even know what flower I'm gonna draw, so I ended up with this. simple sphere with a few petals around them.
even the shapes and the looks of my Illustration not so fancy on detail but that is the point of that! If something I want to put on my pattern needs to be simple and easy to understand the shape. so let's keep that in mind to not over details your pieces.
Next, I give them a unique look for each of my flowers. even though they all looks the same LOL
After that, I've duplicated my original flowers. prepare them for the next step.
what I want to do here Is create Correction Layer to change the color of my flowers to red color.
after everything is all set Right-Click on the Layer panel > New Correction Layer you can also see there is a lot of choices you can choose from. but I'll start changing my Illustration's color with [Gradient Map]
Gradient Map window will appear. what I trying to is adjusting to color to what I have it in my mind or my sketch.
you can read on how to use a Gradient Map here: https://www.clip-studio.com/site/gd_en/csp/userguide/csp_userguide/500_menu/500_menu_layer_shikichou_guradation.htm
After I'm done with adjusting color on the Gradient Map. I know that this won't be enough, so create other Correction layers to continue adjusting the color of my piece.
So after I've adjusted the color to fit what I have in mind, so I'm gonna move on the to next step.
Also this time I'll try to create seamless pattern on the rectangle canvas.
After I've created the canvas. next, you also want to create the guideline.
the guideline that I'm gonna use in this one-side repeats pattern is [Ruler].
In order to create Ruler guideline, you need to > View > Ruler or just simply use [Ctrl+R] shortcut.
and Ruler will appear on the right side and top of your canvas. what you want to do is Right-click on the ruler and drag your cursor to the canvas. this will create 1 guideline on your canvas

Next step is going to [Operation] and make sure to click on a ruler that you've created.
After that go to > Tool Property > you can see that you adjusting the position of your ruler on the tool property. the width of my canvas is ''2400'' so in order to make it change position to middle canvas is to fill ''1200'' or 50% length of the canvas.
now our guideline is already in the middle of the canvas! and you can see there only 2 sections between the guideline which explains that this is only repeated on just one side. If you want your pattern to repeat from the top then create horizon guideline, If you want the pattern to repeat from the side then create vertical guideline.
Next, I've changed paper color and begins to place illustrations on the new layer. nothing much different of other methods, place your illustrations on the middle and don't mess with the edge of the canvas.
After that, I've created a new layer and use [G-pen] to draw a small tree branch all over my canvas.
actually you don't even need to draw tree branch on the edge of canvas at all, because you need to delete it and redraw to connect them anyway.
After I'm satisfied with how the tree branch looks like, so I've created a new layer and starting to draw some leaves into my piece.
Then, merged all layer into one except for the paper layer. and use [Ctrl+A] shortcut to [Select All] and the selection area will appear.
Then Convert the layer to Image material layer, and active the tiling option.
If you already convert the layer and activate tiling option, use [Object] tool to drag down the layer while holding [Shift] to make the layer stick in place. drag down until the blue frame line up perfectly with the bottom section, and don't forget to double-check that you don't make any mistake.

After that [Rasterize] to turn the Image material layer to normal layer.
So, my work now is to connect my piece together.
I've fixed the tree branch and connect them together and delete some of the Illustrations that get in the way, don't worry you can place the new one later.
After that, I begin to fill the empty space with my flowers and leaves.
If you satisfy with the result, then merge all layer and pattern layer together.
Then, convert the layer and active tiling option to check the pattern if there was any mistake.
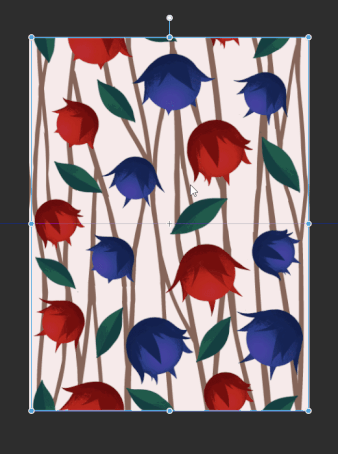
Apply Patterns on Artwork
Now we learn how a lot of different way on how to create a seamless pattern. in this topic, I'm gonna show you on how I apply pattern into my piece. don't it's very fast and very easy to do compare what you have to do when you create a pattern.
Here, I've prepared my piece waiting for me to apply my patterns on her clothes.
I'm also prepared patterns that I'm goona as well. the first one is the patterns that I've created in this tutorial, and second are patterns that I've downloaded from Clip Studio Asset. The first one with apply to my character's T-shirt and the second one with apply to her short jean.
You can also find a lot of pattern on the Clip Studio Asset which you can study and learn from it since it comes with the Image Material File (Most of it) so can't break down on how those patterns actually concocted. but before you gonna use pattern that downloads from Clip Studio Paint don't forget to read about Term of Service.
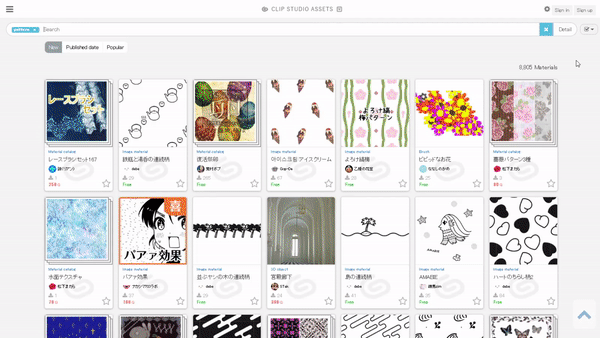
Clip studio paint also has a lot of patterns that come with the software as well.
enough for the talking let's head to next step.
I've prepared each layer for my seam pattern to place and apply. I also create a T-shirt sleeve layer to separate them with the main body of T-shirt.
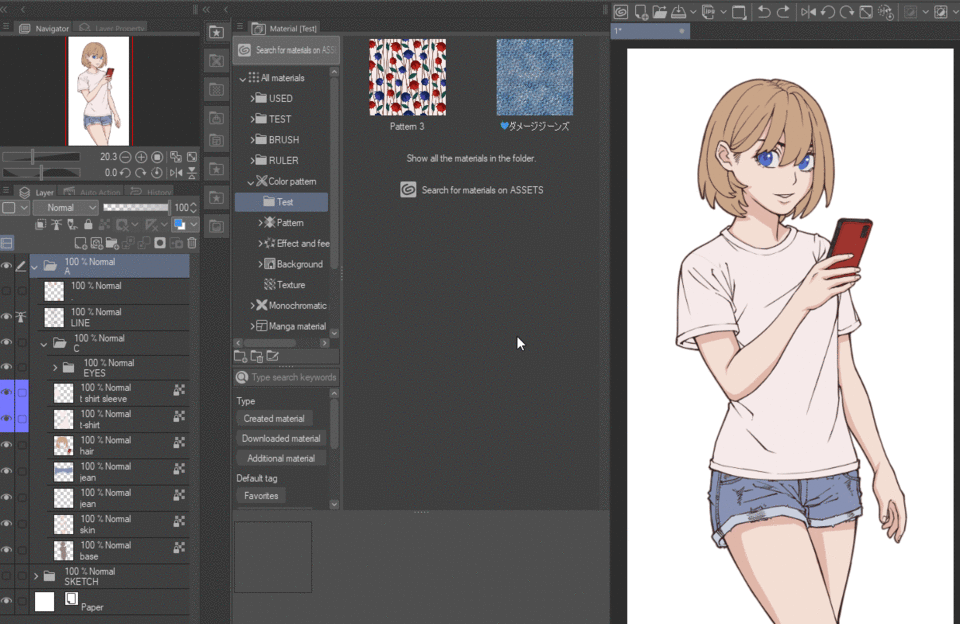
1. To apply the pattern to your work just simply drag your pattern from the material folder and drag them to the top of each layer that you want patterns to apply on.
2. Select your patterns after you already place them in place
3. Select [Clip to layer below] button in the [Layer] palette.
Clip layer helps your pattern only display base on the layer below them.
After that, I've scaled down my pattern size to fit the size of my piece.
I think everything is already set in place. then, I [Rasterize] to turn my patterns to normal layers.
After that, I can erase some part that I don't want in my piece such as T-shirt collar.
as you see those patterns that I've applied into my piece is a little too dense for me.
so low down the opacity of each layer to the point that my patterns don't stand out too much.
you can see Before and After. Looks much better to me!
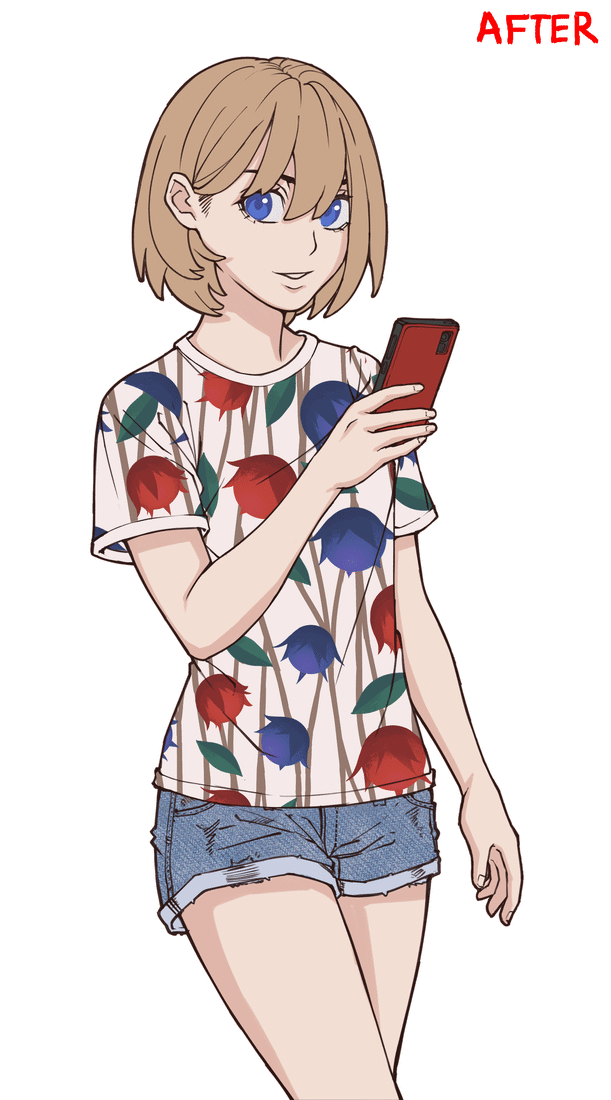
at this point, I think everything is done now. I mean you can choose to add more detail to your work like use [Mesh Transformation] to fit the wrinkles, fold, crease of those clothes.
In order to use Mesh Transform Go to Edit > Transform > Mesh Transformation
a lot of bounding box will appear on your selected layer. you can Transform them by dragging the bounding box or handles.
You can also increase the number of lattice points on the Tool Property. the lattice points of each side can only set up to 10 points of each side.
But for me, I don't actually use Mesh transform on my pattern that much. If you want to your pattern to follow wrinkles and fold in your artwork it will require a lot of afford to do so. unless you need to apply your pattern on a form like geometric shapes such as cone, sphere, cylinder if that so, you absolutely need this tool for sure. But Personally, I will just focus on shading clothes and fold instead.
I think this is all that I want to talk about how I apply patterns on my artwork, easy and fast to do than expected right? haha, compare when creating a seamless pattern this one is far easier.
Author's Word
And now this tutorial is Fully Complete! Thank you guys for reading my tutorial this far. even this tutorial is rush and poorly explain at some part but I'll hope that you will learn some new thing for my tutorial. which I think is worth my time to doing so!
If you have any question or don't understand some part that I've tried to explain, so don't afraid to leave the question down below on the comment, I will answer right away when I have time.
See you later on the next tutorial!




Comment