
Introduction
Hi,
In this tutorial, I will go over some designing tips for coming up with your own humanoid or cyborg characters! We will start off with common design choices for humanoid heads and limbs -- then, I will go through my process, from start to finish, of coming up with a finished illustration for a humanoid in a Sci-Fi environment.
If it interests you, consider watching the video provided. In the fully narrated video, I provide a more in depth look at humanoid design, as well as showcase some painting tips and tricks in the full-process demonstration. Thank you for reading and watching!!
Linco
Humanoid Design TIPS - The Head
Since humanoids are supposed to resemble humans in some small way, it is a good idea to have at least a very basic understanding of human anatomy. This will be a good foundation to start off with and build off of to get our interesting humanoid character!
Also, if you have some understanding of anatomy, you will be able to draw a humanoid character that looks ALMOST human but there is just something very subtle that is off about the character - this can be hard to do, and is covered in the 'Emotions' section
The Humanoid Head #1 - Planes of the Head
I won't cover too much anatomy, but the two basic ideas that will help us to design interesting humanoid characters are:
1. Know the overall planes of the head
2. Know the features of the face and their placement on the head
1. The major planes of the head are the side planes and the front plane. The front plane is where most of our facial features go, it is widest at the cheekbones and narrowest at the chin. The front plane meets the side plane along the outer corner of the eyebrow. Take a look at the diagram below!
Knowing this, we can add in contour lines on the face of our humanoid, following the planes of the face. This is very common way to give the impression that the character is a machine or part machine.
You can see from image 2, just by defining hard lines for the planes of the face, it already looks very mechanical! We can also give a more subtle look such as in images 3 and 4.
The Humanoid Head#2 - Facial Features
2. The other very easy way to give the visual impression of a humanoid is to play with the features of the face!
Change the eyes, ears, mouth, nose, mouth, or any other part of the face and replace it with a more "robotic" look. To do this, you can use and emphasize geometric shapes like perfect spheres, cubes, cones or just use many straight lines.
In the sketches below, I replaced the following:
1. Eyes - more round
2. Chin - metal plate
3. Mouth area - straight lines, small robotic details
4. Ear - boxy, inspired by technology
The Humanoid Head#3 - Emotions
What if we want to design a humanoid, but have it be very subtle, so that our viewer only has the slightest inclination that what they are looking at may not be human.
Well, we can design a humanoid robot to look almost exactly like a human, with only slight modifications to give our viewer that hint. For that, let's look at human emotion.
One of the tell-tale signs of an organic and alive thing is that it can communicate non-verbally -- through facial expressions and body language.
So, the first way we design a humanoid robot to look very much human on the surface, is to give it an emotionless face. Take a look at the diagram below.
Already in image 1, it looks a little bit robotic because all facial features are in their neutral state. Then, in images 2-4 you can see we don't need much to make it very obviously a robot - just tiny little details!
OK, but we don't want to limit ourselves, we want to be able to design humanoids that can also EMOTE as well. How can we do that?
Well, one thing to know about human facial expressions is that there are many many muscles working together to form our basic emotions. We move our brows, nose, cheeks, mouth, forehead, lips, chin, etc., all together to convey nuanced emotions! That's why facial expressions requires a lot of study to draw!
What we can do for our humanoid robot is to divide some of these features up, turn some of them on, turn some of them off, or emphasize certain parts of our facial features to make our humanoid robot look slightly unnatural. As an example, take a look at the image below.
Image 1 definitely looks more natural for a smile, we have the man smiling, raising the corners of the mouth, the chin gets emphasized, the cheeks round out, and the bottom of the eyelids move upwards!
However, image 2 looks unnatural. I kept the top half of the face in the neutral state, while maintaining the same smiling emotion in the bottom half. I also gave more straight lines and over-emphasized the chin. This could be one technique you employ to give unnatural, robotic emotions. Separate out your facial features like separate controllers controlling different parts of the face.
The Humanoid Head #4 - Colour Zones
The last, very quick tip I will leave you with is to related to colour.
Organic creatures have blood flowing through them. This results in different colour zones of the face. For painting, it is sometimes taught and useful to think of the face as separated into three colour zones:
The brow and forehead area: more yellow / neutral
The cheeks and nose area: more red / warmer
The chin and jaw area: more green or blue / colder
For humanoids then, a quick way to colour them can be to give them a cold more grey tone overall, with not as much colour variation in the face. To contrast this, you can also put highlights of saturated colours like cyan, magenta, or neon greens which are often not found on the human body.
The Humanoid Limbs - Connections
We spent a lot of time talking about the head!
I will briefly go over the limbs.
The main core idea for the limbs of a humanoid or cyborg character is to focus on the connections. How are the joints connected to each other?
This means emphasizing details like the elbow, knuckles, finger segments, wrist connection, and shoulder.
You can play around with many ideas here! Is it screwed on? Are there ropes attaching to the body parts? Square joints? Circular joints? -- It's all up to you!
Notice however, that I did NOT put too much detail in the other areas - forearm, bicep, tricep. If the connections are our focal points, then the other areas can be played down to let those connections shine!
Here are some more ideas for the legs! You can take inspiration from shoe fashion, prosthetic limbs, or unrelated technology to inspire your own designs.
Concept Design Process - Research, Compose, Finish
Finally, let's go over an example of a workflow for designing your own humanoid - one that I used to create the image in the thumbnail!
The first stage should always comprise of research. No matter what you're painting or drawing, some research will always help out. Even if I am on a time crunch, I at least try to do a little bit of research, even a short 15 minutes will help out in the long term.
Next up, I make my own rough compositions - I think about the overall composition and layout of the image and brainstorm a few ideas. Now that research can pay off! Don't hold back and let your creativity go wild!
Lastly, I commit on one of the compositions and use various techniques to get the desired final result.
Following these steps can be a way to help you out of artist's block, shake away the fear of making a bad image, and give you a more informed final image.
Concept Design Process - Research
How I research: of course it is helpful to gather photo references online, take your own photos, and keep them organized. For me, I do this but also try to do quick studies of my references.
This helps this gets me warmed up, generates ideas in my head, and I can think about common patterns I see and make my own notes on what I like and dislike. In the image below, I spent 5 minutes on each image maximum before moving on to the next study.
An example of my research for robotic/humanoid designs with notes. (The idea is to recognize common patterns, things you like or dislike, and build up your visual library)
Concept Design Process - Planning / Rough Compositions
The planning and rough composition phase is where your research pays off!
I generate multiple ideas for a picture in rough sketches, again making notes for myself. This time, the ideas simply come from my head and I can think back about my research and the common patterns, and designs that I liked.
One of the things that has helped me a lot is to set a timer for myself. It is always stressful to make your own image -- what if it does not turn out looking nice? Well, I give myself from up to around 15 minutes for each composition, working for one hour or two hours total. This helps because first, I stay focused for the entire duration and second, if an image turns out bad -- so what? I'll move on to the next idea soon, and there's bound to be a few that stand out from the others.
Since it can sometimes look messy, I take a few notes in case I can't decipher my own sketches! Sometimes, a few compositions stand out and that's great -- because then I can go back and work on another illustration in the future!
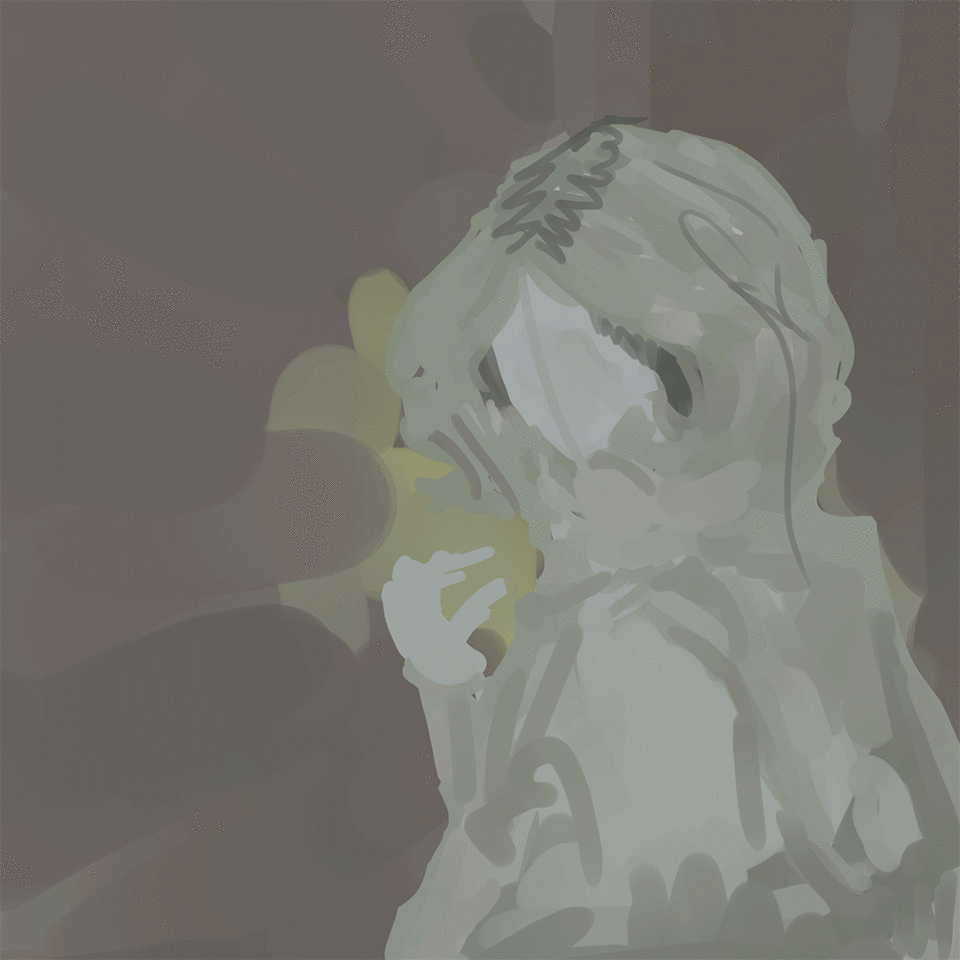
Concept Design Process - The Finish
I take one of those compositions from the previous stage and bring it to a finish!
For this finished picture and many others - some broad general techniques I used: I used photo reference I shot myself to lay as a texture underneath. I started out with the big shapes, being informed by my composition from the previous stage.
Notice the tips discussed in this article for my humanoid design:
1. Expressionless
2. Keeping skin tone grey and neutral
3. Saturated unnatural colours in the eyes and other focal points
4. An emphasis on connections in the arms and hands.
and more!
I also used correction layers at the end to finish up the picture, check out some correction layer TIPS articles written by other community members here!
Here's a quick GIF to highlight the stages of this picture!
If you're curious about an in depth look at the creation of the final, please check out the video!
Thank you
Thank you for reading, I hope you learned something new!
Please check out the video for a narrated process process, and more in depth information!
Linco
Users who liked this post


Comment