
Introduction
Hello and welcome to my Chibi tutorial!
Many people already know what Chibis are, but for those who don't, a Chibi is a Super Deformed version of a character, that are known for having a baby-like face and anatomy.
There are many different ways to draw a Chibi, the possibilities are so big that at first it can become slightly stressful to know where to start from. But don't worry, I've got you covered!
Basics
There are some rules to keep in mind before creating a Chibi. First of all is to avoid realism at all cost, since it will give our Chibi an uncanny look. Chibis must be cute above all, so we have to exaggerate or simplify some characteristics to achieve this result.
One of the most common mistakes is believing a Chibi is just a character with a big head and a small body, however, many other variables come into play when it comes to chibis.
Another tip to make a Chibi look cuter is to make their facial features close to eachother, just like this:
Creating a style
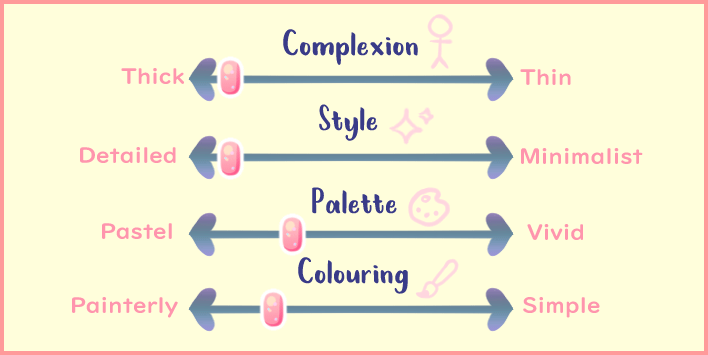
For a Chibi style, you must decide on what to do for these 4 categories:
✦ Complexion
Your Chibi's body type. A Chibi's body type can range from Thick to Thin. You can experiment by changing your Chibi's limbs and body thickness! There are many combinations to work from, find the one that you like the most.
A chibi's height shouldn't be taller than 3-4 times their head. From there, you can explore and play with their heights to find the one that appeals to you the most!
No matter your chibi's height, make sure their arms are able to reach their thighs, just like this:
Having your Chibi's height look neat at first may be hard, but I have this tip for you : When your Chibi's has their arms resting, their hands should reach their thigh, just like I explained. If you think their arms are too long following this tip, then what you should do is move their pelvis up a bit:
✦ Style
A Chibi's style will also depend of how much detail you put to their basic appearance. This means how complex or simple their characteristics are. For example, your character's eyes can be anime-ish, cartoon-ish or just dots, it all depends on how much detail you put into it. Details can also affect other features like hair, hands, noses, even lineart! See some examples with different combinations for yourself:
Example A: Rounder, more detailed hair and hands.
Example B: Tiny eyes, simple, messy lineart.
Example C: Sharp, Detailed hair and simple hands.
Here you can see even more stylization examples:
✦ Palette
Depending on what palette you end up using, your Chibi may give off one vibe or another. Choosing a pastel palette will make your Chibi look softer and innocent, but if you choose vivid/saturated colours for your Chibi, it will give off an upbeat vibe. Depending on the result you want, select your palette accordingly! If you prefer, you can also adjust the palette after you're done colouring your Chibi, by simply following any of these steps:
﹂ For a vivid palette: Press CTRL + U or go to Edit > Tonal Correction > Hue/Saturation/Luminosity and raise the saturation and slightly lower the luminosity. Change the values depending on your own palette and taste.
﹂ For a softer Palette Press CTRL + U or go to Edit > Tonal Correction > Hue/Saturation/Luminosity and lower the saturation and raise the luminosity.
You can also add a new layer and fill it with a warm colour to get a warmer palette. Set it to "Soft Light" and lower the layer's opacity to 50%.
This simple trick also works with other colours, like pink, purple or brown. Depending on the mood you want to achieve, play with colours as much as you need!
✦ Colouring
Lastly, the way you shade your Chibi can really make a difference. There are 3 big different types of shading styles: Painted, Soft-Shading and Cell-Shading. You can see eachother's differences here:
1. Painted: Visible Strokes, Mixing between hard and soft edges. Different colour hues in a same part. Overpainted. Use a watercolor or oil brush to get this effect.
2. Soft-Shading: Soft edges, blurry transitions and slight colour changes. Use an airbrush to get this effect.
3. Cell-Shading: Hard edges, no blending between colours. Use a normal pen to get this effect.
Experimenting is key! Try different styles and mix them to achieve new results. The more shadows you add, the more complex your colouring style gets.
Now I'm going to create a Chibi following these steps!
Building the body
For this example, I will create a Chibi based on these parameters.
Start with a few stickmen posing for you. You need to know what kinda pose you want for your chibi. Drawing stickmen is a fast and simple way to get that done.
I usually start either from the head or the body. You can start from wherever is more comfortable to you, but for the sake of this tutorial, I will start from the head:
Simply draw a circle, doesn't have to be perfect, as long as it's wider than taller everything should be fine! Then imagine its sections to help you locate your chibi's face.
The body in this case should be slightly smaller than the head and marshmallow-shaped. Make sure to draw the hips a little bit wider than the shoulders. To locate where the legs start, put that marshmallow a swimsuit! (This trick works with all chibi styles!) Then draw two "sausages" with tiny rabbit feet.
For the hands, draw a rectangle with its corners rounded. A Chibi's hands don't have to be proportionally or anatomically correct, that would be creepy! We want our hands to look cute, that's it! Tiny and chubby fingers are our goal here, nothing else. If your character is holding something, draw the hands first (Keep in mind the arms' length!).
Now, add the rest of the details such as your character's hair, face and clothes as you would normally do, adjusting it to the body! Clean your sketch a bit, fix anything you think seems off and let's get ready to ink that chibi up!
Linearting
For this Chibi, I'm working on a 2000x2000px canvas at 300 dpi since I like working on big resolutions. I will be using a hard airbrush at 7-10 px. Lineart doesn't have perfect because we will be painting over it later once we've finished shading our Chibi.
Since I will be creating a Chibi in a detailed Style, I want my lineart to look soft and neat. Here are some tips I follow in order to achieve that result:
✦ Lower the opacity of your sketch layer to a very low value yet visible (I usually leave mine at -10%), so you can distinguish between your sketch and your lineart.
✦ Slightly darken the zone where two (or more) lines meet, just like this:
✦ Long strokes are key when linearting (or drawing overall).
✦ When lines overlap, darken the ones that are "closer" to the viewer:
!! Some of these tips shouldn't apply if you're going for a simpler style, where line weight doesn't matter as much.
Now that we have finished our lineart, let's proceed to colouring it!
Colouring Tips
For this Chibi, I want pastel colours but slightly saturated, so I'm gonna pick my palette accordingly, and If want to edit it later, I can do so by following the step I explained earlier!
Use your usual base-colouring method for this step. (I will probably edit the colours once I'm finished though, you'll see me do that later.)
I want a detailed colouring, but I also want it to look cute. There are some tricks to make your shading look cuter!
﹂ For the skin:
An easy way to make your Chibi's skin look cute, is to exaggerate the redness where the blood concentrates more in a human body: cheeks, ears, the nose tip, knucles, elbows and kneecaps. Use a gradient ranging from pastel yellow hue - peach hue - red hue- pink hue (all tones based on your Chibi's skin tone) and see the results for yourself:
For the cheeks you can add glitter to make it extra shiny!
﹂ For the hair:
A shiny and colourful hair is a cute hair! Add extra highlights and colour shapes. Note that this depends on the style your aiming for, keep in mind these tricks are mainly aimed towards detailed and sparkly styles!
﹂ For the eyes:
There are infinite possibilities to choose from, here are some examples for you to get inspired!
Note how all of them are sparkly and very colourful. You can get inspiration from starry skies, forests, rainbows, etc... Think of eyes as mini-sceneries!
﹂ Overpaint:
Once you're done with your Chibi, duplicate all layers and merge the new duplicated ones (except background). Pick an airbrush or a watercolor/oil brush and start detailing those zones that could stand out more, see the difference:
Your own path
There's no single way to create a Chibi, there are many different ways that work for different people, discovering your own way and the fun you have meanwhile is key here. I hope my tips helped you reveal some of that path for you, and if you have any questions, feel free to drop them here!
Users who liked this post


Comment