
[ 0 ] - Introduction
Hello there, meet again with Grace!
Welcome to my new online class! This month of May, I'd like to show you how to create your personalized Chibi style from a simple shape, stick figure, ball heads, and many more!
However, for this tutorial, we'll focus on creating Chibi characters and expressions along with other tips that others might not have been shared! Because there are many tutorials about Chibi already and I'll do my best to think on the other way around to help you as a beginner or even aspiring artists to know tips & tricks better with Clip Studio Paint.
Before you scroll to see my tips here, I've another tutorials which focus on creating your own personalized emoticons, stamps, or stickers below!
Please note that I am not a professional, and I only design characters for fun. Everything I will say or write in this tutorial is based on what I have learned on my own. With that being said, I hope you enjoy and learn a few tips from this Little Thing Called Chibi tutorial!
[ 1 ] - Emotion with Simple Shapes
Let's have warmed up and play with simple shapes! In this first chapter, I'd like to let your imagination plays around a bit.
Using several methods of basic and simple shapes, you can create emotion, even stories with that. Now please take a look at my super-quick mini tutorials below.
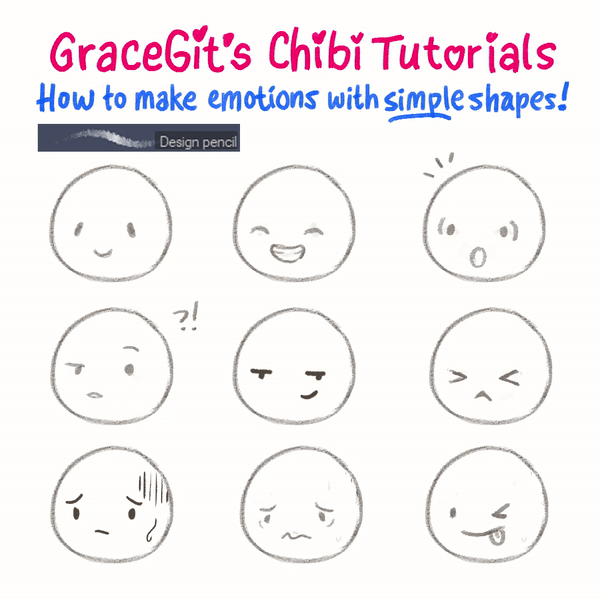
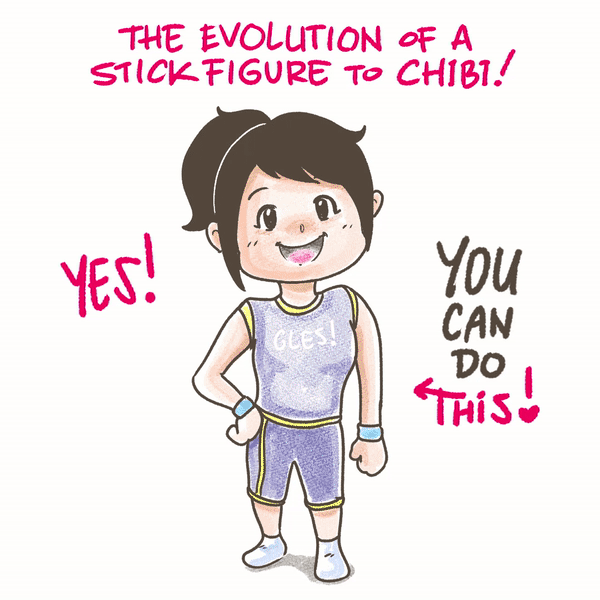
And here's how I make my O.C (Original Characters) named Gles (based on my name Grace of course hahaha!) with only a circle.
I use [ Design Pencil ] for most of my draft, rough, then digitally ink them with [ Turnip Pen ] or [ Textured Pen ] for an artistic look!
Please note: I will not change how I choose these sub-tools with any specific or custom ones because we will focus on the techniques, not the tools.
As you can see from GIF above, I start everything with a simple circle using Design Pencil.
Then adding crosshairs to the middle part of the circle but slightly goes to the bottom left. After that, adding facial features before hairstyle.
Finally, giving more expressions like smile, eyes to the viewer, chubby cheek, and outline with Turnip Pen!
[ 2 ] - Ellipse for Facial Features
I apologize for my typo as it should be written Ellipse instead of 'elipse' on my mini-tutorial progress.
But yes, adding an ellipse to your circle would make a difference in showing the way your characters going to look. It can be straight, down, or up.
Please take a look at my mini-tutorial below.

With a simple line of curves in the round or circle shape, it would be easier for us to determine where's the head facing by adding the ellipses for perspective.
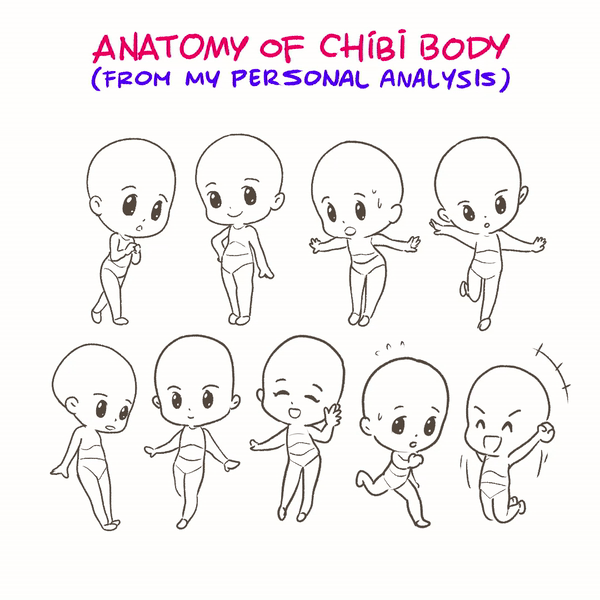
But if you're wondering what those lines are in the middle of a circle, I guess it's pretty basic or common knowledge to place the anatomy of our Chibi head. Please take a look on GIF below to understand it clearly:
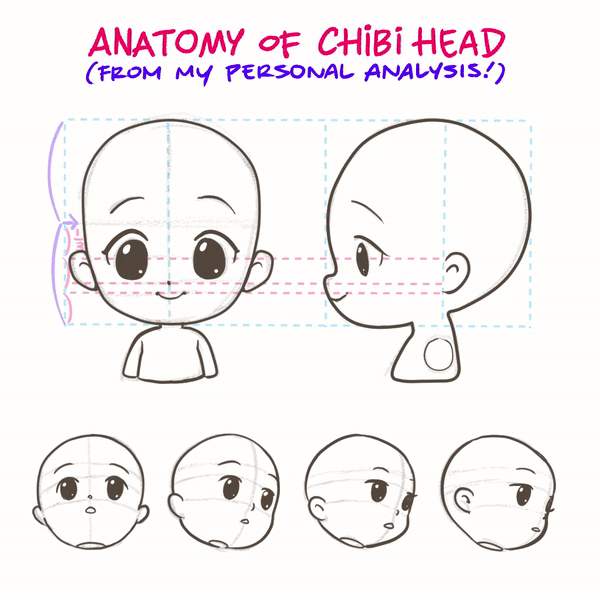
Personally, I've concluded, it's pretty the same as anyone else here in making the anatomy of Chibi's head. We can divide the head by 3/3 portion, from the top of the head to the neck.
All you need to do is pay attention to the location of the eyes, nose, and tip of the mouth. Using red striped lines, you can see I can create the head from the side view and other angles or perspectives.
P.S: You can try it yourself, using a template like an image below for your personal reference.
[ 3 ] - Avoid 'Same Face Syndrome'
Chibi often comes with the same face syndrome as it happens with anime character drawings. And doing a chibi character, although you will do it with your preferred style and colours, still it will look flat and bland at first when you draw it.
Here's a tip I'd like to share when I do my Chibi character designs! Try it out and let me know if it made a difference.
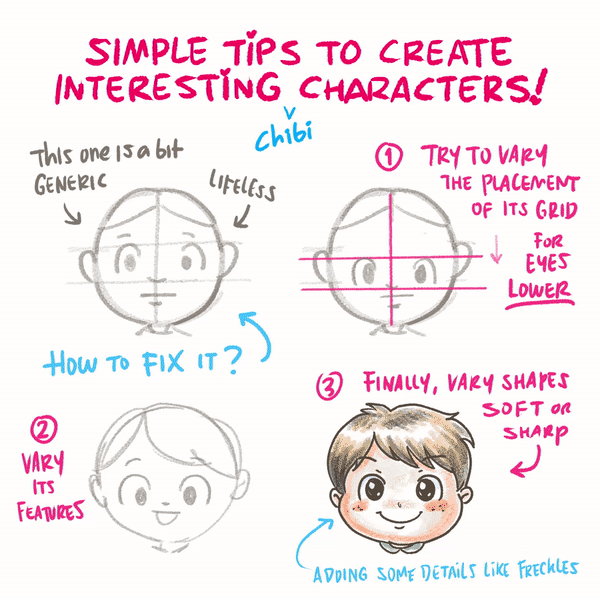
[ 4 ] - Avoid Symmetry
Apparently, 3/4 view is a hot topic when designing a character.
What do you think, should you use it or not for chibi character design?
My mini-tutorial will show you the difference when you create a generic front pose with symmetry and the other one with more life & energy.
You can change the drab position into fab ones by using these tips!

Now you can try it by yourselves, and I think it's a good choice to test between these two poses for your discoveries on which one you should start.
But there will be a good and not so good for each pose. As you can see in my image below, it's only a minor case for me not to use asymmetry pose because it will be hard for some of us (3D artist) to take the reference from the asymmetrical posture.
[ 5 ] - Stick Figure to Chibi Posture
What kind of stick figures do you draw?
I got an idea to talk about stick figures. It took me by surprise because I’ve never seen a stick figure for creating chibi characters and thought it was “bad” It took me a bit to think about what I had to do with stick figures.
When I tried to draw my own, I realized I usually do the taller version of the chibi figure (3 heads) or the “structured” version. You can see my GIF image below to get what I mean by the evolution of stick figure to chibi:
And that I often use that version to make quick characters. It was such an interesting road to go down, so I hope you enjoy that information!
But here we go with 'ball figure' or two heads count for another chibi version:
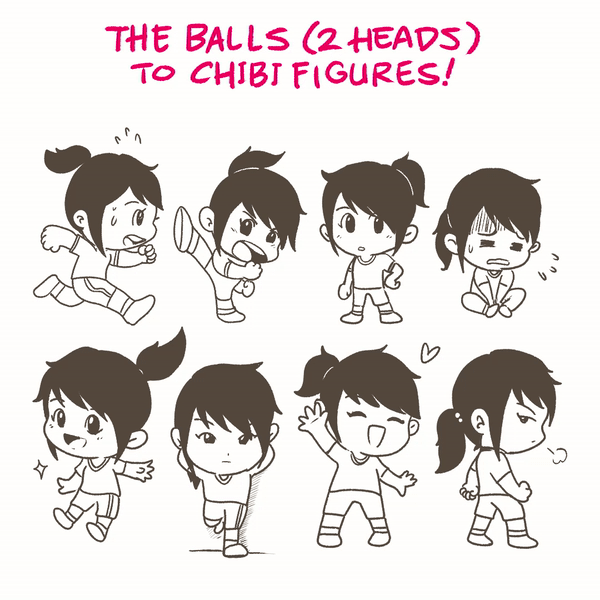
See, it's different in how you will create your chibi characters, and it can start from stick figure or ball heads. Whichever is suitable for you, go ahead and make your chibi figures!

[ 6 ] - How to Draw Chibi Hands
Hands or fingers, in general, were part of the artist's struggle. When we learn to draw realistic fingers, it's a lot of things to consider.
But you don't need to worry anymore when it comes to Chibi's hands drawing!
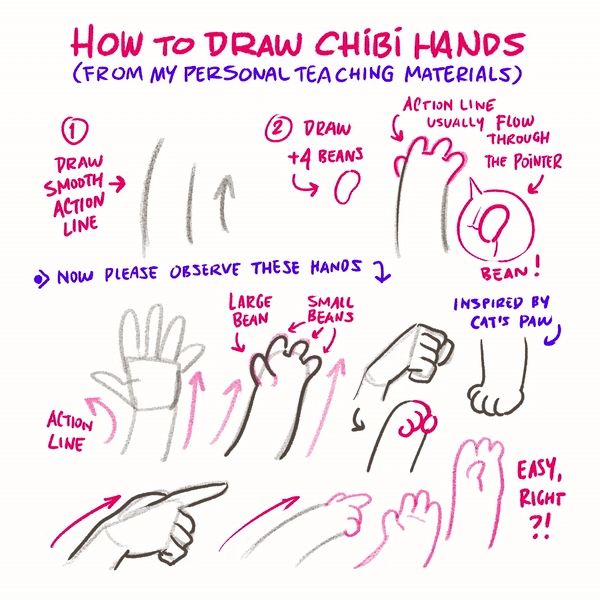
The method above (using GIF) will tell you exactly how I create those chubby little fingers that I called 'bean'. Another artist might have the same calling for the technique or be described as a cat's paw inspiration.
Two things to take on from the mini tutorial:
1. Draw a smooth action line first.
2. Think about four beans.
And that's all you need. It's simple, and you'll enjoy creating realistic finger drawing when you know where to start, right? Think of those long fingers as carrot or something then!
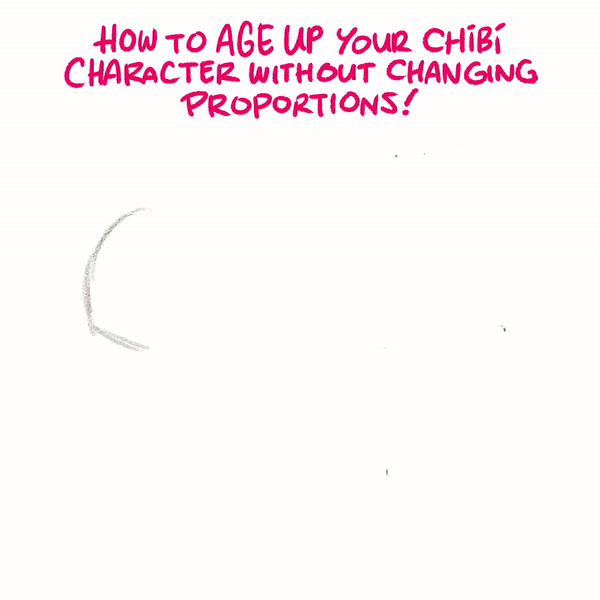
[ 7 ] How to Age Your Chibi Characters!
This chapter will specifically address how we can make a Chibi character age up without changing the proportions. Well, exactly this sounds interesting to share because I found many Chibi characters tutorials quite talking the same thing over and over.
So let me try to introduce you how to make it with GIF and JPG images as well:

Here's how you can try to create a Baby Face (actually Chibi characters often said to have the same principles while drawing a baby):
1. Avoid stray marks or wrinkles around the face
2. Keep the eyes and head big but you can make the nose, feet, hands small
3. Rounder shapes are great way for baby chibi!
Young/adult
1. Feel free to add more details
2. A bit of wrinkle is fine
3. Details like clothing and hair will also age your Chibi character!
Old/elder
1. The hair will be less visible or thin
2. You can even make your Chibi character's posture droop and curve her spine
3. Wrinkles are so much needed here!!
Now that's all from me. I wrote down the 'specifications' for you to understand how to differentiate those 'features' from baby to young/adult to an elder ones!
Hope you can try those things for your Chibi character creation!
[ Bonus ] Gles & Nala Image Cover Chibi - Part 1/2
Now here's the final creation of my 'Little Thing Called Chibi' tutorial. Personal dedication to Nala, my friend. An Alaskan malamute who just lost her soulmate, Spike, a male Alaskan malamute, months ago due to internal illness.
Basically, 'how to create your Chibi based from personal photo' will be varied and different since you might have a personal taste.
As you will see from my mini-tutorial below (speed process because of Clip Studio Paint Time-lapse feature) - That's why I divide it into two sections (1/2 and 2/2).

First, you need to find the 'structures' with simple shapes. I choose mostly circles to fill the 'anatomy' based on my personal photo over there with Nala.
Please take a look below if you prefer to see it step by step.
After that modify your structures into chubbier or 'Chibi' looking style of your choice. Either it can be used the two ball heads or stick figure. Nonetheless, experiment is your best friend!
I choose [ Design Pencil ] as I said from the beginning. Feel free to choose your own when doing a rough sketch.
To ink the image after rough sketch, it's obviously my sub tool will be [ Mapping Pen ] since I'm using graphic tablet, but for those who don't own it; you can try [ Vector Layer ] and search the tutorials for using it.
Believe it or not, it works too. Another artist might've already share the techniques, so I leave you to go and find it from community tutorials or official tutorials about Vector Layer.
After digitally ink my artwork, I move to color. In this step, I create another layer and only need one layer to fill all my colors as you can see from my little explanation below:
Base colors layer is under Ink layer. As simple as that, then I fill the color carefully as seen (not getting outside the ink boundaries):
[ Bonus ] Gles & Nala Image Cover Chibi - Part 2/2
The second part shows you how I have only been using 4 layers to make these Gles & Nala Chibi characters from my photo.
You can see the second part of my GIF as well as only two steps to follow:
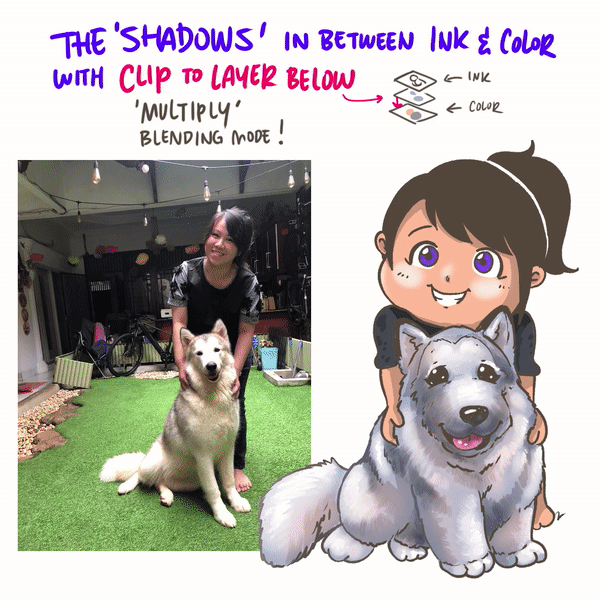
First, Nala and Gles shadows were created with a new layer between the Ink and Color layer.\
The 'Shadow' layer needs to be clipped to the layer below and set the blending mode to [Multiply], and after that, I only use the monochromatic gradient values for colors.
And finally, the top of all layers will be a new layer, as I called it the [Details] layer since I will put the soft colors of Nala and other things to finalize my chibi character creation with my preferred style!
And it's all done!
Thank you once again for showing your love and patience in reading my Chibi tutorials. I know it's not perfect, but at least I'm happy to show you my little tips and techniques, so I hope you feel the same and find them useful.
Users who liked this post


Comment