
# MonthlyTIPS202106
#FantasticCreatures
Hi all.
This is the very first tutorial I've done, however I hope you enjoy it and help you improve your use of Clip Studio Paint.
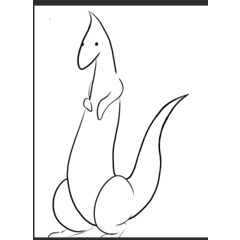
So, I will show you how I proceeded to realize this fabulous creature, originating from the legends of the Beti peoples of Cameroon: "Ngang-Medja"
This tutorial will highlight the uses and subtleties that the software offers us to have the best results in a short time.
1- Sketch and sketch
This is a step that I strongly recommend to all professional or amateur draughtsmen. It allows to give the general orientation of his work and especially to have a good management of its layout.
For this step, you can use any of the pencils in the list of secondary pencil tools at your convenience.
2- Inking
One of Clip Studio Paint's greatest strengths is the quality and sharpness of its inking tools. They are even more effective if you do your inking on a vector layer that I recommend using. The vector layer has the particularity of giving more freedom in the manipulation of the line even when the tracing is finished.
Feel free to ink your design on multiple vector layers, so you can more easily create an effect of depth. The printing of overlapping lines will disappear after you apply the colors.
3- Coloring
Things are getting interesting!
No need for a vector layer anymore. Besides, for coloring I strongly advise against it. Create a new raster layer and place it just below the corresponding ink layer.
Next, set your ink layer as the reference layer by checking the "Set as reference layer" option. You can then keep your vector ink layer and use the paint bucket on the coloring layer without going beyond the outlines of your drawing.
For the paint bucket tool, select the "See other layers" sub tool. And in the properties of the tool check the option "Reference slap".
You then get a result like this.
From there you can put the front and back part of your design respectively in stacked folders. This will allow you to easily work on each part one after the other.
Hold down the Ctrl keyboard key and click in the center of your coloring layer to select only the colored area.
Create a new raster layer on top of your coloring layer and put it in product mode in "Combine mode"
Then go to your color wheel and select one or two gray colors to apply with a brush, the shadows of your drawing. For this operation I have a preference for the "Plume Manu" tool from Clip Studio Paint. The result is really pleasing to the eye.
While keeping the selection area, use the "Gradient" "Foreground to Transparent" tool to apply a color scheme as desired.
We are now going to give an impression of painting to our drawing. To do this, merge the coloring and shading layers while keeping copies in the event of a job error. Then use a watercolor brush tool to adjust the color gradients on your drawing according to your sensitivity. Also reduce the opacity of the vector layer where you did your inking. You can take the opportunity to enhance the contrasts of color and light.
NB: you will have to do more or less the same operations on the second working file, the one corresponding to the back part of your drawing.
4- Texture integration
Our snake has thick fur on its neck. Now is the time to apply some texture to it. This is in my opinion the most interesting part of this tutorial and one of the reasons that Clip Studio Paint is great software.
Clip Studio Paint has many materials, most of which are free. In the context of our tutorial we will be using the material "Leopard print_IS" which is found in the material palette. It is available for download once you install the software.
Put the material layer just above the area where you want to apply the texture. After reducing its opacity and adjusting the size of the texture, rasterize it by making a straight clip on it and choosing the "Rasterize" option.
Then limit your selection area to where you want to apply the texture. Go to the menu “Edition_Transformation_Transformation of meshes…”
You now have the option of increasing the number of lattice points of your selection for a more precise transformation.
When the transformation is complete, you can remove the unnecessary parts and apply the texture where you want it. However, I advise you not to merge the texture layer and to keep a copy of it. For the texture to be more realistic, it will be necessary to make manipulations on the blend mode and the opacity of the layer. If necessary, it will be necessary to iron several times manually with a watercolor brush. The result will depend on your skill and sensitivity.
5- Background and environment management
We can call this stage “the finishing touches”.
Backgrounds are usually very easy to manage in Clip Studio Paint. Here we have simply applied a gradient sky using the "Daytime sky" sub tool of the gradient tool. Use is from the darkest color to the lightest color as shown on our canvas.
For clouds, you can download several from the Clip Studio store and add them to your brush list. By playing with the background and creating layers between your two coloring folders, you will easily generate an effect of depth on your drawing.
NB: using cloud brushes rather than simple brushes saves you a lot of time and gives you a more realistic rendering.
To improve ambiance and colorimetry, duplicate each of your two folders and turn the copies into a pixelated layer. Then apply a Gaussian blur on the layer of the back part.
Once the blur is applied, partially erase the image with a soft eraser to give the impression that the level of detail varies with distance. On the duplicated layer of the front part, do the same operation but instead using the radial blur which is just below the Gaussian blur.
To finish this step, create a layer on top of all the layers and apply the overlay blending mode. With your gradient tool, by selecting the tool's Ellipse property, you will be able to apply an ambient light effect to your work.
Since this is a fabulous creature, I made sure to add a rainbow and a slight halo effect which I selected from the materials list in the software.
I think the result is not bad.
Thank you for following this tutorial to the end, I hope it has helped you improve and improve your use of Clip Studio Paint.
Ngandé.
I invite you to visit my pages via the following link:
https://www.youtube.com/channel/UC2wCYjpHBCs2R_c2jina_Gg
https://www.facebook.com/Martial-Ngandé-1930460387013696
https://www.instagram.com/martial_ngande/
https://www.linkedin.com/in/martial-ngandé-2b4513174/
Users who liked this post


Comment