
INTRODUCTION
Hello!
I'm a freelance Illustrator, mainly focusing on Character Design, and this is my first time posting in Clip Studio Tips! I've been using Clip Studio Paint (CSP) as my main art program for as long as I can remember, but I'm still not an expert though! Please don't expect too much! But, I do believe this post can be used by artists who are at the beginner and intermediate level users of CSP.
I thought I'd give posting here a try and I hope this motivates, or help you even a little in your art making using CSP, as I don't want this to be a "How To" post but more of a 'sharing my process' post, as I'm also still learning and growing as an artist using CSP!
My works are usually meant for mature audiences, some may contain NSFW stuff, but I think for now, I'll stick with SFW, General Art audiences content for this post. Also, please do excuse me if I tend to banter or get out of topic a little, my sense of humour is but a few of the things that keep me sane haha
I'm using Clip Studio Paint EX and a Wacom One on screen drawing tablet. You may use whatever tablet or mobile device you're currently using. I think my process also works on any Clip Studio Paint version, not just EX, so everything's all good!
Now all that's out of the way, let's start, shall we? Prepare for a wall of words! haha
CHARACTER DESIGN
Whenever I design characters, I usually like to give them certain quirks and personalities, so I can better envision their final design.
For work, before anything else, I always ask my clients how they want their characters to look like, and to provide me with as much detail as they can give. If possible, I ask if they have references, mood boards or current characters and designs they like so that I have a rough idea of what they have in mind.
If you're working on a personal project, maybe designing your own character, it's okay to look for inspiration on characters you like or even copy existing designs, as long as you add your own ideas, for me, that's all good!
On topic, we'll focus on creating a combat character, but I think a normal character design workflow will work here as well, we'll just add a weapon or some kind of fighting theme, we'll see. Here are some ideas and details to think about or ask your client or yourself when building your character:
Body type and size: What do they generally look like? How tall or how small are they? Will they be big, muscular, thin, chubby or sexy? Will they be a masculine female or a feminine male? etc.
Species: Are they human? Maybe a magical fairy or an agile elf? A stubborn dwarf or an ancient orc? A majestic centaur or playful demon? A strict demi-god or fearsome half-dragon? Or an entirely new species you come with, let your imagination run wild!
Genre: What kind of world are you imagining? Or how does your client envision their fictional world? Will it be Western? or a Mystery setting? How about Sports or Horror? Or maybe even a Sci-fi Musical Rom Com Thriller Adventure Adult Comedy!?
Other details: Additional details that you want added or what your client wants the character to have. These includes any details you can think about, big or small, examples are:
1. Eyes - Number of eyes - Eye shape - iris and pupil shape and colour etc.
2. Ears - Number of ears - Shape etc.
3. Hair - Hair colour - Hair style - Hair length etc.
4. Skin/Scales/Fur/Exoskeleton etc. - colours - length etc.
5. Extra details: Extra limb/s - Wing/s - Tail/s - Horn/s - Fang/s - Scar/s - Tattoo/s etc. - Special features/powers/quirks
Clothes/Armor and Weapon/s - You can find inspiration for these on your favourite games, book, tv show or movies. A quick google search can also help you in your design. If you're new to designing, as long as it's for personal use, feel free to copy design of others but add your personal touch, eventually you'll find your own style and you can design your own!
MY PROCESS
Now join me as I guide you through my work process when creating a character! We'll keep in mind that this is a "Combat Character", which personally, I think any character can become. Even the dullest, weakest, most pathetic looking NPC (Non-player character) can become the strongest Protagonist in any story with just a simple change in pose.
From this point on, I am assuming that you have basic knowledge of art terms like sketches, drafts, inking, outlining etc. and CSP terms like brushes, layers etc. and basic commands like copy, paste, erase etc.
I also won't go into details on how I sketched or design my characters as is, that will take too much time haha maybe I can another post for that but anyway, here's my process:
I. IDEAS AND DETAIL NOTES
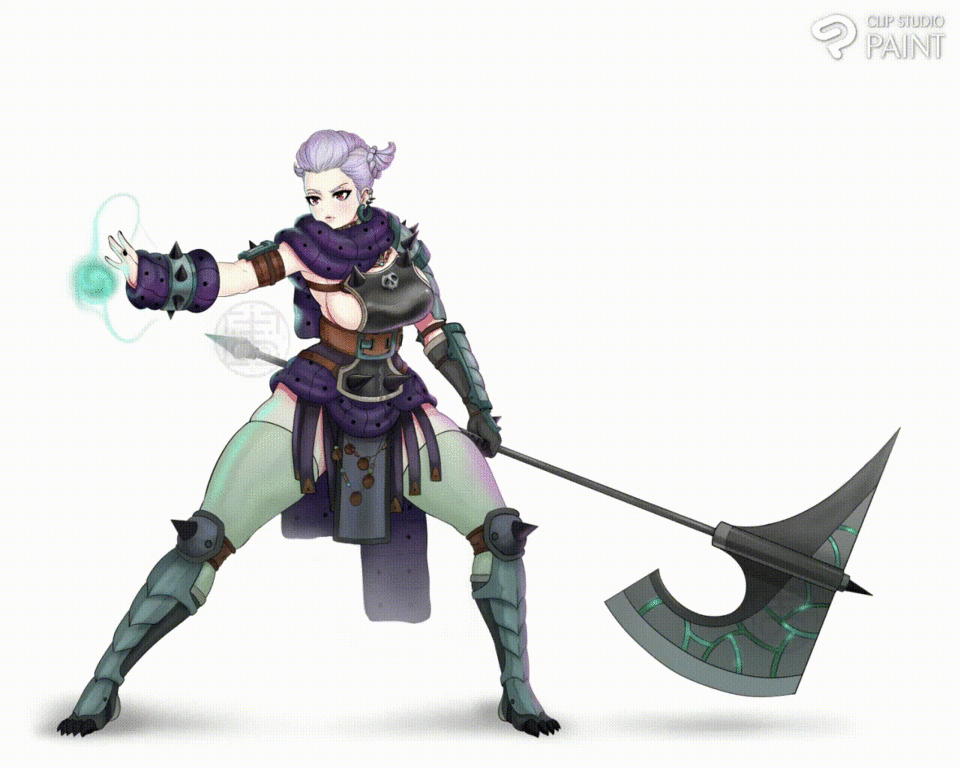
I made a character from scratch for this post, and you'll see her down below. I'm thinking that she will be a selectable class or character in an imaginary game. With that in mind, I designed her with starting equipment and combat ready stance.
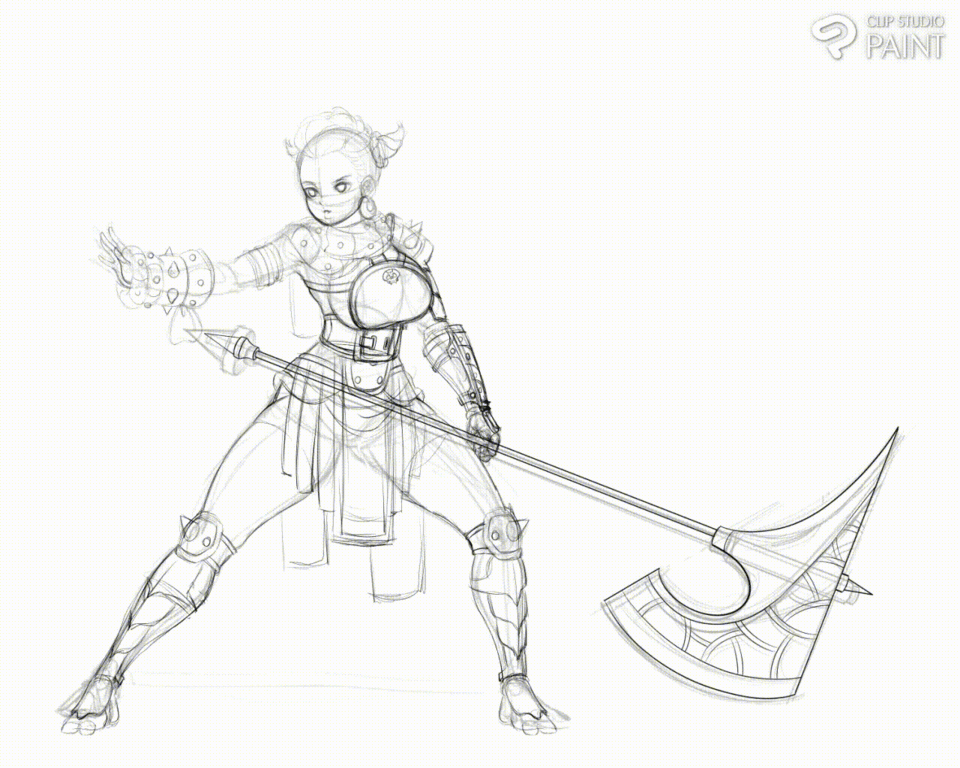
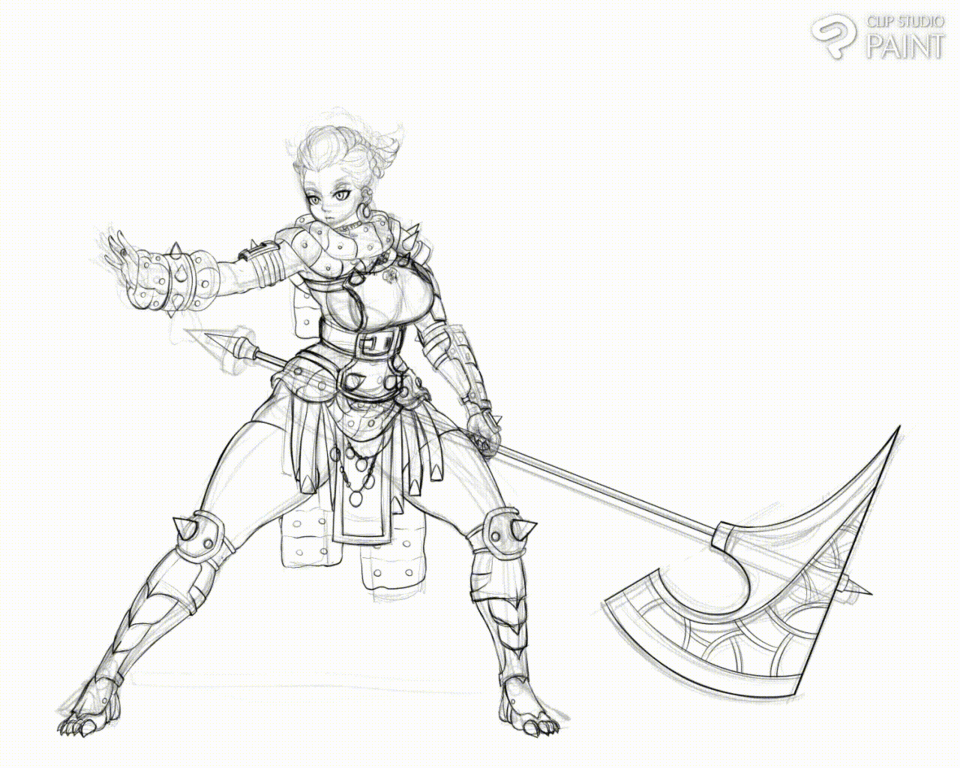
A. Rough sketch of the character. She's a hybrid of an Amazon - Necromancer/Dark job/class.
B. Rough sketch of her armour and weapon. As you can see, I like designing armours that are a mix of symmetrical and asymmetrical elements. I also try to make sure that there are consistent themes in the design, like the spikes and muffler,
C. Two (2) poses I'll pick from when I start working on the image.
II. SKETCHES / DRAFTS
Let's start by making a new Illustration file. Go to File>New (Ctrl+N), rename the file if you like, I'm renaming mine to "Combat Character" as a sample. You can pick from the preset sizes of the canvas or as you can see in the image, I use a custom size for mine. For the resolution, I usually work from 300-600 dpi, smaller if the image size is too big. You can also customize the paper color, but I'll leave it as white. Then click "OK".
Using one of the combat poses above, we start with drafting or sketching our character based on our initial character design above. Let's name that layer 'Pose' and change the layer opacity to 30-50%, depends on your preference. Now, you can use whatever brush you like, personally, my tools of choice for this is the readily available [Pen tool> G Pen sub tool ] or [Pencil tool> Darker Pencil sub tool] .
I usually do 2 kinds of sketches. First, a very rough sketch, during this time, I really don't mind the details much, but I'm already looking out for good proportions that I like or would like to retain. Let's make a new layer above our Pose layer, and call it 'Sketch 1
After finishing my first draft, again, I change the opacity of this layer to about 30-50%, or whatever you're comfortable with. Make a new layer and name it to 'Sketch 2'.
Timelapse!
The second sketch is more of cleaning up my first draft where I start adding more details. This time, still a bit rough, but cleaner than the first sketch. I adjust parts that I think want to change by using Marquee(M) tool > Lasso subtool, scale and rotate here and there until I'm satisfied with the rough look. I also used the Blend(J) tool > Liquify subtool for a quick size change. If you have noticed, I made changes to her amour and added more details to her other parts as well.
TIP: If you like to zoom in (ctrl++) like I do haha, it's a good practice to zoom out (ctrl+-) and see your work at full view (ctrl+0). I also flip the image horizontally (or vertically if needed), because sometimes our eyes and brain trick us into thinking that we have everything in order, but rotating or flipping the image will suggest otherwise.
Timeplase!
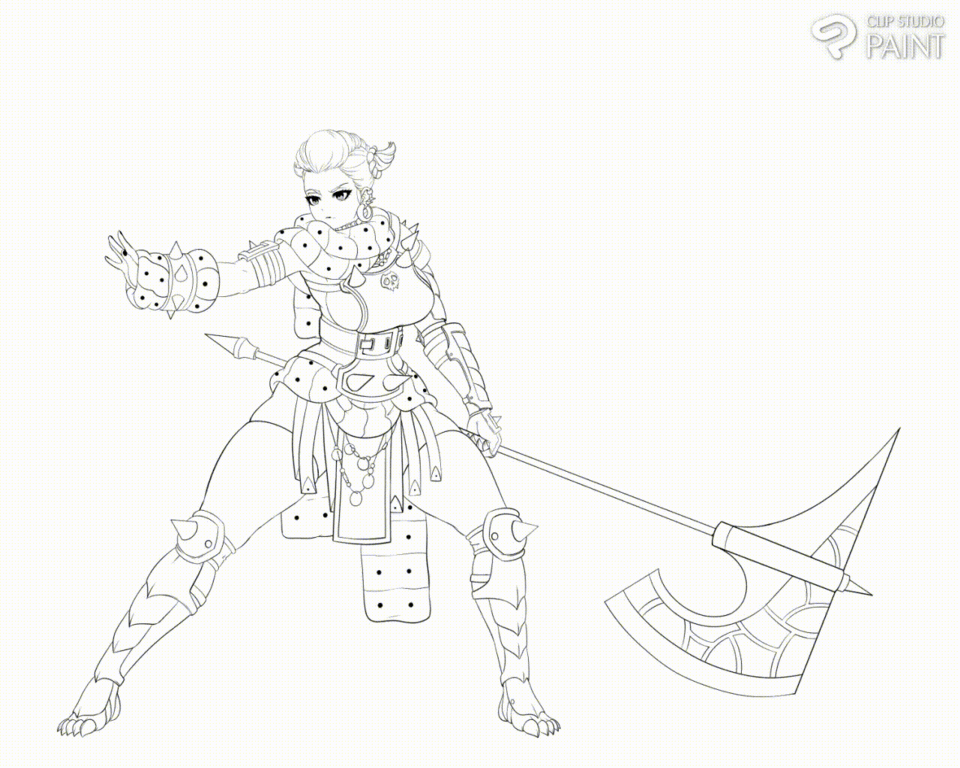
III. INK / OUTLINES
Now that we've finished our sketch, let's work on inking /outlining our draft!
Make a new folder layer and name it 'Sketch', then I drag the 3 layers we made, Pose, Sketch 1 and 2 inside the folder. This will be our reference layer for inking, I do this to organize and clean up layers while working. Uncheck the 'eye' icon of Pose and Sketch 1 layer to hide it or delete it if you want. Leave Sketch 2 alone and then lower the opacity of the folder by 30-50% again. I then change the color of the layer in the layer property, this isn't really needed, it's more of a personal preference haha you can also do this during the sketch phase if you want.
Again, you can use whatever inking tool you like, whatever you're comfortable with, or you can also experiment! Some may use the Brush tool or Pencil tool etc., but personally I prefer, again, the Pen tool> G Pen subtool! I use the default options of this tool, but sometimes I adjust Stabilization to MAX, and it makes your lines so clean and straight! My pen and lines lag a little when I use this, hopefully you won't experience this but if you do, you're not alone haha
Make a new layer and label it "Inks" or "Outlines" or whatever you want to call it. Make sure it's above the Sketch folder we made, if not, drag it on top of the Sketch folder.
Now we ink!
TIP: Sometimes, when I ink parts of the character, I usually do them on multiple layers so that I can go past lines I made earlier and be able to erase stuff without re-inking again to save time. You can just merge layers later on if you think you have too much layers and it's starting to get confusing. Merge by right-clicking on the top layer, and choose 'Merge with layer below' or Ctrl+e as shortcut.
Now during and after the inking stage, you may also adjust parts of your ink/outlines like what we did with our sketch, but I don't suggest this much since it might lower the quality of your lines and you may have to re-ink your adjusted lines.
Timelapse!
IV. COLOURS / PAINT
For colours, I'm thinking of going with either dark purple or green palette for the necromancer/dark theme. Colours can help enhance your character's theme and setting but for me this isn't a set rule, you can create an evil looking character but they have holy/light powers, or an angelic presence clad in white but who enjoys evil deeds etc.
Now, you may put the Ink/Outline layer inside a folder or you can leave it as is, then lock the layer/folder.
Usually, I duplicate my Ink layer, hide one and use the other, so that if ever you make changes with one Ink layer and would like to go back to the initial look of your inks, you then have an extra ink layer to go back to.
Now click the eye icon of the Sketch folder and hide it, do this as well with the other Ink folder/layer if ever you duplicated it as well.
We'll be making multiple color flats for each part of the character. Let's make a new layer under our current Ink layer, and this will be the 'base' or skin of character, let's name this layer 'Base'.
Here's one of my process for this, there are many ways to do this but we'll stick with this for now: Make sure that aside from the paper color layer, only the locked Ink/Outline layer is visible, and then click on it. Then use the Auto Select tool (W) > Refer other layers to select subtool. Select the negative space or the space outside of our outline/inked character, the space where we won't be putting any color, and then press Ctrl+Shift+i or the third button whenever you make a selection, 'Invert selected area'. What this does is, well it inverts the selection you made, meaning it selects the space that you didn't initially select. Below are samples of these steps and how they work if my explanation is confusing, I'm sorry haha
So now we have a selection of our character, don't click on your paper/canvas or we'll lose our selection. Click on our Base layer and fill it in with either Fill tool (G), or brush, pen whatever you want to use. Lock this once you're done.
If you already noticed, we'll be locking a lot of our layers just to be safe, we don't want to unintentionally paint over anything.
Now make a new layer in between our Base layer and Ink/Outline layer. Name this new layer as the next part you want to color, let's say your character's Hair or Eyes or Clothes layer. This time, I'll be using both G-pen subtool and the Fill(G) tool > Refer other layers subtool. Just like our Auto Select tool above, this will think that you're filling in inside the outlines of your character (which is supposed to be currently locked by the way, don't forget!). So let's say you went with making a Hair layer, fill up the hair part of your character on this layer and that's all, then lock it! Do the same with other parts, like weapons, clothes etc. each with their own layer. We'll have a lot of layers, hopefully you don't mind!
TIP: For each part, you can put them inside a layer folder for better management if you want to.
Making these separate layers may be tedious, but I assure you that you'll save a lot time when you add details later on like shadows and highlights! It's either making a lot of layers OR working on just one layer, which is also another way of doing it, but I usually do that when I make digital paintings and not character illustration and designs, so let's save that for later shall we?
Timelapse!
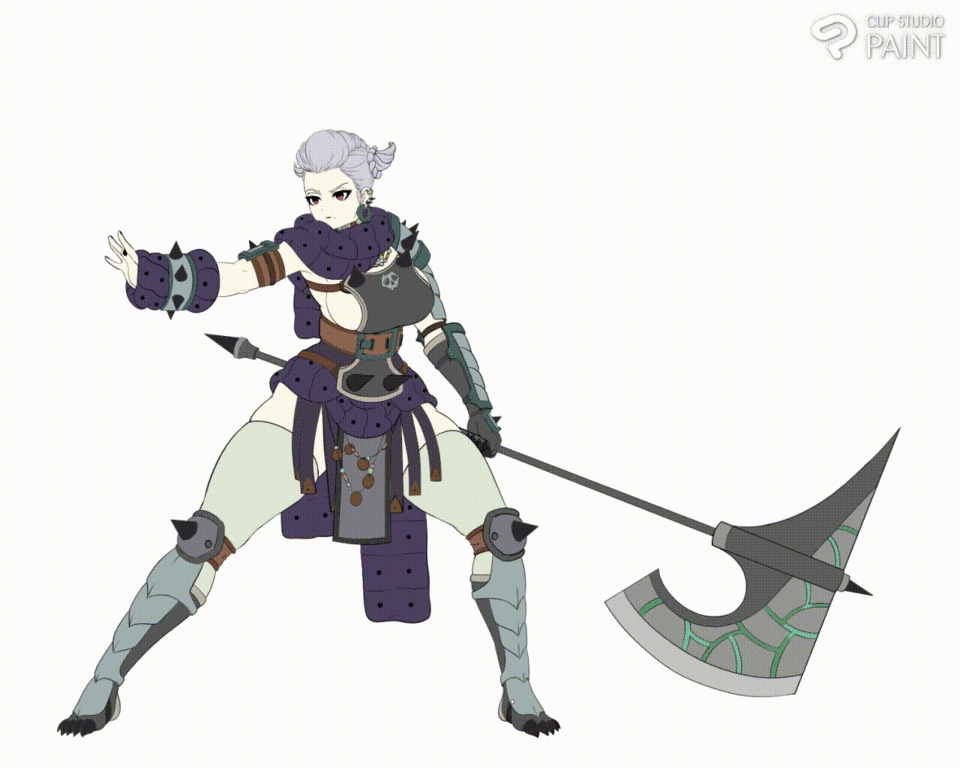
V. FINAL DETAILS
Now, to add additional details by adding simple shadows first and then some highlights. Because we separated our layers, we can add in shadows or other details easier. Here's my usual process for this: Make a new layer above the part you want to add details to, then click 'Clip to Layer Below' or Ctrl+Alt+G. Whatever modifications you do to this layer will only apply to the layer below it. You can make multiple layers like this on top of one another and any changes done on each will only apply to the bottom layer. Apply this technique to our initial outline on top to change colours if you want. Separating layers and organizing them really helps along the process!
TIP: You can also use this process on folders!
After adding shadows and highlights, you can put everything in one folder, copy it before locking it, and then merge that copy into one layer. I do this sometimes to further clean up the image, and add more details if I feel like it
Timeplase!
We can add more details and adjust some parts, but for now we can call this done!
THANK YOU!
Thank you so much if you've read this far! I hope you learned a thing or two with my process! Please excuse me if I missed anything or didn't explain enough, this has also has been a big learning experience for me haha
If you're interested in my works, please check out these links.
Follow, Likes, Retweets are very much appreciated!
https://fllamjr-art-commissions.carrd.co/
https://www.pixiv.net/en/users/10971388
Feel free to ask me anything about this post, I'll try my best to answer if I'm not busy with work. Thanks again! Until next time!
Users who liked this post


Comment