How to paint clothes and their texture
Hello! Today I am going to show you a way to color the clothes in your drawings and give them a unique texture using Clip Studio Paint tools.
I) Basic concepts
Before we get into the tutorial itself, I'd like to first go over a few basics: lineart and coloring. For this I used a white cotton blouse as an example, which is the most common thing to paint.
To facilitate the coloring process, a clean and detailed lineart is very important. In it we are going to draw the lines of the folds that will be our guide for the shading! It is best to use hard, dark lines on the edges/ends of the clothes, while for small details (such as buttons, seams, folds) we will use a low opacity brush.
For my lineart I always use the Artemus Pencil for its texture and great versatility when it comes to registering different percentages of opacity, depending on the pressure exerted by the pencil on the drawing tablet.
We will proceed to place the base colors below the lineart layer, using a different layer for each garment (which will help us to facilitate our work and, more importantly, make it as neat as possible).
>We will put the Lineart layer in [Multiply] mode.
Now I want to show you a little TIP that will help us later:
>Select the Lineart layer and press Ctrl+C. >Create a layer above it and press Ctrl+V to paste what you copied. They will call this "Lineart-Copy" and it will also be in [Multiply] mode (Very important!)
>Now select [Lock transparent pixels] (1) >Select a warm color, preferably orange (2), and with the [Bucket] color the Lineart-Copy.
You can see the colors now look more vivid! It is a very small effect but it will make a difference later, when we finish painting our drawing.
We have everything ready to start giving shadows to the clothes :) I show you a video that I recorded with the program's [Timelapse] and then I will proceed to explain step by step how I painted the blouse:
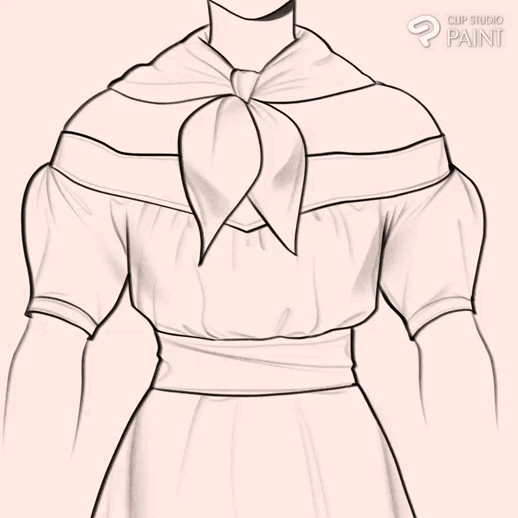
1) The first step is to add a [Gradient] with a color darker than the base color of the blouse. In this case, I chose a not so saturated cream color.
>Create a [Layer] above the base layer and select the layer mode [Clip to layer below] (keep this option in mind always because we will use it constantly).
>Select the gradient tool [Foreground to transparent].
>We place the gradient on the layer, from bottom to top.
2) Now we continue with the hard shadows.
>Again, we create another [Layer], but this time on top of the layer we name "Gradient". This will be called "Shadow".
>I recommend using the [Airbrush] tool (Softer or Harder, whichever you think is better).
>Paint the shadows however you like. Feel free to give it as much detail as you want.
3) To give it a better finish, we will now put a transition color, between the shadow and the base color.
>We select the "Shadow" layer.
>Press the option [Enlarge selected area] and a box like this will appear:
>By default, I recommend using 3px, but the figure you choose will vary depending on the size of the canvas you use.
>We will create a layer below the "Shadows" layer. We will call this "Highlight"
>With the [Bucket] tool we paint with a warm tone color, in this case I used an orange color and lowered the opacity until I liked the result.
What is more beautiful like this? Let's take a closer look at the effect!
(Tip: to remember trick always think that the cold color has a warm color outline)
With this we already have all the basics! =D
In summary, the layers that we will use will be 3 (three), not counting the base color. This will be the base format that we will use to paint all kinds of clothes, which may vary in some special cases.
To better illustrate them, the layer order should look like this:
Regarding the lineart, we can also color it, but this is something optional.
*An extra TIP is to place a noise/grain texture on top of the entire drawing so the colors blend in completely.
For this, I use the "Noise RGB" texture and set the layer to [Soft Light] mode. Also, I lower the opacity.
The fully colored drawing would look like this =)
II) Satin
Satin is a cotton fabric that is characterized by
-Its shine
-Smoothness.
-Since it is a light fabric, it will have more folds and will mold to the body of the person who wears it.
The latter is very important that we take into account! The folds are the most important to give texture to the clothes, in this case it will show that it is a light and slippery fabric.
For the example I chose to use a long white skirt, like the one some brides wear on their wedding day.
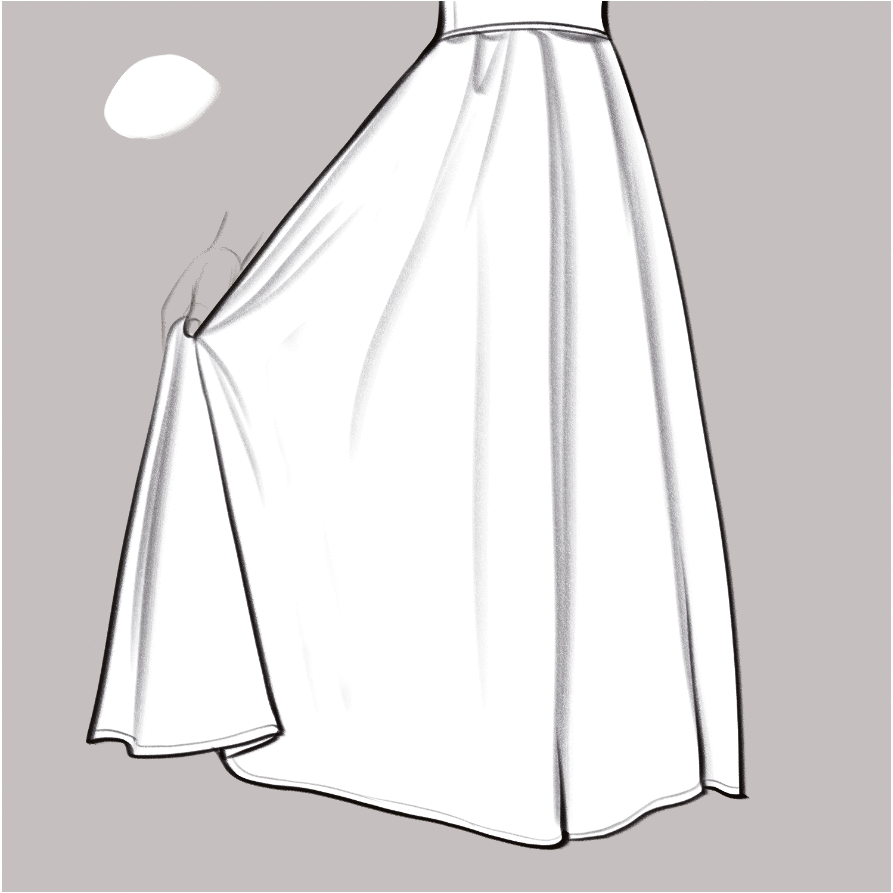
Now I will explain step by step how to paint it (note the way we did it earlier)
1) We put the base color.
2) In a new layer we add the gradient with a darker color.
3) In another layer we shade with the same color (or another darker).
4) On a layer below the shadow layer, we place the outline and lower the opacity (if necessary). In this case I did it with a cold color :)
5) We add a layer above the shadow layer, here we will use a color equal to that of the base, or lighter, to add details.
6) This is an OPTIONAL step. We will use the [Decoration] > [Effect] > [Glow A] tool to add small sparkles and enhance the brightness of the fabric.
7) In this last step we color the lineart with a color of our choice to integrate it into the drawing.
That would be the basics, you can add all the details you like. You can even try this example with other colors!
Here I show you some examples of drawings I made a long time ago using this type of fabric :)
III) Tulle
Tulle is a fine and transparent fabric, ideal for bridal veils or for the transparencies of some pieces of clothing.
Tulle Features:
-Fine.
-Light
-Rough.
-Transparent.
-It is woven in the form of a net.
It is very easy to draw and paint because it is very dynamic. Imagine that it is a fluffy and transparent fabric :)
For this example I will use a wedding veil!
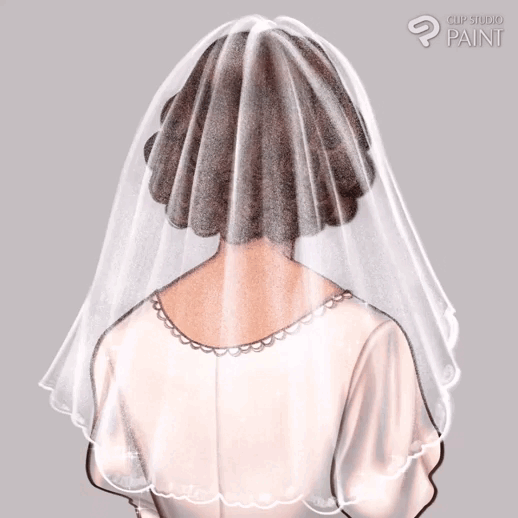
1) First we will make the drawing that will go under the tulle. As the tulle has a unique texture and is transparent (this is the most important thing), you will be able to see what is underneath it: clothes, body, hair, etc.
2) To make the lineart we will use a brush with a rough or paper texture, such as the Artemus Pencil.
We are going to have a lot of freedom to make the lines due to the characteristics of the tulle =D
The only thing to keep in mind is that we will mark the lines with more force in the places where there are folds, because that is where the fabric overlaps and creates greater opacity.
3) For the third step we are going to need this brush (or something similar) that you can get in the Clip Studio Assets section:
We will create another layer to paint the fill with the brush that I indicated earlier.
That would be the basics to paint the tulle! You can add details, such as embroidery and lace.
IV) Pantimedias
Pantyhose are very easy to draw. Since they are glued to the body, we are going to paint them on top of the layer we use to paint the skin.
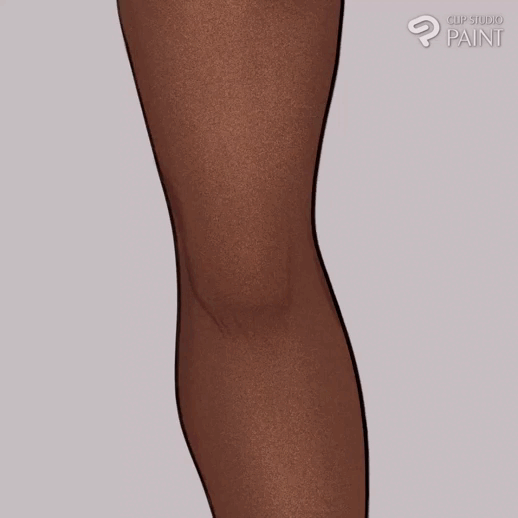
1) First we will paint and shade the skin.
2) In a new layer above the skin, we will put a dark color (I used brown in this case) and lower the opacity between 50% to 80%
3) We will create a new layer on top of the pantyhose to add the glitter WITH THE SAME COLOR OF THE SKIN. For this step we will use the brush that we used for the tulle [ID: 1783197].
V) Fabric with patterns
For this case, we will first have to draw the clothes with a base color, following the steps that I explained in the Basic Concepts section.
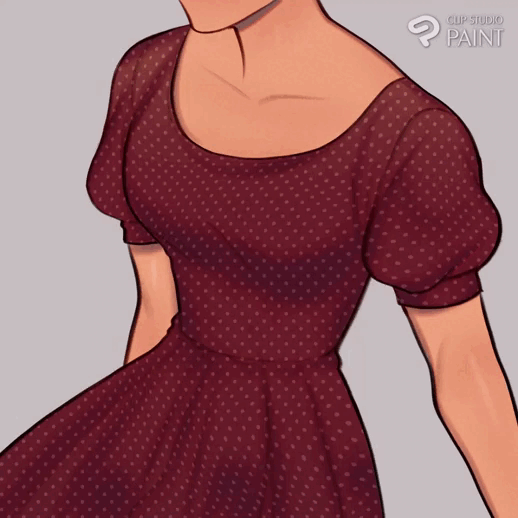
So, now we will use a red dress. But since it is too simple I would like to add a dot pattern to it!
2) For this step I downloaded a set of simple patterns to Clip Studio Assets.
>When placing the pattern we are going to have to scale it down.
>Once we like its size, we have to proceed to convert it into a common layer to be able to change its colors. For this we will position ourselves on the layer and touch [Right Click] > [Rasterize]
3) Now we'll put the layer in [Lock transparent pixels] mode and give it a light color. In this case I used white.
>We will put the layer in [Soft Light] mode and lower its opacity
4) Now we are going to use the [Liquify] tool to give the pattern volume.
You can use this technique for different types of patterns!
(Exceptional cases: If the fabric has a light tone, the pattern we will use will be a dark color. Here we will put the pattern layer in [Multiply] mode)
VI) Advice and final reflections
-To understand how to paint the texture of clothes it is very important to KNOW IT. Take advantage whenever you have the opportunity to feel some fabric with your own hands: touch it, see its folds, compare it with other fabrics, see if it is heavy or light, if it is hard or soft.
-The lineart is the FUNDAMENTAL step when drawing clothes and defining their texture. Always keep that in mind.
-Use this tutorial as a reference and integrate what is useful to your drawing style =)
I hope they have been useful!






Comment