Draw steampunk prosthetics and accessories
Aloh aloh, I'm chafakun, welcome to these chafatutorials in this section of steampunk tutorials, taking advantage of the fact that I love this theme.
Those who know me know that there are two things that I love, bugs and steampunk, so today I bring you my favorite part of drawing. The prosthetics and mechanical accessories for your characters.
Prosthesis design and drawing
The first thing we have to do is think about what we want and why we want it. Something very important when designing prostheses is to take into account joints and mobility. Personally, I think it is very important to have sections and take into account the anatomy of our character.
For this I consider that there are many ways to solve it, the important thing is to think about how it will be articulated and if this articulation has limitations. Personally, I think you can be inspired by the joints of articulated toys or robots to see how mobility works. The important thing is that it is not flat and that it does not deform as if it were fabric or skin. These prostheses must be metallic.
We already chose the shape of our joints, but we can always give it our creative touch, so let's put elements. You can put buttons, lights, cables, more segments, rivets, clocks, steam exhausts, tubes, etc. You can modify the basic shapes. Basically you can do whatever you want, although emphasizing the previous point, take functionality into account when drawing your character in complex poses.
I recommend that when designing you take into account whether these prostheses have any function, as I do not know how to shoot projectiles. In that case, I recommend adding these details and modifications according to the needs of your character. Although it is still fiction, it is not necessary to be so exact if it is not necessary.
The texture is very important at this point, the rivets and the tubes to transport steam will give you that aesthetic that you are looking for in steam machines.
Something that helps me a lot to know where to put rivets is to think about where they would have to weld to join pieces, for example in the example above (the second) in the toes of the legs I thought about how they would join the upper parts to maintain the relief .
My advice to get these steampunk rivets is to make the joint segments or segments in general with thicker lines and then small boxes and zigzags with thinner lines and rivets on them give it a special touch.
Accessories drawing
As in the previous section, you must think about what accessory you want and what function it will have in relation to your character and design it in relation to that. Because the possibilities regarding the design of props and accessories are endless, I will not be able to do a tutorial with so much detail about the design and I will focus more on teaching how to draw the most common accessories for your steampunk character.
Glasses
To draw the classic steampunk glasses we must understand volume. I usually divide them into two basic pieces.
The lens is always inside a truncated pyramid with a very distant tip and the base always has a shape similar to a drop and is curved in the area where it meets the head. By understanding the volume we can have a little more freedom when drawing the lenses at different angles.
Remember to customize them however you like, add rivets, gears, tubes, spikes, whatever you want!
Hats
Drawing hats is usually a bit complex when you don't usually do it, but for a hat to look steampunk you will have to take special care with the details. I always recommend metallic and mechanical details so that the aesthetic retains its charm, although you can also make an ordinary black hat and add steampunk lenses and save yourself the work of designing.
Unlike the previous section, I will not do a drawing tutorial because anywhere they teach you how to draw hats.
Sometimes the easiest thing is to make a regular black hat and just put the steampunk glasses on top, but it is not always the best option since there is an immense variety of elements to put on your character's hat. You can put all kinds of mechanical parts, such as clocks, small pipes, meters, gears, etc.
You can also play with fabrics and metallic decorations, feathers, etc. and of course, accompany them with a few metallic pieces so that the aesthetic remains fabulous.
Of course you can also play a little with the shape of the hat, lengthen it or shrink it, I assure you that the results will be fun and great
The best thing of all is that if you can't draw gears and things like that, you can always download clip studio materials.
Colors
In this article I will talk little about colors in steampunk, since it is aimed at helping you color metallics for prostheses and accessories with mechanical parts, which is what I am teaching in this tutorial
I consider that one of the most important things for steampunk is color. Steampunk usually has brown colors as predominant, however I am not a big fan of palettes with so little color, so I usually make a much more colorful steampunk, however I preserve the essence of these typical colors.
I recommend that you try several palettes and choose the one that best suits your style. A more saturated color palette works better for me, but perhaps others liked one more like the classic steampunk one.
Use the colors that you like, I only recommend keeping shades close to brown and orange with relevance within your character
How do I color metals?
The most important thing when coloring metals is contrast, in my specific case I first put a medium tone as a base, then I add high contrast shadows with a much darker tone and until the end I put the highlights. To give a better finish you can add light bounces or reflections from the environment.
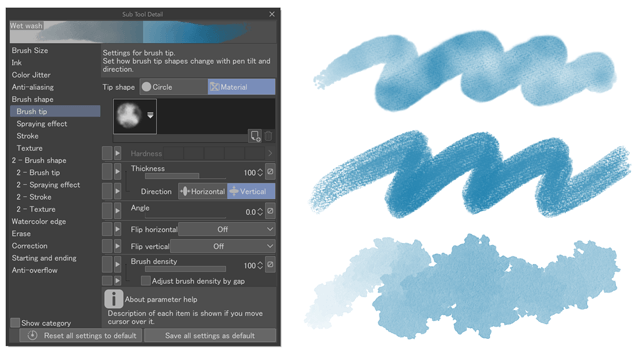
I usually work with low density brushes or a density that changes with pressure, that way I can control the amount of color in my drawing
I use the pen called waterpen
The logic I follow is in relation to the segments I talked about before, I try to maintain continuity in the brightness only in objects that are a single piece and I use the darker shadows and lights to further mark the division between the pieces. However, maintaining a minimum relationship between them, since the light they receive is the same but due to the distortion and angle of the surface it is reflected differently.
Well that's all for today, I plan to do other small tutorials regarding this topic, thanks for reading.


Comment