How to paint Loose Watercolor Florals Digitally
Introduction
Hello! Welcome to my tutorial. I’m Dayuu, an illustrator who loves creating artwork across a variety of styles and media.
Today, I’ll be showing you a simple method for painting Loose Watercolor Florals in digital format using Clip Studio Paint. We’ll be working with the Clip Studio Paint’s Realistic Watercolor Brushes and tools, so no additional downloads are necessary! First, let me introduce the tools we’ll be using today.
Tools
• Round Watercolor Brush
This will be the primary brush we use for coloring in this tutorial. It is located under Brush > Realistic Watercolor. Since we will be adding an external texture, we will lower the Texture Density to 1 (under Tool Property).
We will also set the Blending Mode to Replace Alpha, as we want the color to stand out when painted on top of each other. You can see the difference below.
Now, let’s try out the brush. This is a pressure-sensitive brush, so the intensity of the color will vary depending on the pressure we apply. To create a gradation, start by applying pressure, then pull and slowly release to achieve a lighter tone at the end.

• Texture Blender
The next brush we'll use is the Textured Blender (located under Brush > Realistic Brush). This brush is perfect for blending gradients smoothly while introducing texture and grit to the painted area.
⭑ Be mindful that the size of the brush matters when it comes to blending.

• Lasso Tool
Another important tool is the Lasso Tool. As seen in the example above, it can be tricky to create a gradient while ensuring you're painting the right area. The Lasso Tool helps define where the paint goes. Make sure Add to Selection is turned on in the Tool Property to select multiple areas at once.

• Putting everything together
Now that we've introduced all the brushes and tools, here's a short video demonstrating the three simple steps using: (1) the Lasso tool, (2) the Round Watercolor brush, and (3) the Textured Blender to create our artwork.

Doing so will create an effect that mimics the basic watercolor technique known as a "Graded Wash”.
Let’s Get started
Today, we will be painting from a reference photo I took of a Damask Rose plant. Feel free to download the image for personal use.
1. First, Create New Canvas
Now that the canvas is ready, we can begin sketching the draft.
⭑ Here’s an overview of my workspace: I usually set my draft layer to blue, as it helps the sketch stand out without being too overpowering. To do this, click the blue/white square button in the top right corner of the layer window. I’ve also set up Quick Access with the tools we’ll use today, and the reference photo is displayed in Sub View.
2. Rough Draft
First, lay out the basic composition using simple shapes with a pencil tool (I’m using the Real Pencil tool here). If you're not familiar with drawing flowers, try visualizing the shape as a cone to simplify the process.
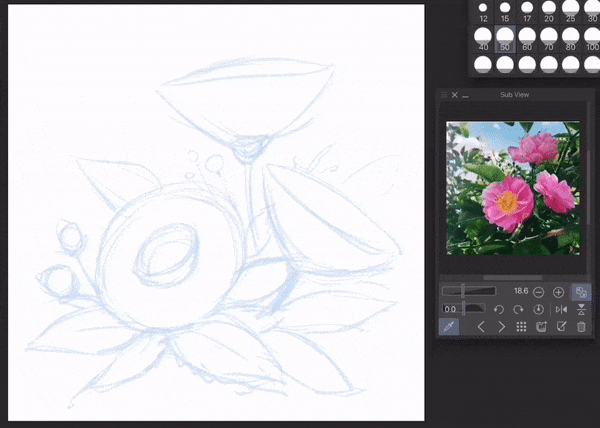
Next, we will add the details on a new layer. Since we're aiming for a loose floral style, there's no need to focus on fine details in the sketch.
Once the draft is ready, reduce the opacity of the draft layer, and we’re all set to begin painting!
3. Create New Layer for Painting
Let’s begin by creating a new layer and applying the Watercolor Border effect.
This will add a thin, watercolor-like border around your painting, mimicking the look of traditional watercolor edges.
4. Painting the flowers
First, use the Lasso Tool to make a selection around the frills of the flower, following the draft as a guide. Feel free to improvise and adjust as you go—there's no need to stick strictly to the draft.
Once the selection is made, we’ll pick a color. You can sample directly from the reference photo and tweak it on the color wheel as needed.
For this step, we’ll choose a warm yellow. Using the Round Watercolor Brush, fill in the selected area.
Next, make selections on the petals, leaving a small gap between each one to prevent them from blending together.
Using the Round Watercolor Brush, fill in the petals with a bright magenta color. As you paint, focus on creating a gradient from dark to light to add depth and dimension
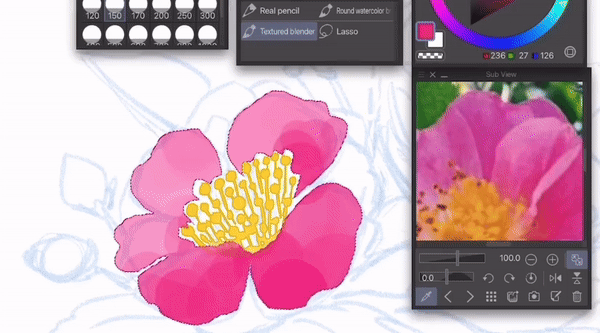
Now let’s soften the gradient using Textured Blender. Gently blend the yellow and magenta tones together to achieve a realistic watercolor effect.
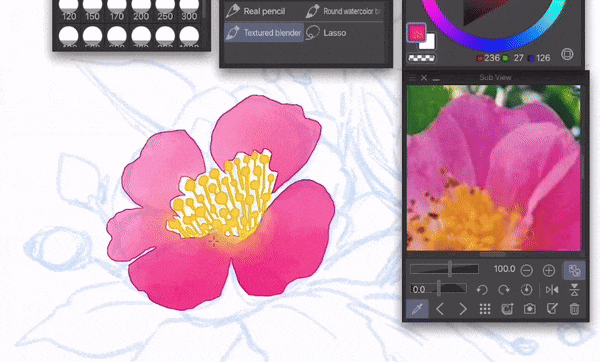
Lastly, deselect the selection and use the Textured Blender to gently merge the areas, further enhancing the watercolor effect.
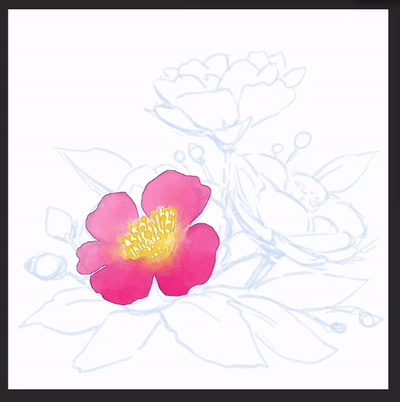
Now that we've finished one flower, let's continue painting the remaining flowers. Remember the steps: 1) Lasso, 2) Paint, 3) Blend.
Here’s the final look of the painted flowers. I’ve added a few more petals on the left and blended some of the edges to create a smooth, flowy watercolor effect.
5. Stem and Leaves
Next, let's move on to the stem and leaves. We’ll speed up the process here.
Use the Lasso Tool to select the stems and leaves, and don’t worry about overlapping the flowers—we'll blend the colors later. Please make sure to leave some separation between the leaves.
Using the Round Watercolor Brush, fill in the selected areas with a variety of gradients to create depth and dimension between the leaves. If the colors appear too flat or lack intensity, don’t hesitate to layer in additional color for a richer, more vibrant effect.
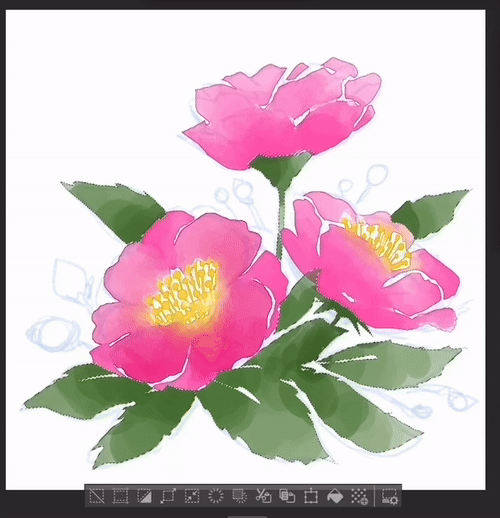
Next, smooth out the painted areas using the Textured Blender. For the final touch, deselect the selection and use the Textured Blender to blend the edges where the leaves meet the petals, creating a watercolor "bleeding" effect.
Blending Tip: Use a zig-zag motion with the Textured Blender along the edges to enhance the bleeding effect, mimicking the soft transitions found in traditional watercolor. Feel free to experiment with the settings of the blender brush to achieve your desired effect.
Here’s the finished piece! I’ve added the flower buds to complete the composition and bring the artwork together.
You can now turn off / remove the draft layers since we don’t need it anymore.
6. Extra: Adding more color
To add more richness to the colors, we’ll paint additional layers of color on the flowers and leaves. First, lock the transparency on the painting layer. Then, using the Round Watercolor Brush, add extra color to enhance the depth and vibrancy of the artwork.
Finally blend in the additional colours and we are done with the painting process.
7. Last Step: Adding Texture
Let’s add a texture to enhance the watercolor effect. Go to Material > MonoChoromatic > Look for Paper, then click Paste Material to Canvas to apply the texture.
Next, select the Texture Layer, go to Tool Property, and turn on Tiling. You can adjust the Scale Ratio to resize the texture to your liking. For now, set it to 100.
Finally, change the layer's blending mode to Overlay and reduce the opacity to 50%.
And there you have it — we’ve completed our digitally painted loose watercolor floral illustration. Well done!
Final Artwork
Here’s the completed piece! I know this tutorial was a bit lengthy, but I hope you enjoyed it. Thank you so much for following along!
Happy Painting!


Comment