
Illustrations drawn with pencil or mechanical pencil have a certain charm,
and in this example I will explain the approach of digitally coloring a hand-drawn illustration as is.
Hand-drawn illustrations on paper
Scan or photograph your hand-drawn illustration with a digital camera,
and open the file in ClipstudioPaint.
*You can import it from a new file by going to "File" → "Import" → "Image".
It looks like this.
[Technique 1] Correcting line density (binary correction)
Scan the original. The example was scanned in RGB color.
The imported line art is surprisingly faint, so we will simply apply density correction.
[Scroll preparation part 1]
Erase unnecessary parts with a selection. Next, select Rasterize Image.
"Duplicate Layer", apply "Multiply", adjust "Transparency 100%",
and increase the density appropriately, then "Combine Images" in the layer menu.
*In the example, after duplicating, it looked good, so I left it as it was and multiplied it to 100%.
With the layers merged into one,
then go to "Edit" → "Color Correction" → "Binarize" to make it black and white.
The "Threshold" in this example is set to 137.
Go to "Selection" → "Color Range Selection" and use the eyedropper to suck up white
to erase the white selection area.
*Alternatively, you can rasterize the image and then use ClipstudioPaint's
◆Edit > Convert Luminance to Transparency
to achieve the same effect as making the selection transparent.
Once it looks like this, the line art is ready.
[Points to note about the completed line art layer]
◆Do not color this line art layer directly
◆Set the attribute to "Multiply" as the topmost layer
◆It's also a good idea to lock the layer
[Scroll preparation part 2]
Create a new layer and draw a rough outline for the border.
Trace the line art and roughly draw the border, then connect the lines to avoid any areas being painted over later.

*The border line (red) in the example was created using
◆Millipoint pen > 2-3 points
◆Basic palette red
◆No anti-aliasing
And I think this is what happened.
Paint the layer parts you want to paint separately using the line drawing of the boundary lines white.
(Example) Auto-select new layer (skirt) → paint white
Create a new layer for each part.
In this example, I divided the layers into "hair", "skin", "clothes", "skirt" and "shoes".
Each of these layers will later act as a painting mask when colored.
It's hard to explain in words, so I made a video of the process.

*If you want to simplify things further without painting them separately, you can automatically select the non-drawing areas, invert them, and then paint them white.
Apply the handy "lock transparent pixels" function to the paint layer.
From now on, painting will not be applied outside the painted area, so it will be treated like a mask.
This completes the base mount.
It's convenient to create the background in the same way.
The border layer drawn in red is made purple and stored as invisible.
(If things get complicated, you can take it out and recreate it from there.)
Once the paint layer parts are ready, you're done.
[Technique 2] Correcting line density (unsharp)
Scan the hand-drawn manuscript.
The example was scanned in monochrome.
Everything other than the subject (including dust) is erased using a selection area.
The density is too light as it is, so duplicate the layer and multiply it.
I think the concentration has become deeper, which is nice.
Merge the layers and apply "Unsharp".
From the Filter menu, select Sharpen > Unsharp.
Adjust "Strength" and "Radius" moderately.
In the example, both Strength and Radius were set to 69.
The trick is to emphasize the contrast without losing it.
Maybe I don't even need to ink it?
If you feel like this, the line art is complete.
Color each part of the paint layer
After that, you can paint each part based on the layer parts. You can paint them however you like.

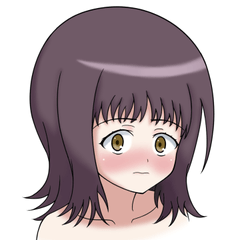
The above example was created using A4 paper, B2 0.5 mechanical pencil, and [Technique #1].
[Advantages of digital coloring]
◆ No need to spend money on masking sheets, art supplies, etc.
◆ Undo function allows you to redo and correct as many times as you want
◆ Instant color changes can be done intuitively
◆ No need to wait for water or art supplies to dry
◆ You can hide the fact that you are drawing moe art from your family
[Disadvantages]
◆ It is difficult to control the strength of the brush (brush stroke) until you get used to it
◆ The initial cost of digital is enormous
◆ Power outages are dangerous

The above example was created using A4 paper, B2 0.5 mechanical pencil, and 【Technique 2】

The above example was created using A4 paper, a B2 0.5 mechanical pencil, and 【Technique No. 2】.
[Technique 1] is for when you want to emphasize the line drawing evenly
[Technique 2] is for when you want to create something quickly while making use of the shading of the line drawing
The necessity of this technique depends on the time, place, and occasion.
It saves time by eliminating the hassle of inking,
and the advantage is that you can draw with a conte touch.
The author often uses this technique to get away from the finishing touches.
This is an approach that focuses on the line drawings of hand-drawn illustrations rather than on rough sketches.
I think the key is to find the method that is closest to the image you want to create from among the many techniques and methods available.
I hope this explanation will help you with your style, and I hope you have a good creative life.
ClipStudioPaint EX Ver.2.0 20240905 Akiben
Thank you so much to everyone who clicked "Like! ♡"!
20241016 akiben.
Users who liked this post


Comment