
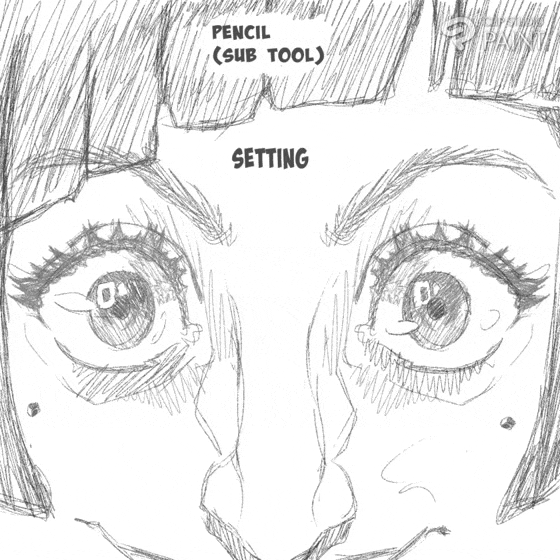
Hello, I am Ann and I will be illustrating the concept I use to create own term of a realistic pencil sub tool,
I will like to show some of the adjustment setting I do to my pencils default settings to help me create the kind of pencil that suit my kind of pencils and also showing how I get to reach those various setting.
Concept (1): How to reach Clip Studio Paint already made default pencil sub tool.
When I newly started using Clip Studio Paint app for the first time, it took me a while to get that base on how in real-life we have different sets of SUB TOOLS and how the appear when we draw was also implemented by Clip studio paint into their various sets of SUB TOOL which includes the pencils sub tools as well. Also I will like to illustrate how as a beginner or one who is new to using Clip studio paint can reach the various PENCIL SUB TOOLS.
Start by first opening the canvas click on any of the sub tool icon on the EDIT BAR on the right.
Any SUB TOOL ICON which was selected, the SUB TOOL page will appear. Let's say we select the BRUSH SUB TOOL ICON, the brush sub tool page will appear, then select that of the PENCIL SUB TOOL ICON so that it can take us to the PENCIL SUB TOOLS page.
In the PENCIL SUB TOOL page will we see the various (Clip studio paint) default pencil which I call already made pencil sub tools.
Some beginners sometimes tends to think that cause some sub tools are on the same selection page means the are the same in all ways. Yes they have similar properties but the tend to differ in some of their settings.
Concept (2) How to get good pencil sub tool made online Clip studio paint assets site by other.
PENCIL SUB TOOL can also be acquire online Clip studio paint assets which as a beginner we can get to on the opening of the app,
Or when in the CANVAS, click on the PENCIL SUB TOOLS icon which will take you to the PENCIL SUB TOOLS page select either the add SUB TOOL selection or the box with an arrow pointing downward icon to take you to the ASSET site, which we can tend click on the kind of pencil which we want and then the downloading page will appear, select it and it will take you back to the clip studio paint app where the PENCIL SUB TOOL will now start to download.
Concept (3) How to easily adjusted CSP pencil (sub tool).
When one is in the canvas, select either of the pencil be it the PENCIL or MECHANICAL PENCIL sub tools, I will just be using pencil for now to show how to twerk and adjust the Pencil Sub Tool to suit my kind of style.
______
For quick to access to the pencil sub tool setting toolbar [Shortcut]
Select the PENCIL SUB TOOL, click on the icon at the PALETTE BAR, a setting page will appear showing the first part of the PENCIL SUB TOOL PROPERTY setting called THE EDIT (SUB TOOL) PROPERTY SETTING, which consist of the below.
While clicking on the icon below the page that looks like a pillar will then take us to the second PENCIL SUB TOOL PROPERTY SETTING called THE DETAILS (SUB TOOL) PROPERTY SETTING, which consist of those below.
_______
For the quick pencil sub tool property setting
Now the other way which we can set the pencil sub tool, is by selecting on the pencil icon on the edit bar, then on the palette bar, click on the pencil sub tool setting icon for it setting page to appear as shown above,
______
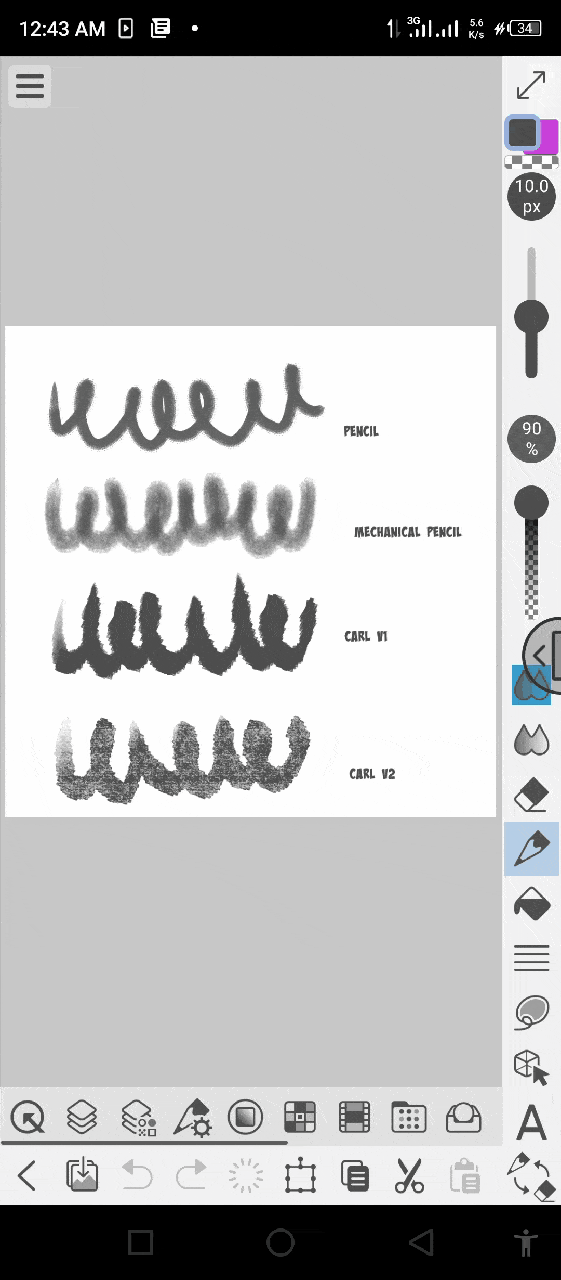
Also I have made an image with our default pencil to show new beginners that it's not the pencil or sub tools that does the art for you but you the artist that uses the pencil or sub tools to create the masterpiece as shown below.
1.) Adjustment of pencil (sub tool) main setting,
Now on the pencil edit (sub tool) property page, one can now twerk some of the displaying setting such as the BRUSH SIZE that is in the in as (1) to adjust it either to any size we want like for me I like use either 4.0px mostly, then we can now click on the icon (2) by the left of the brush size bar.
Different setting options will appear as the BRUSH SIZE DYNAMIC setting. In the options, we will select that of the pen pressure which can be adjusted to look like either of the following: (1), (2) or (3) but I normally do set mine to (50%) to give me control over my pressure sensitivities.
OPACITY the number (1) in the image below is another option on the EDIT PROPERTY, is use to for manual adjusting the pencil sub tool density. Now click on the other icon (2) by the left of the opacity selection.
Different setting options will appear as the OPACITY DYNAMIC setting which looks same as that of the BRUSH SIZE DYNAMIC. In the options, we will select that of the PEN PRESSURE (1) and adjust it to (80%) to give us control over the pencil (sub tool) pressure sensitivities that affect the opacity.
Texture selection (1) help give the brush material a texture appear while that of number (2) deletes the selected material and that of (3) texture density can be use to reduce or increase the material effect on the sub tool.
When we draw using the pencil sub tool with a small brush size one tends to draw rigid and not straight, CSP made a option that solves that issues called STABILIZATION (1), now base on how confident you are you can set the stabilization setting to (0%) (3) but if you know your hand is not that steady one can set it to (4) or (5) cause the high the percentage of stabilization the slower and steady your brush strokes.
2.) Adjustment of pencil detailed (sub tool) editing setting,
At this point with we now see and knowing the various selection in the above setting, we can now move forward by clicking on the icon that look like a SPANNER which will then take us to another version of a setting with the full detail of the settings and it is called the DETAILED PENCIL SUB TOOL PROPERTY.
And they different unique setting options will be displayed when one click the bar with the brush size name (2), and the various options which will appear will just be looking at the following:
anti-aliasing(8),
brushshape(7),
brushtip1(6),
stroke1(5),
Texture1(4),
2-textureshape1(3),
- AndmoresuchasCorrection1,startingandending
In this part, when we select icon (1) with an arrow pointing down a page will appear (2) with different options, which we can then select that of weak (3) which reflect as also as (4).
At this aspect the brush shape, we will see different sets of sub tool that have their own different effect such as pencil,pen, eraser, watercolor and more but because we are looking at PENCIL SUB TOOL (1) select it and click on APPLY BRUSH SHAPE (2) to set the selected sub tool to the brush.
Now on the BRUSH TIP 1, with the selected material bar (2) on the right side, some already selected material will appear, then at that same right side we will see a icon (1) inform a paper with an plus sign, click on it.
The BRUSH TIP SHAPE page (1) will appear, then we can select any of the material that we want but I will be selecting real pencil material (2) and I will then select ok (3).
The material(real pencil)(1) will be added to the other materials while number (2) delete any selected material and with thickness (3) set to 100% to even the widths and breath of the pixels.
On stroke 1, I just select the icon with the three joined circles known as narrow (1) on the gap setting. Then I also select continuous spraying (2) and correct velocity input as well leaving the ribbon option unselected.
But if you want you can select the ribbon option (1) cause it give the pencil sub tool a different kind is effect as shown below as (2).
Note: that number (3) image is when we don't select any of the options on the setting page while the number (4) image is when the narrow,continuous spraying (2) and correct velocity input are selected.
The next part one need to take notice of is STROKE 2 which only have one option called BLEND BRUSH TIP WITH DARKEN, which when enable the stroke appears like image (3) and when disenable appears like image (2).
Moving to the next setting, 2-BRUSH SHAPE 1 is a hole new different set of sub tool Setting that has and act a repitation of the previous selected select that are above but this setting are reflected on the other above settings. And I mostly enjoy this cause it give my pencils sub tool that sense of realism, so I just enable all of it options as displayed below.
Notice that number (1) should the selected options, the (2) and (4) are the image drawn when they options are selected which (3) is the image draw when this above options are not selected.
On the correction 1 setting, the post correction options can be adjusted to either 100% (1) or 50% (2) or more less, which affect the pencil sub tool sensitivity to Bend the stroke to have a pointy edges as shown from the top of the draw boxes downward (3).
The last and final setting called STARTING AND ENDING help makes the ends of the sub tool (pencil) pointy and we start by clicking on (1),
The starting and ending page will appear with different options on which one can select any but I will just be selecting that of the brush size.
After the brush size is select it will display on the bar (1), and the brush size can now be adjusted with (2) to either make blot as (5) or pointy as (4) and (3).
Concept (4) Tricks to easily sketch using pencil (sub tool).
I want to show some of the tricks I use on Clip studio paint to to make my drawing quicker and easier, they are as follows:
Suitable Size adjustment
When I newly started using Clip studio paint app I use to find it difficult to draw base on that I use to draw on paper with pencils that have thin tips put then switching to clip studio paint change my hold perspectives and now to my realization I can now adjustment the thinness and thickness of my pencils or very sub tools and that tends to mess with my sense back then. But I accepted this changes and try finding what suits me and that brings us to the following:
i) Thinner brush size
If you are like me as I mentioned above, you will find thick brush size sub tool to be very intimidating , so the way which I timid or overcome that situation is by making my brush size (pencil sub tool) to be thinner arrow 2 to 4 pixel.
____
While for the next is,
ii) Thicker brush size
This part as I came to later understand is that artist who uses this type of technique normal looks on using this thicker brush size to sometimes cleanly sketch their figure and some do find thin brush also intimidating.
_______
Note that if you want your style to improve be it the way you use you pencil, one has to know which one that suits you.
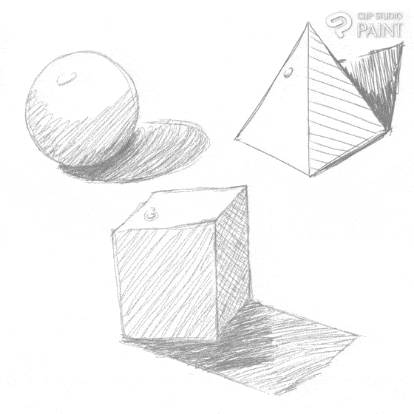
Simplify form of shade
When using pencil to shade, it is best to understand the various ways to shade and the first I will like to point out that when sketching any figure as you draw start by drawing a stroke don't stop there continue that makes your sketch quicker.
The next trick we need to best understand as well is the various ways of shading which are to either draw your shaded line horizontally, vertically or from one edge to the other or cross lines in a form of a stitch net as it is below.
Use of Colour Grading
When you want to sketch with the pencil sub tool, you need to select three or more different kinds of colours grade let's take this box figure for example.
The first colour grade that is use for the rough sketching can act as a base colour,
_____
The second colour grade for the rough sketch can act as the halftone as well,
And the last is use for adding shadow effect on either the figures or on the ground.
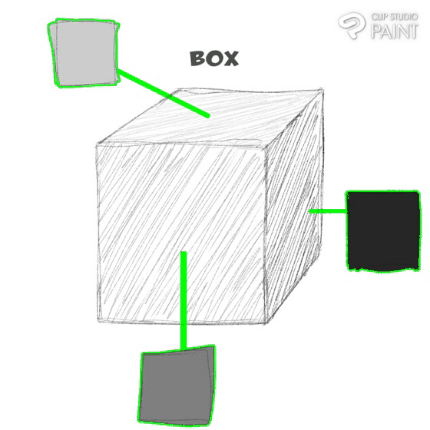
This grade of colours are the ones that give the objects [box figure] the form it has right now.
I do advise as a beginner try practicing how to use different grading of colours.
Concept (5) how to use pencil to gestures sketch
GESTURE drawing is usually a quick, often simple drawing that captures the essential feeling, energy, movement, action, or pose of the subject. It contains a minimum amount of information (line, tone, markings) to achieve the maximum results of the essence of the subject. It can be realistic, but is not always. It does not try to capture anything “photo-realistically” but instead alters reality down to its purest form to tell the story of the scene being drawn.
Since we work in a visual medium, the best thing to do is take a look at examples of gesture drawings:
_____
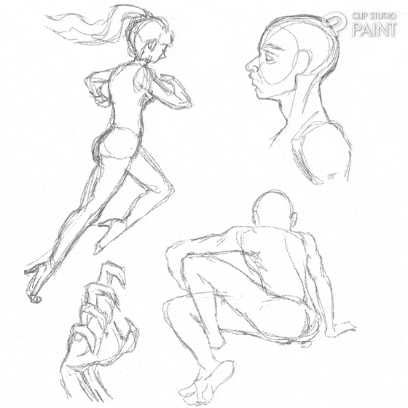
Though the above gesture drawing are all human figures, gesture drawing isn’t limited to just the human form. Animals, Objects, and even Scenes can be captured in the style of gesture drawing.
______
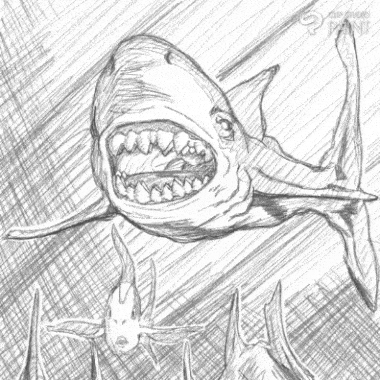
GESTURE drawing is about expressing things such as emotion, feeling, and instant understanding. And It is also about telling a story in a single image. That story can be as simple as “A man swinging a baseball bat” or as complex as “ A shark chasing a bunch of fishes.”
______
Now looking at the drawing of an ULTRA REALISTIC figure with PENCIL SUB TOOL just matters with the kind and how you implement the above mentioned,
Like after, drawing the figure with its gestures roughly (a shark chasing a bunch of fishes).
______
A shark chasing a bunch of fishes
Add some quick shading to the figure and the background using the tricks listed above and if one is successful with applying that, the figures will pop out.
_____
Create another layer and continue adding some more shade to the background around the fishes.
_______
One can now finish up this piece by adding some CROSS STITCH PATTERN to the background to indicate the SHADOWS on a separate layer below the figure layer, then above the figure layer create another layer and add some more shadow.
_____
NOTICE that some of the edges around the fishes are white that is because I use the multiple layer eraser to erase those edges to help the fishes POP OUT.
And the end this tutorial.
Conclusion
I hope this short illustration tutorial was help to everyone who has gone through it, I did try to briefly point above some of the things I came to understand for the days that I have been using Clip studio paint. So for those who will appreciate my efforts thanks alot. Bye
Users who liked this post


Comment