
Hello Hello
This tutorial will cover how to handle painting hair. This tutorial assumes you know your foundation skills, layers, masks, edit and make custom brushes, and the like and will not go over the specificities.
Base Drawing and Colors
We'll start from here! This is just basic linework to define my edges and my base colors. It doesn't have to be super clean or neat because I'll end up painting over most of it anyway.
References
For references, I look for what type of lighting I want. I wanted something that would mimic flat colored hand drawings. So flat lighting and short cast shadows.
Additionally, it helps to have references for the type of hair you want to depict and how the color behaves. If you can't find any good reference for what you need online you can always make the photo reference yourself.
Blocking Out Shadows
Anyway. Define major forms first.
Where is the light coming from?
This will help define your shadows and highlights. I'm still not aiming for perfection right now, I'm blocking out the major shadows. Using Clip Studio's 3D model is a decent reference for this. It's not perfect but it'll give you a general idea of how it should look. It helps with how light should fall on the form but it won't provide cast shadow information. If you're using a reference image for your lighting that will be your clue on how to handle the cast shadows in your image as well.
From the more generalized shadows, I start specifying the form more and try to match the lighting in my references.
Custom Brushes
This is where I can get more specific and start adding detail.
In general, you'd hear that hair should be treated as one shape or mass rather than drawing the individual hairs. At the same time showing the "individual hairs" is what makes the texture to be believable as hair.
Basically, it just means don't define every. single. hair. A general rule of thumb I just follow the defined form of the object to break up the airbrush transitions that I had. While the transition to the core shadows become opportunities to show off smaller strands.
Also drawing singular hairs is time-consuming. So, this is where I use custom brushes.
Facial hairs? Custom brush.
All the hair? Custom brush.
This is meant to be a time-saving technique. That said it's not one click and you're done method you still have to integrate well into your painting.
I use 長髪ブラシ [long hair brush] by 貝類 [kairui] for this instance.
長髪ブラシ >>> https://assets.clip-studio.com/en-us/detail?id=1706855
But I altered it to suit my needs. I wanted it for the shapes to break up the shadows I blocked out.
I use it at a low opacity since hair has a little translucency to it and when the brush strokes layer upon each other the shapes simulate finer hairs.
Detailing further
This is where I can start doing single brush stroke hairs. I'm not trying to simulate hair texture at this point, I'm cleaning up and pushing and pulling shapes and texture generated by my shape brush.
I've also faded out the tips of the hair from my base image at this point and cleaned up my edges.
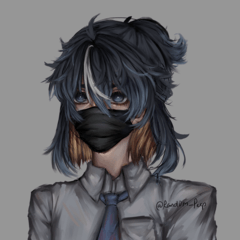
Final
And that's basically it. Below are more examples from the same series of portraits with different hairstyles, colors, and using different brushes than the ones I showed in this tutorial but essentially the same technique.
Thank you for reading. I hope it helps.
-l_aciel
この投稿を「いいね!」したユーザー


コメント