How to Digitally Paint Nails
Introduction
-In this tutorial, we will be going over how to paint nails on our anime characters!
-I use all types of blending modes in my art. Two of my favorites, that we will use in this tutorial, are the [Screen] & [Add/Glow] blending modes.
-Please consider watching the video for additional tips and information.
**I included the .Clip file so please feel free to follow along or take a closer look at what I did.
https://drive.google.com/file/d/10OiBOwTi9u6stsnmFXqEOUdmdPcwx8mq/view?usp=sharing
[A] Setup
[Canvas: 450x257mm; 350 DPI]
[CSP Version 1.10.6]
-Before we start, let’s do a quick rundown of everything that is pre-set up in the video.
*The order of the layers is important.
1) On top, we have our line art [Feet], which is on a vector layer.
2) We have our [Colors] Folder - where we will be doing most of our work in.
3) Then we have the [Color Palette] to keep track of our colors.
4) And finally at the bottom, we have the [Canvas].
*Our vector layer [Feet] should be above our [Colors] folder - so our colors don’t run on top of our line art.
[B] Tools
-We will be focusing on using the [Airbrush] and it’s [Color Mixing] settings.
-But these brushes aren’t necessary. To be honest, one brush could do the work of all three brushes, but things get complicated and it's hard to teach beginners how to work a brush that does 4 things at once.
- Get comfortable with the basics and then find the settings that you like the most.
The two new airbrushes are copies of the default [Hard] Airbrush. Think of these three as:
[Hard - Medium - Soft]. The [Blending Airbrush] works just like the [Blending tool], but we have the [Blending Airbrush] set that it adds a little color with each stroke as well.
-
Here are the exact settings for those interested. But they don't really need to be exact.
-Hard Brush Settings: https://imgur.com/a/Bwf7EfR
-Medium Brush Settings: https://imgur.com/a/8x5aTtg
-Blending Brush Settings: https://imgur.com/a/PCOWhDc
[C] Flats
Let’s begin by setting our base skin color.
Skin: (R: 255 G:241 B:220)
1) Let’s create a [Skin - Flat] layer and we are going to keep this layer at the bottom of the colored layer folder.
-Eventually, we are going to clip all of our layers to this base skin color.
-By clipping those layers, all of our lights and shadows will only effect and be visible on top of the [Skin -Flat] layer. Nothing will go outside the lines!
Placing the color:
-1) Select the [Magic Wand] tool (settings can vary).
-2) Using the wand, select the inside of the foot and make sure everything is selected.
-3) Then press the Fill Icon in the [Selection Launcher]
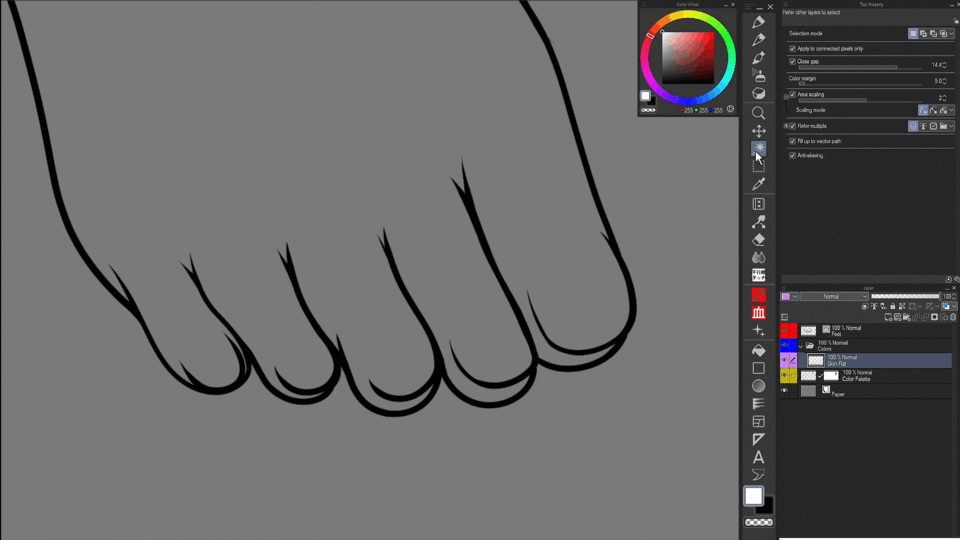
Always double check. Make sure all areas were filled in with our new color.
The colors in this tutorial aren’t extremely important. Everyone's’ computer monitor and personal tastes are different. Everything can be fixed or changed in the [Color Correction] Step.
[D] Setting Up Masks
-We will be using the [Masks] in a way they weren’t originally intended. We won’t be using them to hide anything.
-We will be using these layers so that we can [Quick Select] the area of each nail that we set up. It takes too much time to keep reselecting the same area, so with this set up we can easily select any area we want to work on with a simple click.
-The masks will also create a hard or smooth cut so that we can add lights and shadows better on the nail itself or areas around it - without affecting areas outside of the current selection.
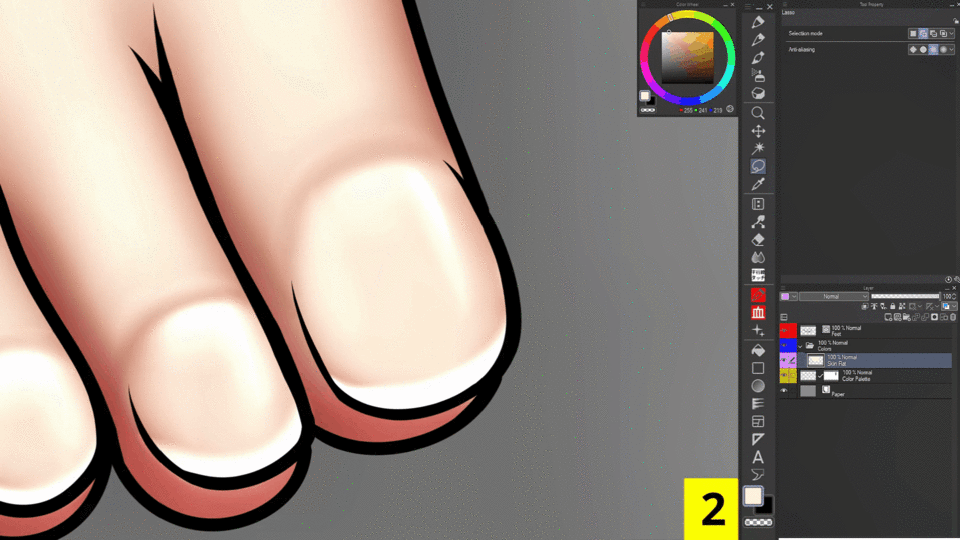
1) Create a new layer and place it in a new folder called [Masks]
2) Pick any selection tool you are comfortable with. I used the [Lasso] tool.
3) Select the general area of the nail.
4) Then go to [Select] -> [Blur Border] -> ~50 px
5) Press the [Create Layer Mask] button (right above the layers)
6) Activate [Show Mask Area] feature (right above the ‘Create Layer Mask’ button)
-[Blur Border] does what its name suggests. It takes our selection and blurs the edges. Just make sure to fill up the edges of the nail.
-You can skip the [Blur Border] method, if you just want a sharper nail line. You can also use the [Pen Selection Tool] and adjust its [Hardness] Settings to get a similar result.
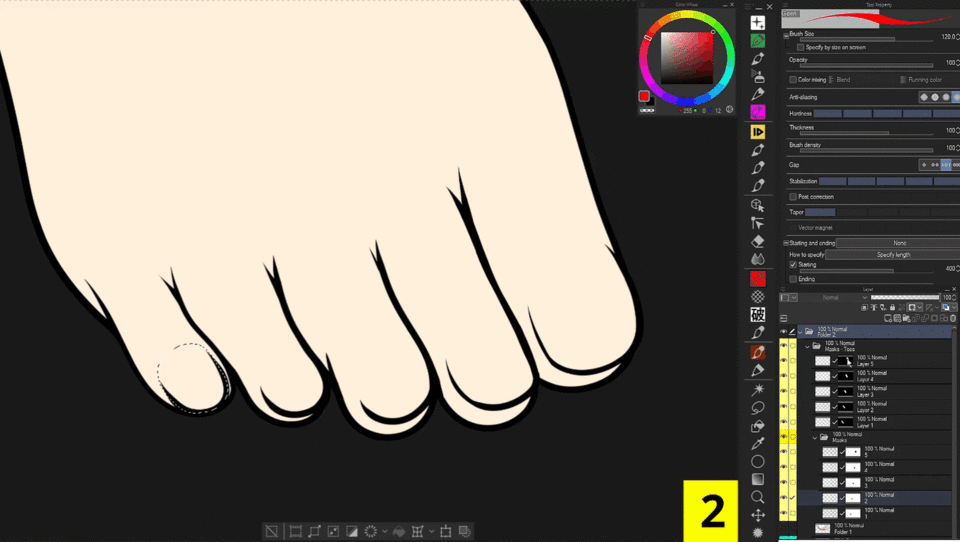
-To use Quick selection:
1) Hold down [Ctrl or Cmd] key
2) Click on the thumbnail on the layer.
-To add more areas to the Quick Selection:
1) Hold down [Ctrl] + [Shift}
2) Click on any additional thumbnails
-Everyone's settings might be different but I think the default is the [Ctrl] button to perform a quick selection. Quick Selection should select everything on that layer except transparent pixels.
-When you use quick selection on a mask thumbnail -> it selects the mask that we just created.
[E] Base Shadows
-In this step, we will just be focusing on applying rough shadows. We just want a general idea of where everything is going to go. We will be blending it all together in later steps.
Applying lights and shadows can be very confusing for beginners. Study and take full advantage of the 3D models in Clip Studio.
Applying lights and shadows on fingers and toes is pretty much the same process. Think of each one like its a cylinder, or tube.
-The area of the cylinder that is closest to the light source should be the brightest. The areas farthest away and covered will be the darkest.
-The covered areas tend to give beginners the most trouble.
-For this tutorial, we are going to keep things simple - with the light source coming straight down.
1) Create a new layer and name it [Shadows]
2) Clip this layer to the [Flat] Layer
3) [Quick Select] the area you want to work on.
4) Use the [Hard] airbrush to set the shadows. (R:206 G:95 B:86)
5) If you would like to clean it up a bit, use the [Medium] brush to form the shadows into shape.
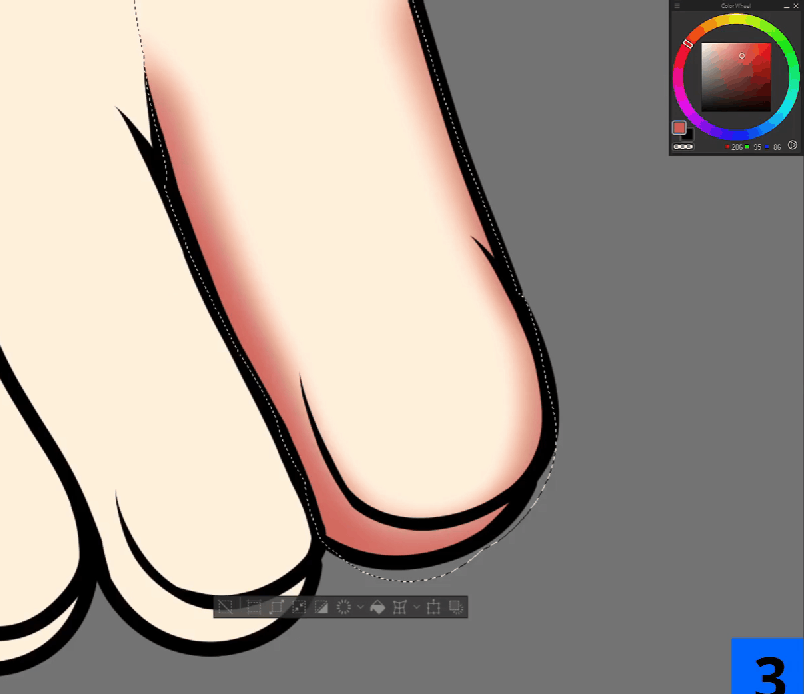
-The areas that we will be shading:
1) Underneath the nail
2) The cuticle area
3) The bottom of the foot
4) The bottom of each toe
5) The areas where the skin is touching and smooshed together.
-Like I mentioned before, the covered shadow areas can get pretty tricky to figure out.
-The bottom of the foot and underneath the nail will be the darkest areas. It receives the general shade a cylinder shape would get... but it also has everything above it (nail) to make it even darker.
Of course, everything is subjective and there isn’t a rule that it must be shaded this way. Work with your style and find what’s best for you.
[F] Whites [Add/Glow Blending Mode]
-Next, we will be applying the white parts of the nails. The distal edge and the lunula.
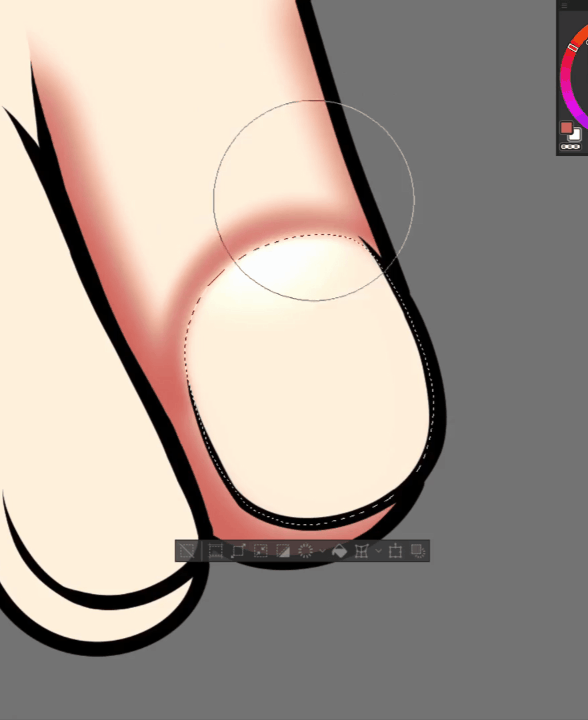
1) Create a new layer [White].
2) Clip it to the [Flat] Layer.
3) Set the [Blending Mode] of this new layer to [Add/Glow].
4) [Quick Select] the area you want to work on.
5) Select the [Medium] airbrush.
6) Enlarge the brush size and create the half circle (lunula).
7) Reduce the brush size of the [Medium] brush and create the white distal edge of the nail.
(*) Use the [Blending] airbrush if you have difficulty shaping either part.
-It's hard to give a straight answer for how to use the [Add/Glow] blending mode. It can be used in a million different ways. I personally use it when applying lights on skin tones.
-What this blending mode is basically doing in our example is:
1) It’s taking our colors and making them brighter.
2) Makes the colors around the [whites/lights] warmer in color.
-It brings a subtle touch of color and gradient to the skin, which I like.
*Remember the order of the layers is important! The blending mode layer will have an effect on the layers below it. Experiment and try out its different effects.
[G] Lights [Add/Glow]
-Similar to the [White] layer, we will be adding a new [Add/Glow] layer to apply general light to the nail itself.
-With this layer, it will make the nail shiny, give it some depth, and make it look like it’s curving. There are a bunch of ways to perform this next step, so I will give you a couple ideas.
1) Create a new layer [Glare].
2) Clip it to the [Flat] Layer.
(*) Use white color, or a color between white and the base skin color.
Method 1 (Shown in the video):
1) Select the [G-Pen] or any sharp brush.
2) Create a curved line towards the area of the nail that gets a lot of light.
3) Select the [Blending] airbrush.
4) Start blending only one side of the line (Preferably the side that is facing away from the light source).
5) Using the [Blending] airbrush, apply more lights towards the top of the nail and blend everything nicely.
-What is happening is: we are creating both the reflection of the nail, and the curve that I mentioned before - to give it more depth.
-Both sides of the line can be blended, but one side should be blurrier than the other - to make the nail look sharp and rigid at that point.
Method 2: Selection Tools:
1) Use any selection tool you like
2) Create an oval selection.
3) Select the [Blending] Airbrush
4) Start adding color to the top part of the selected area.
-This is pretty much the same method that we are using with the mask. You can even set up a mask for this part as well. I felt is was quicker to just use the g-pen and blend it into shape.
[H] Shading, Lighting, and Blending
-In this step, we are going back to the [Shadow] and [Light] layers and we are adding more -shadows & lights - and then blending them all together.
- If you are more comfortable with merging layers, you can do that if you have a easier time blending that way. I like to keep everything on its own layer, in the event, I change my mind on something or make a mistake.
1) Select the [Medium] or [Blending] airbrush.
2) Set the opacity of either brush to around: 0-50
3) Use the colors of their respective layers and smooth everything out.
(*) Use a lighter or darker color, if you feel areas should be darker or lighter.
-This part is the trickiest to explain and teach because, shading and lighting comes with experience. As you get better, you start noticing more often when a gradient is off or if something doesn’t look right.
-The edges of the toe are pretty simple, just create a simple gradient that extends from the bottom of the toe upward.
-Feel free to add some more lights to the top of the toe, for an extra touch & give it more life.
-The biggest part we are going to focus on is the cuticle area - aka. the nail fold.
- This is the area where the skin and the nail are connected, so the skin is laying on top of the nail. We want to create a rolling type of shadow that goes up to the nail mask that we created.
-The best thing to imagine is shading a hill. The top of the hill should get the most light and the bottom area should get the most shadows.
*The more shadows and lights you add -> the steeper the hill looks.
- If you smooth out the lights and shadows -> the hill will look flatter/smaller.
[I] Blush (Screen)
-In this step, we will be creating the blush for the toes.
- Artists like to add some life to the fingers and toes, so they add some additional colors besides the standard skin color palette.
-These additional colors make the hands and feet stand out more to the viewers.
-There are a bunch of methods to create the blush, but we will be exploring the [Screen] blending mode.
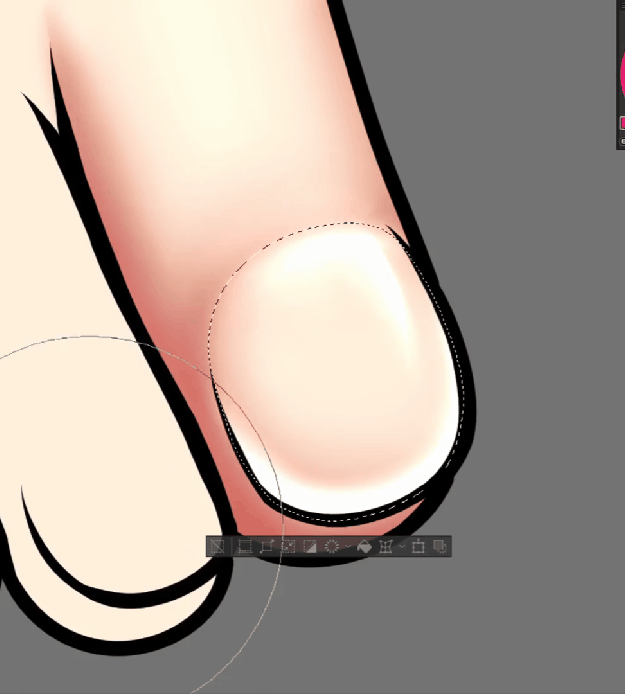
1) Create a new layer [Blush].
2) Clip it to the [Flat] Layer.
3) Select the [Hard] airbrush .
4) Brush in a very dense red color to the tip of the toe.
5) Set the layer to [Screen] blending mode.
-The screen blending mode takes that dense red and softens it out into a subtle pink.
*Remember [blending mode layers] affect other layers besides itself, so order of layers is important.
*This screen-blush method may seem odd, but it is extremely helpful when you make an animation and want to animate blush on your characters.
[J] Adding Purple
-Red isn’t the only color that is beneath our skin. We also have blue veins. And when you combine blue veins and red arteries together -we get purple!
-I like to apply a little of either -blue or purple- to the mix, just to add some extra color & realism. So in this step, we will be doing what we could have done with the [Blush] step.
1) Create a new layer [Purple].
2) Clip it to the [Flat] Layer.
3) Select the [Blending] airbrush.
(*) Quick Select the mask for the nail.
4) With a low opacity apply some purple to the top of the nail and in between the toes.
(*) If you make the purple too dark, try out the different blending modes or just adjust the opacity of the [Purple] Layer
*You can place these additional colors anywhere.
[K] Changing the Line Color [Optional]
-Everything we created so far looks great just by itself, but of course, I want to give you some additional ideas that you can apply to your own art.
-We have just been working inside the [Colors] Folder but now its time to work on the [Line Art]. With this step, we are going to change the black lines in our Vector layer to a different color. We can make the lines disappear or even have it blend nicely with the skin colors.
-Method 1: [Change Color of Line] Effect
1) Select the vector layer [Feet]
2) Go to the [Edit] tab -> [Change color of line to drawing]
-Method 2: Filled Layer
1) Go to the [Layer] tab -> [New Layer] -> [Fill]
2) Select new color. (R:159 G: 54 B:61)
3) Clip this [Fill Layer] to the vector layer [Feet]
-This will take the new color and place it on top of all the black lines.
-I prefer to use [Method 2] because there may be times when I want to go back and add more lines to the vector layer.
-I would then need to have my pen/brush set to that color (or change it afterwards) which creates another step. Other times, I want to adjust the colors of the line and it’s easier to adjust the colors when it’s on a different layer.
-Next we are going to add some more colors on top of our new colored lines.
1) Create two more layers
a) ( Lights [Add/Glow])

b) (Shadows)
2) Clip them to the [Feet] Layer.
3) Using the [Blending] airbrush, add white color to the [Lights] layer
4) Use the [Hard] or [Medium] airbrush to apply - black or a darker color- to the [Shadow] layer.
-The new lights can be placed above the nails and at the top of the foot/toes.
-And the shadows should be added to the areas that should be the darkest, like the bottom of the foot/toes.
[L] Color Correction
-This is always my last step. The magic of color correction!
-[Correction Layers] are extremely useful and I highly recommend every artist to explore and test out each one.
-Sometimes, we may not notice the colors we pick can be - too dark, too muddy, or just completely wrong.
-[Correction layers] are there to help us out and make us realize we have been colorblind this whole time.
-We will be using two correction layers: [Tone Curve] and [Color Balance]
-Tone Curve:
1) Go to the [Layers] tab -> [New Correction Layer] -> [Tone Curve]
2) Adjust the [RGB] graph so that it makes the bright parts -brighter and the dark parts -darker
3) Adjust the [Blue] graph to add a little blue color to the mix.
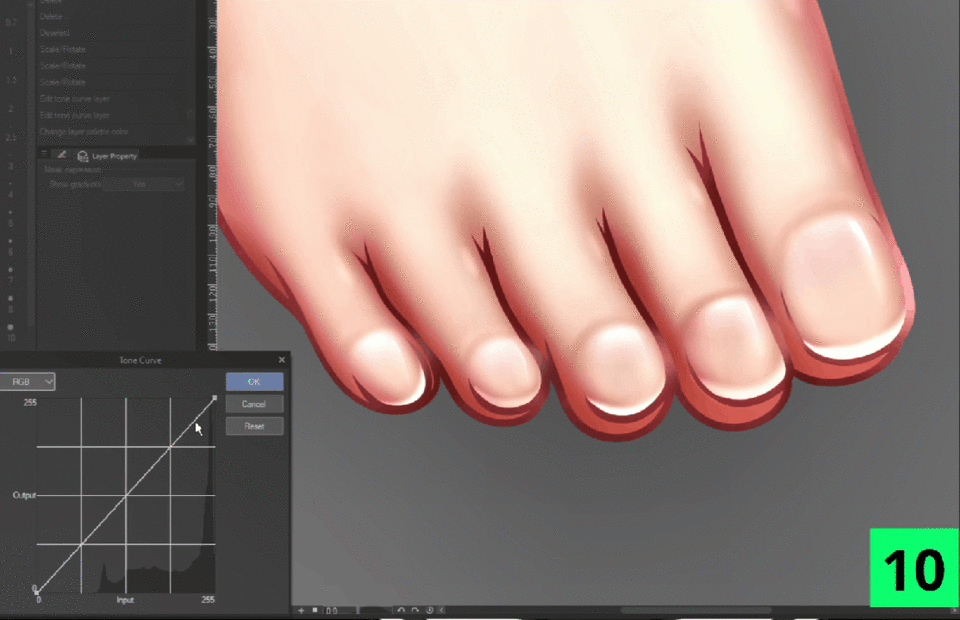
-Color Balance:
1) Go to the [Layers] Tab -> [New Correction Layer] -> [Color Balance]
2) Adjust the [Half tones] [Red slider] setting to “19” to add a little more red to the mix. [19,0,0]
3) Slightly adjust the Highlight sliders [0,-3,-4]
4) Slightly adjust the Shadow sliders [9,0,0]
-These correction layers also have their own blending mode settings. So the possibilities and combinations are endless.
-The colors I picked for this tutorial are already pretty good, but sometimes, we just mess up in our color choices, so these layers are very handy.
*Always remember… art is subjective! These steps vary from artist to artist and color correction is optional.
Conclusion
And that’s it, we’re finished!
-Sorry for rambling on, I wanted to cover everything and I tried to make it as detailed as possible for beginners to understand. If I left something out, please let me know.
-Thank you so much for checking out this tutorial! Don't forget to check the video!
Keep Practicing, Keep Drawing!




댓글