Learn to Cell Shade Faster With Fill Tool
0. Introduction
Clip Studio Paint comes loaded with multiple various settings for all of its tools, and the [Fill] tool is no exception here. Apart from laying down the base colors, it is also very effective for cell shading.
Cell shading is used in many art categories like creating webtoons, manga, animations, illustrations, etc, so knowing how to make the most out of its settings can save you considerable time during your work process.
I will be showing you what its most frequently used settings are for and how to practically integrate them into your cell shading workflow for faster results.
Note: If you are already familiar with the Fill tool settings and sub tools you can skip over to Section 3 where the cell shading process begins.
The first two sections are to familiarize you with the [Fill] tool settings and sub tools you will be using while cell shading.
1.1. Accessing the Fill Tool
The [Fill] tool can be found in the [Tool] palette, which is on the far left of the screen by default.
If you can’t find it there, you can go to the [Window] menu in the top bar and click on the [Tool] option for the palette to appear.
If the [Fill] tool is missing from the [Tool] palette, click on the three bars on the top left of the palette, go to ‘Add from Default' and choose the [Fill] tool from the pop-up menu, and click OK.
With this, the [Fill] tool will be added to your [Tool] palette.
1.2. Accessing Sub Tools and Tool Properties of the Fill Tool
The [Sub Tool] palette can be accessed from the [Window] menu and has four default tools.
The [Tool Property] palette can also be accessed from the [Window] menu and has multiple useful properties that are discussed further down in the article.
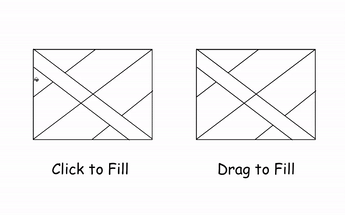
2.1. Basic Tool Use 1: Click to Fill and Click and Drag to Fill
The first two sub tools, [Refer only to editing layer] and [Refer to other layers], can be used to fill closed spaces by either clicking in those areas or clicking and dragging across them.
2.2. Basic Tool Use 2: Enclose and Fill
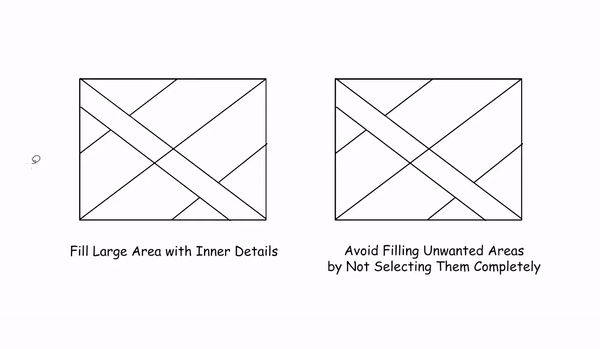
The third sub tool, [Enclose and fill], works as a lasso that detects and fills only the enclosed areas within the selection.
It is very useful if you want to fill an area with lots of line art details without needing to click and drag or worry over small left-out parts in the process.
2.3. Basic Tool Use 3: Paint Unfilled Area
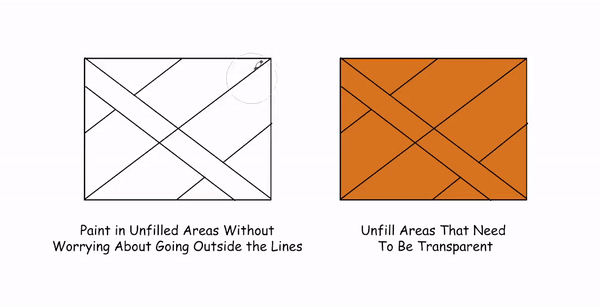
The fourth sub tool, [Paint Unfilled Area] is great for the very small spaces that are otherwise left unfilled due to being too small or being near the edges.
It is also great for unfilling small areas that were filled unintentionally.
2.4. Basic Tool Property 1: Close Gap
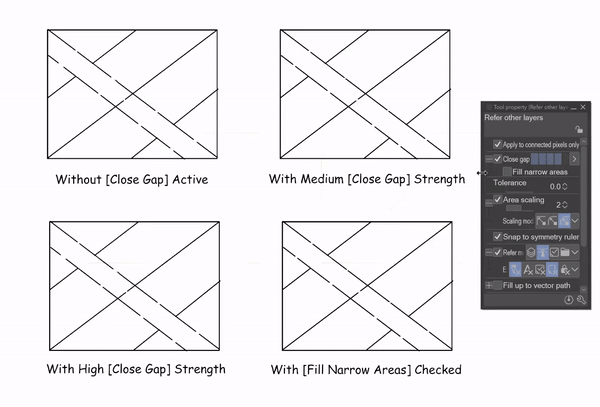
Sometimes there are gaps within the line art, from which the fill color can bleed out when we don’t want it to.
With the [Close gap] property, depending on the strength you decide on, the [Fill] tool will automatically close off small gaps in the line art and not fill beyond them.
Tip: Check [Fill narrow areas] to ensure that small sharp edges are not left unfilled when the [Close gap] value is high.
2.5. Basic Tool Property 2: Tolerance
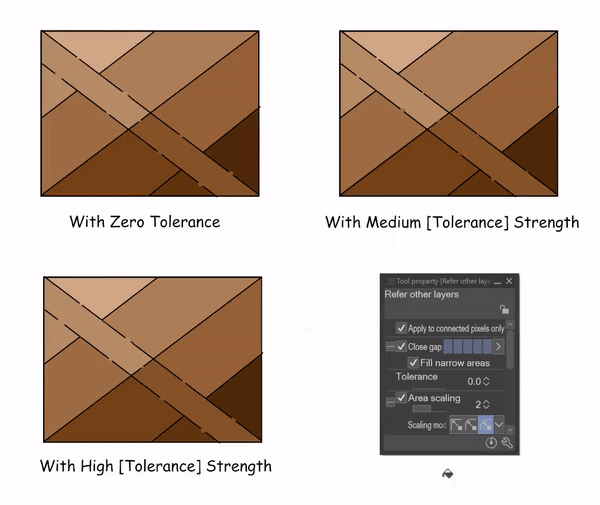
Normally, the [Fill] does not color over other colors and does not exceed beyond where its boundary meets another color. This is the case when [Tolerance] is zero.
The more the [Tolerance] is increased, the more the [Fill] tool will not register the boundary created by other colors.
2.6. Basic Tool Property 3: Area Scaling
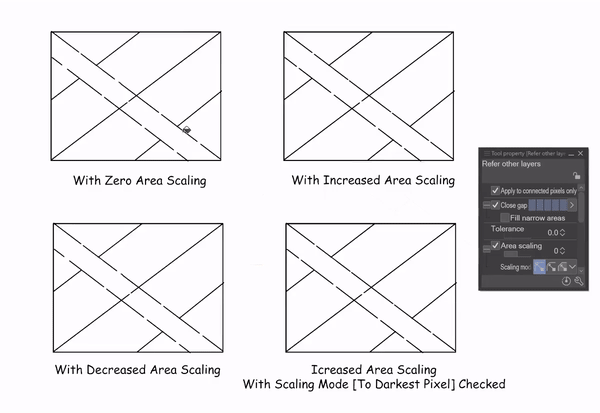
Sometimes you can get a few empty spaces near the boundary when using the [Fill] tool.
To avoid this you can use [Area scaling]. [Area scaling] lets you go beyond what would otherwise be filled.
So, if you set the area scaling to 5, the fill would go 5 pixels beyond what is registered to be filled. Conversely, if you set area scaling to negative the fill area will shrink.
Tip: For best fill results with the [Refer other layers] sub tool I keep the area scaling high (around 20) with the scaling mode set to [To darkest pixel]. This allows me to avoid any small empty corners while also not letting the fill exceed the line art.
3.1. Setting Shortcuts for a Faster Work Pace
To make the most out of the [Fill] sub tools, it is best to create individual shortcuts for each to switch back and forth with ease.
To do this, go to [File], [Shortcut Settings], [Tools] category, and then [Fill]. There you can see all its sub tools and set their shortcuts to what you prefer.
3.2. Preparing The Line Art For Cell Shading by Outlining Lights and Shadows
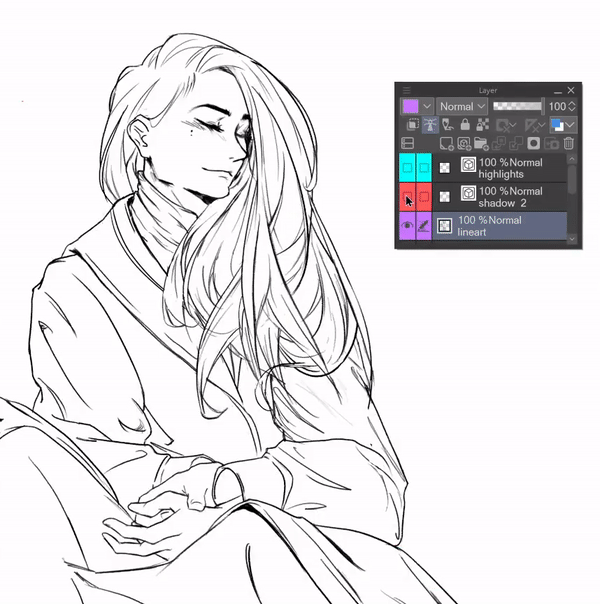
For a smooth cell shading workflow, it is best to define the light and shadow areas right after finishing the line art.
In the example, the main light source is to the left of the character, so I have outlined the light and dark areas accordingly.
To keep things organized, both the highlights and shadows are in their own layers. The colors used for each are bright for easier readability against the black line art.
3.3. Setting Up Reference Layers: Keeping The Line Art and Base Colors Separate
For a better workflow, keeping your line art and flats on a separate layer can be beneficial.
For this, the [Refer multiple] option in the sub tool properties of the [Fill Tool] comes in handy.
If you cannot find this option in the [Sub tool property] palette, you can bring it in by clicking the wrench icon at the bottom right of the palette and going to the [Reference] section in the pop-up window.
Here, make sure the [Refer multiple] option is check-marked and the eye icon is visible on its far left.
From the four [Refer multiple] options, we will choose the lighthouse icon, which is the icon for reference layers.
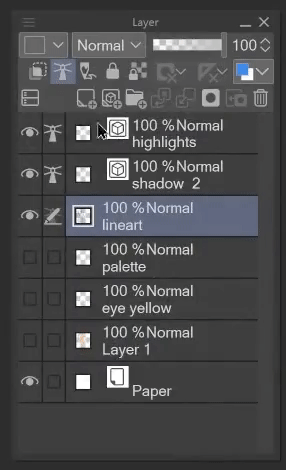
We will need all three layers of the line art, highlights, and shadow for reference while cell shading.
So, we will select all three of these layers and set them as reference layers by clicking on the lighthouse icon in the second row of the [Layer] palette.
Now create a new layer for the flat colors below these three layers. You can click and drag a layer to arrange its position.
This is the layer we will be using to fill in all the base colors.
3.4. Creating the Silhouette
Before adding the flat colors we are going to create a silhouette to help point out spaces we might miss later while coloring in the flat colors.
Using the [Auto select] tool, and making sure the [Apply to connected pixels only] option is checked in the [Tool Property] palette, click in the negative space outside your line art.
In the bar that appears with the selection, first, click on the [Inverse selection] icon and then click on the [Fill] tool icon.
Fill with a color that is easy to see and not included in your base colors. I have filled it with gray.
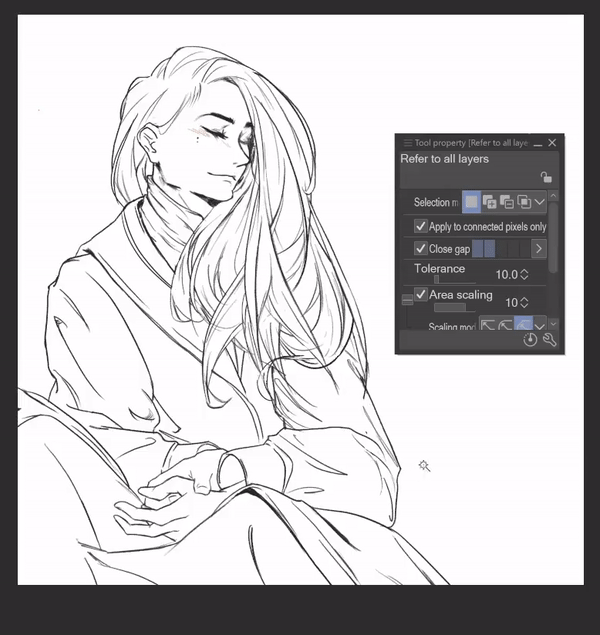
Now, with the transparent color, use the [Fill] tool to unfill spaces within the colored area that will not be part of the silhouette.
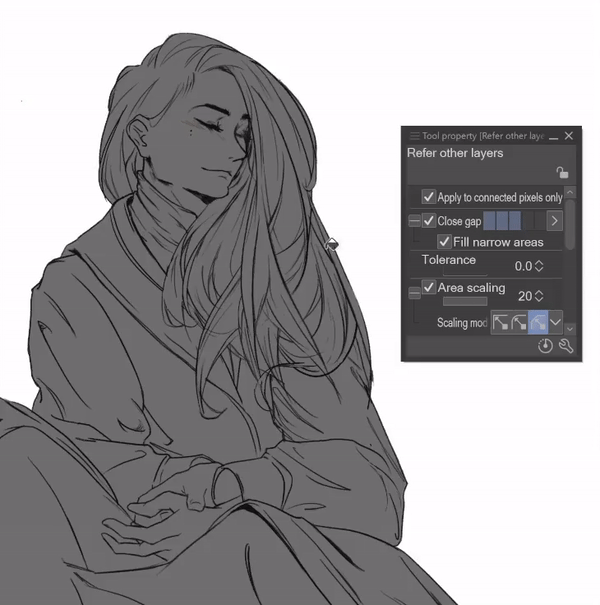
3.5. Filling the Base Colors
First, clip the empty flats layer to your silhouette layer. The base colors will be filled in this clipped layer.
The clipping option is the first option in the second row of the [Layer] palette and the clipped layer has a red bar next to it.
Depending on how simple or complex your line art is, you will need to switch between the sub tools seldomly or frequently.
My line art in this drawing has both simple areas, like the coat and frock, and complex ones like the hair and high neck.
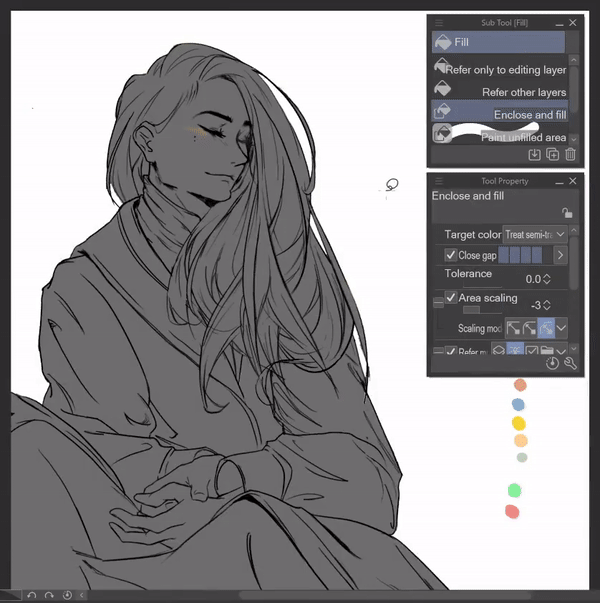
For large complex areas, the [Enclose and Fill] sub tool does a very quick job.
For simple areas, the [Refer other layers] sub tool is very efficient.
For small areas, especially complex ones, the [Paint unfilled area] sub tool works great.
3.6. Filling Complex Areas Like Hair
For filling the complicated hair and high neck, I have used the [Enclose and fill] sub tool.
Any additional filled areas were quickly unfilled using the three above mentioned sub tools with transparent color.
3.7. Filling Large Simple Areas Like Skin and Coats
For large and simple areas like the face and simple clothes, the [Refer other layers] sub tool allows you to fill color quickly.
If it leaves some small unfilled areas, don’t worry about them yet and keep filling the main areas.
We will come back to these areas and fill them using the [Paint unfilled area] sub tool.
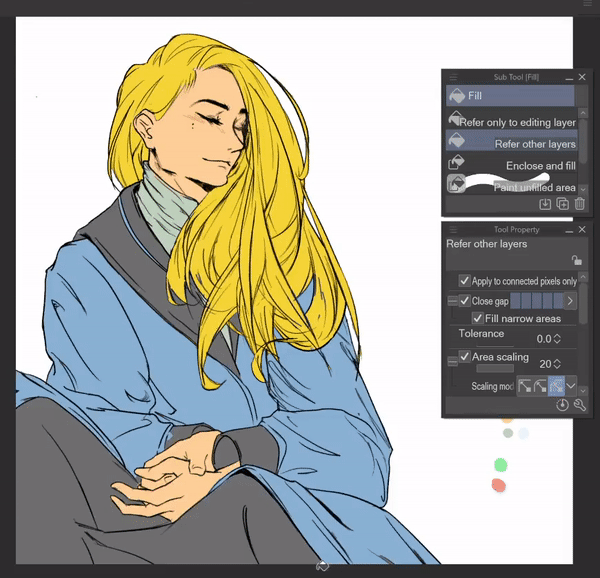
3.8. Checking For Missed Areas
After filling in our base colors, we will check for any small areas we may have missed.
For this, go to your silhouette layer to which the flats layer is clipped.
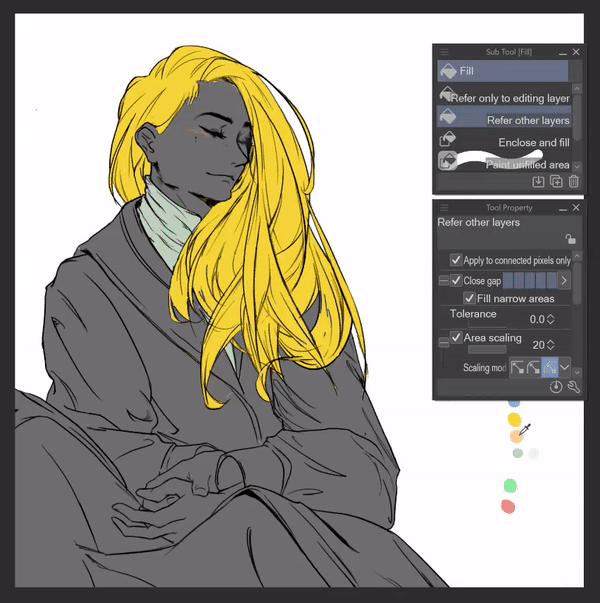
Pick a bright neon color and use the [Refer other layers] sub tool with the [Apply to connected pixels only] setting turned off and click inside the silhouette.
With this, all the empty spaces within your layer of flat colors will jump out and become prominent.
Using [Paint unfilled area], and the eyedropper shortcut, Alt, fill in these areas with the appropriate colors in the clipped flats layer.
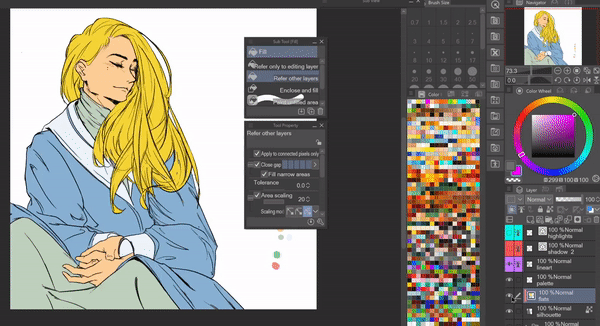
3.9. Changing Base Colors
Once all colors are laid in, you can easily experiment with changing them by turning off the [Apply to connected pixels only] setting in the [Refer other layers] sub tool and clicking on whichever base color you want to change to a selected color.
This makes changing your color palette very quick and easy and you don’t become restricted by the colors you have laid down.
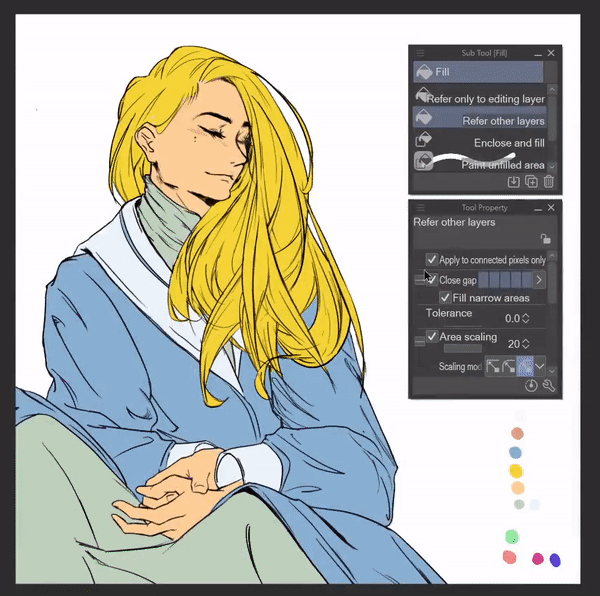
Note: In this step keep the tolerance zero to not let a color bleed into another’s area.
3.10. Harmonizing the Base Colors
Right now, the colors are standing out individually. To make them come together, we will cover them with a solid color in a new layer and lower the opacity.
In this case, I am duplicating the silhouette layer, bringing it above the flats layer and lowering its opacity.
You can use the dominant color in the background for this, like the sky’s blue or a sunset’s orange etc. Here I am using bright purple and lowering the opacity to 14.
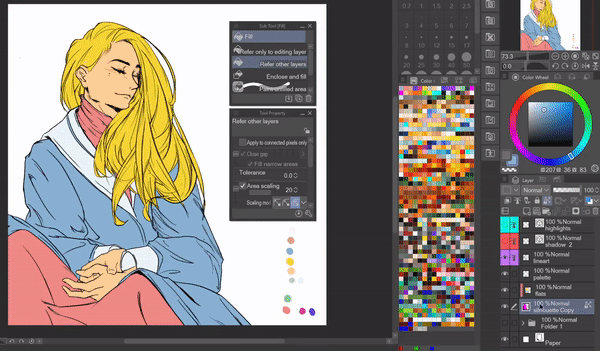
3.11. Adding Shadows
Create a new layer above the flats layer but below the harmony color layer. Set this new layer to [Multiply]. Choose a soft pastel color.
I want warm shadows so I am choosing a soft pastel pink.
Turn on the visibility of your shadows layer where the shadow areas are defined. Fill them in using whichever [Fill] sub tools you prefer.
Turn off the visibility of the shadow guideline reference layer when done and adjust the opacity and color of the shadows to your liking.
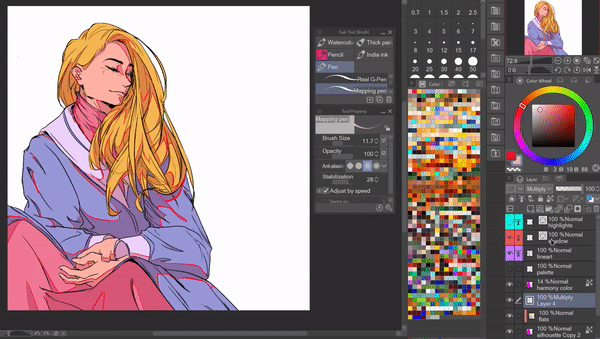
Note: The color of the shadows can also be changed using the steps discussed in Section 3.8.
3.12. Adding Highlights
Create a new layer above your flats layer and set this layer to [Linear Light]. Choose a pastel color for the highlights. I have chosen pastel green.
Turn on the visibility of the highlight guideline reference layer and fill in those areas.
When done, turn off the visibility of the guideline layer and adjust the opacity of the highlights to your preference.
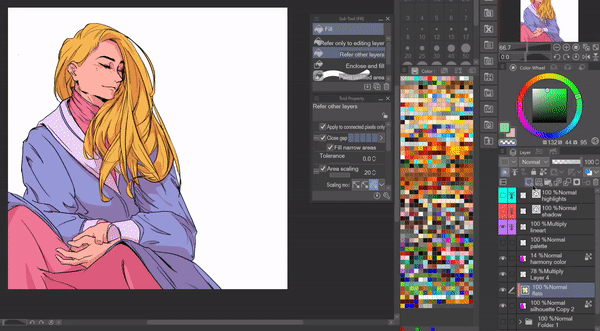
3.13. Simple Background
To complete the cell-shaded illustration, we will add simple depth by adding a shadow.
For this, duplicate the silhouette layer and bring it above all layers. Using the object [Operation] tool drag it to where you want it.
Change its color as per preference. I have changed mine to a pale pink to resonate with the brighter pink in the illustration.
Then bring the layer to the bottom of all layers.
Tip: If the silhouette is not of a solid color when you drag it out, use the [Auto Select] tool method mentioned in Section 3.3 to make it of a solid color.
Cell shading with the [Fill] tool ends here, but you want to add additional depth and color variation to your illustration, you can follow this additional step:
4.0. Additional Step: Adding Depth and Color Variation with the Airbrush
Put all current layers in a folder. Create a new [Multiply] layer and a new [Linear light] layer above the folder and clip them to the folder.
Airbrush with a light color, like yellow and orange, around the top of the illustration in the [Linear light] layer.
Airbrush with a darker color, like dark blue, around the bottom of the illustration in the [Multiply] layer.
Adjust layer opacity as you see fit.
Tip: If you want color variation in the line art you can change the line art color by clipping a new layer to the line art layer and airbrushing it.
You can also add a little more color to the cheeks and lips using the airbrush in the flats layer.
Final Thoughts
This is all for the tutorial. I hope you liked it and learned something new and interesting through it. The Fill tool isn't just restricted to being used to fill base colors and that is something I really love about it.
Thank you for reading and if you would like to contact me you are welcome to reach me through my Instagram handle @s.naaima.


댓글