【Naoki Yoshibe interview】 Make an animation in a month! [Advanced]

-
 MVP ◆This user has contributed greatly to the management of the community, by posting many great responses to the questions asked. Once every three months, MVPs are determined based on the points earned during that period and will be recognized accordingly.
 -
 New Valuable Player (NVP) ◆These are the next-best contributors to the community after MVPs. This is awarded to users who have not yet won an MVP award, based on the number of points they have earned.
 -
 Official Expert ◆Chosen out of all MVP awardees, who are already proof of excellence, this is a testimony of outstanding correspondence in the community. After careful screening, they are appointed by CELSYS and assume their position.Note: Formally called “Evangelists”
 -
 CELSYS official moderators ◆Moderators are official CELSYS staff members who are fluent in Japanese as well as various other languages. As moderators are not experts on software or creative work, they will not be able to directly answer your questions. However, moderators will provide communication and language support to ensure that everyone can smoothly communicate with each other.
 -
 CELSYS officialThis is the official administrator account.
Mr. Naoki Yoshibe, a famous animator, has agreed to give a lecture on how to make an animation in a month in interview format.
Sharpness: the secret of motion! Putting thought in every frame
- In this advanced lesson, I’d like to know more about practical techniques. To start off, can you tell us more about the introduction of the animation?
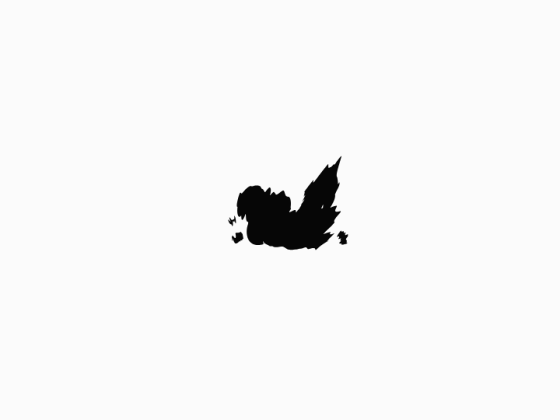
First, I wanted to express smooth movement and the cuteness of the girl. I initially had two versions, but I chose the ver1 because I thought it better matched the theme. It was also more dynamic than the ver2.
▼ From the left, ver1 and ver2.
- I see, ① is bolder and it feels good to look at.
The basic flow of this animation is: a girl comes from the background, crosses across the foreground, and boom, lands. Instead of just moving the camera, I also decided to add plenty of effects.
Effects add information to motion, so it is a technique that I want to recommend to beginners. In this animation, I’ve added very fast smoke trails as the girl passes by. I think you can feel the flow of the smoke with just these movements.
- It really starts to look like an animation once the effects come in.
The downside is that there aren’t a lot of shortcuts you can take, and you’ll have to learn through trial and error (laughs). The easiest thing to do is to refer to pre-existing works. Observing nature carefully is good too.
Basically, animation is about how you fit the movements of nature into frames. For example, the cross-shaped flash at the beginning is a stylized expression of lens flare and halation.
Note: Flare and halation are visual artifacts caused by light refractions in a camera lens.

So in order to actually show the flash rotating clockwise, I immediately moved it a lot, and slowly eased out. I mentioned it in the basic lesson as well, but contrast in motion is important in all animation, not just effects.

Like this animation, I make sure to adjust the speed of the movements throughout the animation. Let’s look at the section where the girl passes in front of the screen.
I focused on expressing the depth of the screen, and the speed when the girl passes in front of the camera.
Imagine footage of an F1 race. Although the actual speed doesn’t change, the perceived speed of a car passing in front of a camera and the speed of a car at a distance are different. A car that’s far away seems like it’s gradually closing in on you, but once it’s in front of you, it’s gone in an instant.
I’m reproducing that feeling by using hold frames and skipping frames.
- So is this the reverse of what you did with the explosion effect in the basic lesson, where you “start off fast”?
In the end, it depends on where you want to focus on. For example, lets look from the flash to where she passes the camera.

For a while, the girl is moving slowly, using double frames (i.e. her size doesn’t change that much between frames).
Note: Frame ... Unit of images needed to produce one second in animation. Here, each frame is repeated twice.

But as she gets closer, the interval between the frames becomes shorter. Here, she is animated on ones, and the previous frame’s silhouette changes rapidly... I’m drawing the most when she passes the camera.
To do this, I start by animating on fours (6 frames per second). I insert another frame when inking, so I end up with an animation on twos(12 frames per second). When she passes in front of the camera, I go further and animate on ones to give the impression of speed.
- I see. As an amateur, I thought that the fastest part would need less work because it’s over so quickly... I made a simple animation, is this what you mean?
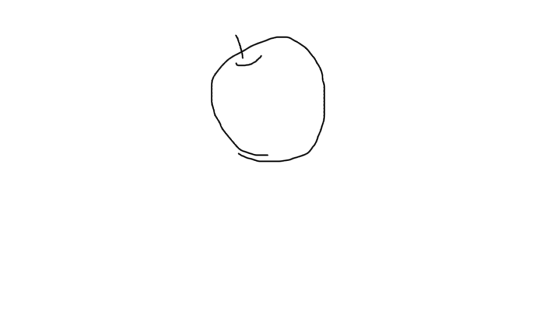
- When drawing on fours for a 24 frame per second animation, I started by holding each image for 4 frames.
Image 1 and 2 are drawn on sixes and held for 4 frames, as the apple is just falling. I animated on twos after the apple hit the ground in image 3 and 4, to highlight movement and shape transformation. On frames 5 and 6, I animated on ones to highlight the bounce.
As the silhouettes of 7 and 8 don’t change much, I went back to animating on twos. For the remaining frames, I held on the blank 9.
Making it myself, I see how important it is to adjust the number of frames depending on the movement and silhouette you want to highlight.
If each image was held for the same length, this animation would be ruined. We’ve said it multiple times, but “contrasting movement” is crucial.
Since movements can ultimately be shown with a changing silhouette, it’s best to focus your efforts on sections with dynamic movement. Although it is important to draw each frame with care, I’d like you to use various timing and expressions and then work on contrast.
- Are there any other points you want beginners to be aware of?
It is better to avoid equally spaced movements, except when you’re going for a specific look. For example, let's see the girl flying in at even intervals.

The timing doesn’t match at all. So even if you’re dividing 1 second evenly, it’s better to focus on a motion. Holding back the motion and adding rhythm is sometimes better than obsessing over details and smoothness.
Another thing. It’s a bit hard, but you should lie in your images. It’s important to be able to confidently fake things. For example, the frames in which the girl comes down are lying, as I haven’t strictly drawn in the right perspective. But you won’t see that when it’s in a sequence.
These little lies are also based on trial and error, and observation of nature. It might be good to explore the boldness and expression unique to animation.
- What motivated you to seek this kind of boldness in your work?
I saw Masaaki Yuasa’s animation and thought, “So, you’re allowed to do that in animation”. My effects are directly influenced by his work. Other examples are Yoshinori Kanada, of course, and director Hiroyuki Imaishi’s work and keyframes. Kaneda’s drawings sometimes have impossible forms, but they all come from close observation of nature and the world. I studied them by replicating their animation frame by frame.
I’d like people to just start out by watching many different animations and realize that they can freely draw what goes into animation.
- Do you have any words for people who are just starting out?
It’s important to just start something. I think that the process itself is important. Give shape to your imagination every day, and sooner or later you’ll make something that you’re really proud of.
The more you practice, the better you’ll get, so start by drawing a line!
- Thank you for today!
We’ve covered how to make animation over basic and advanced lessons! Don’t you think you can make an animation too?
【Yoshihiro Yoshino interview】 Make an animation in a month! [Basic] is here
【Yoshihiro Yoshino interview】 Make an animation in a month! [Extras] is here
■ Artist profile: Naoki Yoshibe
Former Kamikaze Douga Co., Ltd. (2011-2016), currently freelance. Works include various anime shows, music videos and promotion videos. A self-proclaimed “Doodle GIF man”, he is especially known for his short GIF animations on Twitter.
“Short animation making course -Naoki Yoshibe works by CLIP STUDIO PAINT PRO / EX”
Author: Naoki Yoshibe
Publisher: Gijutsu-Hyohron Co., Ltd.
▼ Book information (Japanese only)
Interview provided by: Project BIGSHIP
Users who liked this post


Comment