DRAWING WEBBED WINGS: BASICS
INTRO TO WEBBED WINGS
Hello! Today you will learn how to construct wings for any webbed creature you may envision(bats included). Although wings can be constructed in any way, this is the traditional way to draw dragon wings.
BASIC ANATOMY OF A DRAGON'S WING
This is a simple structure drawing I did of a dragon's wing. The blue color is the bone, and the black is skin and outer layer. i divided up the wing into parts, this makes it sometimes easier to draw, but other times more difficult.
DRAWING THE WINGS: BASICS
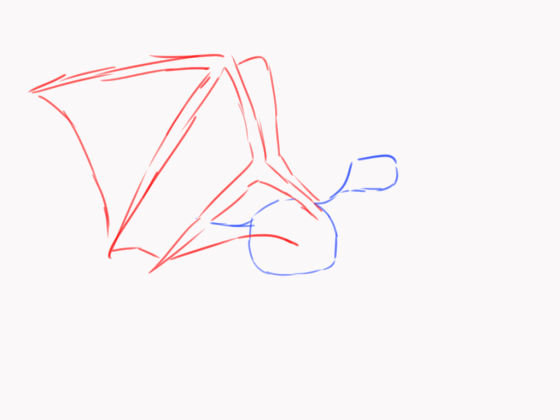
Start with a body, for an example I will use this simple shape as my body.
Now I draw a line from the middle (or sort of the middle) to wherever I feel it should end.
I now draw another line coming from the first line, but this time it will face out, like so:
Once I have achieved this, I draw a third line from the second line, to the end of my body (unless your body is actually a dragon body, then you would do it half way down the tail)
Now our wing is starting to come together.
Now that we have achieved this, we will move onto the rungs, or "fingers (i use this term lightly) of the dragon's wing.
This part is especially tricky, but once you get the hang of it, it will be very easy.
Now, add three lines from where the second and third lines meet.
For the next step, I draw another line from where my second line and my first line touch.
I now have my base for my wings.
I draw the webbing last because it is tying the wing together, and sometimes it is tricky to do this prematurely.
Now that our rough sketch is done we move onto our polished sketch.
POLISHED SKETCH
Your polished sketch should look something like this:
It's fine if it doesn't this is just the way i draw it after all.
Notice how the wing rungs go down is mostly a straight line (mostly)
Once we have our polished sketch, we move onto the claws at the end of the rungs.
The claws can be any shape, I personally like many different varieties of rung claws.
Here are some example for ones I have come up with in the past.
Now that I look back, a couple of these look like bug legs. oUo
Once I have chosen which ones I want to use for my dragon's wings, I now draw them onto my polished sketch.
I now add the claw at the tip of the dragon's wing.
Once this is done, we can draw the dragon's webbing.
This part is challenging, I'm now looking back at my work and thinking "This would be SO MUCH EASIER if I had done a dragon with FULLY opened wings. Well to late for that now, so here it goes.
DRAWING FOLDED WEBBING
Because my dragon's wing isn't opened all the way, I have to make its webbing folded like clothing. I usually try to avoid doing this but I guess it is good practice.
step 1. Connect all of your rungs with webbing.
step 2. Draw lines down the middle of the webbing ( or anywhere down the webbing, doesn't matter that much :)
It should be sort of uneven, so hold that in mind.
Now, connect one end of your line to the rung that its closest to.
It should look something like this.
And now we have a complete wing sketch.
FINAL INKING
Now we ink our wing, and if you would like, color it.
To ink I used this brush:
And there we have it, your own, hand drawn wing!
ANIMATING THE MOVEMENT OF WINGS
To animate the flight of a dragon, I will give this example I made of a dragon flying:

Notice how when the dragon's wings go down, the dragon's body bobs up. This is what I think dragons would fly like, but I'm just guessing, so feel free to do it however you would like!
THANK YOU!
Thank you for sticking with me until the end of this LONG tutorial!!!
If you liked this tutorial please heart me!
If you are still having trouble with drawing wings, here is a 3-D wings study that I found that can be used to help you. If the wings study doesn't help, try this search on tips.


Comment