I'll draw a cool magic circle!
1.First of all
Speaking of magic effects, it is a magic circle, so I will introduce how to draw a cool magic circle using the functions of CLIP STUDIO.
CLIP STUDIO has various tool functions to help drawing and design work. Image material layers, concentric rulers, target rulers, etc. Let's utilize these to create an original magic circle that will satisfy the two hearts of the kitchen.
2, organize the image of the magic circle
First, organize the image of what you want to draw.
Even if you started to say "I want to draw a cool magic circle!", I think there are many people who don't know where to start as an ambiguous vagueness. The following is a summary of the elements of the magic circle that many people would vaguely think "like this".
① A shape like some overlapping circles
② Something like magic characters are studded
③ There is a mysterious symbol in the center
Let's solve these points one by one.
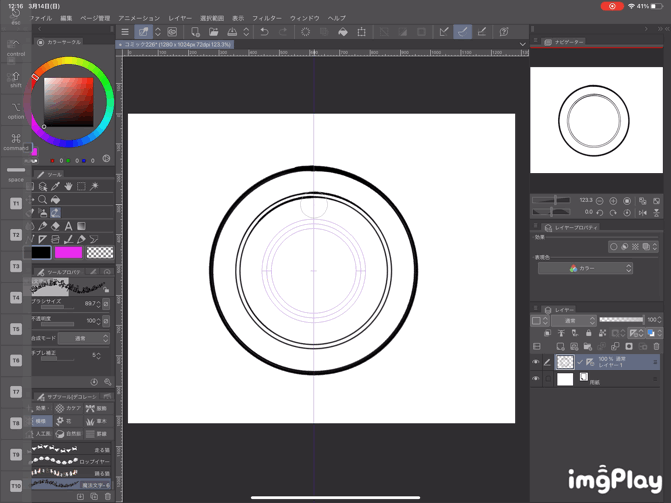
3. Make an outer shape with a concentric ruler

First of all, ① "a shape like some overlapping circles", this will be solved with a concentric ruler.
Open any canvas and make a concentric ruler.
To create a concentric ruler, click the triangle ruler icon on the tool panel and select the special ruler on the sub tool panel. Set the ruler type to concentric circle ruler from the tool panel.
In that state, click and drag the position on the canvas where you want to make a ruler, and you will have a ruler that draws a circle around the specified position.
Let's stack circles around with your favorite brush. Somehow, have you come closer to the image of the magic circle you want?
4. Make a magic character brush
Next, in order to solve (2) "Something like magic characters are studded", make a magic character brush. The process is simple.
(1) Make an arbitrary canvas and write a line of random characters. It is easy to display the grid.
② Select, cut and paste about half of the drawn character string.
③ Move the upper and lower layers to swap the left and right. (The color of the upper layer is changed for clarity.) Use the cursor button to prevent it from shifting up or down.
The left and right were swapped. Adjust the position so that they are exactly on one line, and merge the two layers. This is very simple, but it creates a seamless image unit from side to side.
Layer conversion → change to image material layer and tiling left and right to see how it looks. Is it a beautifully continuous magic character?

Register the created image as a material. At this time, check "Use as brush tip shape". And when you apply it to the ribbon brush, you will have a magic character brush.
In addition to magic circles, it can also be used for spell chanting expressions.

I will use the brush I made for a concentric ruler. It has become quite like that.
For this magic character brush, you can also use a rasterized image by typing in a font. Some pages distribute free rune fonts (please be careful about the contents of the license), so depending on the image you want, you can use such fonts.
It is convenient to make various types of magic characters and use them as brushes. If you write "character-like things" with some regularity by referring to European medieval manuscripts, it will be like that.
At this time, it is important to note that when using characters or images from a culture different from your own as a reference, even if it looks like a mysterious symbol to you, it has some meaning to people in that culture. It may end up.
I was born and raised in a Japanese culture, so I sometimes see works that use kanji as a symbolic image, resulting in strange things that the author might not have intended. .. I don't necessarily feel malicious, but the discomfort often becomes noise, making it difficult to appreciate the work itself.
Of course, I think that many of these things happen in the works drawn by Japanese people.
I think that the response will change depending on the intention of making the work, the scope of publication, how much historical and cultural facts are covered, etc., but personally it is within the scope of my hobby. If you want to draw a fantasy-like image, don't use letters and images from different cultures "as is", but change the shape so that it doesn't make sense at first glance, or make something like that yourself. I have decided.
5. Make a symbol with a symmetric ruler
Next, we will create a symbol to be placed in the center of the magic circle. Geometric figures such as pentagrams and hexagrams will be standard. A symmetric ruler is useful for such drawings.
Here, we will explain how to use the symmetric ruler, taking as an example how to draw the standard pentagram.
First, how to make a symmetric ruler. Click the triangle ruler mark from the tool properties and select the symmetric ruler from the sub tool panel. In the Tool Properties panel, select the number of axes of symmetry and whether to make it line symmetric. If you do not check line symmetry, it will be rotationally symmetric.
After making the settings so far, click any position on the canvas to determine the center and drag in the direction of the axis to create a symmetric ruler. If you want to create a vertical ruler, hold down the shift key while dragging vertically.
Even if the number of axes of symmetry is the same, the figure that can be drawn will change depending on whether or not the line object is checked.

First, when there are two axes of symmetry and line symmetry is checked. Symmetrical lines are drawn so that they face each other with the created ruler line as the axis. This setting is useful for taking the shape of dishes, vases, etc.

When there are two axes of symmetry and the line target is not checked. You can draw a figure that looks like it is rotated with the axis of symmetry in between, starting from the center of the ruler. This is useful for drawing the shape of an airplane propeller.
It is a very useful tool when you get used to it and can make appropriate settings for what you want to draw.
Now, let's make the necessary settings to draw a pentagram.
Make a square canvas of any size.
Display the grid and find the center.
Make a concentric circle ruler in the center and draw a circle. It is a guide for the size of the pentagram drawn by this circle. Hide the concentric ruler and make this layer a draft.
Make a symmetric ruler from the center of the canvas. There are 5 axes of symmetry. If the number of axes is odd, the line symmetry check is automatically unchecked and rotationally symmetric. Here, it is traced with a pink line to emphasize the axis of symmetry.
Now you are ready to draw the pentagram.
Let's draw a pentagram.
(1) Create a vector layer and pay attention to the intersection of the draft circle and the axis of symmetry. Connect the skipped points with the straight line tool. At this point, you have a simple one-stroke pentagram.
② Connect each vertex of the pentagram with a vector line connection. That way, the corners will come out more beautifully.
It is possible to complete it at this point, but since it is a big deal, let's add a little more decoration.
③ On the axis of symmetry, pay attention to the point slightly inside, and connect them with a straight line in the same way. Let's connect these vertices with vector lines.
④ With the vector eraser set to "up to the intersection", erase the overlap of the positions circled in red. A pentagram with the contours of the double lines intertwined is completed.
The same procedure was used to stack another pentagram on the inside.
The state with the fill added. Add various arrangements and register the materials for each of the completed symbols.

Another method is to use a symmetry ruler with 10 axes of symmetry and a check mark for the line object.
In this case, you can make a star shape like lace paper just by drawing it appropriately.
You can create innumerable types of motifs by arranging such things as combining line symmetry and rotational symmetry, rotating and overlapping drawn motifs, adding fills and organic decorations, and so on. If you can make something you like, register it as a material.
By the way, in the case of a six-pointed star, you can draw with a symmetry ruler with 6 axes of symmetry unchecked, or with a symmetry ruler with 12 axes of symmetry.
You can make up to 16 axes of symmetry, so please find your own arrangement to see what kind of figures you can draw.
6. Complete the magic circle
Once this is done, the rest is easy.
It depends on the combination of the concentric ruler and the base made of magic letters. The more motifs you have in stock, the more variations you can make.
It is a good idea to stock the magic circle itself as an image material.
7, other arrangements
Here are some other types of arrangements.
If you get used to making a type with a symmetric figure motif on a circular base, try removing some symmetry or combining multiple types of figures to get an elaborate impression.
I think that the motif in the center is a classic image of celestial bodies such as stars and the sun, but here we are designing a place where creatures like dragons are intertwined. Roughly designed and transcribed using a 4-axis, rotationally symmetric symmetric ruler.
It is a place where the stocked magic circles are combined and made to emit light.
You can refer to various things to draw a motif that creates a mysterious image. I often look at Celtic patterns, Islamic architectural decorations, and alchemical motifs. However, when referring to them, I think that the same consideration as when using letters is necessary.
It depends on the content of the work and the place where it is presented, but when referring to the religious motifs and ethnic designs of each country, even if it is an ancient work without a signature, it can be used as it is. It would be safer to avoid it. Please think about how to deal with the reference according to your own needs.
8. Conclusion
What do you think? I hope it will be a hint to draw your ideal magic circle.


Comment