
Hello! Today I would like to share my process of creating an illustration using watercolor brushes in Clip Studio Paint.
Clip Studio Paint has a wide range of textured watercolor brush that really brings the feel of the traditional watercolor art to your digital process. It makes it more convenient to explore your style with watercolor brushes.
I have also made a speedpaint video using the in built timelapse function in Clip Studio Paint which you can see below:
1. Base Sketch
Sketch out your idea for the illustration, I like to use the pencil brush for this
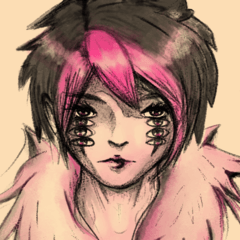
2. Lineart
Clean up your sketch and create a firm lineart
3. Skin Coloring
To start off I like to use "먹는빵simple water" brush by CSP user Bakery00 for base coloring
Start off with full opacity with the darker areas where you would put your shadows, then turn down the opacity of the brush to 20-30% to fill in the rest of the area
The principle is similar to traditional watercolor where your first wash will be darker than the next lighter wash.
Add in details of more shadows to define the features more prominently such as highlights, secondary colors, blush, and lip color
4. Clothes
Color in the clothes with broad strokes. I like to use CSP's "round watercolor brush" for this for the texture it gives.
Adds in defining shadows and secondary colors (corresponding with the secondary colors you used on the skin as well) with the previous "먹는빵simple water" brush.
5. Highlights
Use a Pen brush on a different layer to create harsh white lines to create defining highlights. This adds to the texture of the clothes and hair.
6. Background
I use the "round watercolor brush" again to paint the background. Mimicking the way you would simply blob your watercolor brush on paper, create big dots of varying colors corresponding to the secondary colors and light colors you use in your illustration, or any color that complements it.
7. Effects and Touch Up
To add to the melancholy feeling of the illustration, let's use the Effect brushes in CSP.
I used the "soft circle" and "sparkle" brushes here.
Typically you will put the effects where you would usually put highlights, or near areas you want to focus on.
And we are done!
Thank you so much for reading I hope the article could be of use to you.
Users who liked this post


Comment