
This tutorial allows beginners to learn and master practical lighting skills from the simple to the deep by explaining the basic geometry and character light and shadow knowledge and basic lighting.
After following this tutorial, I believe you will have mastered basic lighting techniques. Using this knowledge, the characters and scene atmosphere can be better rendered in actual painting, and the management and application of layers will also be easy to grasp.
■ Basic skills explanation (light and shadow of geometry)
1-1. Create layers
First, we need to do a little planning. Prepare for the next painting job by creating, reserving and arranging each layer and folder.
You can follow up with the example below. When you are familiar with each step in the picture, you can make appropriate adjustments according to your needs.
Now let's pick up the brush and start drawing geometry ^o^.
First, prepare the folders and layers, and the next steps will be as easy as filling in the blanks.
▼Line art (100% ordinary)
         Lineart/Cube (25% Normal)

        Line Art/Projection (3% Normal)
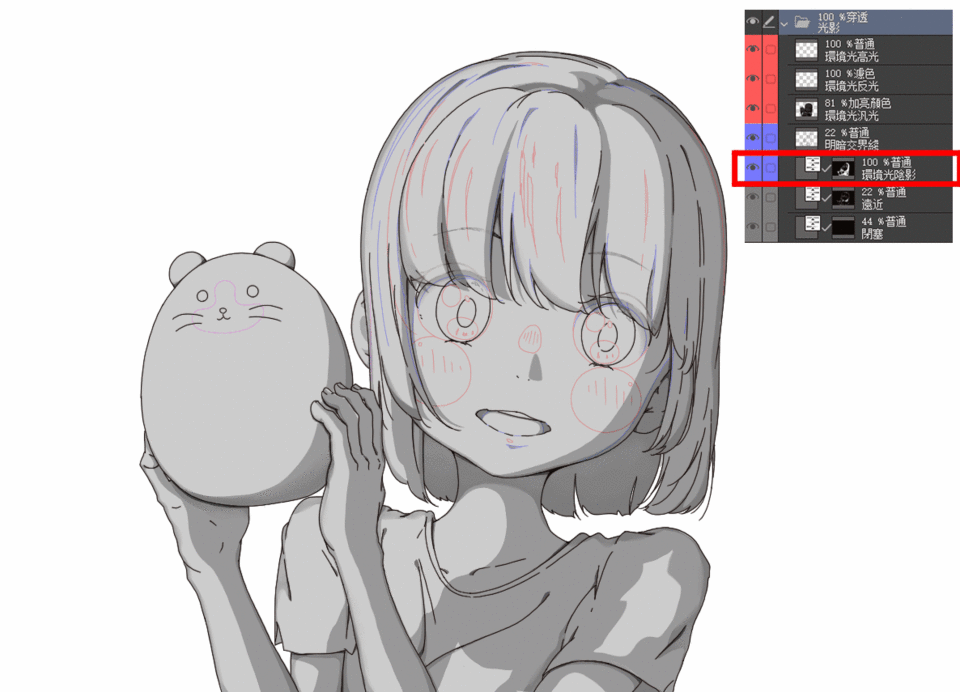
▼Light and shadow (100% penetration)
-------------------------------------------------- --------------------------------▽ Light part
         Ambient Light Highlights (100% Normal)

         Ambient Light Reflection (15% Color Filter Screen)

         Ambient floodlight (100% highlight color Color dodge)
-------------------------------------------------- --------------------------------▽ Ambient main light source shadow
         Light and dark boundary line (100% normal) (new correction layer--Hue/Saturation/Luminosity)

         Ambient key light shadow (100% normal) (new correction layer--Hue/Saturation/Luminosity)
-------------------------------------------------- --------------------------------▽ Diffuse reflection and shadows from near and far
         Far and near (100% normal) (new correction layer--Hue/Saturation/Luminosity)

         Occlusion (100% normal) (new correction layer--Hue/Saturation/Luminosity)
▼Background color (100% normal)
      |Color (100% Normal)

        cube

        ground
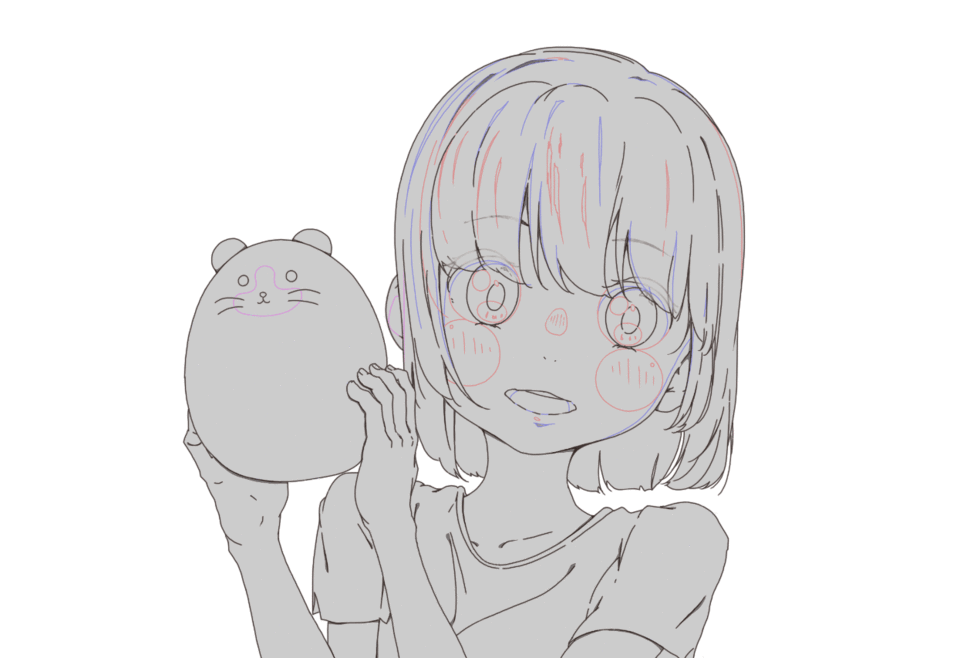
You will notice from the layer creation that we divided the shadow into two parts, a total of 4 layers.
1. Diffuse reflection and shadows from far and near are marked in gray in the figure;
2. The shadow produced by the main light source of the environment is marked in blue in the picture.
The light is divided into one part, a total of 3 layers, which are marked in red in the picture.
In the following production process, we will gradually understand the light and shadow content corresponding to these layers.
1-2. Line art & background color
·Line draft
Next, we prepare a line draft of the box and its projected range.
Now that we're ready, let's paint the diffuse reflections and shadows from near and far.
·Grayscale planning^v^
Before drawing shadows, we need to plan the grayscale range of an object: in general, for an object with a matte surface, the color of the shadow is generally in the middle of the natural color and pure black. For example the following picture:
The first white (v=100) frosted surface sphere, its shadow has a v value equal to 50 (v=50);
The second darker frosted surface sphere, with an intrinsic color v value equal to 50 (v=50), and its shadow with a v value between the intrinsic color and black, with a v value equal to 25 (v=25);
The darker the object, the less the grayscale change, and the brighter the object the more grayscale change.
·Background
Fill in the base color in the base color layer, here we use a grayscale of 80 lightness.
Note that we are not in a hurry to add color here, but first create an overall grayscale image of the object on the screen.
Before we have mastered the color, adding color to the picture will affect our visual judgment, which will increase the difficulty of drawing in subsequent adjustments. Or inadvertently mix colors on other layers and cause irreparable damage.
Therefore, preparing grayscale images in advance can improve the drawing efficiency of artists and reduce unnecessary waste of time.
1-3. Shadow part (4 layers)
When we draw light and shadow, we must first consider shadows, discard some complicated theories, and divide all shadows into 4 layers to make them.
Occlusion (AO/Ambient Occlusion)
Generally, it is a place where the light is difficult to reach, and the shadow of the object in contact with the object;
Far and near (diffuse reflections and shadow transitions caused by the distance of objects)
In general, objects closer to us will be brighter, and objects farther away will be darker;
· Shadows from ambient light sources
After confirming the direction of the light source, use the new tone compensation layer to draw the shadow of the cube and shadow;
·Boundary line of light and dark
Continue to add a layer to the darkest part of the picture to distinguish light and dark.
1-4. Light part (3 layers)
· Ambient floodlight
Fill the canvas with pure black, and then draw the bright part of the illuminated object with a grayscale that is higher than pure black; pure black (HSV/000) layer blending mode: brighten color
·Ambient light reflection, generally reflected light from the ground and adjacent objects. Add at the edge of the gray surface;
·Ambient light highlights
Use pure white to make highlights on the basis of floodlight;
1-5. Adjustment & Colorization
· Soft & Transition
Use color blending to soften the edges of the layers so they come together naturally.
coloring
In this way, the light and shadow shaping on the geometry is complete! In the following pages, we will explain how to apply this method to characters.
■ Light and shadow changes of characters
We have learned the basic lighting techniques of geometry. Next, let's take a character as an example to see the effect of lighting in different directions on the work.
Sometimes it is difficult for us to do all the shadows at once. We can split the shadows of the characters into two parts, which can create richer and more varied shadows.
Here I select a few of the more commonly used lighting to explain.
There is a completed line draft at the bottom of the tutorial, you can download it by yourself and perform lighting practice ^v^.
2-1. Diffuse reflection and shadows from near and far
Imagine putting a character in an environment with no clear primary light source. Here, we don't need to consider the light source, we only need to draw occlusion shadows and shadows generated by diffuse reflections.
2-2. Shadows generated by the main light source of the environment
Draw shadows from the main light source.
● Summary: Draw two simple shadows separately, as long as they are combined, you can get a rich grayscale image.
2-3. Different situations of the main light source of the environment
· Front light
The object is uniformly illuminated, and the overall is relatively soft, suitable for softening the shape of the object, without strong contrast, it appears relatively flat, and the performance of the volume is relatively weak;
· Side light
The shape of the object is highlighted, the three-dimensional sense is strong, and the details are sometimes lost;
·Top light
The contrast is strong, the key points are highlighted, and it can also create a sense of holiness and mystery for the characters;
·Bottom light
Horror atmosphere, funny expressions, create unique visual effects;
·Backlight (backlight)
Generate beautiful contour light, which can enhance the texture of transparent or translucent objects, and also enhance the visual impact of the picture;
The above main light source changes are as follows:
■ Character drawing process
3-1. Draw the shadow part (4 layers)
·Diffuse shadow rendering
1. Create folders and layers and name them. It is more convenient to create separate folders for line art and color art;
▶Line art (100% normal)
▼Light and shadow (100% penetration)
Ambient Light Highlights (100% Normal)
         Ambient Light Reflection (100% Color Filter Screen)

         Ambient floodlight (100% highlight color Color dodge)

         Light and dark boundary line (100% normal) (new correction layer--Hue/Saturation/Luminosity)

         Ambient key light shadow (100% normal) (new correction layer--Hue/Saturation/Luminosity)

         Far and near (100% normal) (new correction layer--Hue/Saturation/Luminosity)

         Occlusion (100% normal) (new correction layer--Hue/Saturation/Luminosity)
▼Background color (100% normal)
         Hair (100% normal)

         Skin (100% normal)

         Clothes (100% normal)

         ......
2. Fill the layer under the line draft layer with a gray background. Here, I set the grayscale of the brightness to 80; layer the gray background for each part, such as: hair, skin, clothes...
In order to avoid the situation where the boundaries of each part cannot be clearly distinguished when filling, and the filling and painting are wrong, you can first use different brightness to distinguish the parts, and finally unify the brightness.
! ! Light and Shadow Folder Layer Blend Mode: Through
3. When we are ready, let's draw the diffuse reflection and the shadows generated by far and near;
Occlusion, far and near, all use the new tone compensation layer, set to hue·chroma·lightness, which is convenient for post-adjustment (in this stage, all grayscales are first placed above the background color folder, and later to be adjusted more carefully, you can put grayscale is placed on top of each base color layer that has an inherent color);
 Far and near (100% normal) (new correction layer--Hue/Saturation/Luminosity)

         Occlusion (44% normal) (new correction layer--Hue/Saturation/Luminosity)
▼Background color (100% normal)
#Occlusion layer: Draw the deepest shadow of the contact part between the object and the object;
#Far and near layers: Draw near and far shadows. Normally, objects closer to us are brighter, and objects farther away are darker; (note that the shadows will not be very deep without the main light source we are painting now.)
When painting, you can maintain clear edges, and finally adjust the overall, using the blending and skewing tools to make soft and hard edges.
Using the base color layer as the reference layer, it is easy to draw shadows by smearing with the paint bucket.
Diffuse + shadows from near and far:
· Paint shadows generated by the main light source of the environment
#Ambient light shadow layer: draw the overall shadow,
Create a new tone compensation layer and set it to Hue, Saturation, Lightness, which is convenient for later adjustment;
Ambient key light shadow (100% normal) (new correction layer--Hue/Saturation/Luminosity)
#Boundary line layer of light and dark: draw the transition between the bright part and the dark part, and set it as Hue·Chroma·Brightness, which is convenient for later adjustment;
Light and dark boundary line (100% normal) (new correction layer--Hue/Saturation/Luminosity)
3-2. Paint the light part (3 layers)
#Ambient light flood layer: first fill the canvas with pure black, and then draw the bright part of the illuminated object with a grayscale with a higher brightness than pure black; pure black (HSV/000) layer blending mode: highlight the color
Ambient floodlight (100% highlight color Color dodge)
#Ambient light reflection layer: draw the reflection of the object;
Ambient Light Reflection (100% Color Filter Screen)
Generally, a solid color with a concentration of 100 is used for reflection. It should be noted that when dark objects reflect light, the layer blending mode is generally normal; light-colored objects are reflecting, and the layer blending mode generally uses filter color.
#Ambient light highlight layer: generally use pure white with a concentration of 100, layer blending mode: normal
Ambient Light Highlights (100% Normal)
The above are several basic layers of ambient light, you can also add layers according to your own works. Note: It is best to finish the light and shadow of the basic layer first, and then add layers according to the overall effect.
Drawing of ambient light:
Finally, make soft and hard edges and adjust local details.
■ coloring
#Create a clipping mask for the layer above the gray background;
#Fill the inherent color with a layer on the gray bottom;
|Color (100% Normal)
# Adjust shadow parameters on a new tone compensation layer for diffuse shadows and shadows from ambient key light sources.
Ambient key light shadow (100% normal) (new correction layer--Hue/Saturation/Luminosity)
^o^ Done!
ps: After coloring, you can create a new effect folder on the light and shadow layer, and add several layers of effects, such as sunlight, sky light, reflected light of the background, some shape effects, etc....to make the picture more vivid.
The text does not mention the layer blending mode, the mode is normal. I hope this article was helpful to you, and good luck!
■ Updates & corrections
*Thank you for your likes and favorites. With more views than expected, I decided to take the time to revise this tutorial and add a new table of contents detailing how to revise the paintings. Improve the overall finish and make it look more beginner friendly.
*Two videos are being planned to talk more about this method.
5.3
◆ Add a new directory; can better locate each step;
◆ List the key content of the layer image in words, and further explain the division intention of the layer;
◆ Change the position of the grayscale plan, the new position is in "1-2 Line Art & Background Color";
◆ Added & corrected the noun explanation in "1-3 Shadow part (4 layers)";
◆ Changed the picture description in the "● Summary" section in "2-2 Shadows produced by the main ambient light source" to intuitively understand the two parts divided in the shadow layer; remove the case of highlights in the combined shadow map.
◆Replace image - fix the problem that the character eyebrow layer is not opened;
◆Replace picture - fix character ears;
◆Various gif corrections;
5.4
◆Replace image - geometry shadow range/transition issue;
◆Replace image - increase the grayscale of the ground part of the geometry;
Users who liked this post


Comment