
♦ ️Writing & Revising & Attention - In the process of work and business adjustment, the update is temporarily suspended!
·230407 15:27 The detailed content has been basically completed and is being revised. Words are being mulled and optimized to make sure other language (auto-translated) versions don't look too difficult.
· 230407 18:26 gif is trading off compression and clarity. Some gifs are being remade. Due to the long process and many details, the length is relatively long.
·230409 16:27 Added part of the content of using 3d puppets and automatic shadows during the setting process. The specific content will be adjusted according to the details in the actual production video. Some materials and gifs are being exported and organized.
·230413 13:35 According to the video record produced, after the layout is added, the inspection/correction process is completed. The video material for the follow-up content is being suppressed.
·230419 1:37 is adding layout layered display content. Express the role of layout more intuitively.
■ It is strongly recommended to use the button in the lower right corner, after reading, you can go directly to the table of contents. Directory is being optimized.
■At this stage, it is still planned to carry out the content until the end of Layout. Considering that the content is too long to cause reading trouble, it is decided to divide it into three parts: "top", "middle" and "bottom".
————————————————————————
·The content and methods shared in this tutorial are summarized by me in combination with actual production experience. It can provide a certain process reference for "individuals" or "small teams of 1-3 people" to make animations.
·If you want to enter the animation industry, the overall process will not change much, but the details will be completely different and much more complicated. Please refer to the customary flow of each production company to learn.
·There are many functions in this tutorial that can only be realized with clipstudiopaint EX version. For example, use an animation file to directly create a storyboard. Although I highly recommend using the ex version to make animations, please make adjustments according to your own situation.
For reference, the minimum configuration device I use in production is iPad Pro2018.
foreword
Hello everyone, I'm max, it's a pleasure to meet you here.
Thank you for your endorsement of the previous article in this series.
This is the second issue of the actual combat series. I will take the actual work as a case, start from scratch, and share with you step by step how to make a magic animation shot.
🌟 Goals
This time, the actual production content will be carried out until the "production of design drawings (LAYOUT)" part.
The goals to be achieved are as follows:

And the flower effect magic to be used in this layout.
Originally, the process should be counted in the original painting, but after drawing this shot, because I want to judge the basic effect, I first make a sketch in the layout stage to predict the overall effect of the picture.

The content of the next issue will start from the original painting until the end of the production. If the length is too long, there will be some adjustments. stay tuned
■ Basic flow of animation production
Although there are many animation production processes, for individual producers, the process is mainly concise and clear.
I like to simply summarize the basic process of animation into 6 parts.

If you want to make animations by yourself like me, and occasionally cooperate with relatives and friends, you can try to continuously optimize the process and use simple and efficient tools.
Fortunately, clipstudiopaint can help us with most of the process.
·—1. Conception—script, storyboard, setting
We need to do three things well at this stage:
1. Set the story down;
2. Draw the story into pictures, roughly determine the duration of each picture and the whole story, and record the time information;
3. In the process of creating stories and storyboarding, make some simple settings for the main characters, and finally determine the settings of the characters and the environment.

Note that this stage does not require detailed depiction but focuses more on storytelling.
The painting of the soul can help us quickly record the pictures in our minds.

·—2. Make design drawing (layout)
After our story, storyboard, and settings are basically determined, we need to refine each shot to a certain extent.
Generally, it may take about 70-130 shots to make a small animation episode of about 5 minutes, and we need to refine them one by one. Although it looks like a lot, in fact, as long as we finish them one by one patiently, a complete work can be produced.
So we need to focus on the picture expression of each shot next. You can start by picking your favorite scene from the storyboard, so that every time you complete a sketch of a scene, you will have a sense of accomplishment and motivate you to keep doing it.
Before formally producing the picture of each shot, we need to make a design drawing according to the situation of each picture. This design drawing is called Layout.
It can help us predict all the things that need to be done in the next process, so as to prevent us from taking detours.
At this stage we need to do 4 things:
1. According to the story, we need to refine it on the basis of the storyboard, grasp the space, composition, and proportion of the characters, and see the basic effect of the picture;
2. According to the needs of the picture, design the detailed method and process of drawing and production. For example, distinguish between dynamic and static layers and so on.
3. Adjust the specific time required for the screen, and determine the duration of each screen.
4. Organize and explain the above details in words to prevent us from forgetting some specific details.

·—3. Painting
In the painting stage, we only need to complete the painting according to the layout design. Painting is generally divided into three parts: sketch, line drawing and background. The sketch will first draw the key motion nodes and then add the middle frame, and the line drawing is to clean up the sketch. The background can be drawn directly, and I will try to draw from the field as a reference.
·—4. Coloring
Usually after the setting is completed, the color specification will appear. Color it later. I have been using Retas for coloring before, but in order to reduce the workflow, I chose to use vector layers + paint buckets directly in clipstudiopaint for basic coloring.

·—5. Audio
This part is often difficult to do well on a personal production, and I prefer to use the camera's mic for this process. It's not bad for the recording of ambient sounds.
If you need to complete the dubbing of the lines, it will be a big expense.
I suggest doing a plot without dialogue at the beginning, so that the degree of completion of the work can be very high.
·—6. Later stage
In the later stage, it is mainly done on AE. All the drawn materials are stacked together in the order of distance, and some ambient light effects are added according to the style I like.
■The production starts!
After reading these processes, why don't we make a few screens and try it out!
✨ Create file
There are already some good templates in the official tutorial to help us arrange the animation production process.
We can build our basic working panel exactly as above. But this is a workflow for multi-person teams,
Some operations are indeed a bit cumbersome for animations made by individuals or a small number of people.
If you are like me, personally or 2-3 people use clipstudiopaint to make, you can try to create a file like this:
ProjectX Chapter 01 (Project folder)
🏷️References (folder)
🏷️Story-layout-settings (folder)
   |——— —·Mirror-layout.clip

   |——— —·Setting.clip

   |——— — 🏷 ️Export
🏷 ️Drawing (folder)
   | 🏷 ️cut001 (folder)

   ||———·cut001_original painting-animation.clip

   ||———·cut001_background.clip

   ||———— 🏷 ️Export

   | 🏷 ️cut002 (folder)

   ||———·cut002_original painting-animation.clip

   ||———·cut002_background.clip

   ||———— 🏷 ️Export
———————————————
On the one hand, if you just want to do some animation with a friend or by yourself, too many files will actually cause more troubles and increase the time cost of organizing files. Therefore, it is necessary to reduce the switching of files as much as possible to improve the efficiency of personal production.
On the other hand, if you want to highly integrate the production of files and put everything in one file, the loading speed will become very slow and the number of animations will increase a lot.
If you want to use ipadpro, mobile terminal, and multi-terminal synchronization to draw animations, you need to pay more attention to these issues.
In order to ensure file security, cloud synchronization will also become very slow, and animations will not play smoothly, which is not a very good experience.

I recommend individuals or a small group to put "storyboard-layout" in a clip file, "animation sketch-animation" in a clip file, and finally "background" in a separate file.
In this way, you can avoid switching so many files when drawing animations, and you don’t need to load so long every time you open a file. It is also very friendly to network synchronization and backup.

In the storyboard-layout file. I do everything from storyboarding to layout. Use animation folders to separate the "shot" and "layout" sections. In this way, the sub-mirror and the layout can be put together, and the opacity of the sub-mirror can be lightened as a reference for layout drawing.
In the actual production process, I often use ipad to synchronize project folders. I would make it a habit to keep the important generic files out there, usually the templates for making the usual docs, and most importantly the story cards. This will be very convenient for me to open and watch at any time. Especially plot cards, always test and recall how the picture serves for the expression of the plot during the production process.
1. Conception - script, storyboard, setting
·—1-1. Story
——The Importance of Stories
The idea of a story is usually the beginning of animation creation. This is true even for individual animations. Often the thing that bothers me the most during production is the creation of the story.
For personal animation, we often see various cases of picture priority. And good stories are few and far between.
If you work hard in this area, you will be able to make your works more expressive and presentable.

·—— 🌟 Structure & Ups and Downs & Skills
At the story stage, I will use GOODNOTES on the IPAD to arrange the various scenes of the story with cards of different colors.
(The following is the text above the plot card)
——Prologue——————— Development————— Conflict————Climax—————————
The green ones represent the clips that give the viewer a positive mood, and the white ones are the ones that give the viewer a bad mood.
I'll divide the plot into several different parts at the top. Arrange the cards according to the structure of the plot knot, and you can intuitively see where the center of gravity of the content is.
With these two methods, you can remind yourself to work hard to control the ups and downs of the plot.
With regard to story structure and emotional ups and downs, charts can be drawn to detail the various story types and how they affect the audience emotionally.
If you're interested in how stories are created, check out Robert McKee's Story. There are tons and tons of tips and tricks for creating stories.
I recommend that you read more and record and organize your favorite plot structure.
In the next video I'll share some of the techniques I use in creating stories.
·—1-2. Storyboard
Next, we need to draw the story into a picture, which is the shot draft.
We will directly make the storyboard in the clip animation document, and add the key frame of the camera movement to facilitate the preview of the story effect.

·——The layer structure of the storyboard file
The clip file of the storyboard I used was modified on the basis of the officially shared animation file. You can read the tutorial above and download assets, autocommand templates for animation.
If you are like me and want to animate individually or with 1-3 people, I suggest making the following changes:
■ 1. Unlock (remember to unlock first) and copy a copy of the template folder, right click (ipad long press) to use layer conversion to change the color layer from a vector layer to a bitmap layer. ——————The purpose of converting layers is to preview the picture effect more smoothly when using the camera.

■ 2. In the template folder, click on the 1 folder to rename shadow to rough.
We also need to add our picture frame. I made a separate LOframe file, which can frame our picture range. We need to place it at the bottom of the new template folder, and at the bottom of the document, above the paper layer.
The LOframe layer has been uploaded, the size is 140F-160dpi, transparent png, using open source fonts. It can be saved here for direct use.
After putting it in, the Template and the structure below are as shown in the figure:
There are several reasons for this:
·When we use a file to make a storyboard, we will encounter individual shots that need to be zoomed in, zoomed out, moved, and rotated. We must use the LOFrame layer to mark the position of the screen.
✨ Note: Don't let the camera move too far, in case the canvas of the entire document is too large, it will become very stuck when playing and previewing. Because the larger the canvas, the higher the requirements for computer configuration.
Shots with large-scale movement can be solved by drawing animation as much as possible.

If you really have special needs and need to move the screen in a large area, you can divide the storyboard files into:
·Screen-layout_A-part.clip
·Screen-layout_B-part.clip
———————————————————
However, when such a storyboard is finally planned, it needs to be exported to mp4 and edited together to preview the full effect of the film. Compared with processing in a file, it is a little more complicated.
———————————————————
■ 3. Use the template in the official tutorial file to create the "Original Painting A Folder" and rename it to "Storyboard". (Remember to check whether the layers in the 1 folder are bitmap layers. In the stage of mirroring, in order to draw smoothly, vector layers are not needed.)

■ 4. In the options of the timeline panel, create the animation "Camera 1", and put the "Storyboard" animation folder into the "Camera 1" folder. —————Using the camera can facilitate us to quickly preview the effect of the lens movement. Select the camera layer and use the object tool, combined with the use of key frames, you can move, zoom in and zoom out the picture.

■ 5. Create the paper for the storyboard. And use the "Also specify film" function. I suggest that the interval between each shot should be 48 frames (2s), and the interval between each frame (shot) should be 2 seconds on average. This time I created 100 storyboards.

■ 6. Save your file and use it as a storyboard template. Every time you need to create a storyboard, you can copy this template to avoid repeating the above process every time.
——————————————————————
The finished effect of my storyboard file is as shown below.
✨ When painting, there are a few points to pay attention to:
·Close all the folders in the animation folder, and then draw

When drawing, you don't need to open the layer to use it, so the layer panel will be messy.
We can regard each film as a "document", and press "<" ">" to switch between "documents".
Layers within the Document can be controlled using the Filmstrip panel.

Then you just need to invest in your production and express your story in the way you like.
·—— 🌟 Be sure to pay attention to the duration of each shot!
Please DO remember to plan and schedule your time on the timeline.
If a shot is less than or more than 2 seconds, you can right-click on the film interval in the timeline panel, or use the "insert frame" and "delete frame" functions on the shortcut buttons above to adjust the length of a shot duration.

Please combine the story and use clip studio paint to play the storyboard script multiple times to explore more ways of picture expression. As long as you keep going, you will definitely increase your understanding of shot time control!
————————————————————————
·——Notes and explanations for each shot
When the team is making it, if there is a division of labor in the next part, then it is necessary to clearly describe the notes and instructions of the storyboard in words.
We will place a text box on the upper left of the storyboard. When we need to cooperate in production, we will describe in detail the specific effects of the screen, the actions, states, expressions, and things to pay attention to in the text box. Afterwards, a storyboard meeting will be held to explain specific issues in detail.
🐻 The picture needs to replace the explanatory picture of the composition mirror
·——Summary & Sharing
In the above content, I have introduced in detail my workflow in the storyboarding stage. In essence, it is actually a form between mirroring and layout. It can not only watch the rhythm effect of the whole film in the form of playback, but also can be used directly as a layout sketch. For the production of 1-3 people, it shortens the process and speeds up the efficiency. The overall effect can also be seen more clearly.
✨Key points of this section:
·Individual or a small number of people make, do not need to use too complicated form, simple and effective.
· (Important) The storyboard does not need to be elaborately expressed, but only needs to concentrate on the performance of the story. It doesn't matter if you use a very rough sketch. Please leave the work of refining the picture in detail to the layout part.
·The control of time has a great influence on the rhythm of the story. We can play the time axis repeatedly to correct the duration of each shot in real time.
·Storyboards can be combined with text descriptions. The most important thing is that both you and your partner can understand what the storyboard expresses.

After I finish writing the story, the drawing of the storyboard is usually handed over to Xiaoxiong, and I make corrections based on her.

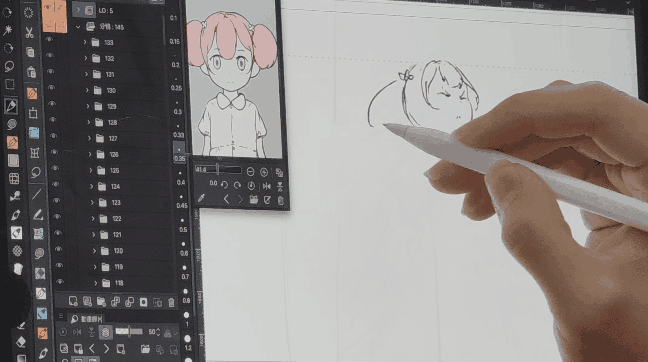
·—1-3. Settings
·——Three Views of Characters
The setting requires us to simply draw the front, side and back of the character, determine the height ratio of the character, and fill in the background color with the line.

I recommend personal animation to slowly discover the characteristics of the main characters in the story during the drawing process of the storyboard, and slowly visualize the characters.
The characters designed in this way will be more in line with your inner imagination. You can also go out to collect materials and observe all kinds of people. Extract the parts you want from them and combine them into your inspiration.

·——— 🌟 Pay attention to the proportion of characters & spatial relationship
In the early drawing of the storyboard, we should also pay attention to the height and spatial relationship of different characters in the picture. Especially the close-ups of the characters. This is very helpful for us to grasp the spatial effect and lens language of the picture.

·——— 🌟 Color design
In this part, we will first determine the three parts of highlight, ambient light shadow, and occlusion shadow.
Use the three parts of red, blue and green respectively to divide the range of each part.

If you don't understand the division of shadows very well, I have detailed how to draw light and shadow in this tutorial.
Although it is a tutorial for illustration production, the role of shadows will not change.
The tutorial is relatively long, if you want to learn it quickly, please jump to:
1-3. Shadow part (4 layers)
3-1. Draw the shadow part (4 layers)
The 4 layers used in tips can also be used during animation. On the basis of the 3 layers of shadow mentioned above, add a "reflective" layer to create a more gorgeous light effect.
It works great, but the production time of the response becomes longer 😂 . . .
—————————————————————————————
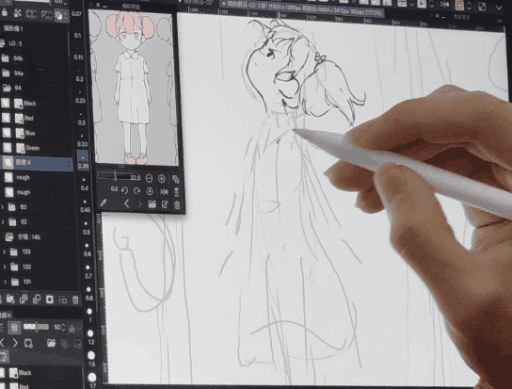
During the making of this shot, we also used the Auto Shadow feature to aid in painting.
We will discuss in detail how "Auto Shadow" is used in animation in the "Part Two".
·——— 🌟 Use 3D puppets to assist in painting
After the setting is completed, we can use 3D puppet to assist in painting.
Usually we lower the opacity of the front setting image. Then fine-tune the puppet against the settings.
Version 2.0 optimizes the puppet, giving us more control over the settings. Very convenient.
We can make corresponding models of the characters we design, precisely control the height and proportions in the screen, and avoid basic proportion problems in production.

2. Make design drawings (LAYOUT)
·—2-1.
We have always done this link before the storyboard. After a period of time, we found that in the process of storyboarding, if we only roughly depict the picture in our mind and reserve a certain composition space, in this case, the efficiency of material collection can be improved. Because in this state, what kind of things need to be observed and what kind of places we want to go, we have plans in our hearts, so the purpose is stronger.
In the layout stage, the determined things are mainly refined. I usually find a place similar to the actual place in the storyboard to collect materials and find some inspiration, so that I can continue to observe and learn, and will not be limited to my own brain for creation.

The place where the material is collected can be any place, place, to shoot and observe the scenery and people. Capture their state of mind. At this stage, I will also modify the content of the storyboard from time to time. Gradually make its vague places concrete.
After the materials are collected, we will organize, trim, and organize the photos, videos, audios, etc. taken into the material library. To facilitate post-production.
In the next video, I will share with you the detailed process of my wife and I collecting materials and making animations.
·—2-2. Refine the storyboard draft
After the materials are collected, we will not modify the storyboards, but directly refine the storyboards in the "LO" animation folder.
Because it is mainly made by individuals, in order to optimize the process, try to reduce repeated steps.
The refinement here can be understood as choosing the moment when all the elements in this shot appear, layering, planning, and arranging well, and making its effect until it is well-thought-out. We can continue to play and preview our finished film effect in the storyboard-layout file. Then proceed to the next step of production according to our plan.
Before you start trying to draw, there are 3 more things we need to do:
1. The template folder follows the file structure used in the stage of mirroring. Add or adjust layers according to the complexity of the storyboard.
Pay attention to use the "Layer Properties" function to give the layer a color. In this way, you can directly switch layers to achieve the effect of drawing different colors while keeping the pen in black.
(If there is a requirement for vectors in the refinement stage, and you want to use vector layers for refinement (generally not recommended, because the adjustment and playback will become stuck), you can use the "template-original" folder.)
2. In the LO animation folder, create an animation film corresponding to the storyboard folder.
Generally, as many animation films as there are in the storyboard, there will be corresponding animation films in the LO folder. We put the LO folder on top of the storyboard folder, and create it on the time axis corresponding to the position of the storyboard film.

3. Duplicate a LO-frame at the bottom layer of the layout. Once the camera moves, rotates, or zooms, you can duplicate this layer and use it to mark the position of the screen. It is convenient for the subsequent painting process to find the position quickly. .
Before we start drawing, we need to pay attention to one very important point. That is stratification and planning.
·—2-3. Layering & Design
While refining the storyboards, we have to plan each part of the screen to prepare for the next animation and post-production.
In the layout stage, we only need to make a detailed design and record it with layers of different colors and text.
Note that at this stage, no actual crafting is required.

Regarding the way of layout design, we can start from these aspects:
A. Separation of dynamic and static - the protagonist and dynamic things need to be layered with static things such as the background;
 ·—The dynamic part of each screen (usually characters, special effects, etc.), in the next original painting and animation process, needs to use the animation folder to make.

 ·— For the static part (usually the background, etc.), in the next art background process, you can use the ordinary layer folder to draw. If there is a part that needs to be moved in the picture, it needs to be drawn in separate layers.
B. Distinction between near and far, space & perspective expression————————— In the screen, if the camera has requirements such as advancing, following, moving, swinging, etc., we have to put various elements in the screen one by one according to our production needs Draw separately. We'll identify these places and detail how each part of the frame moves.
C. Planning of special effects———During the production process, if you encounter some special effects in the story, such as wind, fire, gas, light or magic and so on. These usually need to be achieved through different layers, superposition or special post-processing.
We need to make a good plan according to the effect we want to express.
Usually, if it is an effect that you are not familiar with, you can actually observe and think about how to make it layered. Or, you can learn how others make it.
We need to list the materials we made. At this stage, layout can also be used as a rendering.
You can try to approach the production of layout with the mentality of completing a single frame. Especially when you have no idea and can't judge the effect. You can try simple coloring with dot matrix layers, superimpose different layers, complete a single frame, plan the color range, and see if you can achieve the effect you want. After adjusting, find a way to draw animation layer by layer.
D. List———A list is required to explain the cascading far and near relationship. I usually have text listed next to it. It will be more convenient in later production.
·—2-4.layout example
Let's take a look at the picture of this lens:
The little girl rushed down along the beam of light, her body spinning slightly. A magical effect of flower patterns blooms around her. The more she went down, the more resistance she received, and she seemed to be exerting herself more and more.
In this picture, I want to pass the magic shape. To reveal the truth about some girls. This part is also the climax of the animation. So I hope to have a better visual effect as much as possible.
However, limited to the scale of production, I can only try to choose the effects that I can accomplish.
I'm going to use 6 layers of animation effect layers to achieve such an effect.
Its cascading relationship is as follows:
·F-magic pattern
·E-Airflow
·D-Particle & Streamer
·C-Lightwave 2
·B-light wave 1
·book beam of light
·A-Girl
·—2-5.layout instance-layer relationship
In the actual production process, we often encounter some problems in the layering relationship.
In the layer-to-layer relationship above, we can disassemble it to see what the actual effect is:
·A-Girl
🐇 girl single layer material map png-gif
·A girl+Book beam of light
🐇 girl+beam png-gif
·A Girl+Book Light Pillar+B-Light Wave 1
·—2-5.layout conclusion

·—— 🌟 2-4-1. Drawing of special effects
In the process of drawing layout every time, you will definitely see content that you have never drawn before.
In fact, when I first came into contact with animation, I was not sure how to do it well. But with more experience, I found that this is actually not a bad thing.
Because animation is like this, the themes it can describe are endless. There are countless things in this world, and it is impossible for you to study and study them one by one. Every time you encounter a picture that you have never painted before, or some strange effects, it is a learning opportunity. It is also a time to test your learning ability.
Many things cannot be explained by a law or a method. For example, a simple picture of grass moving in the wind, the wind speed and direction are different, and the swing of the grass can be said to be ever-changing. It's just that in most shots, these are not the focus of the depiction. So there is no need to get too tangled up.
But let's change the situation. If you happen to come across an animation and want to use such a close-up picture to express an artistic conception, it can be an image expression of the character's mentality. Then, you must re-observe carefully to understand these movement methods in a deeper way.
In essence, doing animation is rather a test of our learning and observation abilities.
·——————The magic effect of "flower"
Back to the theme this time, in our screen, the layout needs to complete a special effect in the shape of a "flower". It needs to fall with the little girl, showing some status symbol of the girl. There are a few points I'm considering here:
·In the process of falling, the girl is generally in the process of resisting the rising force of the beam of light. She will work harder. This is more like part of her overflowing energy.
·The scenes are more exciting, you can refer to slightly more intense natural effects, such as explosions. But the magic pattern is in the shape of a "flower", and the protagonist is a little girl, so it can't be too intense. On the contrary, some more elegant elements need to be added in it. Rather than acting boldly, it would be better to give priority to showing the gentle heart of a girl. Serve the drama.
When the energy overflows, it will dissipate, so we can't keep circulating. We can simulate smoke or other things, and the shape will gradually dissipate from small to large.
·—— 🌟 2-5. Check & Correct (very important!)
After the layout is made, we need to check and correct the content of the layout.
The main reason is that there are many effects, and in the actual production process, there are often situations that need to be adjusted.
At this stage, we found problems with the above layout:
·The beam of light is generally cylindrical, so in our 2-layer light wave animation layer, one layer should be behind the girl and the beam of light book.
So, we restructured the layers here. As shown in the picture:
After adjustment, its cascading relationship is as follows:
·F-magic pattern
·E-Airflow
·D-Particle & Streamer
·C-Lightwave 2
·B-Girl
·book beam of light
·A-Light Wave 1
Layout conclusion
Thank you all for being here.
In this article, we have covered half of the pre-production content.
We sorted out the general process from conception to making design drawings (Layout). And it explains some details that are prone to problems in operation. In addition to the basic painting skills that hinder us from making, these small places often become our stumbling blocks. I hope this tutorial can take you to some extent to avoid these problems.
If you want to take animation seriously, this tutorial will definitely help you. Although there are not many discussions on painting techniques, it can open up some processes that you may have never imagined and challenged. These should all be part of the animation.
If you are interested, you might as well give it a try. You can share your thoughts and experiences with me by writing comments. If you have any questions about some details of the specific operation, please leave me a message.
When talking about animation production, technical topics are often involved. Today's production tools are getting more and more convenient, and the development of AI is getting faster and faster. I also hope that one day these advances in technology and tools can greatly improve the production process, reduce the threshold of production, and allow more and more people to focus on the creation of stories.
Whenever I make an image, it's not just for show, it's part of the whole story. This kind of creation is very motivating to me. As long as I think of the release of this story, it will motivate me to create, and I want to take the time to complete each picture of it bit by bit, and finally integrate it into a work.
The content of the next issue will start from the original painting until the completion of this picture. If the length is too long, there will be some adjustments. stay tuned
Users who liked this post


Comment