
Introduction
Welcome.
Colloquially the legs are known as the entire lower extremity of the body.
Drawing legs, from the thigh to the foot, should not be complicated, so in this tutorial I will explain and teach you how to draw a structure so that you can guide yourself in how to draw legs without too many lines that can confuse you.
• The program I use is Clip Studio Paint, but you can follow the steps in the traditional way if you wish. The tutorial goes from a beginner level.
• First I show you the simplified form of the structure of the legs and we compare the differences between male and female legs according to the anatomy.
• I explain a little how to draw the hips and buttocks because it is important to shape the thighs.
• I teach you how to draw the final shape that the legs will have.
• I also teach you how to draw feet, their differences because the internal part is different from the external part.
• For the feet we start with a brief explanation of anatomy, then the simplification of this with simple figures so as not to confuse you.
• In the coloring I will show you the parts that are shaded to better see the shape of the legs and feet.
• At the end you will learn to draw the legs and feet in different poses, and also to color them so that you can improvise in your works of art. And make drawing legs and feet easier and more fun in the process. Let's start.
General structure
• Draw a trapezoid, then a small diagonal from the middle of the ends.
• We draw a line slightly inclined downwards and in the center, this part represents the thigh; and add a circle that represents the knee joint.
• We continue with another inclined line that will represent the leg, this line can be straighter.
• Then we closed with circles for the ankle joint and added a truncated pyramid to represent the foot.
• The distance is the same between the femur and the anatomically known leg.
• For the foot it is a distance similar to the circle of the knee. From the truncated pyramid we draw a line above the base to represent the fingers.
Difference between a male and female legs
Men have narrow hips but the legs are more robust, whereas women have wide hips and the legs are more delicate.
Men:
• First, for the man's hip use a rectangle.
• In the male body the femur (thigh bone) is almost straight because of the hip.
Woman:
• In contrast, the woman's hip is a trapezium, and the femur is more oblique due to the anatomical arrangement of the pelvis.
Similarities:
• Feet should be facing out.
• For a side view, use a forward-leaning rectangle for both chaos.
• If you want to differentiate them in a better way you can add swimwear. This little tip will help you a lot.
simple and brief anatomy
This is a representative way to guide us to locate each point mentioned above on the human skeleton.
a. Pelvis.
b. Femur.
c. Ball joint.
d. Tibia.
and. Fibula.
F. Foot bones.
Hip
The legs work in conjunction with the hip, the thigh, the commonly known legs, and the feet.
The drawings are seen in 2d, but if we add additional lines to any object it will have depth and we see it in 3d. In addition, it is much easier to work with because it helps us generate different perspectives.
a. This is what a flat hip would look like, but if we add a curve to the top, the figure is easier to see and position since we gave it depth.
b. turned to one side.
c. Side view - you can use an oval. But if you feel more comfortable you can use a square figure.
d. Rear view: the trapezoid will be tilted forward and you will see a little of the lower part that we will represent with a curved line. In the upper part draw a small triangle that is the sacrum bone in a representative way.
Gluteos
It is also important to draw the buttocks because it is a continuous part of the thigh and shapes the body.
a. Back View: Use an inverted heart.
b. Side View: From the top corner to below the bottom, draw a curved line. For the thighs use this shape.
Grades:
• Now you just have to imagine this little curve in different views.
• Look at the shape of the upper part of the thigh (green color).
• You should not complicate yourself in making the shapes precisely, remember that they are only strokes that will help you direct the model of your drawing.
thigh and knee
We are going to use cylinders. It's that simple! We go little by little.
Then we make some ovals at the bottom as well as at the top to give it volume to guide us better; It is a demonstration so that you can differentiate it, it is not necessary to draw them, but if you need them to guide you, you can use them.
a. For the knee, although its representation is an inverted triangle, here I am going to apply it as a small rectangle located a little above the circle that we used for the joint.
b. The patella is a notorious bone that we have in the knee part. As you can see, it is covered with muscles, tendons that will ultimately give your knee this look. The knee changes when walking, sitting down, crossing the legs, in these postures they change the most; and how you can see the little rectangle is slightly above the circle.
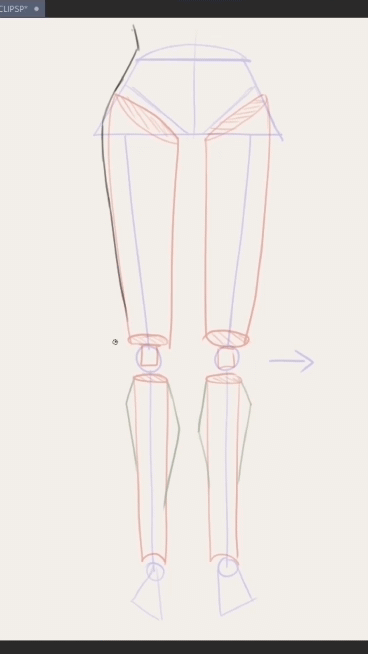
Legs
The legs (anatomically known).
It uses a cylinder and as it goes down its thickness decreases. We are going to finish with a small crescent to continue later with the articulation of the foot.
To represent a bit of the leg curves due to the muscles, we are going to use very open triangles on top of both edges (green color).
1. Front view.
2. Side View: Shape it this way to make it easier to draw at the end.
3. Rear view: It is similar to the front view.
Front view: The outer triangle is higher than the inner triangle.
Lateral view: we are going to use only one triangle on one side that will be seen on the back of the leg, this will roughly represent the gastrocnemius muscle.
Rear view: the inner part is more noticeable, you can even draw the triangles directly with the cylinder.
Lineart
Use curves to represent the whole figure.
Grades:
The inner part of the thigh has a small indentation, a little lower than the middle of the thigh.
On the knee: the outer part draws an almost straight line. In the inner part: It borders the space with a more pronounced curve.
Leg: the curve of the inner part is lower than that of the outer part.
Side view:
Thigh: Don't use a straight line across the front of the thigh. Draw a not-so-protruding curve. It is an intermediate between the two.
Knee: follows the shape of the rectangle (patella).
Leg: the front part is also somewhat curved.
Rear view:
Thigh: the inner part is more pronounced in its internal curve.
Knee: borders the space that is represented with a circumference. The inner curve should be slightly up, and this curve is right in the space where the circle is.
Draw some lines to represent the calf.
Legs: they should be slightly inclined towards the center.

Pies
The fear of every cartoonist, but don't worry because at the end of this tutorial you will end up loving drawing feet, it is even easier than hands due to the limitation of movements they have.
Let's take a look at the anatomical configuration of the foot.
a. Tarsus
b. Metatarsus
c. Phalanges: the first finger only has two phalanges, and the other fingers have three.
The sole of the foot has fat, muscles and ligaments to support the full weight of our body, which gives it the shape we know:
The outside of the foot is very different from the inside.
a) The outer part is flatter around its edge.
b) The inner part is more curved which gives this aspect to our foot when we walk, the typical footprint of the foot.
When we see it in a lateral and medial view:
1. The lateral part of the foot is straighter.
2. The medial part has three curvatures due to the support points of the foot (marked with yellow figures): at the heel (3,), at the base of the big toe (2) and at the distal phalanx of the same toe ( 1).
To make it something easy that you can practice and draw without so many lines, you can guide yourself with this structure:
Medial or inner view of the foot
1. Draw a truncated pyramid.
2. From the upper end we lower a diagonal line and close to form a triangle.
3. Then we add a small triangle that will represent the fingers.
4. Begin to border the figures:
-Note the 3 curves at the base of the foot.
-In the upper part, follow these curves so that the foot does not remain flat. Remember that it has bones and muscles that give it its shape, in addition to fat.
5. The fingers are smaller and decrease in size. Finally add the ankle.
Lateral or external view of the foot
1. Use the same way as above.
2. Make a small curve at the base of the foot, almost straight.
3. Draw the fingers from the smallest to the largest.
Grades:
• The little toe has a more flattened shape because it turns inward.
• At the top of the foot follow these curves to give it a better shape.
Front view
First glance:
1. Draw a truncated pyramid, but it is much wider.
2. Draw a line at the bottom as shown in the drawing to represent the fingers. At the top we draw a diagonal line that represents the ankle (lower ends of the fibula and tibia bones that are noticeable. The highest part represents the tibia.
3. Then we make a curve from end to end to represent the distance of the fingers.
4. Remember: the inner ankle is higher than the outer ankle.
5. For the fingers we are going to use shapes ranging from large rectangles, squares, circles and ovals. That is, from the first to the fifth finger (little finger) its figure changes to a softer one.
6. To represent the length of the two, in this view, it is the shape of an elongated “S”.
Nails: the nail of the first finger is a crescent, that of the other fingers is dome-shaped.
7. This way you can see is as if it were at eye level.
Second form of a front view:
Our feet are usually facing out.
1. We are going to use the same truncated pyramid. The dorsal or upper part of the foot will be represented with other diagonals that open outwards.
2. Then we draw a small line below the base to represent the beginning of the fingers. And towards the end we add a small circle that represents the fulcrum of the big toe.
3. Lastly, we add a curve to represent the fingers. We add the direction of the malleoli. Remember that the widest part of the curve is going to represent the big toe.
4. To represent the fingers:
-Between the first and second fingers there is a greater distance than the other fingers.
-Draw a staggered shape, but as you get closer to the first finger the staggered shape of the fingers is smoother.
-The first finger is looking up.
-The last finger is smaller and is always inclined towards the other fingers.
To draw the fingers, these vary from person to person, the direction, or the size.
a. We first draw a large rectangle for the big toe. Be sure to leave a space between this finger and the one after it.
b. Then two small rectangles, you can make them square too.
c. For the last two fingers, we are going to use ovals.
d. To complete with the rest of the phalanges of the fingers, we are going to follow this half-stepped structure.
and. Finally, we complete with the nails that have a dome shape. The first finger or big toe, the nail looks like a small crescent.
F. The other fingers will be shaped something like this. It will give more direction to the drawing.
Here is another example with the fingers extended upwards: the curved line is a very good guide to guide you in the position of the fingers.
Plantar or sole view of the foot.
It is the part where our foot sits when walking or standing. This part is softer because of the muscles and fat that protects the bone.
1. Draw a circle at the top and a bean shape in the middle of it. Then draw roughly in the middle and below the initial shapes.
2. Bring the edges together with these lines.
3. For the fingers we are going to draw a curve, try to make it higher at one of the ends because it will represent the first and second fingers.
4. Draw the fingers first. The first finger is the thickest, guide yourself through squares and the last one with almost circular figures.
5. Add some curves at the base of the fingers.
6. Make some representative lines to indicate the depth.
You can lower the initial structure a bit to have different results: Note that the fingers can even be separated.
Here the foot is as if it were walking.
standing on tiptoe
Use the same figures mentioned above, but in this case you will find yourself more inclined, as if you were being pulled down.
a. Foot seen from the medial part.
b. It is a view from the outside.
Here I can help you with what the inclinations of the foot would be like. The upper part of the foot is higher in the part that accompanies the big toe, then it descends towards the outside.
sketches
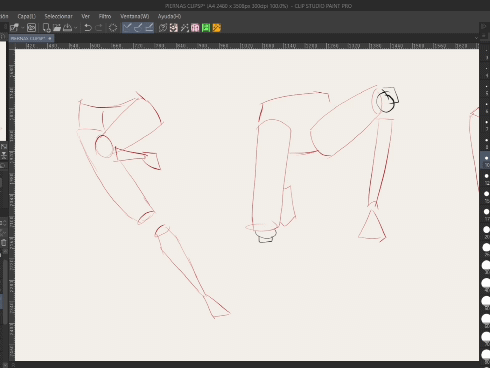
Time to put what you have learned into practice.
Make quick strokes to establish the position that your character will have.
Try to exaggerate the direction and shape of both the lines and the cylinders, to give more dynamism and fluidity.

colored
First of all, I recommend that you make your drawing in a "vector layer", the advantages are many.
1. Place a base color.
2. With a darker shade, between reddish and orange, set the shadows. Then add a softer color, for example a pink.
3. We mix the colors:
-I used the “Color Mix” → “blur” tool. Access letter: “J”.
-Value of “blur intensity” between 50 to 60.
4. Highlight upper thigh, knee, and upper legs with base color.
5. Darken the edges to give an effect of depth, which is more color in the inner part of the thigh.
6. Add glitter, on the thigh, buttocks in the back, also on the heel.
Benefit of using vector layer: you can change the color of the lineart:
-Select “operation” → “object” →”main color”. Then a small window appears where you can choose the color and it changes the color without any problem.
Feet:
• The coloring is similar:
• Set a base color and put a dark color in areas that are deep, and light colors in areas that have a raised surface, for example the top of the foot.
• Paint shadows also between the fingers, under the fingers, behind the ankles.
• You can use reddish colors, pastels, you can even touch it with a light purple color.
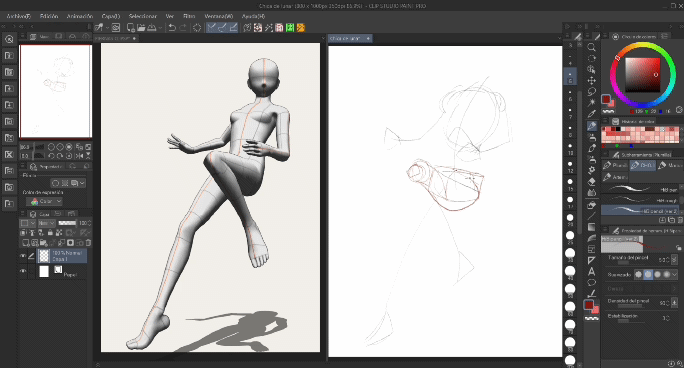
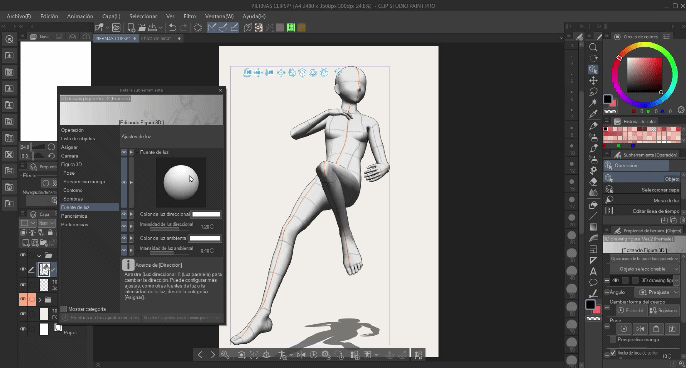
Extra Point: 3d model
Clip studio has 3d models, we can download them in "clip studio assets" or use the ones in the program. You can modify them if you cannot find reference images on the internet.
Using a three-dimensional figure will help you see how the body behaves as a whole if they are complicated poses.
You can draw on top of the 3d model, or it is best to practice drawing on another canvas so you can correct mistakes and improve them.
You can modify the light position. !This is incredible! Because if you have difficulty representing light and shadow, these models will be your allies.
conclusion
As a conclusion I can say that drawing legs: from the hip, thighs, knee, normally known leg, and feet, is important to draw the poses of our character.
The explanation did not have to be complicated with so many lines that in the end you can get confused, and for that reason I have indicated step by step, from a brief concise explanation of the anatomy of the lower extremities so that you can understand from the beginning why a structure has a certain shape.
From something simple you can have great results.
Thanks for reading and your hearts ♥ !
Users who liked this post


Comment