
I. Introduction.
Hello, long time no see. I'm back with the 'let's have fun' series (o´▽`o)!
As with the old posts, my posts may not be too informative for you. There are many posts that are more informative than are published by other talented authors. Here, I will share with you information that I have gained from my own personal experience in illustrating children's books. And some tips to make this drawing even more fun!
Let's get started! °˖✧◝(⁰▿⁰)◜✧˖°
II. Get to know a little bit about illustration.
First, speaking of illustrator, especially when it comes to illustrating children's books, there are many styles or ways to choose from when it comes to illustrating books.
You can use the traditional methods of painting with brush and paper, or you can also use special methods such as montage-photography or any other medium to serve the story, ideas and your creativity.
But to the last step, to be able to get to the finished product, you still have to convert these methods to 'paper pages' on electronic tools so that they can then be printed or released digitally. .
So, although there are many creative ways, the simplest way for the whole process is still to draw pictures on digital media.
You see, there are many styles of illustrations that can fit the content of the book, and there are also quite a few differences between illustrations for children's books and books for teenagers and older.
Be creative and don't worry if the illustrations are 'nice' or not. It's important that you have fun creating them o(≧▽≦)o!
III. Process to create an illustrated book?
To summarize, the process to create an illustrated book will include the following basic steps:
• Select the topic/content of the book.
• Choose a style that matches the selected content.
• Start sketching and crafting characters and key ideas.
• Choose the right color palette for the content.
• Build storyboards.
• Start from sketching to finishing illustrations one by one.
• Arrange the text (narrative content) of the book.
• Layout.
• Print or digital release.
Looks complicated? Don't worry, trust me! Honestly, just pick up the pen and get going, and you've already taken a big step!
Let yourself enjoy this, it will be much simpler (´▽`) And best of all, there is a lot of helpful support from Clip studio that you can use and in In this article, I will take some examples for your reference!
Now, let's move on to the next moveヽ(・∀・)ノ
IV. Get to work right now!
The first and also one of the most important steps! Selection of the content of the book!
With that said, this post of mine will focus on the topic of children's books because most of the books I have had the opportunity to work on are mainly in this field. Themes for children's books are also very diverse.
From drawing according to fairy tales, to new creations. Educational topics that teach children about skills or common sense.
Depending on the age and genre, the content and illustrations in the book can become 'complex'. In general, the line of children's books will tend to be concise in content and the text and drawings are attractive and should be educational.
In this post, I will give you some specific options for your reference (´。• ᵕ •。`) ♡
❤ 1. The first step is to determine the age of the book's readers.
I will choose the 'target' is children from 3 to 8 years old.
Once you've determined the age of your audience, you can determine what to do with the complexity of the story, the illustrations, and the amount of text in the book.
❤ 2. Make the story short.
All stories follow a fixed pattern with: Beginning – Development – End.
In this case, I will choose a story that I created myself. You can also draw illustrations according to other contents like I mentioned above if you want. In general, the ways it happens are not too different.
And don't forget to jot down ideas!
One of the best ways to start crafting a story is to ask questions. Eg:
Who is the main character?
Who is involved in this story?
Background of the story?
What is the character trying to achieve?
What will the character have to face to achieve the goal?
What are the developments and climax of the story?
The more questions you ask and the more you answer yourself, the more clear you will become of how you yourself want to create a story.
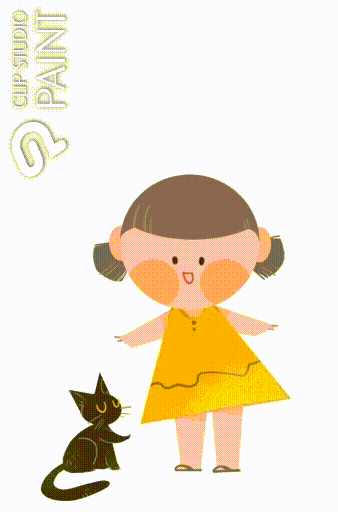
So~ I will draw a story about a little girl looking for her cat.
After thinking! Here's an idea for a story I want to draw___〆(・∀・)
❤ 3. Choose a presentation style for the story.
With that said, there are many styles of illustration. focus on topic ( ´ ▽ ` )/ Let's choose a flat design illustration style to tell the story.
❤ 4. Start sketching the character and choosing the color palette.
This is one of my favorite steps (☆▽☆)!
The main character of this story is a little girl and a cat.
I wanted to choose a bright and lovely color palette for the main characters ♡( ◡‿◡ )
As you see.
To choose colors, I choose the main colors first. Then, auxiliary colors will be added, which will be used to support the main colors. And finally, there are additional colors, they are used to show small details or to create additional effects.
The tint of colors is quite important in illustration.
Especially the illustrations for children. Paintings will often have many colors, so if we don't pay attention to the hue, it's easy for the colors to get mixed up or have no accent.
You can also edit your palette to suit your taste or creativity. Don't limit yourself! Find joy in your creations and love them ~('▽^人)
❤ 5. Build the storyboard and arrange the text.
To get started with storyboarding, first choose the size of the book.
In this case, I chose the size 2000 x 4000 px.
For illustrated books, each picture will often use a 'double page' that can balance the image and the content presented.
Next is to build the storyboard.
Once you have an idea, the next thing you have to do is write down the body of the book.
My story is very simple. Talk about a little girl who wants to find her cat.
And below is the piece of content I have organized and rewritten. To be able to present ten pages of the book.
Title: [Mr. Cat, where are you?]
[The little girl calls out the name of the cat in her room, but the cat is nowhere to be found.
The little girl went into a large bedroom and called out to the cat, but there was still no answer.
The little girl entered a room with many books and called the cat, but still no sign of him.
The little girl went through the corridor and called out to the cat, but there was no movement.
The little girl went into the kitchen, where there were many cakes on the table. She called out to the cat, but there was still silence around.
The little girl went to the bathroom, she looked inside, but her cat didn't seem to be there either.
The little girl went on and on, until she came to the back garden where there were many overgrown trees.
"Miao".
A cat meowed somewhere in the corner of the garden.
"Here you are!"
The little girl found her cat lying under a sunflower tree.
The little girl carried her cat to their room.
"Next time call me to come with you."
The little girl whispering to the cat.
"Miao"
And the cat also responded to her with approval.
Let's adventure together next time.]
And here is the storyboard I paraphrased the story out.
V. Complete a page in the book!
We won't be able to finish the whole book right away.. so, for example, I'll finish one of them first!
Hmmmm And I will pick page 8 (*・ω・)ノ
Back to job, in Clip studio, I use that tools to draw characters:
And this is the result!
I used a 'dry gouache' brush to create more texture.
In addition, to create more effects for the illustration page, I often use some more texture images that can be found on CS. Here are two of my favorite textures:
And I'll be using them as well when I finish this illustration!
After creating a new blank page, I will use the ruler to mark the center of the illustration. That location is the fold in the middle of the book, so be sure to mark it, so that when you draw you won't draw important details into that part.
And now, let's start drawing! (๑˃ᴗ˂)ﻭ
On this page 8, the main image of this illustration includes many patches of trees and leaves. There is a CS brush that I quite like and you can easily find it in the link below.
And we just keep drawing..
I also used the brush below to create some small details.
VI. And the result is?
TADAH! ☆:.。.o(≧▽≦)o.。.:☆
So we're done with a page in this book!
What do you thing? Not too difficult, right? Even though it may seem like a long time to write, in short, pick up your pen and draw, my friend!
It's good if you also feel happy when you're done with your own book.
So my post here has also stopped.
See you soon in another post. Hope you will always have fun while drawing you guys (´。• ᵕ •。`) ♡
THANK YOU AND SEE YAHHHH!!
Users who liked this post


Comment