
Intro
Hello there, this is Tamil. Today I wanted to go over how to paint a cool tree. There are many ways to approach trees. People have different styles and methods, so I will just share mine. I will try to keep it as simple as possible, so it is easier to follow along.
Watch the video if you prefer watching over reading. I am a visual learner, so I like to watch videos too :)
Let's get started!
Sketch
I usually start with looking at references. When I am out, I try my best to take as many pictures as I can. It's good to have your own library of pictures.
After I have all my references, I usually start with simple sketching.
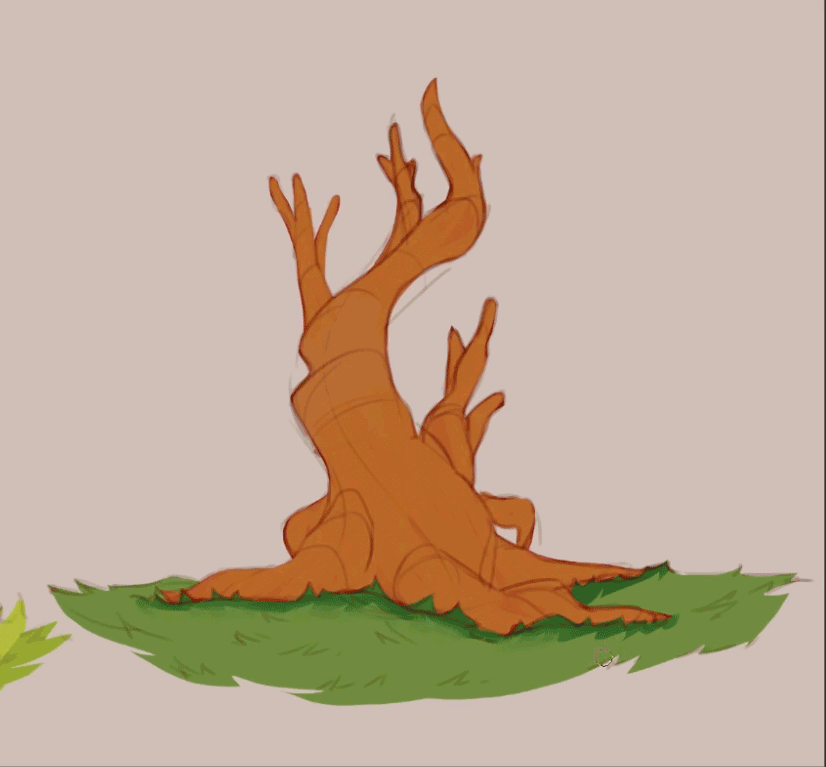
There are many different trees you can find online. A good way to spice up your tree drawing is to have more dynamic look to it. Use action line to see start your drawing.
You can play around with lines and different angles. If you have many trees, then it's best to stick to static and straight lines. In my case I am using one main tree, which is why I can play around with it so much :)
You can also see that I added ground / grass here. That helps us to see that the tree is placed somewhere and not just floating.
Don't forget about the rule 3!
Big, medium, small. It's a nice rule that keeps me organized when making random organic objects like trees or rocks.
Flats
What are flats? Flat is just one color that will help us create the base to work with for out artwork.
My favorite way to do it is to just use lasso tool.
You can access it by using M shortcut. In the tool property there are two options. Selection mode is how selections will behave. I usually set it to the second button. That way if I select twice, it will just combine the selections.
If you hold Alt or Option on mac, your lasso will start deselecting. It's an easy way to get started with flats.
After selecting, pick a color that will work for your art. If it is a tree, I will most likely use some dark brown/red to get started.
Once you have everything selected, you can just use Alt/Option + Backspace/Delete to use the fill color.
After you have your flats. You can always create a new group of layers and use that flat to mask it.
Just like this! You can set it to a layer or a whole group all together. To create the selection again, just do Ctrl/Command and left click on the layer. This will create the selection of that layer.
Shading
Once you have flats, it's a good time to start rendering a little bit. There are different ways to do it, but my general approach is start with simple lights and major soft shadows.
Tree is basically made out of cylinders. If you know how to shade a cylinder, then you are good to go.
I just use Overlay with a slightly bright yellow. For my brush I simply use my Airbrush that I have been using for years.
Adding light to the middle of the tree. You can always find a good reference in case you are struggling.
After that I usually use a Multiply layer to add some light shading to the darkest parts. In this case that is going to be where the tree is meeting with grass. The light will have a hard time getting in there. I also added some brightness to the grass.
Add texture
After we are done with general shading it is good to start adding texture. The key here is to not go too early with details. It's important to have your base finished before that.
For texture it is easy to get carried away too. Do not overdo it. It's a good idea to zoom in and zoom out whenever you can to see if it reads well on a small scale.
For mine I just started adding more texture with simple hard round brush. If you never done this before, it is a good idea to test your texture painting skills first. Find a photo of a tree and just focus on painting ONLY the texture. See how it bends around and try to follow it.
My textures are not perfect, but I try to just give the illusion of the wood. It does not have to be exact. Real wood texture has a lot more details, but it does not look readable when scaled down.
You can keep adding textures based on what style and importance of the tree. If you have a forest, maybe make it more simple. If you are painting only one tree, maybe it is good to do more details. Same goes for grass around the tree :)
Leaf and foliage
Let's say we are done with the tree. Going forward we can start adding simple leafs and bushes. What kind of tree does not have leafs? ( I mean some don't, but let's go for a happy tree ).
What is a simple way to create a bush?
In this example I am going to use pointillism default brush to start out.
Our main goal is to get texture and direction in our bush.
Just like before, I use the lasso tool to get very basic shapes down. As you can see I move the brush in curve shapes. In a way it looks like a "C" shape.
I also start with a dark green color which allows me to build on top.
After dark green, I also create a more saturated mid tone. It's easy to break down objects into 3 values.
Pick the color of your light. In this case I used yellow.
After setting up the base for our bushes, we can start breaking down more into shapes. For this we will use one of the default brushes from Clip Studio Paint.
If we color pick and draw on top with this brush, it will create amazing patterns that will make it more believable.
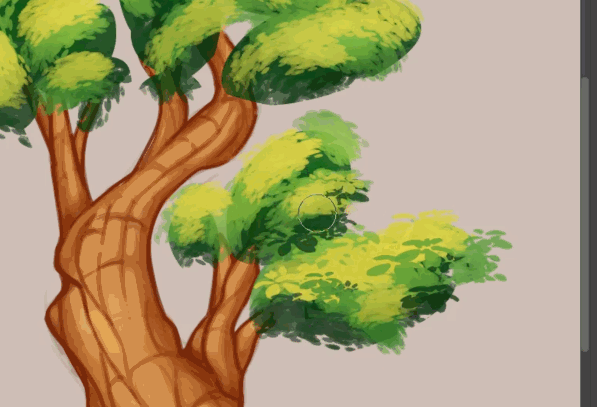
After some time we can see get pretty good results.
After adding more leafs, we can go ahead and get some manual painting done. Just grab any brush you love using and start adding or removing some parts of the image to make it more beautiful.
Sky and shadow
One of the last few things to do is add shadow to our tree and throw some sky behind. For easy shadow. I just duplicate the leaf layer and mask it to the tree. Just like I said before: ctrl+left click on the layer to select, and then click the mask button.

As last touch, we can just add some blue behind the tree to make it pop.
Here is our tree sketch. This is a great thing that can be turned into something more amazing with more hours and effort.
We can add more details, characters, and lighting.
The end
Thank you for reading. I really appreciate you spending time with this material. Hopefully you learned something.
As usual, you can check out more video with more real-time time lapse.
My links:
Users who liked this post


Comment