
Intro
Hello everyone, today we are going to review what is a fish-eye lens effect, how and why the distortion strength change the image and different ways to reproduce or create a similar barrel distortion and produce diagonal and circular images in Clip Studio Paint 2.0 with Filters, Rulers, Cameras in 3D layers and Panoramas. So, let's Begin.
1. What is a Fish-eye lens?
Fish-eye lenses are curved wide lenses designed to capture more from a scene into a photo. In other words to have a wider and larger “Field of view” (FOV) than the human vision both vertically and horizontally (similar on how supposedly a fish would see to above from the water). In addition to that the lens will distort the shapes and lines closes to the edges making them curve, adapting them to the hemispherical shape. This is know as barrel distortion.
In photography the Field of view is the maximum area of a scene that the camera can capture into an image or photo. This usually is measure in degrees. The field of view (FOV) along with the Focal length (mm) of the lens will determine how wide or close (zoom in) is the photo or image.
A short number of the Focal length such as 16mm will give you a wider Field of View (FOV) around 180 degrees. And a higher number like 50mm (close to the human vision) or 85mm will give you a closer or zoom in Field of View (FOV) around 46 degrees or less.
Now, on Fish-eye lenses depending of the strength of the effect in the lens (determined by the focal length mm) you can get a “DIAGONAL” or “CIRCULAR” image/photo. In this context the word Diagonal means that the image will fill the entire width of the frame from the top left to the bottom right. As for the circular, this will have a rounded shape filling the height of the frame but only the center of the width. Circular images will have a larger field of view that diagonal ones. Some of these lenses can use a focal length as wide as 6mm, covering around 220 degrees.
NOTE: Not all wide lenses below of 16mm have barrel distortion. Lenses without barrel distortion are called rectilinear and most of them correct the lens distortion in camera or in post. Fish-eye lenses are designed to intentionally keep the hemispherical or curved distortion from the lens which you can clearly see around the edges.
2. When to use the fish-eye lens effect?
Fish-eye lens and barrel distortion have been used since the introduction of consumer lenses around 1962 in photography. Now, you can use this effect in any scene, shot or illustration you want. However there are some situations where you can see the fish-eye effect used regularly. So, in no particular order of importance:
1. Peepholes. Those small lenses to look who is in the other side of the door. These gives to the viewer a wider FOV of around 180 degree.
2. Security cameras that implemented wide lenses to capture as much of the location as possible. One fish-eye camera can cover the same space that multiple standard lens cameras.
3. To capture either large or small spaces. Ideal for architectural structures like buildings, houses, apartments, studios and at the same time play with the effect of the hemispherical distortion. Also, using low angles you can make structures look bigger.
4. Focus attention on the center. Place your vanishing point in the center along with your subject(s) or object(s) and the curved distortion will help to focus the viewer sight exactly where you want. Keep in mind that anything in the center that is away from the lens or shooting point will be not affected or have minimum barrel distortion. You can use this to create contrast between distorted and not distorted elements.
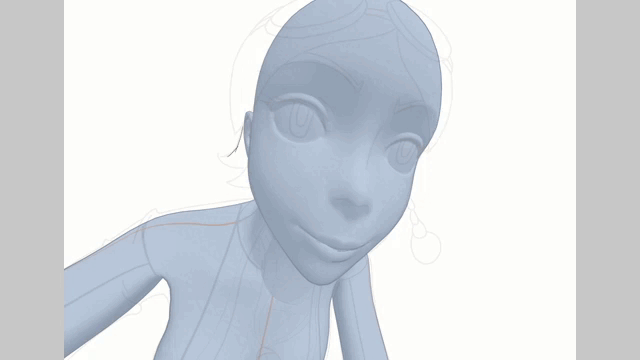
5. Personal Focus in characters. When you place the subject close to the lens or shooting point it will be affected by the barrel distortion. You probably have seen the fish-eye distortion when the focus is in the character facial expressions for close ups, portraits, selfies, group photos and so forth. Also, it can be use to show the state of someone at emotionally or psychological level.
6. Play with the Perspective. Place your angle above, below, at the left, right and create curved vanishing points that are not possible with regular rectilinear lenses. Using high angles you could make subjects and objects look smaller and with low angles you could make them look bigger. You can also use these to show more from the context of the frame/scene or to exaggerate superiority or lower rank in characters.
7. Dynamic and action shots. The barrel distortion can give some sense of dynamism or movement to the frame/scene or exaggerate it even more. Perhaps that is why fish-eye lenses were pretty popular around the 90s and early 2000s for extreme sports like skateboarding. And in different genre of music videos and cover album photos.
3. Fish-eye lens effect in Clip Studio (Diagonal & Circular)
There are more than just one way to create or replicate/emulate the fish-eye lens effect in Clip Studio Paint. From my experience you can use Filters (1), Rulers (2), Cameras on 3D layers (3) and Panoramas (4).
You can also adjust different values and sliders to produce both diagonal and circular images as if you were using a lens with low focal length either from 6 or 16mm.
3.1. Filters
You can use Filters in Clip Studio to try to replicate the fish-eye lens effect in your illustrations, photos or designs. We are going to see how to use the Fish-eye lens and Geometrical distortion filters to achieve that task. But first you will need to Merge visible layers to a new layer or duplicate the flattened layer you want to distort.
IMPORTANT: Always duplicate or keep the original editable version of the illustration, design or image in a separate folder, layer or file. That way you can always start again in case that you don’t like the result after using the filters.
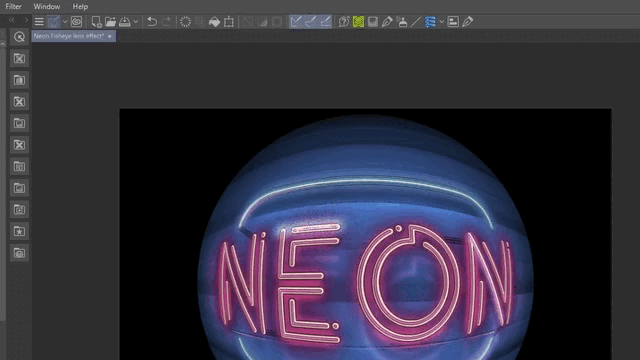
Select the flattened layer in which you want to apply the effect and go to the menu Filter > Distort > Fish-eye lens (1) or Geometric Effect (2). Then you can adjust different values to get a diagonal or circular image depending of what you want or need.
Fish-eye lens
NOTE: The illustration used in this section is on a A5 canvas so the aspect ratio is 4:3. If you image is in a different canvas or proportion you may need different values that the ones shown in this tutorial.
For a Diagonal image select the layer where you want to apply the effect and go to Filter > Distort > Fish-eye lens.. Choose [Area: Specify area (use Radius and shape)]. In Radius go to 100 and keep the Shape value around -0.30 to 0.18. Then move the distortion among 10 to 80. Keep in mind that although it will emulate the effect of the Fish-eye lens it won’t capture all the field of view (FOV) from the image.

Geometric distortion
For an elliptical or circular image place a black layer or background below to simulate the dark vignette of circular photos and select the flattened layer you want to distort.
Then go to Filter > Distort > Geometric Distortion. Adjust the Distortion value to an elliptical or circular shape from 0.02 to 1.00. Then move the Scale/ratio value to fill the frame vertically.

If you want a perfect elliptical or circular shape you can always use a mask after apply the distortion effect. Or add a Gradient layer with transparency above for the vignette effect.
Another easy solution is to make an Elliptical selection at the center and invert the Selected area with the icon in the selection launcher. Then fill the area around with black in a new Fill layer to simulate the vignette effect.

Then you can add a Blur Filter to the mask to make the edges softer. To do that go to Filter > Blur > Gaussian blur...
You can also use Geometric Distortion and try different values to get diagonal images from your illustrations, photos or designs. Or even use negative Distortion values to get different or reversed curved lines.
PERSPECTIVE AND VANISHING POINT
You can move the red “x” on the canvas to change the direction of the effect. From top to bottom or left to right you can achieve different results or try to replicate vanishing points.

However if you try to emulate the fish-eye lens effect from photography. Remember that subjects and objects at the center that are not close to the lens usually don’t have distortion. But if you place them really close they will be affected by the distortion.
3.2. Fish Eye Ruler
Fish-eye ruler works like regular perspective rulers with the addition of the barrel distortion. So, if you want to draw following the ruler remember to activate Snap to Special Ruler before you use it.
This type of ruler was introduce in Clip Studio version 2.0 and it is a great feature both for rulers and 3D layers as we are going to see later in the tutorial.
In this tutorial we are not going to see in depth all the functions of the ruler so if you want to learn more about the ruler controllers you can check the official tutorial from Clip Studio Paint:
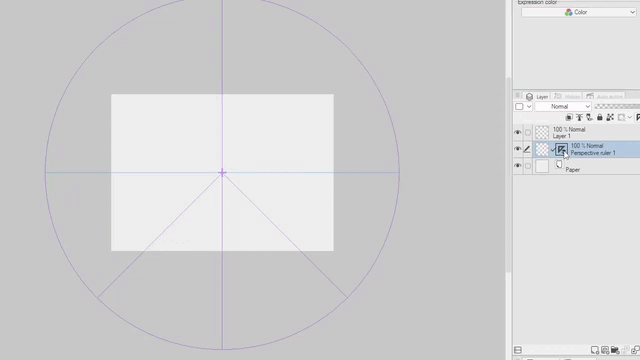
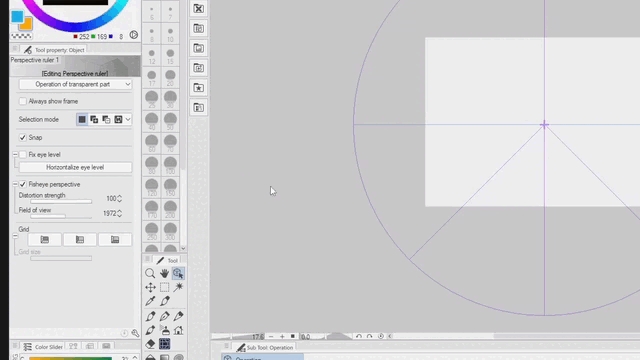
You can create a fish-eye ruler from Layer > Ruler/Frame > Create Perspective Ruler. Then select the number of point perspectives and check Fish Eye Perspective.
Let’s create a ruler with 1 point perspective which can give you a good result if you are planning to place the main subject or object somewhere around the center of the frame.
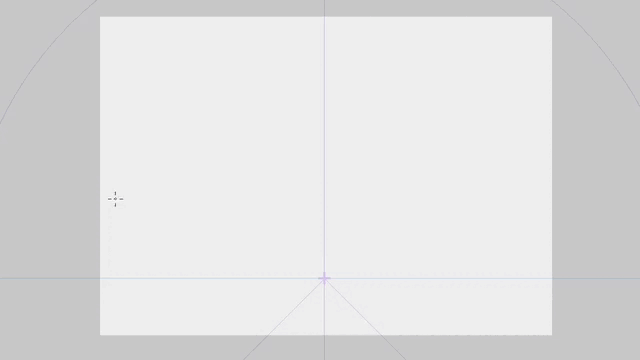
The ruler will be created with the focus of the lens in the center of the frame/canvas. And will be ready to start drawing a Diagonal image and not a Circular one. So, it will cover all the canvas from the top left to the bottom right.
Now, you can edit the Field of view from the Tool Property palette. Click on the ruler icon on the Layer palette and with the Object tool adjust the ruler from diagonal to circular as we saw earlier in the previous chapters.

If you wan to move the Fish-eye ruler make sure you have ruler selected on the Layer palette and click over the ruler in the canvas. Then use the Cross icon with arrows to move the ruler or use the arrow keys on your keyboard.
Before start sketching or drawing you can see some guides to know the orientation of the curved lines. Go to the Tool Property palette and click on the third Grid icon. You can adjust the size with the slider according to your needs.
There is one icon for every axis. And you can make them all visible at the same time or hide them if they get in your way.

Now activate Snap to Special ruler from the Command Bar and use your favorite brushes to start sketching or drawing.
You can also use the Figure tool and Direct draw Sub tools in both pixel and vector Layers.

If you want to turn off one or two guide controllers from the ruler you can click on the icon with the shape of a “diamond” close to the controllers. You will see that the color of the guide and the icon change.
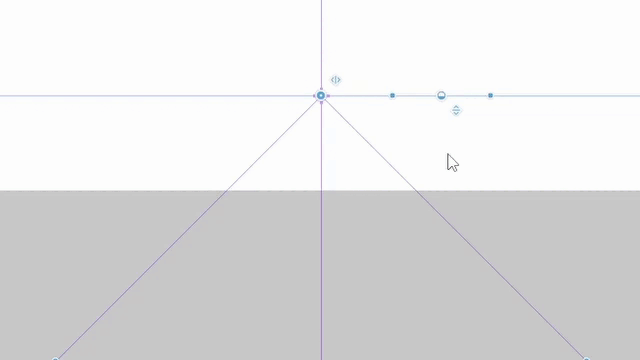
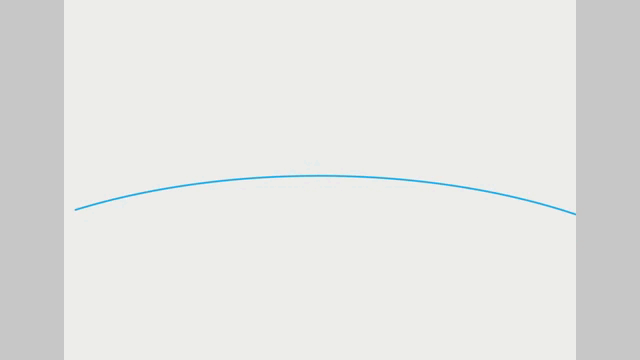
Leaving just one guide activate you can draw lines in just one direction whether is horizontal, vertical or diagonal into the vanishing point.

Then you can quickly draw or sketching thumbnails with the Fish-eye perspective. Remember that rulers can be use with more than just one layer just make sure the Ruler icon is active on the Layer palette.
Rulers also can be helpful when you try to use decoration brushes following the perspective of the frame. It will work the same way as with regular brushes. Give it a try.

If you want to learn more about the controllers you can check the official tutorial here:
3.3. Camera Perspective in 3D Layers
If you try to drop a 3D object with an existing Fish-eye ruler on your canvas, the object will not follow the perspective of the ruler as it does with 3 point perspective rulers.

Instead you can use the Camera Perspective from a 3D layer first. Then you can increase the perspective introducing distortion and create the Fish-eye ruler based on the perspective you have set with the camera. You can also use the 3D figure as a reference for your drawing but with some wide-lens distortion added to it.
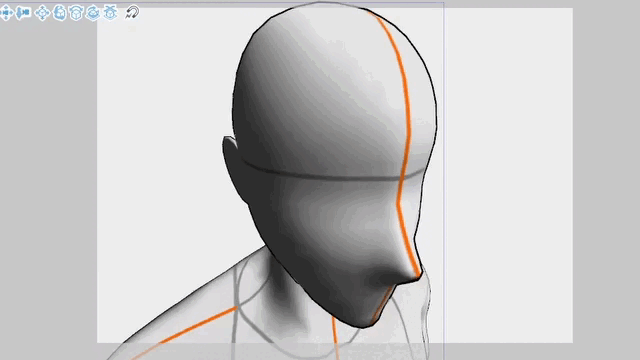
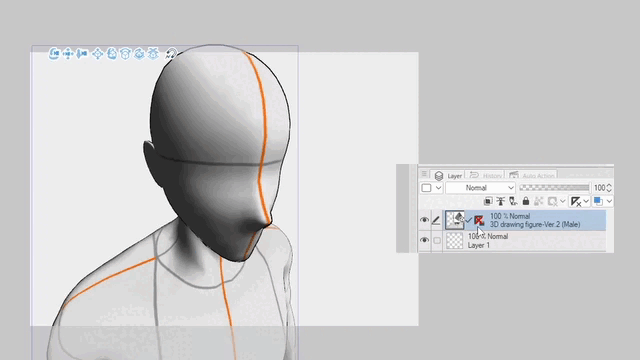
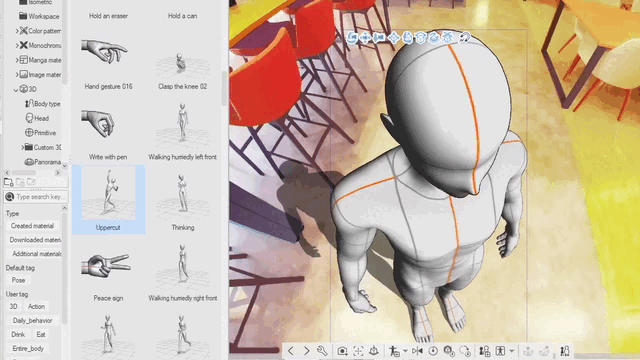
First, drag a 3D drawing figure, object or character to your canvas from the 3D Materials folder.

Then use the Camera controllers from the canvas or the 3 buttons from your mouse and place your subject in the frame. You can also use camera presets from the camera icon. For this example let’s place the camera close to the subject.

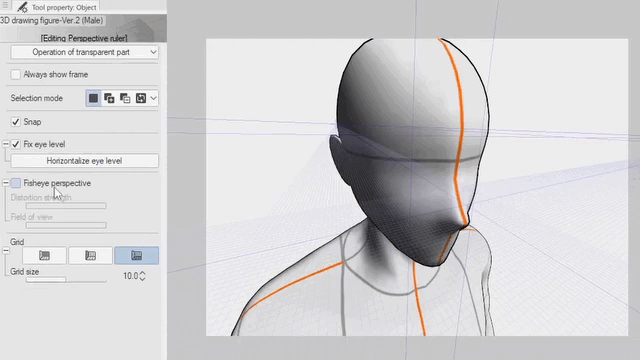
Now from the Property Tool palette find Angle > Perspective. If you can’t see the option click on the wrench icon and find it in the Sub tool palette. Then move the slider to the right to increase the value and see how the 3D object/subject is distorted by the perspective of the camera in the frame.

Use the Camera controllers again to adjust the subject with the new perspective and distortion from the camera.
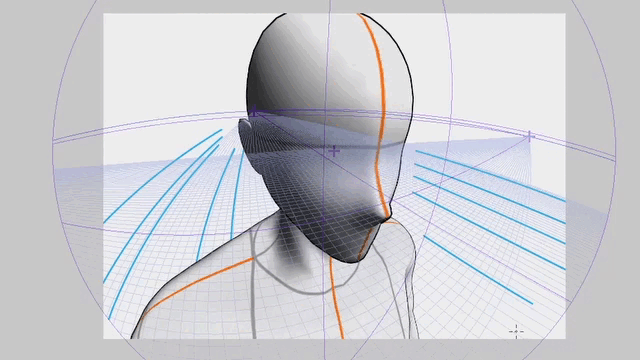
Now, to create the fish-eye ruler, click on the Ruler icon in the Layer palette. And you will see that the Perspective ruler is visible on the canvas.
Then with the Object tool selected go to the Tool Property palette and click on the Fisheye perspective check box. The ruler will change the rectilinear guide lines for curved ones.
Now you can use the ruler as a 3 point perspective Fish-eye ruler. Remember to activate the Snap to Special Ruler option from the Command Bar to follow the curved perspective.
If you want to use the 3D subject as a reference to draw. You will first need to deactivate the Snap to Special Ruler or hide the ruler from the Layer Palette in the "right click menu" or hold SHIFT and click over the icon.
Then you can do some sketching, inking and coloring over the reference. Here you can see the process for an illustration that could be use as a peephole door or to focus the attention at the center of the frame or in the character.
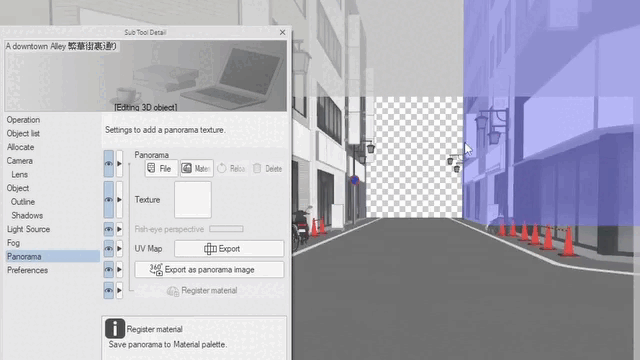
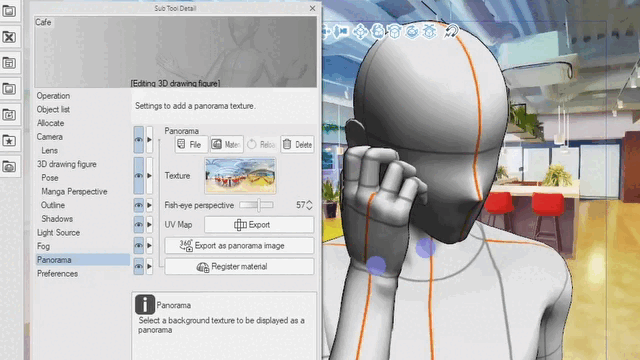
3.4. Fish-eye Panorama
Finally, you can also use the Fish-eye effect in Panoramas on 3D layers. Let's see how you can have a wider field of view with some barrel distortion in Panoramas.
First drag a Panorama from the materials folder into the canvas.
Use the left click of the mouse to rotate your view inside of the 360 degree Panorama.
Now from the Property Tool palette find Panorama > Fish-eye perspective. If you can’t see the option click on the wrench icon and find it in the Sub tool palette under Allocate. Then move the slider to the right to increase the value. You will see that the field of view gets wider like when you use a low focal length number like 16mm or less.
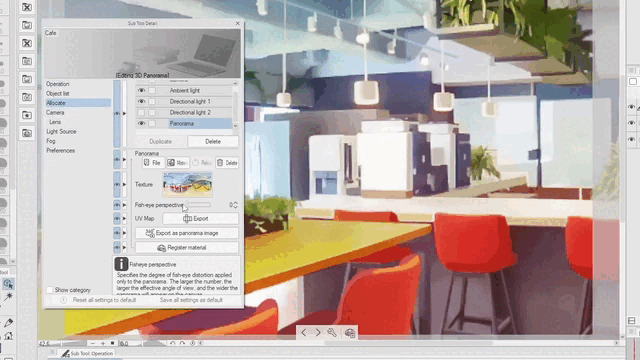
If you don’t see enough barrel distortion around the edges you can also increase the Perspective from the Camera. Like we did in the previous section.

Then you can play with both values to get the perspective and distortion that you want.
You can also add a Drawing figure or 3D object along with the Panorama.
Now, you can use the camera controllers from the 3D drawing figure to move or zoom individually the 3d reference. But if you use the rotate icon the Panorama will also rotate along with the camera.

You can also use Presets from the Camera icon on the canvas.
Then you can duplicate the camera from the Tool property palette and try different angles.

If you want to add some movement you can use 3D poses. Just drag one from the materials folder over the 3D drawing figure in the canvas to apply it. Or select one and click on the Paste selected material icon.
Finally you can use the 3D reference to do some sketching, inking, coloring, etc. Just in case you want to create a fish-eye ruler repeat the same process from the previous section. Personally, for drawing characters I prefer to keep the ruler hide most of the time.

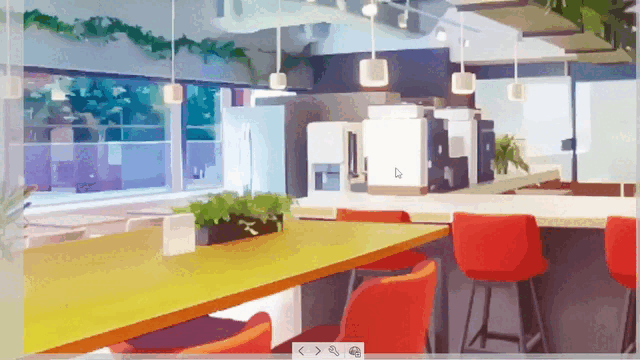
Here you can see an illustration that could be use as a selfie portrait, or someone that just found the security camera in the building, either way I hope you get the idea.
IMPORTANT: If you have your own 360 degree images you can use them too. Also Clip Studio let you to create 360 degree images from 3D scenes that you have made or bought in Assets.
Here you can see a Panorama image created from a 3D asset in Clip Studio Paint version 2.0.
To create a Panorama from a 3D scene. Go to the Tool Property palette Panorama > Export as panorama image. Or if you can’t see the option click on the Wrench icon and find it under Panorama in the Sub Tool palette. Then you can save the image as a Clip Studio file and export the panorama as JPG.
And to change the default Panorama click over the thumbnail or in the File button. Select the new Panorama and Open the file.
Why you should use a Panorama image instead of the 3D layer? I can think in two main reasons. First, your device (PC, Tablet, Phone, etc.) will probably work faster. And second you can add barrel distortion to no organic elements such as buildings or vehicles. In addition you can add filters or effects such as gradient maps in the clip studio editable file.
To learn more about Panoramas you can check the official tutorial here:
Summary and Conclusion
So, in summary you can create or reproduce the barrel distortion from fish-eye lenses in Clip Studio Paint version 2.0 with Filters, Rulers, Cameras in 3D layers and Panoramas. Also, you can decide if you want a Diagonal or Circular image adjusting the strength of the distortion.
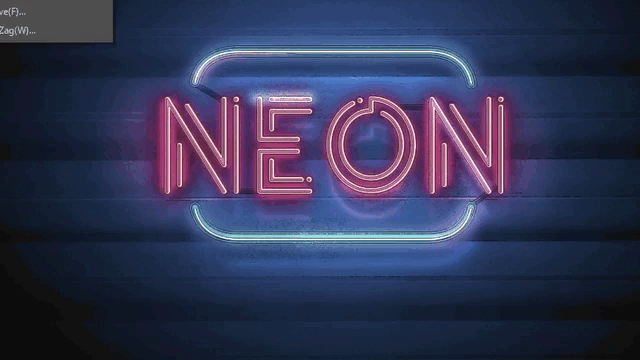
Whether you use the effect with different angles to make subjects and buildings look bigger or smaller. You can focus the attention to the center, on characters, and other type of situations like close up portraits or wide backgrounds, dynamic scenes, to distort neon text images and more.
I hope you have found something useful in this tutorial. Feel free to leave a comment or share your thoughts about the subject below. This is Ed saying until the next one.
For more tutorials about 3D layers you can check:
Users who liked this post


Comment