
Presentation
Hello! Welcome, I'm Aria and I'm delighted to have your visit. On this occasion we met here to learn about the new CLIP STUDIO PAINT filters, their characteristics, uses, and in general, how we can enhance our art with them, especially with these that are classics in terms of improving illustration.
Good good. Without any more preambles…
Let's get started!!
0. Video
1. Considerations
There are certain considerations about these new filters that we must keep in mind when using them, among them we have:
• Filters are applied on a single layer; knowing this, what has to be done when we have many layers making up an illustration is to combine them all into one before using the filter.
If you have many layers we can put them in a folder. An easy method to select multiple layers in seconds is to hover over the second rail of the layer window while left clicking with the mouse (the boxes in that column should appear with a check mark) or if you are working with a pen ( in the case of graphic tablets and tablets) just go over it by clicking. Now all you have to do is drag the first selection to the folder icon and drop.
Once in the folder you have to right click on it and choose the option: Combine selected layers. Done.
*• Filters are destructive;** this roughly means that they will be applied directly on the illustration layer and not on a layer above it. This can lead us to lose the original version without the filter.
To solve this, it is advisable to create a copy. Creating a copy is easy; there are two methods:
1. Right click on the thumbnail; In the drop-down menu go to the option: Duplicate layer.
2. Having the layer selected, press “CTRL plus C” on the keyboard to copy and “CTRL plus V” to paste.
Optionally, you can completely lock the editing of the original layer to avoid any mistakes by clicking on the lock found in the command bar at the top of the layer list.
• Filters are applied to the entire layer; this feature can be a difficulty if we only want the effects to be present in specific sections or to have a blurred edge effect, but that's okay, there is a method to do so. deal with this setback.
The solution I bring you is the following: First we will create a copy to which we will apply the filter(s), now on this copy we will create a layer mask. Masks are generated by clicking on the white icon with a circle in the center found in the command bar above the list of layers.
The reason I use this method is because it is non-destructive, it works like a fake crop, allowing me to hide or appear sections. To recap, remember to keep the original layer visible so that when you delete, the layer below can be seen without filters.
On the right side a white thumbnail will appear, this will be the one we must select. To erase the parts that we do not want, we must use the eraser or the black color with any brush or tool, and to reappear what was erased we will use the white color. Another advantage is that when using a brush to erase, its texture will be preserved.
• Filters can be applied within a selection; simple, using the selection tool in any of its versions we can delimit an area and apply the filter only to that area.
For example: In this illustration I want the eyeball to have a noise effect, to achieve this select the outline with the lasso tool, and finally apply the filter to give a somewhat gloomy effect.
2. New filters
The launch of version 3.0 of the program surprised us with the incorporation of some important filters for illustration; effects, which it goes without saying that they are widely used by various digital artists. These new filters are:
*•** Chromatic aberration
• Noise
**Vintage movie
** Pencil drawing
(A) Chromatic aberration
Chromatic aberrations are super famous for giving that futuristic effect with their color decomposition. Before, to achieve this effect we had to do it manually by duplicating and changing the tone of the image, but now everything will be easier.
To go to this effect we must access the following path: Filter > Effect > Chromatic Aberration.
Now let's see how the filter configuration window works:
• Radial mode: Radial mode applies the effect with a circular expansion. An “X” will appear on the canvas, marking the center of the circle, as well as a sign that the effect will not be applied in that area. We can move the “X” around the canvas; With this we were able to emphasize the area where the filter will not be applied.
• Lateral mode: On the other hand, with this the chromatic aberration will move in one direction. To indicate the direction we will have to move the slider in the “Angle (A)” section.
• Intensity: The density slider allows us to precisely measure the intensity level; from subtle to over the top in both modes.
(B) Noise
The noise effect is my favorite of all the recently added effects; Because? Well, you should know that I love textures, I want to add textures to everything and now with this effect everything has become easier.
The effect is located in the following path: Filter > Effect > Noise.
Its interface is very easy to use, in it we find two modes: Color mode and gray mode. To modulate the intensity of the grain we must use the bar: Noise intensity.
• Color mode: With this mode we achieve a grain that has a subtle chromatic aberration effect. A very beautiful effect if you ask me.

• Gray Mode: This, on the other hand, only provides grayscale grain. An elegant and classic way.
(C) Vintage movie
This effect gives us the perspective of an old movie scene with warm orange colors.
We find it in the following path: Filter > Effect > Vintage Film.
Within the configuration we have the following characteristics:
• Presets: Here we find three options that automatically configure the values of: Effect, intensity and noise intensity. These default settings are: Vintage, modern and warm. The last “Nothing” has its overridden values.
By selecting each of these we would obtain the following results:
• Effect: Here we find five filters that we can apply to the illustration if we want to adjust it manually without depending on the presets.
By selecting each of the filters we obtain:
• Intensity: This slider controls the degree of noticeable chromatic aberration.
• Noise intensity: Here we have the controller for the intensity of the noise particles.
(D) Pencil drawing
Lastly we have the pencil effect; As its name says, with it we can achieve a texture that simulates a traditional illustration. Additionally, it should be noted that this effect looks very good with a grayscale finish.
To find it we must go to the following path: Filter > Effect > Pencil drawing.
Upon accessing, you will find this window more complex compared to the previous ones, but easy to decipher; Now let's see what it is:
1. Show contour: This is a fundamental option, it is what allows the contours to have the effect of a pencil line. In addition to also serving to extract the line of photographs in a rudimentary way in case we do not have the “Extract line” function available for the EX version of the program.
To get an image with only the linear one we will have to deactivate the box: Show feathering and have a blank layer below the edited layer.
2. Show feathering: With this option we obtain the pencil stroke texture over the entire illustration. When it is activated, the color that was lost when only the first box was activated appears.
NOTE: Options 3, 4 and 5 are closely related to this second one, because they precisely control the feathering characteristics.
NOTE: We can have “Show outline” and “Show feathering” active at the same time, and if so, the outline of the line will become more noticeable. For example, the image on the left only has “Show feathering” active and the one on the right has both.
3. Brush size: Here we have the slider that allows us to control the thickness of the strokes.
4. Roughness of the feathering: With this option we can change the length and intensity of the stroke.
5. Feathering angle: Finally, we find the configuration that allows the direction of the stroke to be modulated.
NOTE: To obtain more realistic results, I advise avoiding using exaggerated angles. Not so pronounced inclinations are considered natural.
6. Export in grayscale: When this box is checked, the colors in the artwork will be converted to a light grayscale.
3. Filters in action
Lastly, I will show you the process I followed using some of these filters to give the final touches to the illustration.
The illustration I will use will be the following:
- Noise -
The first filter I will use is the noise filter. Because? You will wonder; Well, the reason is very simple, it is due to a technical principle. When we take a photograph in a dark atmosphere, it usually happens that it comes out with noise, this is due to lack of light or a bad shot. In this case, since the girl is in the middle of a vacuum with a headlight, it is convenient for the noise to be noticed.
I will place the noise with a value between 10 or 15 so that it is not so exaggerated and ruins the image. I consider that only in static circumstances is excessive noise appropriate.
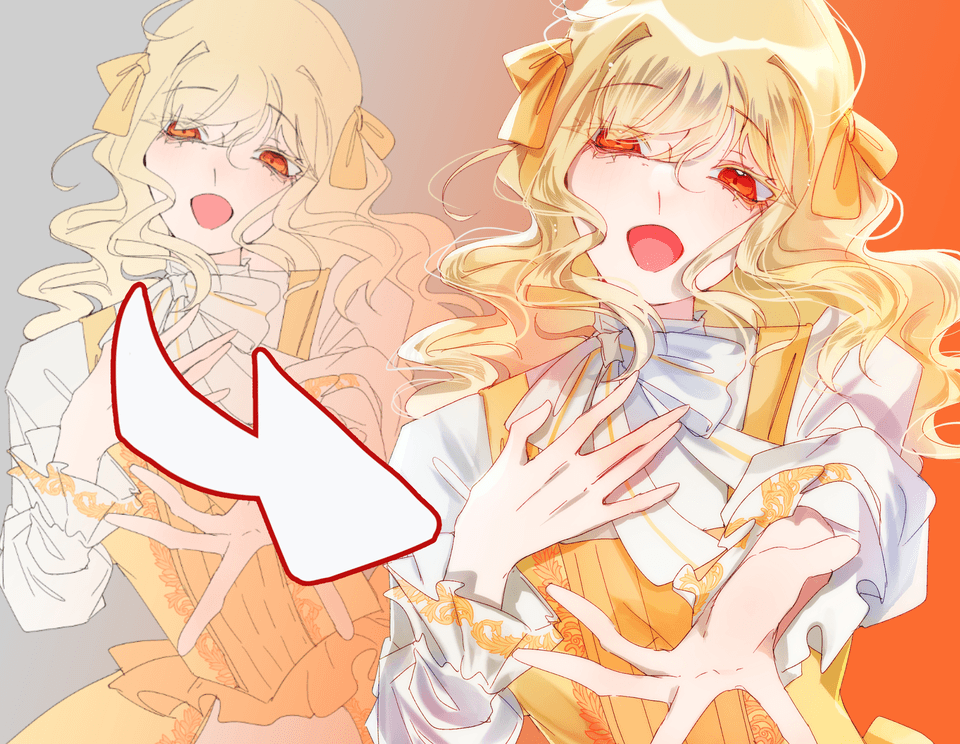
- Chromatic aberration -
Now I will use chromatic aberration, to give it a colorful blur effect. In addition to being a photographic error and the essence of this illustration is to imitate a photograph.
The effect will be applied to the entire image, but I don't want this. I'll erase the sections of the face and a few of the flowers. To achieve this I will use the layer mask in case I change my mind later and not have to apply the filter once again.
Farewell
Finally, don't forget to experiment with all the filters, combine them with each other and with other functions, to get to know them better and find out what is the best way for you to use them.
I hope that what you see in this tutorial is helpful to you. Well, without anything to say, thank you for coming this far! ପ(๑•̀ुᴗ•̀ु) ॣ৳৸ᵃᵑᵏ Ꮍ৹੫ᵎ ॣॣ
We won't see you another time ( •⌄• ू ) ✧
Learn more about me at:
Users who liked this post


Comment