
ANIMATION SHOWCASE


Ayo everyone, I hope you enjoyed my animation showcase featuring my original characters!
I am hwancept, nice to meet you!
So, you wanna know how to use Clip Studio Paint program for character animation?
Then you’ve come to the right place!
- - -
Just so you guys know, I am currently using Clip Studio Paint EX (Version 3).
Clip Studio Paint PRO is limited to only 24 frames, while Clip Studio Paint EX has unlimited frames.
When picking between PRO and EX, it completely depends on how you want to make your own character animation.
With that said, let’s get started with learning to how to use Clip Studio Paint’s animation features!
In case you want to know your program’s version information, go to [Help] >>> [Version Information…].
You will see a pop-up of [Version Information] window.
You can find the complete information on the top left corner of that window.
I realize the index section can be super intimidating, but this tutorial also acts as a refresher for me to handle the program and animation better.
When I first got the Clip Studio Paint, I had hard time getting started with the animation since I literally had no idea how to work with the animation features.
It was a lot of guide searching and messing around with Clip Studio Paint program.
Hopefully, this tutorial, based on my knowledge so far, will help with that.
CLIP STUDIO PAINT ANIMATION INTERFACE AND TOOLS
This is for anyone that needs help with navigating Clip Studio Paint program and making the most out of its animation features.
This is probably the most boring part, but I assure you that knowing the interface and features will make your animating process much more easier!
- - -
If you already know the technical aspects of Clip Studio Paint’s animation interface and tools, you may skip to the “VERSION 3 - IMPROVED ANIMATION FUNCTIONS.”
Those are pretty new and I highly recommend giving this a read if you are curious about what the Version 3 has to offer for animation.
-- CREATING NEW ANIMATION FILE
Open your new animation file by going to [File] >>> [New…] >>> [Project: Animation].
-- SIZE OF OUTPUT FRAME
Drawings inside that blue border will only be displayed in exported files such as GIF or Movie.
Anything that’s outside of the blue border will not be displayed in the exported files.
For unit type, I always work with unit of pixel (px).
1920 x 1080 resolution is pretty much a standard for a character animation project, but you can always opt to difference sizing.
Perhaps in square resolution, such as 2000 x 2000.
It is entirely up to you!
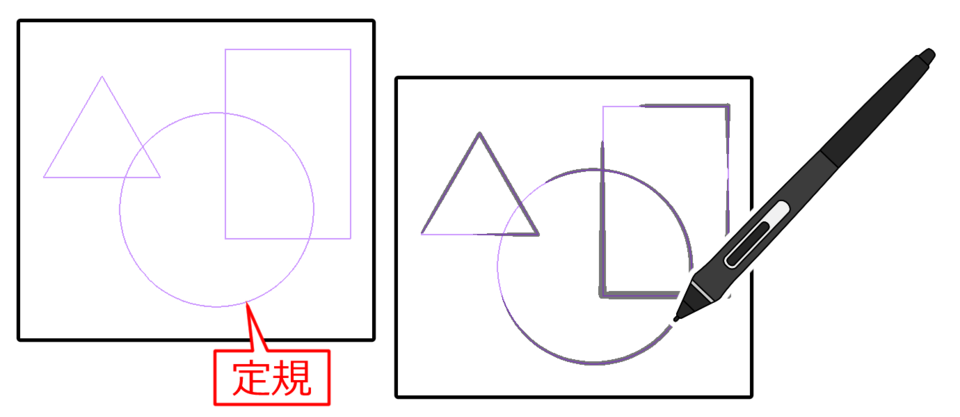
-- BLANK SPACE
I do recommend working with [Blank Space] feature.
It’s a lot more easier to draw out the character a bit outside of the blue border, so you can work with its animation better.
It is also practical for minimal camera work.
-- FRAME RATE AND PLAYBACK TIME
You can always adjust the [Frame Rate] and [Playback Time] at any time after making a new animation file, so do not worry too much about it for now.
- - -
When setting the [Frame Rate], I do recommend the range between 10-24 frames per second. It really depends on your project!
- - -
[Playback Time] is simply the total number of frames, or the clip length.
For example, if you set the playback time to value of 72, then you will get the empty clip, with a length of 72 frames.
-- TITLE-SAFE AREA AND OVERFLOW FRAME
Just so you know, I will not be fully covering aspects of [Title-safe Area] and [Overflow Frame].
However, I can explain them a bit shortly, they could be useful for your character animation projects.
For [Title-safe Area]… it is an extra output border guide for your animated work.
This is to ensure that any objects displayed there are viewable on other users’ different screen resolution types.
As for [Overflow Frame]… this is more practical for heavy camera work, since that function will give you much more open space to work with.
- ANIMATION FUNCTIONS AND TOOLS
First, let me explain the difference between frame and cel.
Frame is a slot in timeline, while cel is your individual drawing.
You insert a specific cel (drawing) into a specific frame (slot), in order to have it be displayed in an animation.
- - -
With that said, let’s get to the functions and tools for animation!
- TIMELINE INTERFACE
This is where you will do most of the animation work there, so this is definitely really important to know if you want to get started with the project!
- - -
If you are unable to find [timeline] window, then go to [Window] >>> [Timeline].
You will get a [timeline] window that looks like that:
You can use the zoom buttons (the magnifying glass icon) to take a closer look at the cels, or looking at the big picture of all the cels and clip length.
You can find useful buttons such as play button; single frame button; and start/end frame button to test and watch the animation in your workspace.
The loop or replay button can be toggled.
This will come in handy for watching the replays to catch any animation errors.
No need to press play button every time the animation ends.
You can stop the loop by either pausing it or clicking on other tools.
-- TIMELINE PALETTE
We will start with [timeline] palette, this is where you do all the work with cels and frames.
Just so you know, cel is an individual drawing, while frame is a slot.
-- FRAME NUMBERS
This is where the frame numbers are marked for each column.
This is for your convenience of checking the timing in your animation.
I will discuss more on that when we get to the actual character animation!
It also has an interactive function!
You can click and hold that section, and then SCRUB it!
This is useful for checking the motions in certain section of the animation.
-- TIMELINE CLIP
This is a clip for a specific animation folder.
Individual clip will be made in every row for each of animation folder, raster/vector layer, regular folder, or Paper layer.
I would recommend labeling your folders and layers for ease of tracking.
-- BLUE START/END FRAME FLAGS
You probably would notice the blue flags in between the clip.
Those are your start-frame and end-frame flags.
This is how you would know where the animation begins and ends.
You can freely adjust them by holding that blue rectangle and then dragging it to your desired length.
It will not adjust the clip length accordingly to the blue flags, so keep that in mind!
NOTE FOR VERSION 3 USERS: You can actually do so if you have an auto-extend clip length function enabled.
-- EDITING CLIP LENGTH
If you take a much closer look at the clip, you might see the thin bar above the clip.
It is separated into three sections: one short-right bar, one long-middle bar, and one short-left bar.
The short bars are for extending the clip length!
This would benefit more for EX users, just so you guys know.
- - -
As for long-middle bar, it has two functions, depending on how you interact with it.
- - -
By holding that long-middle bar, it allows you to drag the entire clip to the left or right.
This will help with efficiently moving a group of cels at once to their desired position.
Remember, you cannot drag it to different rows, only the row it was assigned in!
- - -
On the other hand, if you right-click the long-middle bar, you will get a menu for editing the clip.
The menu will look like this:
So far, I only used Delete, Copy, Paste, Merge Clips, and Split Clips for making a repetitive cycle animation.
Something like blinking, hair swaying, or walking.
- - -
I also used Insert Frame and Delete Frame in order to make the motion look slower or faster.
When a cel (drawing) has many frames (slots), it will stay on the screen for as long as it takes.
On the other hand, when a cel has fewer frames, it will look temporary on the screen.
-- ANIMATION CEL
The number/name inside that clip is your cel!
Cels are usually named in numbers, and sometimes combination of a number and a letter.
The cel shows where your drawing will appear in the animation.
You can click and hold that cel to drag it around the clip to a specific frame.
This is how you time your cel drawing’s appearance on the screen!
The cel will continue to display on the screen until it reaches either the end of the clip, OR in certain amount of frames before another cel appears to show the new drawing.
That is the secret to “timing,” one of the animation principles.
I will explain more on that when I get to the actual animation project, look forward to that!
This button will make new cel for you to draw on.
First, click on a specific frame on the [timeline] palette and then press this button to make a new cel.
It will place the cel in that specific frame.
-- UNDERSTANDING THE RELATIONSHIP BETWEEN CELS AND FRAMES
Now that you have seen cels and frames on the [timeline]…
It’s important to remember that the cel is an individual drawing for an animation, while frame is a slot in the clip.
You would notice that both cel and frame have similar naming convention, which is in numbers.
The cel number is simply a name/label for cel.
You can always change its name by renaming the cel’s layer.
This is supposed to help you identify which cel number to track, assign, or delete from the [timeline] palette.
- - -
On the other hand, the frame number is simply for cel’s timing placement.
You would notice that the frame is divided for each number as a column.
Those columns are meant to help you keep track of when a cel should appear on the screen.
I can make the relationship of cels and frames easier to understand, hopefully!
To understand that, let’s make the Cel name be letters.
Those are your drawings.
The numbers on the top are Frame numbers (you can disregard 0 and 24).
The numbers displayed there are always odd numbers!
Those are your slots.
- - -
You noticed Cel A is in Frame 1, you will see that drawing for 1 frame, before Cel B quickly takes over in Frame 2. This is called one’s.
Cel B is in Frame 2, you will see it for 2 frames, until Cel C drawing appears in Frame 4. Including Cel B’s column and the next column before Cel C, that the total of two columns. This is called two’s.
Cel C is in Frame 4, you will see it for 3 frames, until Cel D drawing appears in Frame 7.
That’s the total of three columns, so this is called three’s.
Cel D is in Frame 7, you will see it for 4 frames, until Cel E drawing appears in Frame 11. That’s the total of four columns, so this is called four’s.
Cel E is in Frame 11, and you would notice that Cel E drawing will essentially stay on screen until Frame 24, ending the animation.
- - -
Now you know how the frames affect your cel drawing’s appearance on the screen!
-- ADD OR REMOVE CEL FROM SPECIFIC FRAME
If you wanted to reuse the same cel in different frame, then this [assign cel to frame] button will do the job!
Simply click on specific frame in the clip, and then press that button.
You will be prompted to pick or type out the specific cel number to assign into that new frame.
If there are cels that are not needed from your animation, you can use [delete cel] button to remove any cel from the [timeline].
While the cel is deleted, the original layer will remain intact, but it will not show up on animation.
This is something to keep in mind.
I should mention that while the original layer exists in the [layer] window, the layer name/label is still a cel number.
This might cause the algorithm to force new cel to use slightly different naming convention.
I would recommend to either delete that layer, or rename it to something else that isn’t a number or a combination of a number and a letter, for organization purposes.
- ANIMATION FOLDER
This will make new animation folder.
You can create multiple animation folders and they will work like layering, similar to how you would layer an illustration with line-art, coloring, and such.
When you have a new animation folder created, then that’s when you can start working with cels.
Make sure to remember the difference between animation folder (top) and regular folder (bottom)!
You see, while you use raster/vector layers for cel drawings, you can also use a regular folder as a cel drawing.
You can rename a regular folder to match one of the cel’s name in the [timeline].
It will become a cel drawing.
I included lineart layer and color layer in the regular folder with assigned cel’s name.
This will make it more convenient if you prefer to draw and color together in a single cel drawing.
The layer’s name inside the regular folder will not affect the cel placement.
As long as the regular folder’s name matches the cel name, you can go wild with the regular folder’s layer name.
- - -
Technically, you could call it as a “cel folder” instead of a “regular folder”…
Anyway, the issue will arise if you have two cel drawings (regular folder and/or raster/vector layer) that share the same cel name in the [layer] window.
For example:
If you do something like that, you will get this warning message, so simply press ‘ok’ and then rename one of the cels accordingly.
-- QUICK ANIMATION TAB MENU
You can quickly access to [Animation] tab by clicking on that icon in the top left corner of the [timeline] window.
The icon looks just like that: [ ≡ ].
This [Animation] quick menu will be very useful if you wanted to change some settings for your animation project.
In fact, I do recommend checking out [Thumbnail size] and set it to [None].
This will make timeline a lot more easier and neater to follow.
That is up to you, though!
- ONION SKIN TOOL
Literally every animator’s best friend, I’ve known that good onion pal since 2009!
Anyway, this is especially useful if you wanted to make an in-between drawing between two cel drawings, to complete a motion.
Check out the buttons in your [timeline], this is where you can toggle [onion skin] tool quickly!
With the [onion skin] enabled, I am currently viewing my cel drawing (1a) in Frame 4.
I can see the red cel drawing from previous frame, and the blue cel drawing in next frame.
The frame length does not matter as long as the cels are next to each other.
You might noticed that the [onion skin] color is different on your program, that’s because I changed the color via [onion skin] settings.
You can adjust the [onion skin] settings by going to [timeline] window, like so: [ ≡ ] >>> [Show animation cels] >>> [Onion skin settings…].
Feel free to play around with the onion skin settings after doing some bit of animation projects, and see what needs to be changed.
- LIGHT TABLE TOOL
[Light table] works almost like an [onion skin] tool.
Except that you can interact and manipulate the selected cel(s) to help with the consistency for drawing current cel.
You can also zoom or rotate the canvas to assist with drawing moving figures for consistency.
The [light table] tool basically makes a copy of an original cel of your choice.
That copy can be viewed only when the [light table] is enabled.
The color will be different, similar to [onion skin] coloring.
You can also manipulate that copy while the original cel remains unchanged.
I mostly used [light table] tool to help me with measuring the proportion in relation to the distance, or if I wanted to reference back to certain cel that is way far behind in the clip.
It’s kind of a learning curve for me, so I can only share what I understand in regard to that [light table] tool.
To find [light table], go to [Window] >>> [Animation cels].
I recommend displaying both [layer] window and [animation cels] window at once in your workspace for animation!
I find it more easier to work on them together.
You might notice it will show either two or three sections.
I had three sections activated.
Top section is “Edited cel,” which is where the cel will be displayed for you to work on along with [light table]’s cel copies.
Middle section is “Cel-specific light table,” which is where the [light table] cel copies will be displayed only in selected cel to work on.
Bottom section is “General light table,” which is where the [light table] cel copies will be displayed in all available cels.
I will show the photos to demonstrate those differences.
-- ENABLE LIGHT TABLE
First thing first, if you want to use [light table] tools, make sure to toggle that button to enable it.
You can always disable it quickly, once you are done with the [light table] tools.
-- WORKING WITH TWO DIFFERENT TYPES OF LIGHT TABLE
There’s two buttons that I used most often.
The left button is a [show cel-specific light table].
The right button is a [show general light table].
It is up to your preference and your project.
--- CEL-SPECIFIC LIGHT TABLE
This is the [cel-specific light table].
You may noticed that a [light table] copy is displayed in specific cel that is being edited, and then simply disappears when you select different cel to edit.
This is useful if you wanted to allocate all the [light table] copies only to a specific cel to edit.
--- GENERAL LIGHT TABLE
This is the [general light table].
You may notice that a [light table] copy is displayed in all cels that are being edited.
This is useful if you wanted to continue working with same [light table] cel copy in other cels to edit.
-- MOVING, ZOOMING, AND ROTATING THE CANVAS
In the [cel-specific light table], when you click on that layer with a special icon marking, you can freely move, zoom, or rotate the canvas for your convenience.
The cel drawings will not be affected; HOWEVER, the [light table] cel copies will remain in the same position.
For example, if you rotated the canvas, the [light table] cel copies will not rotate and will remain unaffected.
-- MOVING, RESIZING, FLIPPING, AND ROTATING THE LIGHT TABLE'S CEL COPY
In any kinds of [light table]. you can select any of the [light table]’s cel copy to adjust.
The two-tones marker is an indicator that it is a cel copy.
You can adjust the cel copy to your liking without affecting the original cel copy.
You can also make multiple same cel copy and/or variety of cel copy (notice the layers’ numbers!).
They are complete independent of each other, so you can literally have multiple cel copies with different adjustments made to each of them.
Again, the original cel copy will remain unaffected.
-- CREATING LIGHT TABLE COPY
To create a [light table] copy, simply drag one of the layers from the animation folder to [cel-specific light table] and/or [general light table].
You can also drag the [edited cel] layer into other [light table] sections, but I prefer to do that directly from the animation folder in the [layer] window.
-- QUICK TIPS ON LIGHT TABLE'S CEL COPY ADJUSTMENTS
This is for resetting the [table light] copy.
Any adjustments made to that copy (sizing, flipping, rotation), will be reset.
This is lot more quicker for me to use it to flip the [light table] copy in order to draw characters facing opposite direction.
I had it enabled to toggle the opacity of all the [light table] copies of cel drawings.
This is useful if you want to delete certain copies from the [light table] for whatever reasons you have.
You have to select any of the specific [light table]’s cel copy first!
-- ADJUSTING LIGHT TABLE SETTINGS
You can adjust the [light table] settings by going to [File] >>> [Preferences] >>> [Animation].
I noticed that Version 3’s [Preferences] now includes everything from [Animation] and [Light Table].
You would probably see just the [Light Table] in older Versions.
- MAPPING SHORTCUT KEYS FOR ANIMATION COMMANDS
I highly recommend that you set up the shortcut keys for the animation commands!
You can do so by going to [File] >>> [Shortcut settings…].
Make sure the category is labeled as “Menu commands.”
Then, click on [ > Animation ].
You will see wide variety of animation commands for shortcut keys mapping.
-- SHORTCUT KEYS FOR PREVIOUS FRAME AND NEXT FRAME
I do recommend setting up shortcut keys for [go to previous frame] and [go to next frame].
This will make it much more easier and quicker to alternate between two cel drawings.
In my case, I assigned them with my number keypad.
Num1 for [go to previous frame] and Num 2 for [go to next frame].
VERSION 3 - IMPROVED ANIMATION FUNCTIONS
To anyone that is unsure or currently own Version 3 upgrade, this section will explain new animation perks that are helpful.
In fact, I actually needed those features long ago for better work efficiency in animation.
Like, I actually got more productive compared to the other versions.
- - -
You can find most of the Version 3’s animation features via [File] >>> [Preferences] >>> [Animation].
- COPY AND PASTE CELS
VERSION 3 ONLY
Paste to cels function has two options: [paste to selected layer] or [paste to new layer].
It is up to the user, but I tend to go with [paste to selected layer] since I feel like I have a lot more control that way.
I find this especially useful if you wanted to copy a drawing (part or whole) from a cel and then paste it into another cel.
This just makes animation process much more quicker and easier.
- - -
I apologize if I got this wrong, but I remember in Version 2, it was not possible to paste anything in layer within the animation folder.
I think I used to copy the layer from an animation folder, and then paste it outside of animation folder.
After making adjustments to the copy, I renamed the layer to match the next cel’s name. And finally putting it into that animation folder.
I mean, it’s a workaround in a way, but it totally interrupts my workflow.
Pasting cel drawings in layers window was one of my most needed feature from Version 3.
- ADD/DELETE CELS VIA LAYER WINDOW
VERSION 3 ONLY
Now, this function is especially one of my highest demand from Clip Studio Paint’s animation feature.
You can now add cel to specific frame by adding a layer in an animation folder.
And you can also delete cel from specific frame by deleting a specific layer OR removing it from animation folder.
When you delete cel on the [timeline] window, that cel’s layer still remains, but will not be displayed on your animation.
Version 3 function will simply delete the entire existence of that cel by deleting its specific layer.
- AUTO-EXTEND CLIP LENGTH
VERSION 3 ONLY
If you see the blue end-flag in your [timeline] palette, you can extend it by dragging that blue rectangle. The clip length will automatically extend.
If you do not have that auto-extend function enabled, then the clip length will remain the same until changed manually.
It is up to your preferences.
In my case, I had it activated, so that I can quickly extend the clip length.
PREPARING FOR CHARACTER ANIMATION - THE FOUNDATION
Want to know how to get started with character animation project, but feeling lost and overwhelmed?
Then, we can get started by breaking things down into smaller, manageable tasks!
- CHARACTER REFERENCE SHEET
A character reference sheet should have models in different angles and color palette.
This will be helpful should you plan to make character animation with your own characters.
This will avoid the hassle of recalling the design or color.
In fact, you can always refer to it on [Sub View].
You can find it in [Window] >>> [Sub View].
You can even use color pick from the reference sheet in [Sub View] for easier coloring process.
Only you, yourself, know your own characters well.
And it’s not just the design and coloring, you should also consider knowing their personality, lifestyle, and facial expressions.
This will help you get a better idea of what you want to create in a character animation.
For example, knowing a character is a social recluse, so they might be timid. Maybe their body expression is limited or their facial expression could be mostly shy.
This will help you plan out better and even give more life and personality to your character animation.
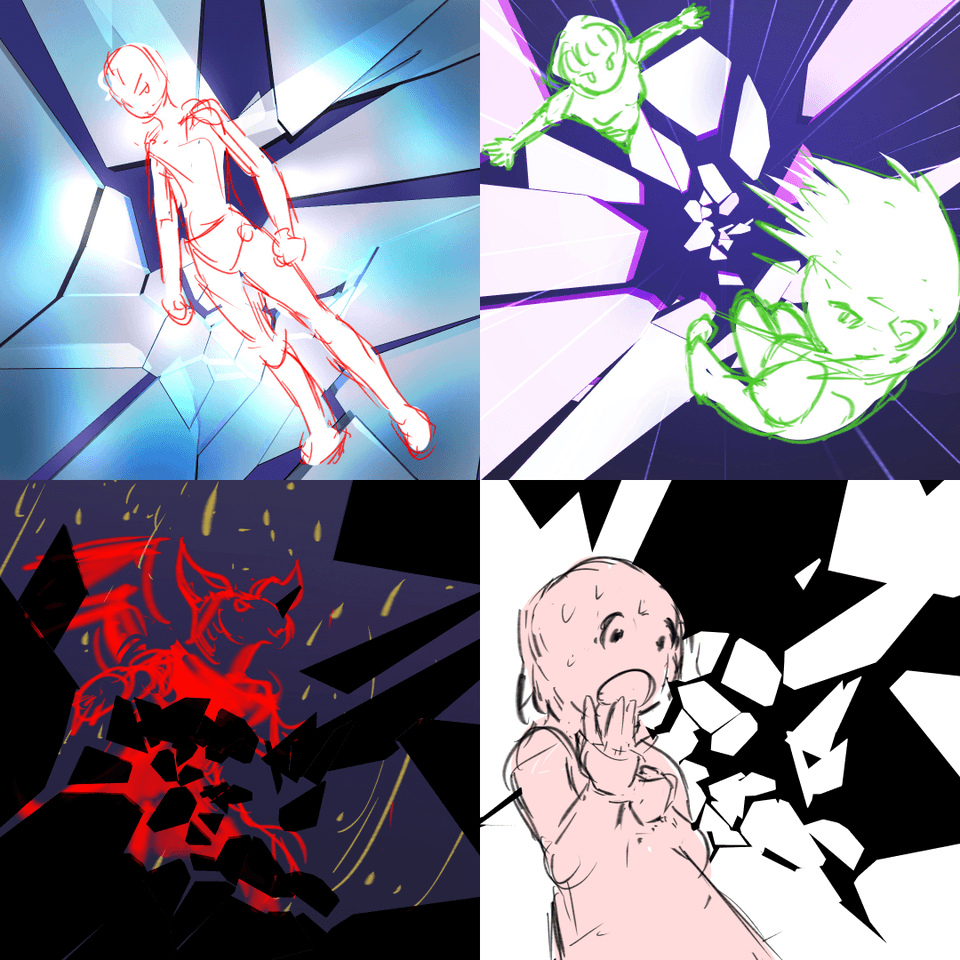
- MAKE THUMBNAILS
It is helpful to make thumbnails to keep track of what you are going to animate, from the beginning to the ending.
Think of this as making a quick comic.
Remember, animation involves making multiple artworks, so it may get overwhelming.
Without a plan, it’s easy to lose sight of the end goal in your animation project.
It definitely helps to prepare quick drawings for starting frame and ending frame, so you know exactly what to animate.
After testing out the rough animation, I decided to stick with just 3 characters/poses.
- USE STOPWATCH
It is helpful to time certain actions, so that you know how many seconds it take to complete a motion.
For example, you start a stopwatch for a walking motion (about three steps), and you get roughly 3 seconds.
If you plan to animate in 24 frames per second (based on the file’s frame rate), then you should multiply 24 frames x 3 seconds to get the total frames: 72 frames in 3 seconds.
You do not need to be exact in following the stopwatch timing for your animation.
This is simply for getting a rough idea of how many frames are needed to be able to display that motion.
- ACT IT OUT
Animators, especially in character animation, are also actors… in a way!
When you are set with the actions or expressions that are conveyed in your thumbnail or other kinds of rough planning… it’s time to act it out!
You may use the mirror, or record yourself acting as your character.
This might be embarrassing, but I can assure you, no one will ever see the videos, and only you can use it as a useful reference!
It’s very helpful with understanding the motion and timing.
You can conveniently pause the video at some moments to study the expression or posing.
Good news is that you do not need to meticulously study every single frame from the video.
Be selective of the motion frames you feel is important or helpful for your animation.
- - -
Your acting skill does not have to be award-winning.
In fact, if acting is hard to get the hang of, then it is up to you to search for inspiration!
Watch tv shows or movies, they will be helpful with how the characters act and present themselves in front of the camera.
Study the facial expression and posing that comes with it.
You should also observe the camera composition since it contributes to conveying mood and posing.

This is my attempt after testing out the timing and acting.
CHARACTER ANIMATION TIPS AND TRICKS - THE FUN PART
Animation is an art of movement. Same goes for character animation, but with acting!
As such, do not get caught up with making sure every frames are masterpieces.
You should focus mostly on creating an illusion of movement and expression of a character.
- - -
While I would explain some of the helpful character animation principles before diving into the actual animation, I will instead explain how I use those principles in practice.
That will probably give you an idea of how the principles work in certain expressions and motions.
You may have a better understanding if you try it in practice yourself, instead of overthinking before even attempting to draw.
Now, let’s get started with the fun part, CHARACTER ANIMATION!
- DYNAMIC ANIMATION (HALF BODY)
The most important aspect in animation process is setting up the two story frames (in this case, let’s call it story cels, to avoid confusion).
The story cel drawings are usually the starting pose and ending pose.
It gives the viewers a chance to understand what is about to happen, and what happened afterwards.
- - -
When you get the story cel drawings ready, you can begin with the middle position’s cel drawing to complete a motion. The middle cel drawing connects those two story cel drawings.
Most case, the details from middle position are not distinguishable to the viewer’s eyes because it is a motion that just passed.
While they cannot complete see the detail of the middle position, it will still give a feeling… an impression of a motion.
- - -
With that said, I would recommend making sure the story cel drawings are readable, and that the passing position drawing makes sense, in order to complete a motion that is convincing to the viewers.
Understanding the motion for your animation requires either through your observations, research, or common sense.
Let’s start with the thumbnails of some sort.
I need map to know where I am going with this in animation project.
Drawing many similar artworks can be bit mind-numbing and you could potentially make too much frames or losing track of your goal.

My timing is basically a mix of ease-in and ease-out; along with constant motion.
So my animation is evenly paced.
If I wanted to make adjustment to the pacing, I would have to add or delete frames between cels.
It is lots of experimentation, so feel free to test out what looks the best when shifting the cels around the frames.
I wanted to make this character do a pirouette, so the frames will have to be close to each other to make it look like he spun quite fast.
And then right after, I made sure to space out the subsequent cel drawings a bit more to achieve a slowing-down motion.
I do this in order to transition into story cel drawing for the viewers to read and process what just happened.
Both of the characters are moving in constant motion, as you can see in the evenly spaced out frames (red markings in the timeline).
It takes a lot of trials and errors to get the motion satisfying enough to me.
Do not get caught up with making sure your project is perfect, what matters is that you finish a small project and then take what you learn from it.
That way, you can apply it for a much, much better animation project in the future.
I find it helpful if you made an arc drawing to fix your rough animation.
I always put a circle on the head to make sure the motion is pushing enough.
This is where spacing becomes important, you wanted to be sure the head placement makes sense enough to give a sense of motion and direction!

Also mind the joints, such as wrist and elbows!
It’s helpful for making sure the joints are not completely distorted when going through an arc.
When swinging an arm from one side to other, the arm in middle position tends to look longer than those starting and ending positions.
If you wanted to stay consistent with arc motion and the proportion in relation to the perspective, I recommend enabling [light table].
This is useful compared to [onion skin] since you wanted to compare the distance between one point (near the background) to another point (near the screen, or towards us).
In example, this character is almost moving towards us before receding backward to make a pose.
Because he is closer to us, I would have to scale the [light table] copy drawing by making it larger, to give an impression that his head is closer to the screen.
I tend to make the mistake of having his head smaller when he is closer to the screen compared to his head from the starting position, so the [light table] assisted with fixing the proportion in regard to perspective.
The secret is in the anticipation frame and exaggeration.
An anticipation frame depicts an action that is the opposite from the action that is about to happen.
As you can see, he is crouching down, with his shoulders raised up.
During that motion, the viewers can anticipate that he is about to go back up.
An anticipation frame can be one frame, and I would recommend adding some exaggeration to it, to give it a sense of force in the motion.
- - -
You can see his shoulders are raised way too high and his neck looks seemingly missing or broken.
The good news is that the viewers won’t see that exact detail, unless they paused it at the right moment for a good laugh.
But that kind of exaggerated artwork is mean to match something like a motion blur (like how when you take a picture of someone that is in motion, you would tend to see lots of motion blur).
Give it a try by having three or four cel drawings. One for anticipation frame, one for middle position, and one for the next pose that is the opposite of the anticipation frame.
ANTICIPATION FRAME
MIDDLE POSITION
- - -
NOTE: Sometimes you do not have to include the middle position to give it a strong push.
How you want to animate force is entirely up to you.
The animation project is your oyster!
OPPOSITE OF ANTICIPATION FRAME - To complete a motion.
When you are satisfied with the rough animation and linework, then you can continue with the coloring process.

- ANIMATED ILLUSTRATION

Now, I know I just said that animation is not a series of detailed illustrations, but there is an exception to few instances, and it’s this one.
The character illustration can be set as a background, and it is up to you to create a motion of your character’s features!
If you have a character illustration done, then we can get started with animating features such as hair and eyes!
I do recommend making sure to omit the facial details that will be animated from the illustration. You may keep the sketch design of hair and eyes for references.
In this case, I will be omitting eyes and hair.
For blinking, there are many ways to do it since people have unique ways of blinking.
As for my project, I decided to make 5 frames of blinking motion.
Now that I got the eye drawings ready, it’s time for me to work with timing.
I decided to go for ease-in and ease-out for blinking motion.
If you look closely at the [timeline], you can see that Cel 2, 3, and 4 are close to each other, while Cel 1 is bit far from Cel 2, 3, and 4.
That means Cel 1 will appear on screen for a bit, and then the motion will happen in a blur when it goes through Cel 2, 3, and 4.
That’s a blink moment.
Then, the Cel 4 is farther apart from Cel 5, so this will give an impression of the eyes “slowly” opening before reaching Cel 5 to complete the fully blinking motion.
You could make Cel 4 and Cel 5 one frame apart, I do not make the rules!
- - -
When you opt to adding more frames in between the cel drawings, it will make the motion appear slow.
Remember, the more frames there are between the cel drawings, the more time they will take to stay on the screen.
Otherwise, delete some frames to make motion look fast.
Again, the less frames there are between the cel drawings, the less time they will take to stay on the screen (you might even miss it when you blink).
I have to mention that Version 3 literally made it so much easier for me to just copy some cel drawings from Cel 1 and 2, and then paste it on Cel 4 and 5, respectively.
Select a specific cel or layer to copy from.
Press Ctrl C to make a copy of specific eyes drawing.
Select Cel 5, and then simply CTRL V to paste the Cel1’s drawing into Cel 5.
You would notice it with the selection line that appears after pasting.
No need to go through workaround process like the older versions.
This is especially useful if you wanted to make another copy for another cel that involves similar posing.
Something like a face side profile facing left and right.
They are the same drawings when you flip them.
And since the side profile might be asymmetric, that function will be useful since it essentially allows you to paste it on another cel and it can be edited without affecting the cel that is being copied from.
Compare that to assigning same cel number in different frames, where changing that cel, will also affect other identical cel, making it an issue if your character is asymmetrical in some aspects.
Now let’s work on the hair swaying motion!
This is about 9 frames of drawings.
I made sure the frames are spaced out evenly for all cel drawings.
Perhaps in two’s OR three’s.
Evenly spaced out frames such as this one, will show a constant motion.
Nothing is speeding up or slowing down.
First four cel drawings can start out with hair swaying to the right.
The fifth cel drawing is the middle position, so the hair begins to change direction.
Then, the last four cel drawings will show hair swaying to the left.
The hair movements are unique, so feel free to experiment with many kinds of hair movement for your characters.
If it helps, I tend ot make sure that the short hair movement would have smaller frames in between the cel drawings, while the long hair movement would have longer frames in between the cel drawings.
This is to give an idea of a weight.
Short hair is lighter than long hair, so the movements between them are quite different.

And you would be done with animated illustration.
You can get away with minimal shading by animating one or two hair strands’ shadows in another animation folder.
It is up to you if you wanted to add a bit more complete feeling to the overall motions.
- - -
The moving background will be explained further down the tutorial.
I decided not to explain it in this section since I feel that the learning curve for it is high, along with some mathematical concepts (nothing TOO complex, but you will see).
I did not want to overcomplicate things, especially when we are just getting the hang of timeline concepts and animation principles.
- 2D TURNAROUND
Technically, this is half of a turnaround.
But this animation explores more on anticipation, smear, and overshoot.
And the fact it is a transparent GIF file, so this could be useful especially for the emoji projects or as an icon.
As you can see, I made 9 frames of drawings.
- - -
I will be using those frames as a quick review of few animation concepts and principles, and how they are applied in those drawings.
Cel 1 and 9 are the story drawings, so you can see that the rabbit is making an attempt to turn around.
They take the most amount of frames, so they take the longest to stay on the screen for viewers to read.
- - -
They are also important for animators to be able to create a middle position.
You see, I drew Cel 5 thanks to Cel 1 and Cel 9.
I can also draw Cel 3 thanks to Cel 1 and Cel 5.
I can also draw Cel 2 thanks to Cel 1 and 3, and so on…
- - -
Cel 5, is my middle position between the story drawings.
The details are indistinguishable during the motion, but you can get the impression of the motion from Cel 1 to Cel 9.
Because it is on one’s it happens so fast, and that’s where animator usually adds in smear frame.
I actually used the [mesh transformation] tool to make its body stretched out.
I made its body stretched out to give a sense of power and weight as it tries to pivot around.
- - -
Cel 3 is an anticipation drawing, which is basically an action attempting to go in opposite direction, to “start” the motion.
At that moment, viewers would be able to tell that the character is trying to make an attempt to turn around.
- - -
Cel 8 is an overshoot frame.
It’s not very noticeable, but the outward leg overshoots a little.
Meaning, its outward leg is stretched or elongated towards us, before receding back in Cel 9.
It’s a very subtle detail, but it gives an impact to the motion, showing that there is some bit of traction when turning around.
COLORING WITH CLIP-TO-LAYER-BELOW AND LASSO FILL
- CLIP TO LAYER BELOW
This is for anyone that hasn’t tried [clip to layer below] function.
When activated, the drawings will only be shown on the drawing area from layer directly below.
Without the [clip to layer below], the spray paint covers the background.
I wanted the spray paint to cover only the head.
So, I activated that function via [clip to layer below] button.
The BG layer is not affected, but the ART layer is!
You can keep track of that function for any layer by checking the pink mark symbol next to the layer’s thumbnail.
This is useful for lighting and shading.
I had it activated for hair lighting and eyes shading.
This will work if you have animation folder dedicated to each part of the facial features.
I have animation folder dedicated to eye white (sclera) coloring.
And then I use the [clip below layer] for one layer with shade color.
I do not necessarily have to animate the shade color!
- - -
I want to add that if you have too many animation folder, but you wanted to shade them all.
Instead of having to shade for every cels in every animation folders, you can simply group the animation folders into one regular folder.
And then add a new animation folder above that regular folder.
[Clip to layer below] that new animation folder to cover all elements from that regular folder.
You would still have to make cel drawings to shade every frame, but it is much easier that way compared to having to shade every elements from individual animation folders.
As you can see, I have too many animation folders at the bottom of the list.
I wanted to shade all the elements from the animation folders (hair color, eye, skin tone, clothing), but that’s too much work.
Instead, I grouped all the animation folders into one regular folder (coloring folder).
Then, I created a new animation folder dedicated to shading.
I can activate [clip to layer below] on the new animation folder.
In the animation folder for shading, I can make cels and shade all the elements from the multiple animation folders at once!
- LASSO FILL TOOL
[Lasso fill] works like a lasso tool.
Once you make a shape, the tool will automatically fill color on the inside.
I use [lasso fill] for lighting and shading purposes.
This works especially well with [clip to layer below] function.
- - -
I noticed users have a hard time looking for that specific tool, so you would have to click on every tool icon that resembles a line, shape, or lasso.
You have to look for [Direct Draw] in sub tool window.
It looks something like this:
Or… if you have Version 3, you can always search it up via [Window] >>> [Quick Access], and then search up “Lasso fill.”
KEYFRAMES AND INTERPOLATION TOOLS
This section will deal with keyframes and graph editor tools to work with interpolations.
This is best used for working with background/staging, 2D camera path, and audio control.
However, I do not have much experience with 2D camera path and audio, for now.
WARNING: Interpolation “adds frames” to display some scenes within an animation.
While it is convenient, it comes with a price.
Interpolations will make exporting take a bit while and even making the file memory size bigger.
Just something to keep in mind!
- ACTIVATING KEYFRAMES
Press [enable keyframes on this layer] to activate the keyframes mode.
Note the wordings in “enable keyframes on this layer,” that means the keyframes mode is currently on for that specific animation folder.
You would have to enable the keyframes mode again on other select few of the animation folders.
You will notice the cels will change from its name into tiny triangle icons.
They are simply markers for cels location.
Your cels are not affected, but they cannot be edited while the keyframes mode is enabled.
You can select any frames to assign the keyframes.
Once you select a frame, press the [add keyframe] to set up the diamond marker.
Those are your new keyframes!
In order to work with keyframes, let’s start with going to the [graph editor] by clicking that [graph editor] button on the top-left corner of the [timeline].
- GRAPH EDITOR
Behold, the [graph editor], quite intimidating to look at!
Now, while this is intimidating, let’s take this slow.
One at a time!
You can pick one of the 5 options: Position, Scale Ratio, Rotate, Center of Rotation, and Opacity.
In this case, let’s pick “Position.”
You might also notice the X, Y, and V symbols.
For now, let’s go with X, which is basically an X-axis.
Since we are in “Position,” we will be dealing with making image move from left to right and/or the other way around.
You can adjust the values of the “Position” by clicking on the keyframe (diamond icon).
If I make the graph go downward, that would cause the image to move to left.
Remember, the x-axis also have number values.
You might recall negative and positive numbers.
The number decreases as you go left, while the number increases as you go right on the x-axis.
I apologize if math is not your thing, but it’s quite a practical application for such things.
With that said, if I make a graph that is U-shaped, then I can make the image move from left to right.
That’s how I made the background a bit more dynamic in my animation.

I would recommend working with just two keyframes, so you can test out how the graph between two keyframes affect the image!
While you cannot edit the layers while the keyframes are enabled…
You can toggle that [edit with keyframes enabled] button to make some quick edit with the layers.
If you are not satisfied with keyframes, you can always delete them via this [delete keyframe] button.
If you do not want the keyframes running during the playback, you can always disable the [enable keyframe] button.
You would have to enable it if you wanted to include that interpolation in the export file, as far as I am aware.
EXPORTING ANIMATION FILES
Remember to save your work as Clip Studio Paint (.clip) file before exporting! You might need Clip Studio Paint file for any editing or exporting to different file formats.
Now, that you got your animation file saved and ready to export…
Go to [File] >>> [Export animation].
[Export animation] offers wide variety of file formats, but for now, I will stick with [Animated GIF…] and [Movie].
- ANIMATED GIF
WARNING: GIF file format does not support sound file, since GIF is simply a series of images.
You can only do this via exporting as “Movie…”
-- WIDTH AND HEIGHT
Make size adjustment as needed, to fit in certain upload size limit in social medias and media players.
For example, if your project is 1000 x 1000 px, and you want to upload it as an icon in social medias, you can resize it to probably like 300 x 300 px.
The exporting process will take care of that.
-- EXPORT RANGE AND FRAME RATE
I would double check on [Export range] and [Frame rate].
[Frame rate] is pretty much self-explanatory, and [Export range] is basically your targeted clip length to be displayed in GIF.
If you have a project that has 72 frames, you would set [Export range] from 1 to 72, so that you can be sure that the GIF displays all of those 72 frames.
The range is limited to where your blue clip flags are in your timeline.
Make adjustments to the clip flags if you have a specific clip range you want to display in GIF file.
If you made adjustment to [Export range], most case you will have part of the clip omitted from the GIF file. Be sure to double check that!
-- LOOP COUNT
I always go for [Unlimited] for endless looping (auto-replay).
There’s [Number of loops] option, where you can limit the looping to certain amount of time(s).
-- DITHERING
Dithering helps with smoothing out the gradient pattern, so be sure to check that!
I made two GIF files, one with dithering and another one without dithering for comparison.

Without dithering, the sections of a color gradient is noticeable.

With dithering, the sections of a color gradient is less noticeable.
-- TRANSPARENT GIF SUPPORT
VERSION 3 ONLY
Now, if you currently own Version 3, you may notice the [make background transparent] option from Animated GIF export window.
This is especially useful, and one of my most needed feature from Version 3.

- MOVIE
While, I cannot upload Movie file in this tutorial page, I feel like this process is pretty much self-explanatory.
Based on your choice, it can be exported as either of the two format types: mp4 or avi.
Compared to GIF file format, there’s no looping option, but dithering is not needed since those file formats are better with color depth.
This file format also support sound file, so keep that in mind!
I noticed mp4 file format is mostly used, since it it a lot friendly for uploading and displaying it in other media players. That is up to you though.
If you want to add 2D camera effects into the movie, make sure to check that!
AFTERWORD

Animation is a mentally strenuous process, since there’s so much planning and thinking going into such projects. But seeing the result, even just the rough phase, is so satisfying.
While I do love animation, there were times I actually gave up because the process was long and difficult. I guess it’s only natural when animation requires making multiple drawings and applying animation principles.
If I am going to be honest, it’s not just the process itself; but I totally chickened out when I got way too over ambitious and unrealistic with making a “large-scale” animation project. That can totally overwhelm and destroy your will to power through the animation process.
It never hurts to start small and being realistic about yourself and what you can do with the project! That was how I am able to mess more with other small-scale animation projects. They are more fun that way, and you can actually learn a lot from it too.
Animation is definitely quite a beast to tame. You can have fun with animation, but you also have to be disciplined. I am sure that isn’t any much different from other branches of art.
Don’t get me wrong! I still love animation, and I would do it again! I am simply explaining the natural part of the animation journey, and it’s an endless one. There’s so much more to see and learn along the way!
In fact, feel free to ask me any questions or feedbacks! I can always make another tutorial based on frequently-asked questions from this post.
Thank you for reading! Until next time…


Users who liked this post


Comment