
1. Presentation
Hi! I'm Staviraa, formerly known as “V21e”.
I'll show you how to make animations from scratch using some of the features available in Clip Studio Paint, such as the “eraser” layer properties and brush customization. I'll also show you how to animate images that were not previously planned for animation, taking advantage of the program's features such as “Auto Interpolation”.
I'll explain how I animate and my logic when working within the program.
Hope you like it!
2. The animation
Animation is a rapid explosion of images that gives inanimate objects the illusion of movement. It's an optical illusion, in a nutshell.
Animation is adding the time factor to the medium of expression. A photograph with the time factor? It's a video strip. A real-life sculpture simulating movement in a sequence of photos? It's the "stop-motion" animation style. Drawings with movement in time? Traditional or 2D animation.
The dimension of "time" that is given to the work can be in different ways.
According to Richard Williams in his book "Animator's Survival Kit" (2001) the human being has managed to create the dimension of time to tell small animated stories before the invention of animated films. With the invention of the Thaumatrope ("wonderturner" in English), the Praxinoscope and the Flick book... to name a few.
✧ Objects to simulate time in images: thaumatrope (1.), the praxinoscope (2.) and the Flick book (3.).
✧ How the thaumatrope works. It consists of a disk with two different images on both sides and a piece of string on each side of the disk. In the animation above, the image of a bird and a cage are shown at different speeds. When the thaumatrope spins at high speed (Left) it seems that the bird is inside the cage. The slower animation (Right) can be distinguished when the thaumatrope spins, without generating an optical illusion.
After the invention of animated films, animation has now become a more accessible medium for everyone. This facilitation is due to the greater accessibility of electronic devices capable of projecting images at high speed - film projector, television screens, computers and cell phones - and the creation of software that allows the creation of animations compatible with these media such as Clip Studio Paint.
Let's start exploring how to give the dimension of "time" to our illustrations in Clip Studio Paint!
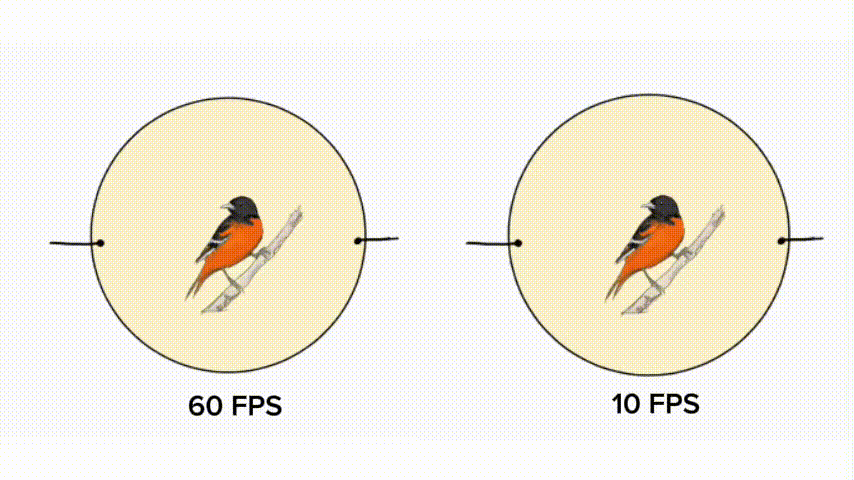
✨ It has been seen that the minimum projection speed required for an animation to be able to deceive the human perception of movement is the exposure of 24 images in one second. This exposure measurement is known as “Frame Per Second” or as “Frame rate” (English). Its translation into Spanish would be “Photograms per second” and “Frame rate”, respectively. Its abbreviation is “FPS“ and its symbol is “f/s”.
The following FPS amounts are usually used to animate: 8FPS, 12 FPS 24FPS, 30FPS, 60FPS… up to 120FPS!
The more FPS required to animate, the smoother the animation will look… however, it means using more drawings to be able to finish a second. Be careful not to overdo it with the amount of FPS you use to animate! Especially if it's 2D animation… [laughs]
3. Introduction to animation tools
While in this article I will highlight the most important tools and functions in my opinion for the animation process, it is necessary to have basic knowledge of what the Clip Studio Paint interface is in its animation mode.
I suggest reading the following articles, especially if it is your first time in the world of animation within the Clip Studio Paint program. If you are someone more experienced in the program or you come from other animation interfaces, you may not need to read them to navigate fluently through this tutorial. Even so, I suggest a little reading if you have questions.
I hope my explanations are useful for your learning process!
》Article focused on explaining in detail the Clip Studio Paint animation interface.
It shows everything from setting up a new document for animation to basic explanations of animation concepts such as “frames per second”
》Specialized section for freehand animations and how to animate moving backgrounds in a simple way. It consists of several parts, ideal for getting familiar with the interface.
If you want to see what's possible with animations in ClipStudio Paint, I recommend checking out KevinFarias's work right here at Clip Studio Paint TIPS!
He has very complete and clear work when explaining, especially since he documents each of his creations step by step not only in his written article, but also with a video. Don't hesitate to check it out and get inspired!
4. Animation interface
4.1 Timeline
In order to animate, you need to add the “Time” dimension to Clip Studio Paint. This is done with a timeline. To access the timeline in Clip Studio Paint on a computer, you can do it in two ways.
First method: You can access this feature by going to the bottom left of the canvas, where the [zoom slider] is located, you will then be able to see the figure “⯭” (1). Click on the icon to display the timeline (2).
Image of the Clip Studio Paint program where “⯭” is located (top) | Timeline display (bottom)
You can change the display size of the timeline on the screen by moving the cursor near the top edge of the timeline until the cursor changes to “↕“
To hide the timeline, click “⯯”.
Second method: This feature can be accessed in [Window]→[Timeline]
(Image below).
4.2 Basic animation tools on the timeline
When unfolding the timeline, we can find different icons that will help us in our animation process.
In the timeline, there will be a small section where we can see our animation cells (6) and their exposure duration weighted in frames per second.
We have an icon to play or stop our animation (1), add special folders to start animating (2), add cells to make new drawings to our animation (3), the use of [onion skin] (4) and an icon to access [Automatic interpolation].
In case your timeline looks empty - Common in .clip documents that were not configured from the beginning for animation - We have the [New timeline] icon (8.) to add the “time” dimension to our document.
✧ Steps to activate the timeline. Click on [New timeline] (1). A pop-up window will appear with the timeline features (2).
✧ In the timeline pop-up window, you can customize the animation cell speed [FPS] and the total number of cells you want to start animating (3). If you are happy with this data, click [accept] (4).
If you create a new file from the beginning specifying that it is for an animation, the “activate timeline” step is skipped.
Note: In Clip Studio Paint Pro you can only work with 24 total frames. In Clip Studio Paint EX you can work with more than 24 total frames. The FPS are customizable in both versions.
✧ Done! You have your timeline active!
There is a correlation between the timeline and the display area of our layers. (Image below)
✧ b. The correlation between the animation folders in the layer view and the timeline is shown. This is marked with different colors. | a. The correlation between the layer view in the layer view and the timeline is shown.
4.3 Animation folders, frames and onion skins
Layers inside [animation folders] on the timeline are transformed into [Frames]. However, you work inside them as if they were a normal layer.
If you work on a layer outside of a timeline folder, you will not be able to animate.
To add a new [animation folder], simply click its icon.
The animation folder will be displayed in the timeline and in the layer view.
There are two ways to add frames to the timeline. **The first method is to click on the icon to add a new frame.
This action will be reflected in the timeline and in the layer view.
The second method, is to select the area of the timeline where you want to add the frame. The selection is represented by the red line on the timeline.
Next, [Right click] → [New animation cel].
If you want to add another frame, simply repeat either process.
Added frames will automatically be named 1, 2, 3, […] ; when a frame is added between two keyframes, the frame number plus a letter is usually displayed. Example: 1a, 1b, 1c […] (Image below)
If you want to move the size of a frame, you can select the slot between frames on the timeline. It will turn red. Then, by dragging with the cursor, you can move the frame to where you want it.
You can also move multiple frames at the same time by selecting them!
If you want to delete a frame, simply [right click] on the frame → [Delete]
The [onion skin] allows you to see some of the drawings before and after the selected frame. This allows you to animate the intermediate frame more consistently. It is activated and deactivated by clicking on its icon, as shown in the following animation.
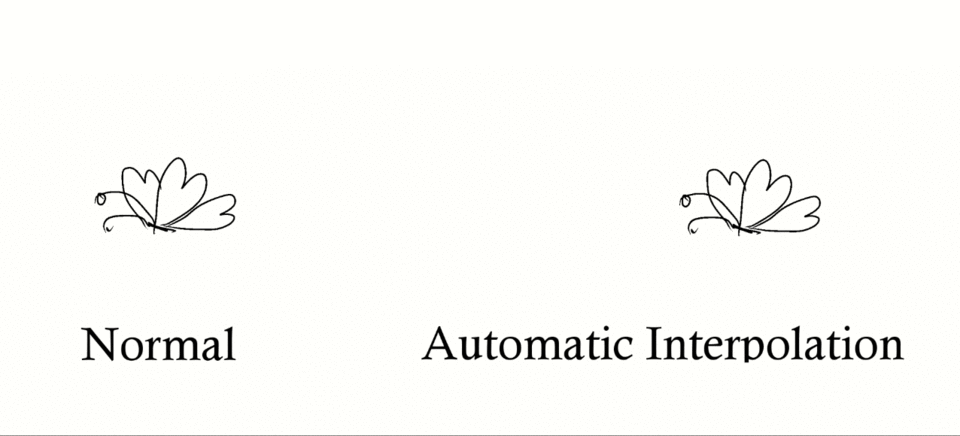
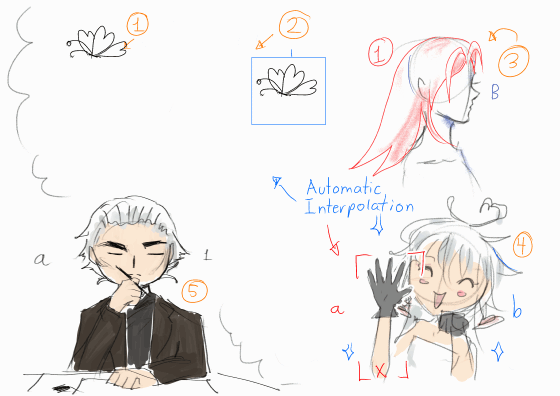
4.4 Automatic interpolation
Interpolation makes it very easy to animate static images or complete animations. The existence of this tool makes it possible to greatly speed up the workflow.
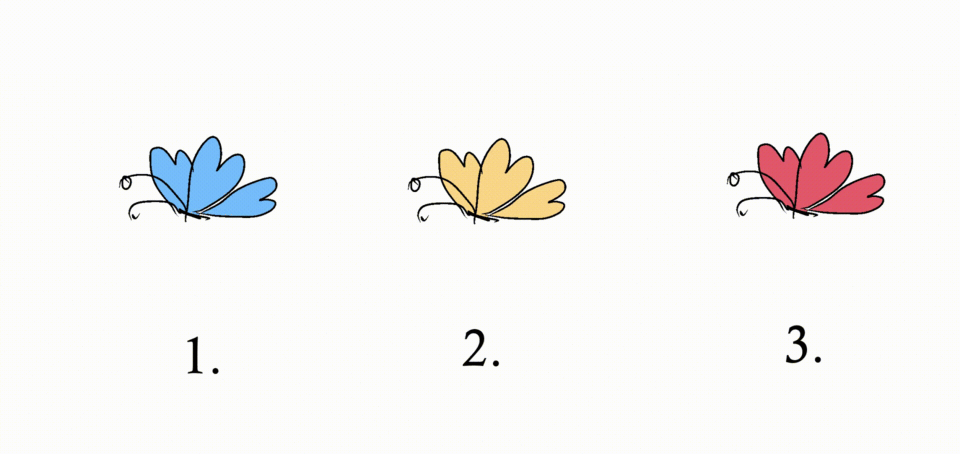
For example, if you have a complete animation of a butterfly flapping its wings, you can animate its path through the air without having to redraw the butterfly animation.
Auto-tweening is not limited to moving an object or animation around, you can also animate a scale (1), the rotation of the object axis (2) and opacity (3.)! (see image below)
It is possible to animate all of these features in a single animation or image. With a little creativity, anything is possible! I suggest that if you plan to use this feature, do so at the final stage of your animation.
To activate this feature, you need to be in the folder you want to enable keys for in order to do automatic interpolation. Next, go to the bar [Timeline] → [Enable keys for this layer] (image below).
On the timeline, in the folder we want to animate, small triangular figures will appear at the bottom indicating that the timeline is ready to insert animation keys. In the layer view, in the folder we selected to animate, a pencil and a lock icon will appear.
To add a new keyframe to animate with automatic interpolation, we give [Right click] → [Insert key]. The keyframe will appear on the indicated frame (red line on the timeline). A diamond will appear over the frame. (Image below)
To edit the position of our folder, we have to go to [tools] →[Operation Sub Tool] →[Object]
With the [Object] sub tool it is possible to edit very easily what would be the position, opacity and rotation of the objects within the folder since the image transformation controller appears. (image below)
You can see the measurements and features to be animated reflected in [Tool Properties] -below the subtools window-. They can be seen active because they have a rhombus inside a square next to the name of the feature to be animated. If you want to add a key to a feature that has not been considered for animation within [Tool Properties], simply click on its corresponding square. (Image below)
If you want to Delete, Cut, Copy or Paste any keyframe with its information, you must position yourself over the keyframe in the timeline →[Right click] →[Delete/Cut/Copy/Paste].(image below)
If you use [Insert Frame…] or [Delete Frames…] within the popup window, you will delete or add frames from the timeline, not from the auto-interpolation keyframes.
You can also delete auto-interpolation keyframes by positioning the timeline pointer (red line) over the keyframe you want to delete (1). Then click on [Delete Key] (2.)(Image below)
Do you want to edit the content inside the animation folder again? You can disable auto-interpolation keyframes by clicking [Enable keyframes for this layer] or you can click [Edit layers with keyframes enabled](image below.), whichever you like best is fine.
- ✨ - I have several animation layers: one for lineart, one for base coloring, one for highlights and shadows. How do I animate them all together with automatic interpolation?*
-You need to put all the animation layers inside a normal folder inside the layer viewer. Once you have that normal folder, make sure that the normal folder is selected and click [Enable keyframes for this layer]. The normal layer will be ready to animate both in the timeline and in the layer viewer. The last step is to insert keyframes into the normal folder inside the timeline… and that's it! you're all set to work on multiple animation folders at once.
Please refer to the “7.7 special effects” section to see it step by step with images.
4.5 Setting shortcuts for animation
Keyboard shortcuts are very useful to speed up work on the computer or on our phone. There are very famous keyboard shortcuts such as “Ctrl+Z” to return to a previous action or “Ctrl+C” to copy something selected. Knowing how to configure or know keyboard shortcuts is important to be able to customize and make our experience more enjoyable when using Clip Studio Paint.
For the animation process, I suggest programming 2 new keyboard shortcuts: Previous Key and* Next Key.
This will avoid hiccups and the feeling of immobility that comes from not being able to have dynamic control in the travel between keyframes in the timeline.
To configure our custom keyboard shortcuts, this function can be accessed in [File]→[Shortcut Settings]. (Image below).
Next, a pop-up window will appear. Within this window, there are the categories and sub-categories that can be customized for a keyboard shortcut in Clip Studio Paint.
To customize the [Previous Key] and [Next Key] actions, you will need to go to [Animation]→[Move Frame] in this window. In this subcategory, you will find [Previous Key] and [Next Key].
I suggest that you assign [Previous Key] and [Next Key] keyboard shortcuts that are easy to remember, rarely used, and one right after the other. I use the “.” key for [Previous Key] and “-” for [Next Key]. They are right next to the arrow keys and easy to remember.
4.6 Tips for getting familiar with animation mode
At this point, with all of the above in mind, I suggest that you open a new document and play around with the program, trying to animate something simple… It can literally be a doodle! The important thing is that you become familiar with the tools and see how you work more comfortably within the program.
Take your notes, take your time… after that, we are ready to animate!
5. Animation production process
I have written this section to inform you about the animation process and what exactly I am going to cover and work on in this article.
The animation process within the industry can vary greatly from the sequence of steps that are taken to make a school project animation or an individual animation for fun.
In my words, the differences between each process depend on the intention behind the creation of the project -entertainment in the industry, final school project, presentation for a contest, personal project-, the level of organization necessary to make the project efficient with the resources at hand -workers, salary, time frames, training in different animation programs- and the final result -personal satisfaction, quality, monetary compensation, etc.-.
The general steps to make an animation are the following:
-Planning: Choose the concept or idea, design characters, get to know the audience.
-Design: Create script, storyboard, layout, character and background design.
-Animation: References for animation, keyframing, in-betweens, coloring, lighting.
-Postproduction: Editing, special effects, retouching and audio.
For this article, I'll just cover a little bit of the planning and animation part of making a mini animation… the rest of the steps are superfluous! You don't need to have a storyboard for a 3 second animation or character sheets when the characters are stationary… that's better used in a longer animation project.
In this article, all that's required is a little bit of creativity, clarity on what you want to work on… and of course, knowing how to use Clip Studio Paint!
Speaking of clarity, let's talk about…
6. Methods, tips and important points for planning animation
What do you want to animate? How do you plan to do it? With the tools we know, what can we do to make our animation easier? With this section of the article, I hope to help you find answers to these questions.
Here, your personal experience in using drawing programs, video editing, making animations and post-production programs to add special effects will be very useful, especially for the experience of how to organize a project.
✧ Descriptive image about how an animation or drawing project is visualized in the artist's mind.
When you are a beginner at drawing in digital programs, it is normal to draw everything on the same layer. However, with time, experience and looking for a little bit of techniques, our workflow becomes more refined. The background is worked on in one layer, the main characters in another; the coloring of the outline of the drawing is worked on separately and the details go at the end. This workflow may be logical, but at the beginning when we are just discovering the world of digital drawing, it can be difficult to speed up our work. The same happens with knowing how to animate. That is why your experience animating, drawing or editing is important here!
Animation folders have the same properties as a normal layer, so it is possible to divide the drawings into animation folders and work on parts separately.
Some things possible with the animation tools in Clip Studio Paint are the following:
You can animate frame by frame (1) and add auto-interpolation to that animation (2). This can be very helpful for walking or flying creatures like ghosts. You can present a still image and animate on it in an animation folder frame by frame (3). This is quite useful if you want to animate hair that is moved by the wind or light clothing . If you want to animate with the least possible effort, you can animate a still image with auto-interpolation (4). You can achieve very nice results with that simple function like a girl waving. You can also make two animations at different times (5). This allows you to make an animation that repeats itself that is very attractive to the eye despite being so simple.
These are just a few examples… knowing how to organize your animation folders and knowing how to handle the Clip Studio Paint tools will allow you to exploit your creativity to the maximum.
Can you identify or imagine how I made the following animation?
7. Anime style animation process
In this section, I'll share my animation process from start to finish. I'll share my personal tips for animating - Like using guide lines to delineate light and shadow- as well as some Clip Studio Paint brush settings to make our coloring process clearer and easier.
As a side note, I've created a white sheet of paper that simulates the perforated sheets used in animation. This image is just for aesthetic purposes. I'm attaching the link for anyone who wants to use it. It's free in Clip Studio Paint ASSETS.
Without further ado, I hope you like it!
7.1 Idea to animate
At this stage of the animation process, I narrow down the idea I want to animate.
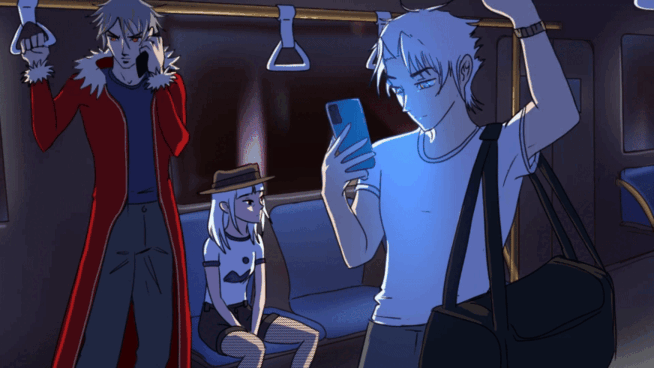
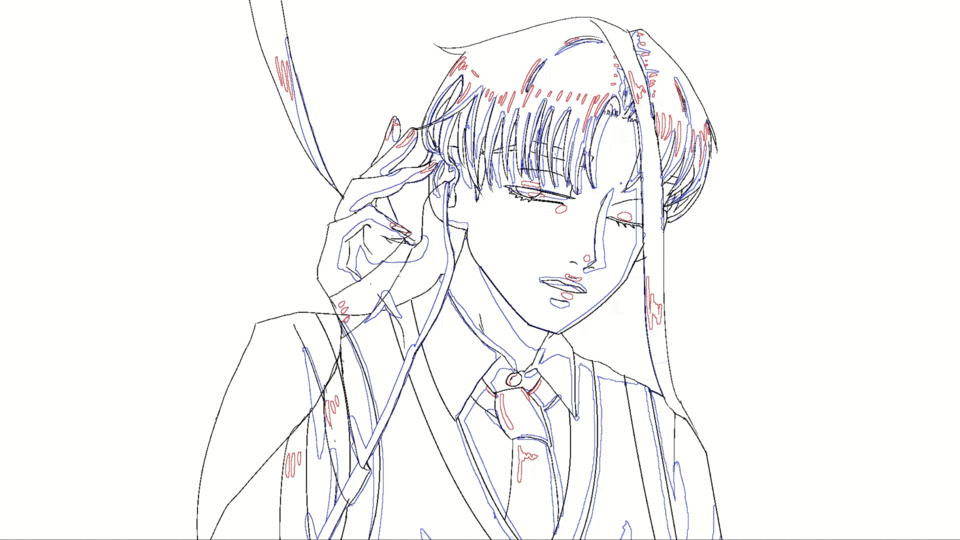
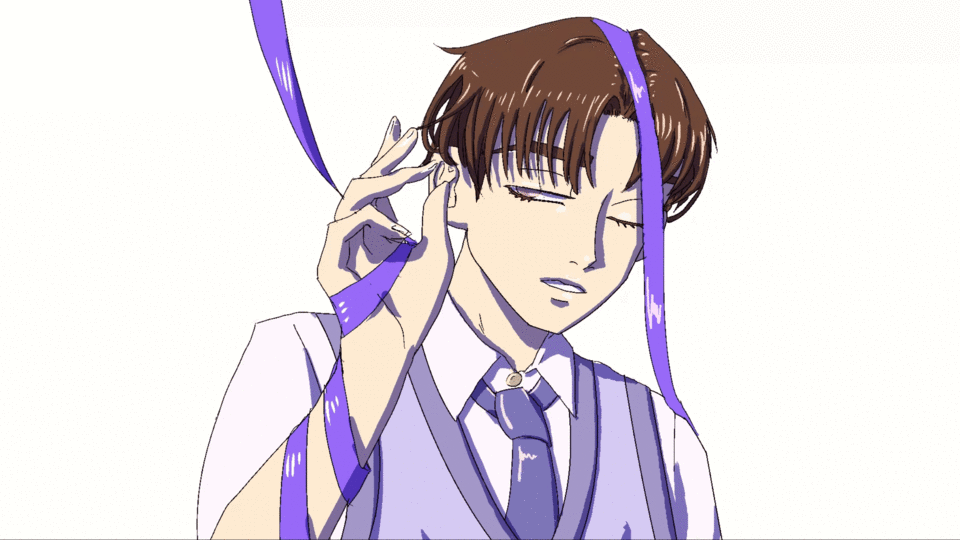
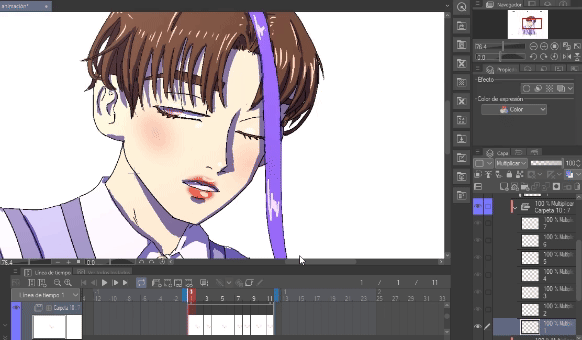
In my case, I want to animate something very simple: An animation of about 2 seconds of a handsome young man going from one pose to another, where he takes off a bit of the ribbons he has on top. (Representation in Image below)
Usually, for a very short animation - lasting a few seconds - it is possible to skip some preparations prior to animating (such as creating character sheets, script, storyboard, etc.). Consider your project and, if relevant, have prior data. In my case, for this project, simply knowing what color the character's clothes would be and what movement he was going to make was enough.
7.2 Prepare the workspace
It consists of having our necessary references nearby, our clean workspace and some extra elements that help us in our work. It depends on each person how to do this step!
In my case, I prepared a color palette for the animation, a glass of water and my headphones to work inspired and happy.
7.3 Keyframe Eraser
This step involves drawing and outlining our keyframes.
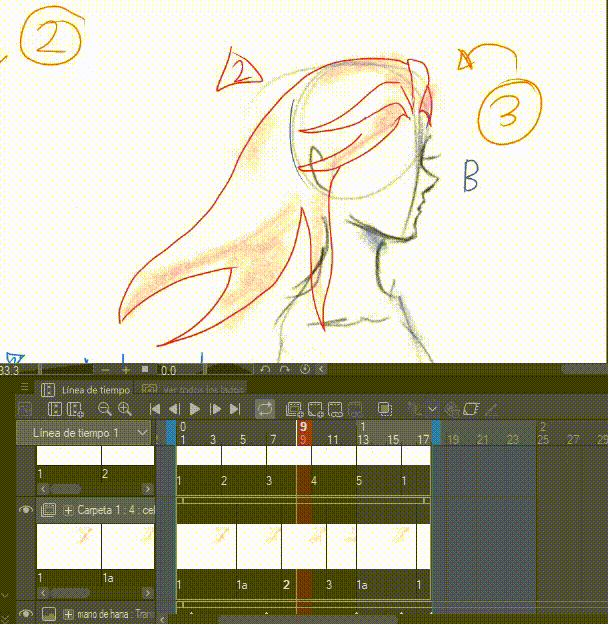
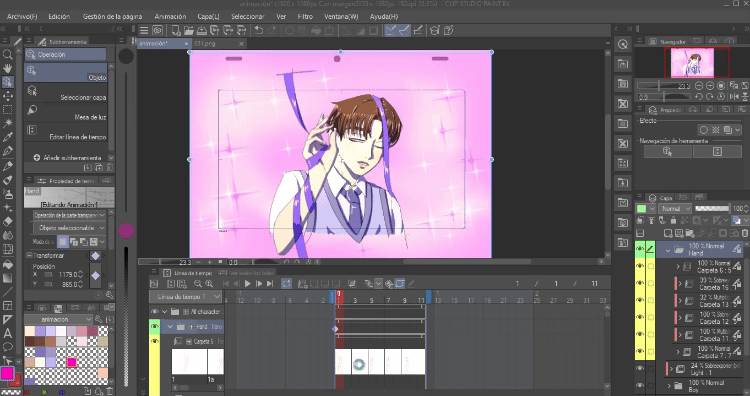
I made two separate animations in my animation document. I made one animation folder for the hand animation and another animation folder for the boy animation.
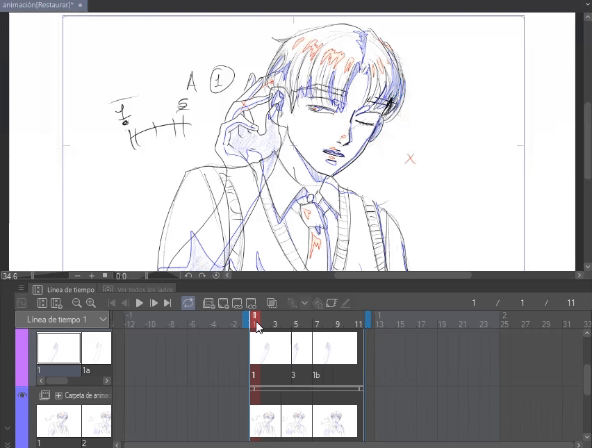
✧ Animation with its timeline. Purple animation folder: Hand animation. Blue animation folder: Boy animation.
For the keyframe draft, I used the default Clip Studio Paint tools like the G-Pen (size 5.0) and along with the pencil and mechanical pencil to make the animation draft (Size 5.0). These drawings are just a draft, so the edges and some sections of the animation are rough. However, I tried to outline where the outline would be as clean as possible.
I indicated the light areas with a red outline and a yellow fill, while the shadows were indicated with a blue outline and a slightly darker fill. The areas that are white (without fill in the animation) were indicated with a large red “x”.
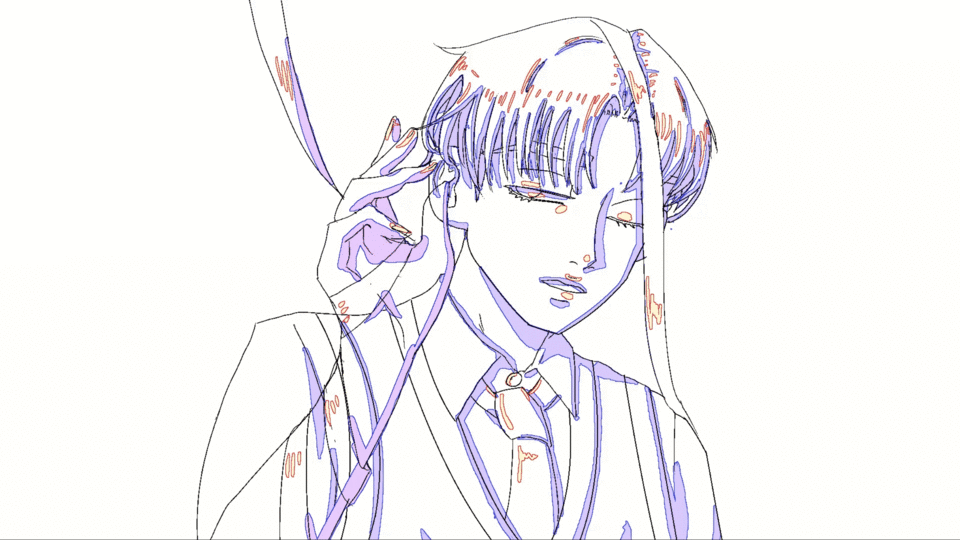
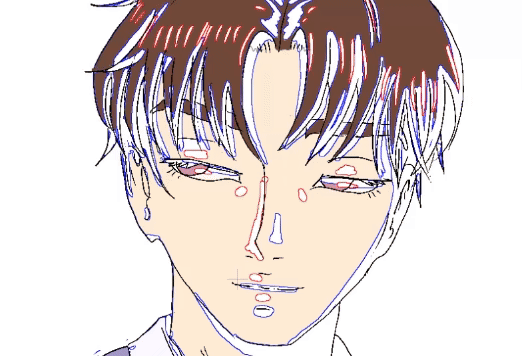
7.4 Keyframes
This step consists of making a clean outline in your animation drawings.
By clean I mean an outline where our brush has no smooth edges and is as homogeneous as possible in terms of line thickness.

✧ My animation with clean outline. I have also animated the intermediate frames between the keyframes. Outlined with G Nib size 2.0.
To achieve this finish, I slightly altered the tool properties of the G nib and the stronger eraser. It is a simple process to do.
To change the edge smoothing of our brushes, we need to go to [Toolbar]→[Pen (1.) /Eraser]→select [sub tool: Pen G (2.)/ Stronger Eraser]→[Tool Properties](3.)→[Smoothing]→select [None] (4.). (Image below)
The edge smoothing property can be customized in 4 levels: None, Weak, Medium and Strong. The higher the smoothing level, the more blurred the edges of the brush will look. While, if we lower the smoothing level, the edges of our brushes will be more delimited by their original shape.
If you want to return the brush properties to their original state and you don't remember how the brush was originally configured, you can simply click [Restore selected subtool settings] in the [Tool Properties] window (image below)
I suggest this brush setup to make our coloring work easier later on.
7.5 Guide lines for light and shadow
✧ My animation with guide lines. The blue lines are to delimit the shadows and the red lines to delimit the lights. It has a color fill for educational purposes.
In this step, we are going to draw the guide lines where our lights and shadows are located within the animation.
It is necessary to create a new animation layer exclusively to delimit our lights and shadows. The layer to delimit the lights and shadows will be positioned below the animation folder of our outline. (image below)
✧ Layer position for animation. 1. Outline layer. 2. Boundary layer for highlights and shadows.
To make this outline, you need to follow the brush settings I suggested in the section “7.4 Keyframes”. You need to take your time. Try not to make it as elaborate as I did [laughs}. Sometimes you can get excited about your projects.
Your final result should look like this:
7.6 Coloring
✧ One of the fully colored frames from my animation.
This is the stage of the animation process where we will see our work “come to life.” Working cleanly and organized will allow us to work easily in this part.
It is necessary to add a new animation folder between the outline animation folder and the guideline animation folder for the highlights and shadows. This animation folder will be for the coloring.
✧ Layer order illustrated. Outline animation folder (red), Coloring animation folder (yellow), and Highlight and Shadow Reference Lines animation folder (purple).
Since we have added the new Coloring animation folder, we head to [toolbar] → [Fill] (1.) → Sub tool [Refer to other layers] (2.) → [Tool properties] (3.) → Disable [area scaling] (4.)
Layer scaling allows the fill tool to “overfill” an area.
This is a useful feature when we are coloring a comic or an illustration. For this occasion I suggest disabling it since we have a very clean and fine outline. There is no need to use it… unless it is to your liking and preference in your workflow, of course.
I also suggest disabling the [close gap] property of the fill tool. (image below)
This property allows for tolerance of spaces between lines. It can be a wide tolerance (image on the left) or it can be a very small tolerance (image on the right).
For this occasion, I suggest disabling it because it can cut off your workflow… Although truth be told, is this feature useful to you? If yes, then use it! The important thing is that it works for you and works.
As a reminder, you can always reset your tools to their original state by clicking [Restore settings of selected subtools] (image below)
With these changes made, -In the color animation layer- we begin to fill in the areas of the base color of our character that are not affected by a light or a shadow.
I show you an example of a frame in my animation.
It may look a bit strange, but it should look like this.
Now that we've finished coloring the base color, let's go to the layer viewer →[select the animation folder that we used to outline the highlights and shadows] (1.) →Activate [Set layer as sketch](2.). In your animation folder -along with your frames- a blue line will appear** (3.), indicating that the sketch function is active.
What is the purpose of putting a folder or layer with the sketch property? Well, I only know of two functions. Maybe I have more, but these are the ones I can share.
The first function is not to appear in the final rendering. If you are drawing a comic, you can put your traditional scan/draft in the sketch layer and do the outlining in another layer. If you export the image, the traditional scan/draft will not appear in the final result.
The second function I know of is that any layer or folder with the sketch property is “invisible” or goes unnoticed by the program’s tools, however, it continues to be displayed on the screen.
What is the purpose of that? Well…
In the case of animation, filling in highlights and shadows is a simple matter. (In fact, discovering this property and its application motivated me to make this tutorial [laughs] )
If you have problems with very small unpainted areas the size of a pixel, in the same [Fill] tool (1.) there is the [Paint Unfilled Area] Sub Tool (2.)
Its function is very simple. Pass the brush over the area you want to fill with the color of your choice. Done! Problem solved.
From here on out… patience and painting are required.
7.7 Special effects
Here I dedicated myself to adding final details, such as animating with [auto interpolation], adding makeup or extra lights.
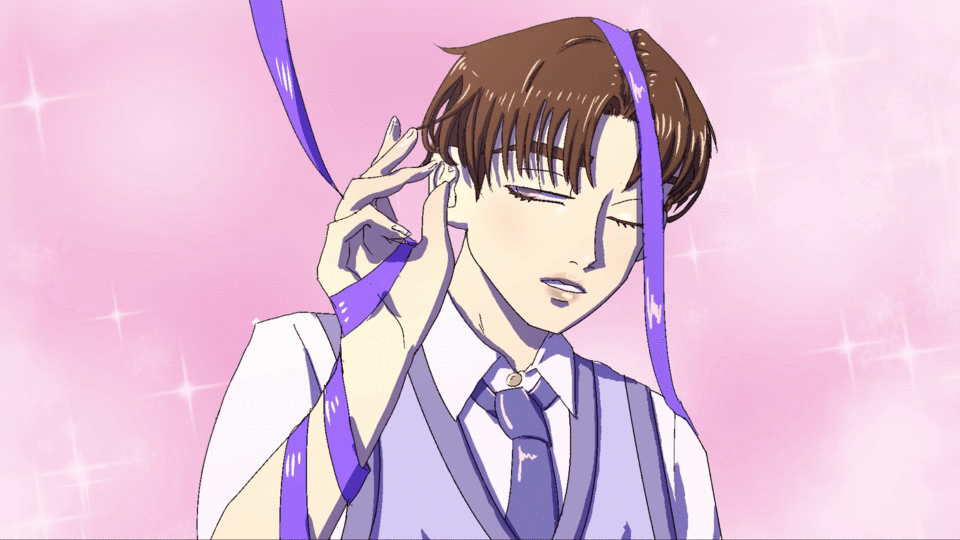
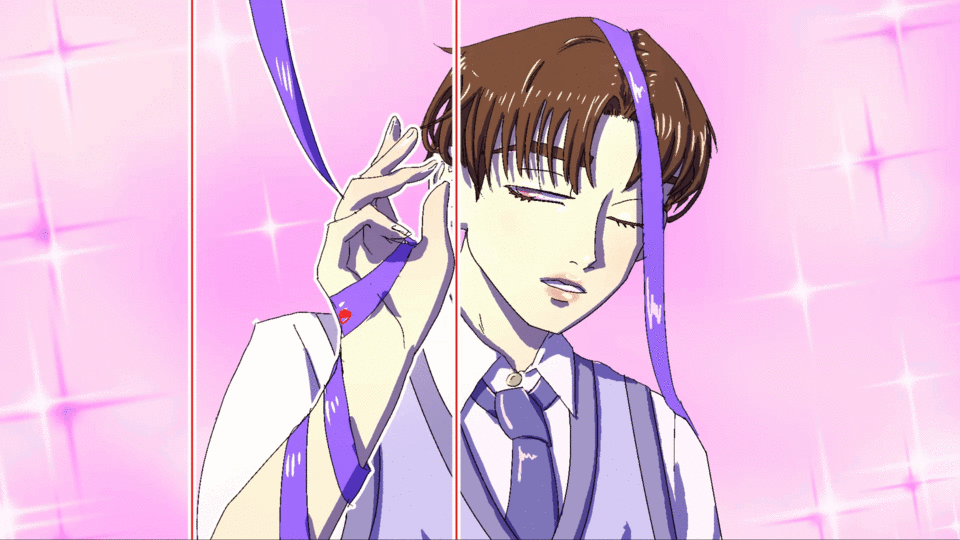
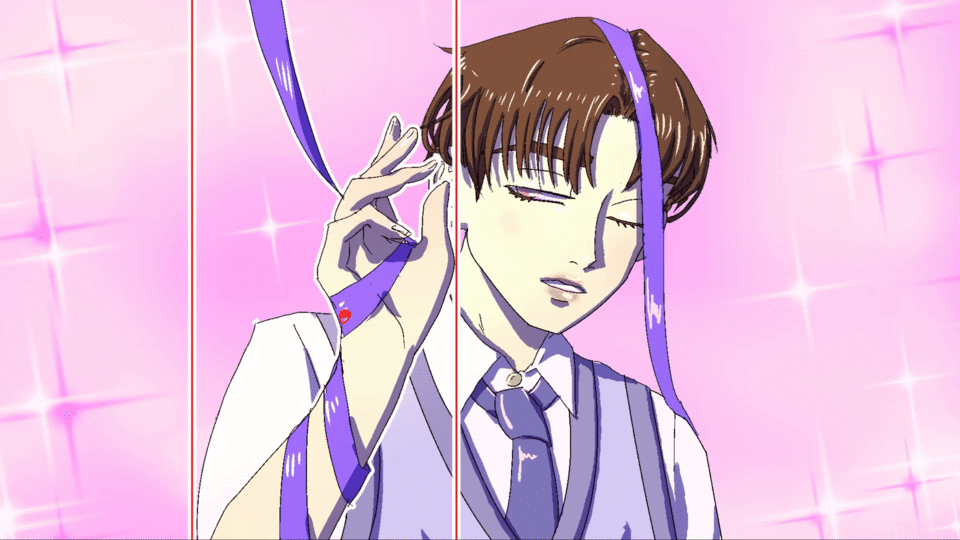
✧ Final result.
To add blush to the character, I made a new animation folder and hand-drew her makeup. I used a strong red for the blush and her lips. All done with the airbrush tool.
✧ Screenshot of my work process.
Since the color was very strong, I decided to lower the opacity of the animation folder so that the makeup would look a little more natural. If you change the opacity of the animation folder, that setting affects all the frames that are part of it. (Image below)
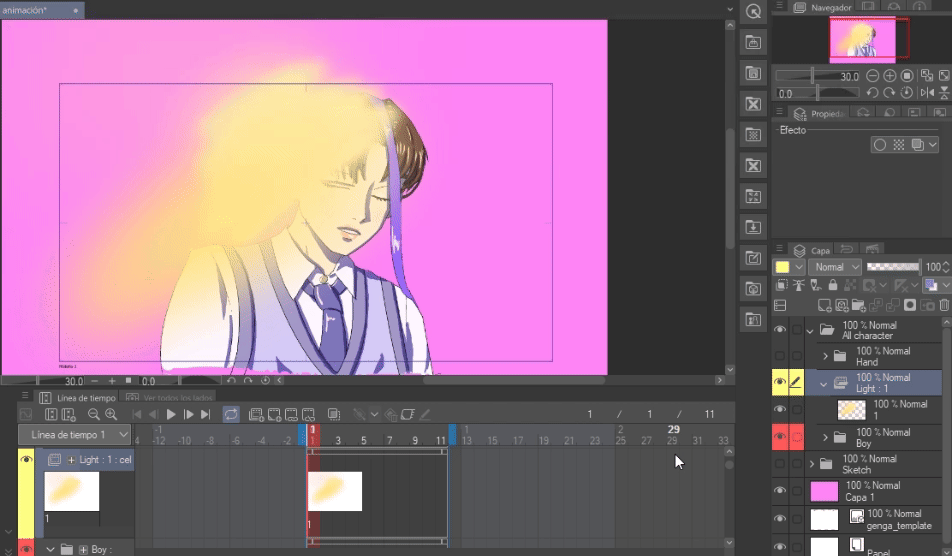
In this final stage of the process, I also wanted to add some lighting. I organized my animation folders that made up the boy's body -outline, color, blush- and grouped/put them into a regular folder and named it “Boy”.(red folder) Next, I added a new animation layer for the lighting I wanted to add (yellow folder) and a new frame inside it to work on. I airbrushed and added a light yellow tone to the areas where I wanted to see my character illuminated. (Image below)
Animation folders can be used like normal layers and their properties. The yellow I added could serve as a light if I lowered its opacity, however, I didn't like the effect.
To improve the way the color interacts with the other layers, I went to the layer viewer -with the animation folder selected- → [Blend Modes]

Since I found a lighting mode I liked, I lowered the opacity of the entire animation folder. This was my result.
✧ Initial image. 0% opacity in the lighting animation folder (right) , final image. 18% opacity in the lighting animation mask. “Dodge (brightness)” blending mode (left).
Although I have achieved a nice result, I do not want the light to affect the background, only the character. I do not need to draw the lighting of my character by hand, To be able to illuminate only my character in an easy and simple way, I go to the [Layer Viewer]. I make sure that my layer with all the animation set of the boy's body is below the lighting layer → I select the lighting folder → [Adjust to layer below] (image below)
What is the function of [snap to layer below]? It consists of snapping to the pixels of the layer below. For example, if you have the silhouette of a character on one layer and on another layer above you add some brush strokes, it will most likely look like this (image below)
✧ Correlation between layers and strokes. Blue layer, background. Uncolored layer, character silhouette. Purple folder, pink stroke.
If we activate [Snap to layer below] on our layer where our stroke is located, it will adhere to the shape of our character. When [Snap to layer below] is active on a layer, a red stripe is seen on it. (image below).
It's a very useful function. It works on layers and on entire folders... also on animation folders and 3D documents!
I'm adding how the [snap to layer below] function looks in my animation document.

To add detail and lighting to the character's hands, I made a few separate animation layers just for the character's arm.
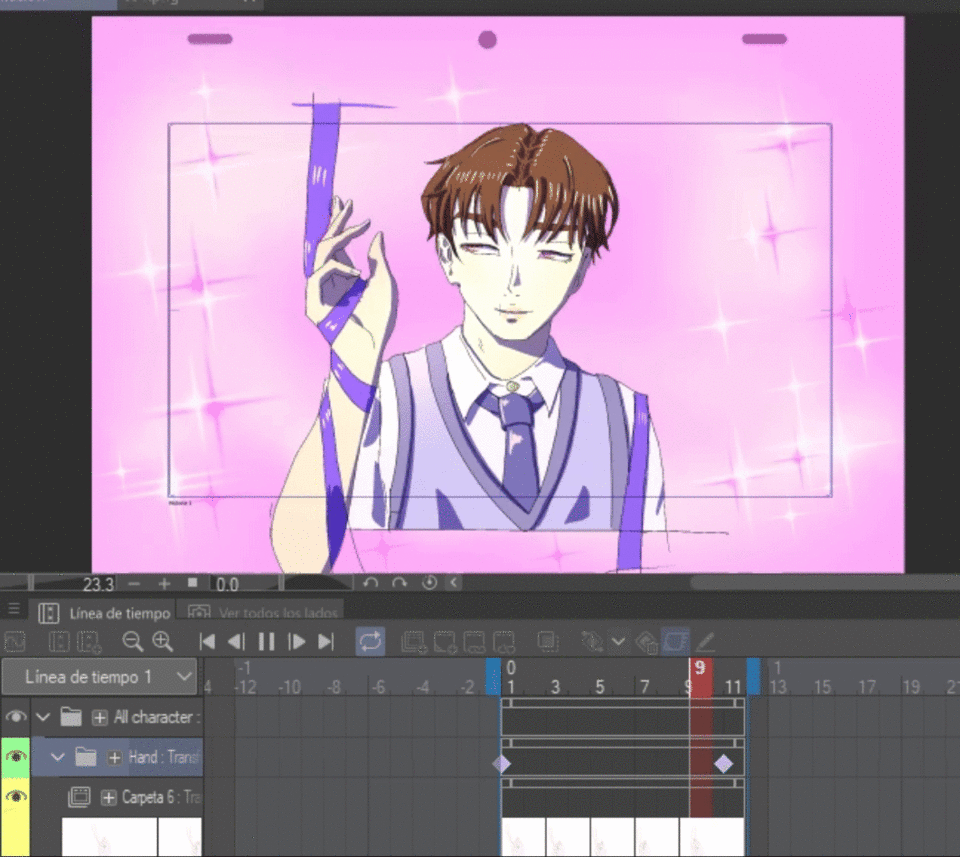
As a final detail, I decided to add a slight movement to the character's entire arm (images below)
✧ Original arm animation (Above).
✧ Arm animation with automatic interpolation.
In order to move a complete animation piece -Like the arm with all its components: outline, coloring, touch-ups, lights...- it is necessary to put all the animation folders in a normal folder that includes all the animations.
✧ Screenshot of a portion of my workspace. All the animation layers in yellow are the parts that make up the boy's arm. The green folder is the folder that holds all the animation folders for my character's arm together.
As I explained in the “4.4 Auto Interpolation” section of this article, after doing this step, -while hovering over the regular folder- we'll go to [Enable keys for this layer}. Small triangular shapes will appear at the base of the folder in the timeline indicating that the timeline is ready for animation keys to be inserted. In the layer view, in the folder we selected to animate, a pencil and lock icon will appear. (image below)
We position our pointer on the timeline, in the normal folder section (green), [right click]→[Insert key]. A blue diamond will appear on the timeline. (image below)
We edit the position of our animation with the [object tool]. (image below)

In my case, I like the initial position the arm is in. To add movement, I add another keyframe on the last frame of my animation. Next, I position the arm where I want its movement to end. (image below)
And that's it! Our character's arm has a slight auto-tween animation.
With some adjustments, small details and fixes, we could say that we have a finished and presentable animation.
7.8 Export
To export your animation to a .mp4 format, you need to go to [File] → [Export Animation] → [Movie] (image below).
Name your file and where you want to save it. Click [Save].
A pop-up window will appear. You can customize the FPS rate that will be exported (1).
Be careful, because if you have animated at 12 FPS and decide to export it at a higher speed -24 FPS, for example- your animation will look faster! This can negatively affect your work if you don't intend for it to happen. I suggest exporting the animation at the same speed you have animated at.
Now that you're done selecting your settings, hit OK.
We now have our animation ready!

8. Animate already finished images
No matter how small an animation is, it always makes a difference. Animation brings a new dimension of life to our works. It is also very satisfying to watch.
In this part of the article, I will show you how I animate a finished image. It is one of my favorite drawings. It is an old drawing. My drawing has no outlines and has coloring where I simulate brush strokes of paint. It will be an interesting challenge.
I hope to inspire you to decorate your drawings with animations.
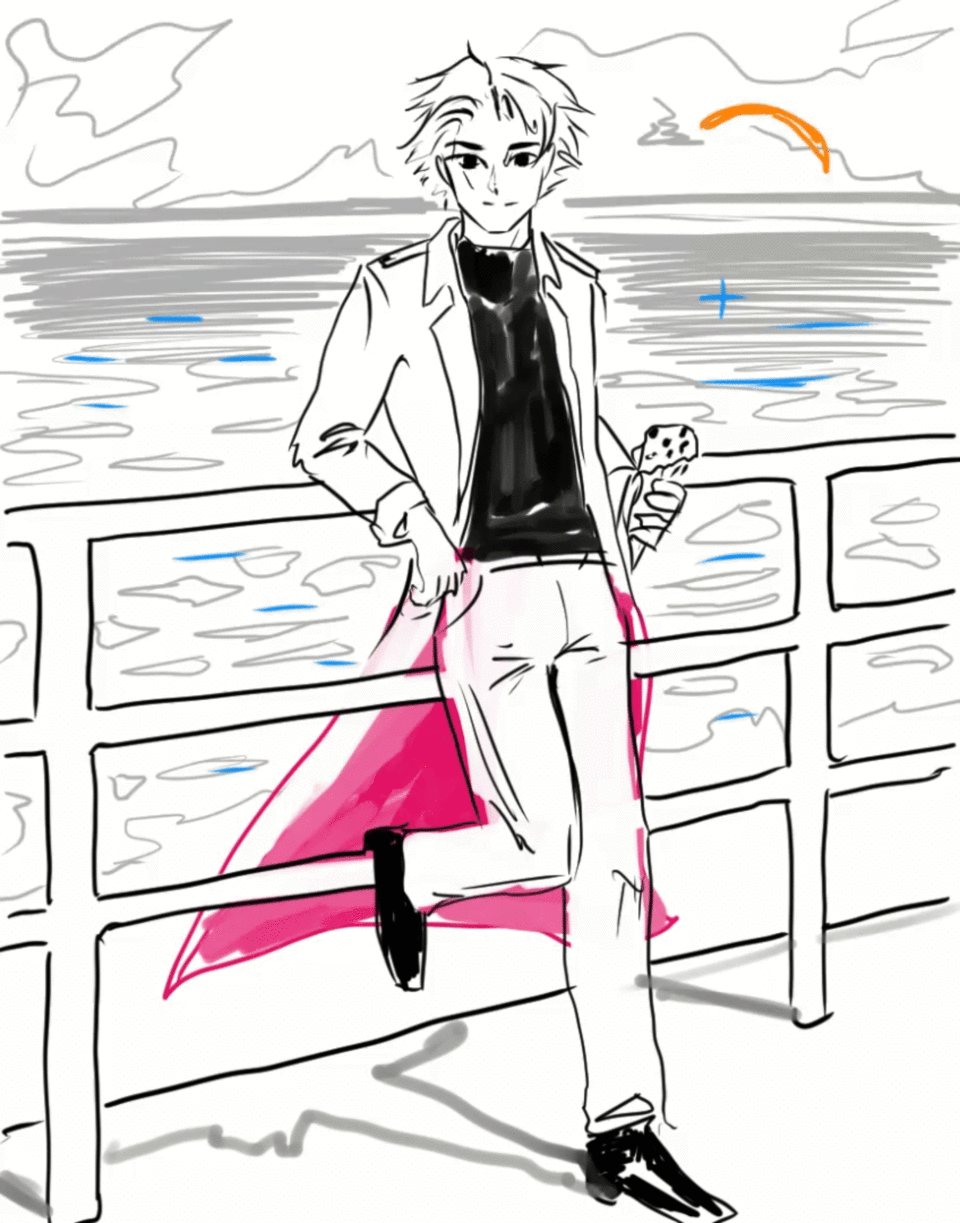
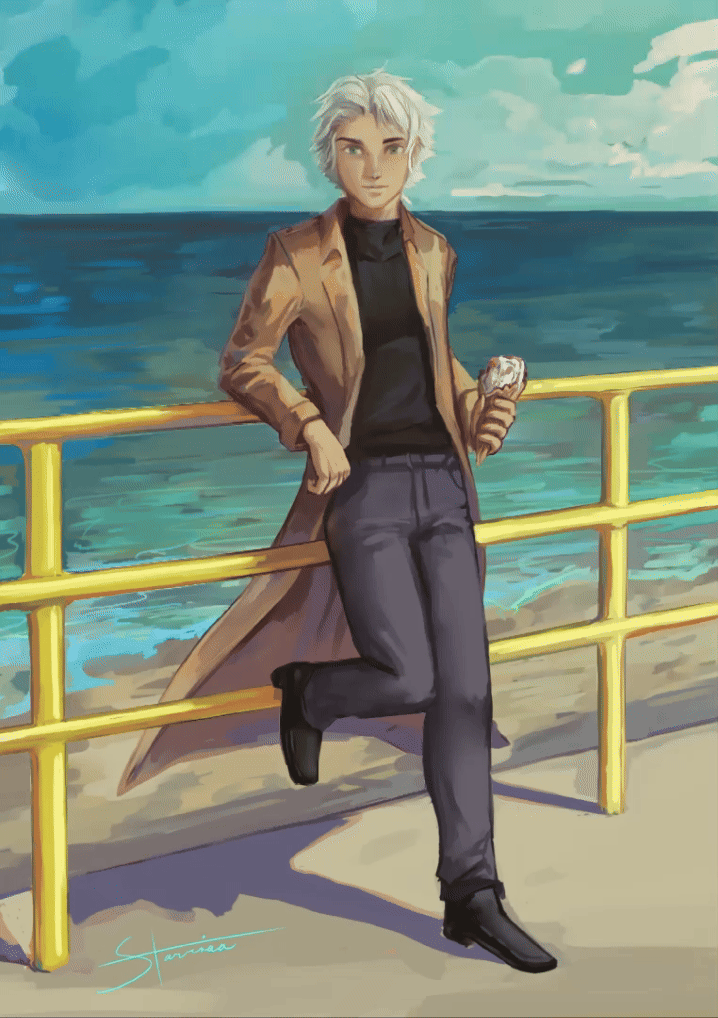
✧ “Just is” por Staviraa. 2021.
8.1 What do I want to animate?
“I want to animate my character’s trench coat being blown by the wind on the beach. I also want to add sun flares on the sea and a seagull flying in the background. I would like the animation to look rudimentary. I feel like all of these elements together would look great with the drawing style.”
8.2 Image preparation
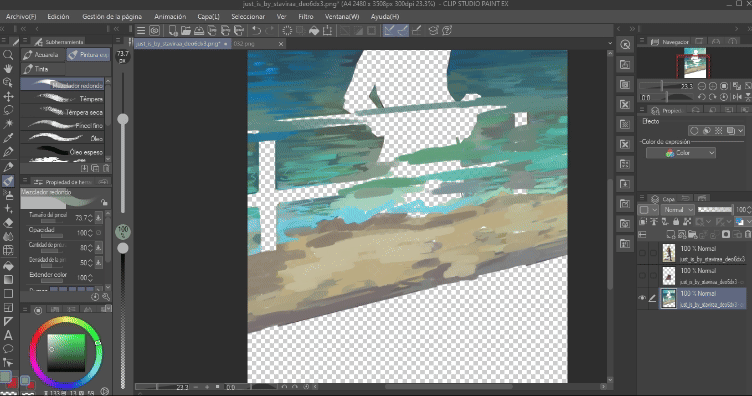
To achieve this animation, it will be necessary to separate the layers into parts. In my case, I want to animate the lower part of my character's trench coat. So, it will be necessary to divide my image into the background, the lower part of the trench coat, and my character with the railing and the concrete.
✧ Image split into different layers. 1. Background, 2. Trench coat. 3. Character.
In order to be able to animate, it will be necessary to fill in the incomplete parts of the background and the trench coat, since if I want to animate or make any movement on my canvas, the hollow parts of my image will be visible. (image below)
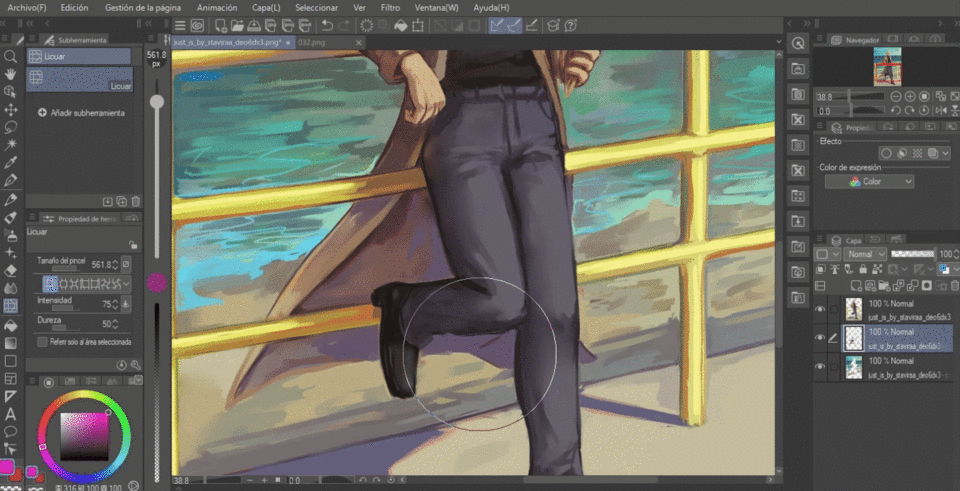
✧ Movement on the trench coat layer with the [liquify] tool.
To fill the parts of my image, I did some manual coloring.
If you have your original document .clip of the image you want to animate, you can make a copy of your document and easily separate your document into layers to animate.
✧ Example of my workflow for the unfinished areas of my document.
Now that I've finished filling in the missing areas of my layers, my document looks like this:
✧ Image split into different layers. 1. Background, 2. Trench coat. 3. Character.
8.3 Animation
As I explained in section “4. The timeline”, I activate my timeline in my document.
Next, I add an animation folder to animate the trench coat. I take the layer where the trench coat is (Yellow) and put it inside the corresponding animation folder (Orange). (Image below)
The trench coat is not visible even though the animation folder and the trench coat frame are visible. This is because the trench coat frame has not been added to the timeline.
To add the frame to the timeline, place the pointer where you want to add the animation → [Right click]. The window for adding frames will appear. In the left section, you will see the name of your layer. Click on it. (image below)
The left section of the pop-up window shows a list of your frame names. If you want to add a frame you've already drawn, right-click on the timeline and select the frame name you want. This is quite useful in animations where your sequences repeat over and over again.
To duplicate a layer, you can select the layer in the layer viewer → Copy and paste ([Ctrl+C],[Ctrl+V]). Since I'm going to use the same image multiple times, I've copied and pasted my base layer of the trench coat 7 more times. Then I add the frames to the timeline as explained above. (image below)
To animate, I decided to use the [Mesh Transformation] mode. It allows you to have more control when transforming objects.
To access the mesh transformation, you need to select our section to edit. You can select your element with [Automatic Selection] - Colloquially known as the “Magic Wand” - or you can do it manually with the [Lasso] tool.. or simply put a square selection [laughs].
The closer the selection is to our object, the better our editing will be with the transformation in Maya.
✧ Selecting my object with [Auto Select].
Next, we go to [Edit}→[Transform]→[Mesh Transformation].
Different handles will appear over our selection. These will allow us to have greater control over the deformation of our selection (image below)
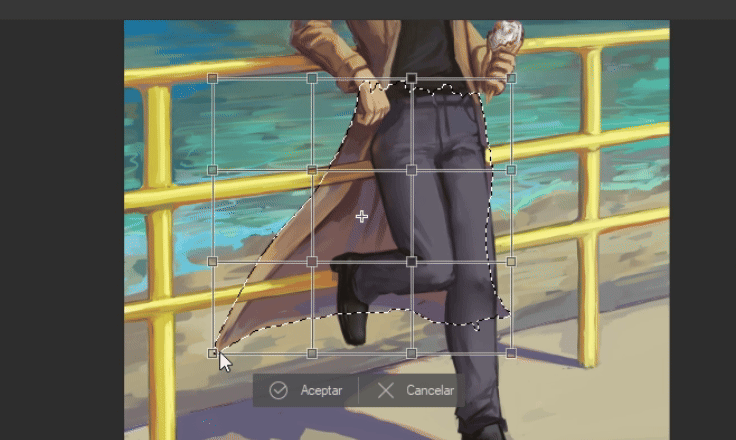
With this selection style, I set about animating each frame of the trench coat's movement. I also made touch-ups with the brush on the edges or thought that a fold would look good. The result is as follows.
I added a new animation folder and animated the sea by hand. I changed the [layer settings mode] of the animation folder to “illuminate”, as I showed in section “7.7 Special Effects”.
Finally, I added a new animation layer and made the simple animation of a seagull. I made an automatic interpolation (as I explained in “4.4 Automatic Interpolation” or in 7.7 “Special Effects”).
I animated on a new animation layer what would be the shine of the railing and the ice cream.
This was my final result! 🌟

9. Acknowledgements and farewell
Thank you so much for reading this tutorial, I had a lot of fun writing it. If you want to see more of my content, you can check out the tutorials and social media links on my Clip Studio Paint profile.
It was a pleasure and an honor to have somehow facilitated this training for you in your artistic journey.
For my part, that was everything. Thank you!
Users who liked this post


Comment