Steal My Eye Painting Process (Follow Along)
Hello! I’m back with another tutorial ^_^
In this article, I’ll be sharing how I approach painting eyes. The article as well as the videos of the process will be somewhat longer than usual, so that you can easily follow along with the process. Some steps for painting might not be linear, since I wanted this tutorial to be true to my process. Just like painting on traditionally, you’ll see me go over the same areas again and again, slowly building up the colours.
I hope that, through my process, you’ll find some techniques that you can borrow into your own work as well!
Before we begin, a note from me:
Hi! I’m Tosh and I love colours :) Unfortunately, I am mildly/moderately colour blind, so you’ll see me say stuff like “reddish colour”/”orangish colour”. I might name the colours incorrectly time to time, through ( I believe that) it does not impact my ability to paint.
Another point I want to mention is that for this tutorial, you need to have a very basic understanding of values. If you don’t, please refer to my previous article on colours :)
Also, throughout the process, the colour wheel will be visible so you can easily follow along with how I pick colours!
Brushes!
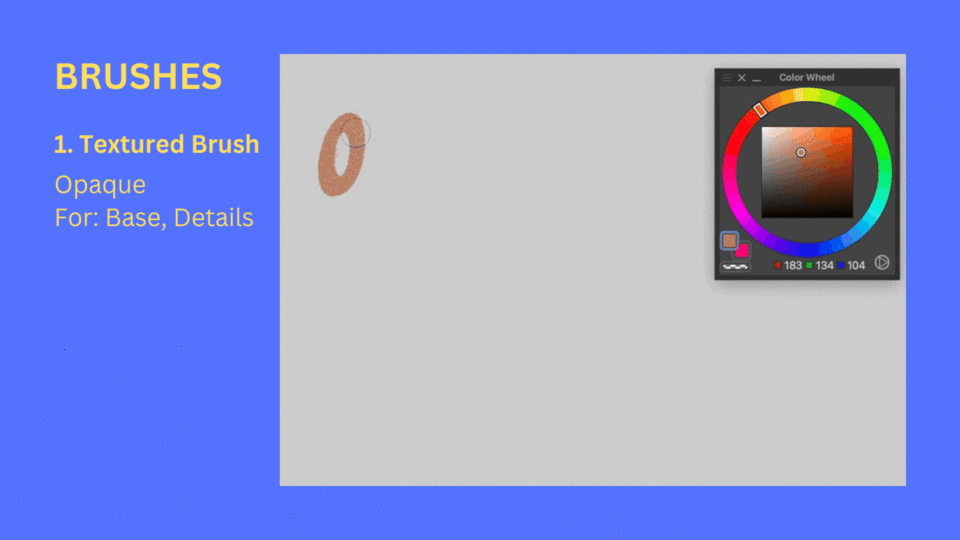
These are the only three brushes that i’ll be using for this tutorial. The second and third one are a part of Ahmed Aldoori’s brushset, but any round brush and thin sharp brush, depending on your artstyle will do. The first brush is a simple textured brush, unfortunately I no longer recall where I got it from since </3
PART 1: Parts of The Eye
Simplifying the Structure
Before we begin, I think that it’s important to first discuss the parts of the eye that I usually focus on when painting. When painting, it’s crucial to identify the important parts of the chosen subject. This includes being able to simplify lines and colours in ways that easily convey the shape of the subject.
The best way to learn is through using real life examples. Below is how I simplify the shape of the eye through geometric lines.
(all images are free stock images from pexels.com)

Start by noticing the points where the direction of the lids change. Most eyes can be simplified into 3 parts or so. Focus only on getting the rough shape down. When actually sketching, these direction changes won’t necessarily be this sharp, rather they will be somewhat curved. Nevertheless, first understanding the basic shape is really important since this basic structure will represent the shape of the eye.
They’ll also allow us to make the painting process smoother by helping us easily tell where the shadows or highlights will go.
Other Important Details
Other important details include the following:
1. Direction of the eyelashes
The eyelashes are generally always curved and move along the direction of the eyelid. In my observation, the lower eyelashes always curve downwards while the upper eyelids may curve upwards or downwards based on the shape of the eyelid.
( It’s also important to note that while looking down, the upper eyelashes will also face downwards. )
In the gif below, you can see the direction more clearly.
When drawing eyelashes, you don’t need to draw each individual hair. I prefer to draw a few small sections of a shape similar to that of a cone that show the direction and curvature of the eyelashes. You’ll see examples of this later on in the article.

2. Waterline
This is the area between the cornea/Sclera and the lower lash line or upper lash line. The absence of a painted waterline can really change the look of the eye, adding to the realism. Although, keep in mind that the waterline might not be visible in all eye shapes or at all angles.
3. Eyelids
In my opinion, the shape of the eyelids is arguably the most important thing to pay attention to when painting eyes. The top lid is generally more prominent in comparison to the lower eyelid.
In the above gif, I have added a few examples where you can notice the difference in the shape of each eyelid; the first one has an extra crease at the corner, similar to the first example that we used. Asian people, on the other hand, may have monolid eyes, that is, they have no crease between the eyelashes and eyebrows.
In round eyes (3rd image from the left), the crease is almost exactly the same shape as the top of the eye. Finally, some people also have hooded eyelids that overlap the the lash line.
Bonus
While the focus of this article is to focus more on my painting process rather than anatomy, below are some simple sketches to further understand what we discussed prior.
1. Eyelashes’ direction with angles: As mentioned before, the direction may change based on the eyelid, for eg, going downwards when looking down. In all of these cases, you’ll notice that they follow the shape of the lash line, going up when the eyes are rounded facing up and going down when the eye curves downwards (while looking down). Similarly, when looking sideways, the eyelashes cluster at the middle/corner, curving upwards, once again.
On the other hand, if the eyelashes curve downwards in the front view, the same will be seen in side views as well. In any case though, they’ll rare curve upwards when the individual is looking down.
2. Shape of the iris: As you may know already, the shape of the iris changes at different perspectives. To understand this better, you can put a circular sticker on a ball and move it to see the circle becoming an oval shape when viewed from the side.
The shape of the eyebrows also changes with the perspective!
3. Example of difference made by painting waterline using an old illustration to demonstrate. The difference is subtle, but noticeable.
PART 2: Shadows and Highlights
Understanding how to recognise where to place darker and lighter colours is crucial for painting. In this section I will explain how I mark these areas and how I approach painting them.
Please Note that shadows and highlights depend on lighting! In this article, for simplicity, I’ll focus only on one lighting condition.
Blocking The Areas
An easy trick to use for recognising areas of shadows and highlights is by squinting your eyes. This will make it easier to recognise and mark “borders” where the darker or lighter values end.
Shadows
Generally in lighting from above, there is a shadow formed under the eyebrow, since it protrudes outwards. Similarly, the bottom eyelid casts shadows as well. You’ll also commonly see a shadow moving outwards at the outer corner of the eye, connecting to the edge of the eyebrow.
Blocking these areas out as simple geometric shapes makes the painting process much easier for me. These shapes don’t need to be perfect by any means.

Highlights
Continuing with the same lighting from above (the sun), the inner eyes are generally a lighter colour.
Other areas that have highlights may include the area right under the bottom lash-line, which is usually the brightest in the middle.
The area under where the eyebrow curves or changes directions is also generally lighter than it’s surrounding areas.
Finally, the area of the cheeks connecting to the lower outer edge of the eye is also lighter in colour.
Painting Basic Shadows and Highlights
Let’s now try to paint an eye, using the above examples to add shadows and highlights in the areas that we marked earlier. The videos will be slow on purpose so you can easily see the whole process and follow along!
For all the parts of this article, you can always switch to the youtube video to slow down or speed up the higher quality version of the speed paint sections at your own pace!
I started by drawing a sketch of the eye and then laying down the base colour. Then, on a new layer, I marked the area that we recognised in Part 1.
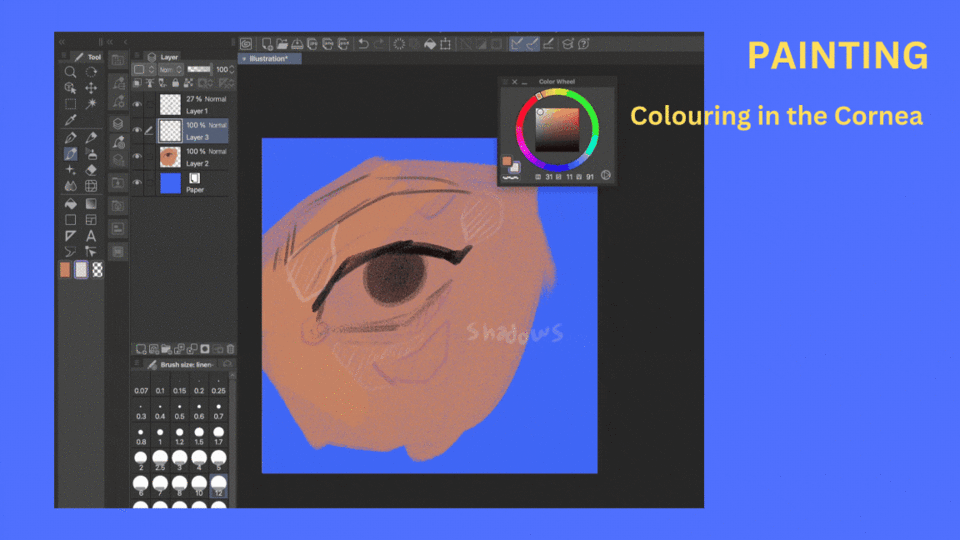
For the colouring process, First, I filled in the Sclera (incorrectly marked as cornea in the video). Personally, I prefer using a lighter desaturated version of the base skin colour for the sclera.
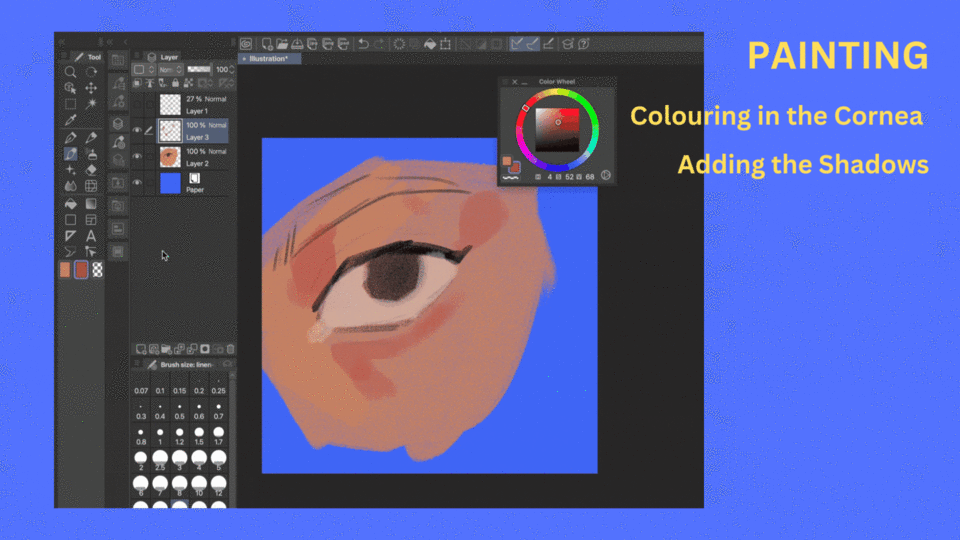
Next, using a more saturated and darker version of the skin colour, I filled in the shadows. You’ll notice that I changed the hue as well here (moving towards yellow) , this helps the skin look more vibrant.
Similarly, to blend the shadows into the skin, I used an orangish colour to extend the area of the shadow. These strokes follow the direction in which the shadow gradually shifts into the skin’s colour, as seen in the references.
Then using the base skin colour, I blended the orange and shadow into the skin. For this part, I’m using a round brush.
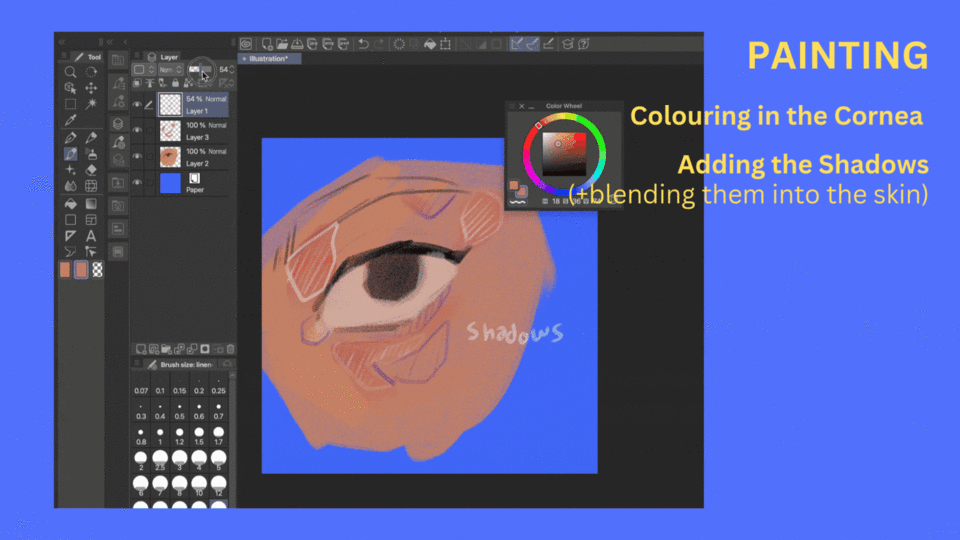
Likewise, add the Highlights and blend them into the skin as well.
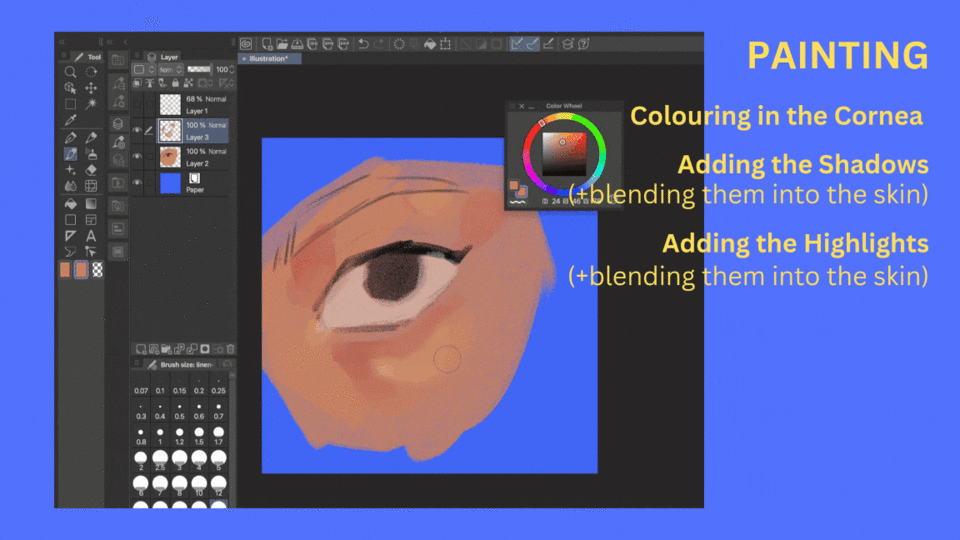
After that, I fixed the edges that had gotten blended a little too much.
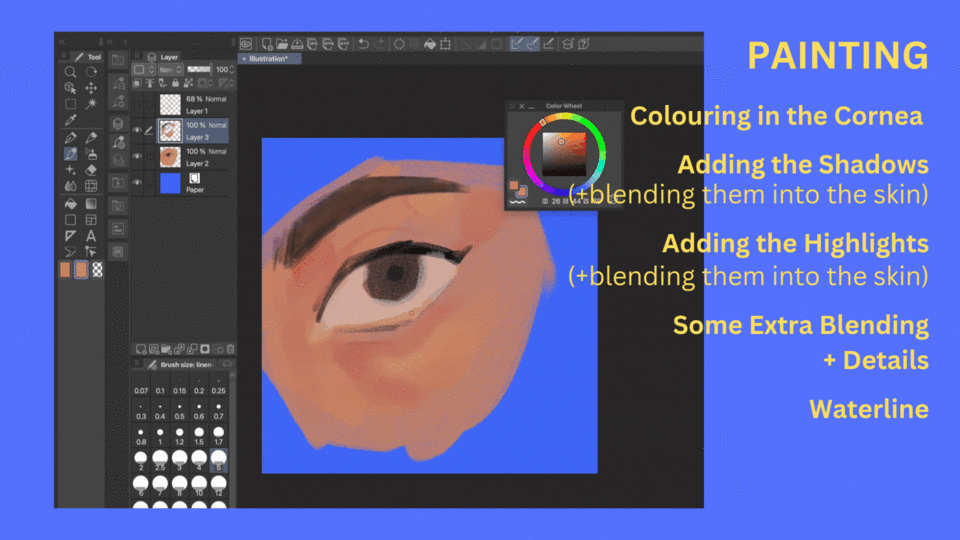
For the waterline, Use the skin colour or a lighter colour and draw over the bottom lid. Outline this area with a darker colour to separate the sclera and the waterline.
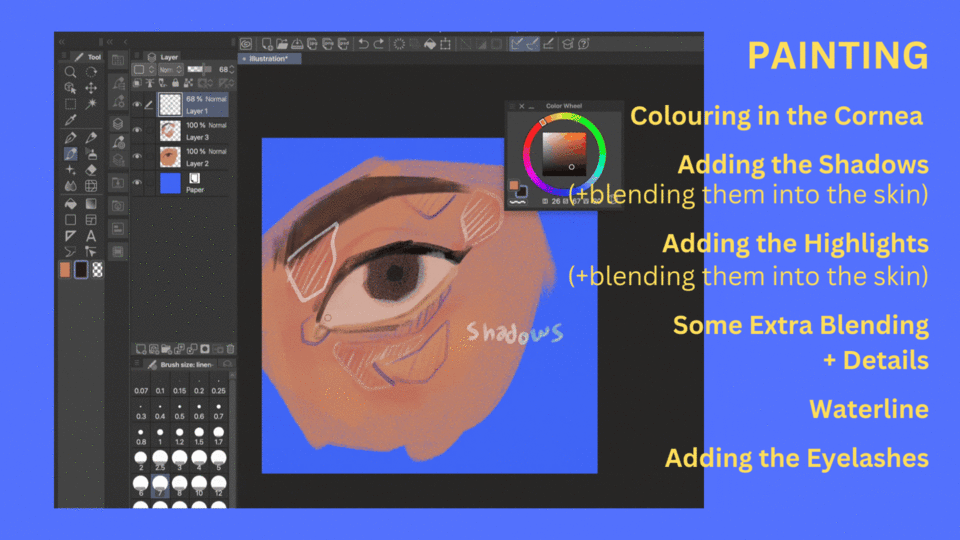
Then I redid the outlines that were painted over, filled in the eyebrow, added the pupil and a shine in the eye.
At the end, I added the eyelashes, curving along the eyelid.
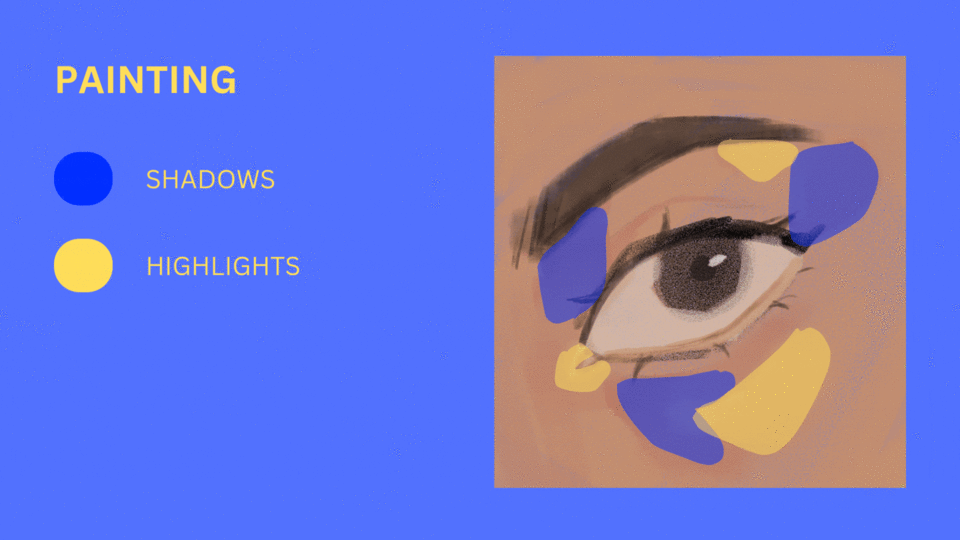
In Part 3, 4 and 5 I will be sharing my process for painting eyes at different levels. Part 3 being the simplest and Part 5 being the most time consuming one.
PART 3: Painting (Lesser Effort)
In this section of the article, each gif will be divided into two sides. The left hand side shows each step and explains it, while the right hand side shows the actual process that leads to the final product of each step simultaneously. You can focus on either of the side based on what you prefer. ( I would recommend paying attention only to one side and referring to the other whenever you feel it to be necessary!)
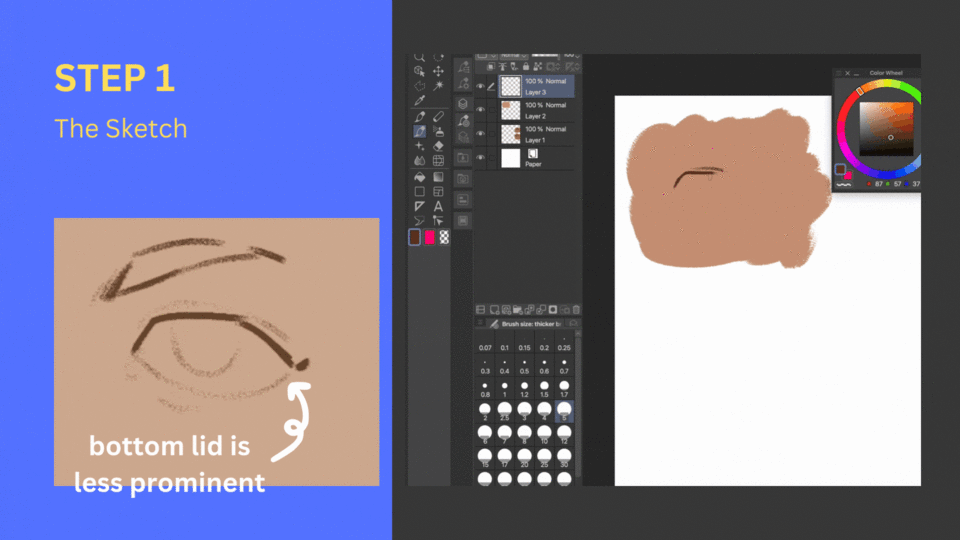
Step 1: Due to the shape of the eye, the bottom lid is generally always less prominent, hence I usually make the top lid thicker in comparison.
Step 2: Once I’m done with the sketch, I colour in the Sclera using a lighter desaturated colour, which you can see on the colour wheel in the gif.
Step 3: I add a desaturated border to the pupil to add some depth, along with a rim drawn with the colour opposite to that of the iris, just to make the iris pop.
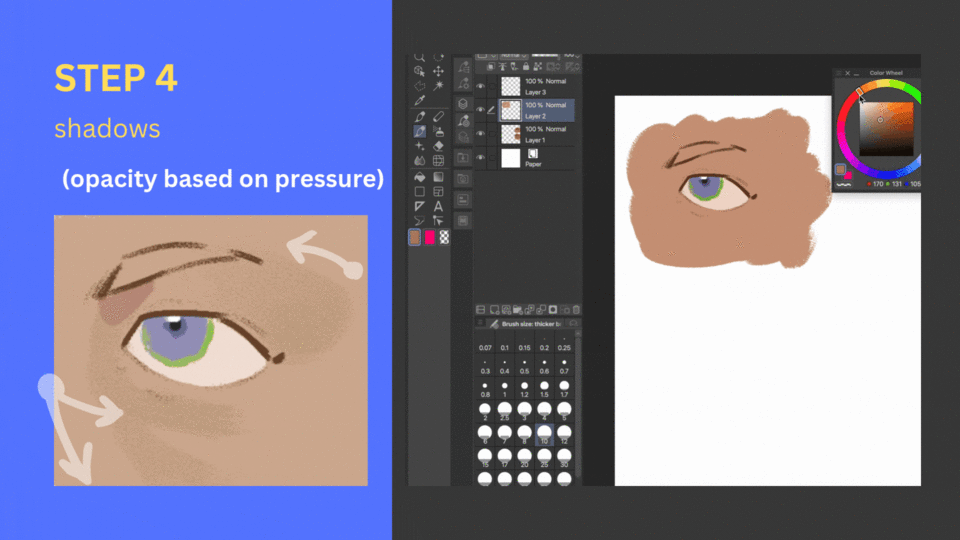
Step 4: I add the shadows, making the block under the eyelid opaque. Usually, in this lighting, the shadow under the eyebrow is the darkest, whereas the shadows around the eyes shift back into the base skin colour more gradually. This gradual shift can be done easily through brushes where the opacity is determined by the pressure.
(The steps to change any brush’s settings to make it’s opacity change with pressure are given at the end of Part 3/after step 12)
Keep in mind that even if the eyebrow hair are absent, the eyebrow area protrudes outwards, hence the shadow is present regardless of absence of eyebrows. The character I had in mind has shorter eyebrows, hence the shadow moving from the corner of the eye, towards the end of the eyebrow still curves along the shape of an imaginary eyebrow.
Step 5: Using a slightly darker colour, draw the bottom lash line and eyelids.
Next, colour in the eyebrow, and use the same colour on the top lash line since the eyelashes would have the same colour at the eyebrows.
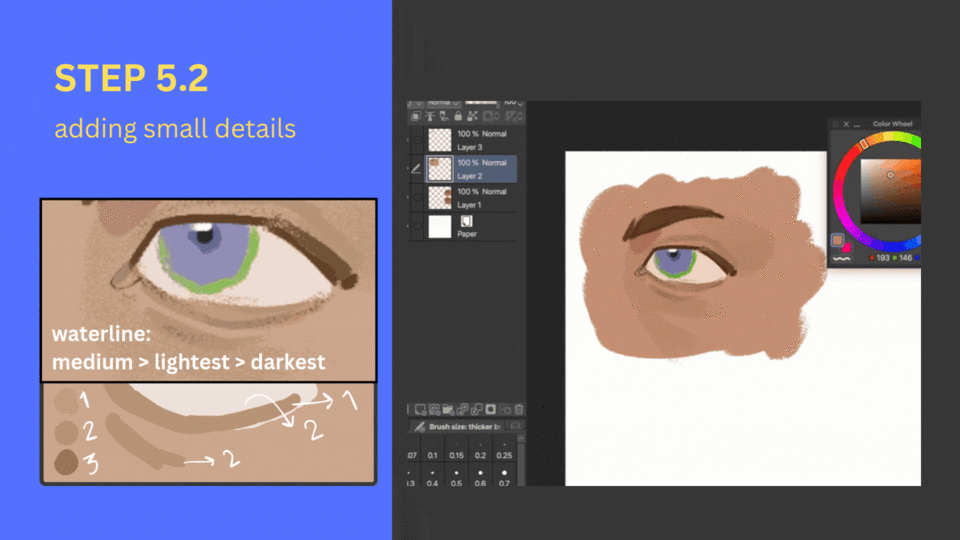
Step 5.2: For the waterline, The method I use consists of 3 colours of 3 different values. I layer each colour one by one, starting with the medium value, then adding the lighter value and finally at the bottom I add the darkest value, as you can see in the illustration.
Step 6: Next, I added the eyelashes and made the waterline slightly darker.
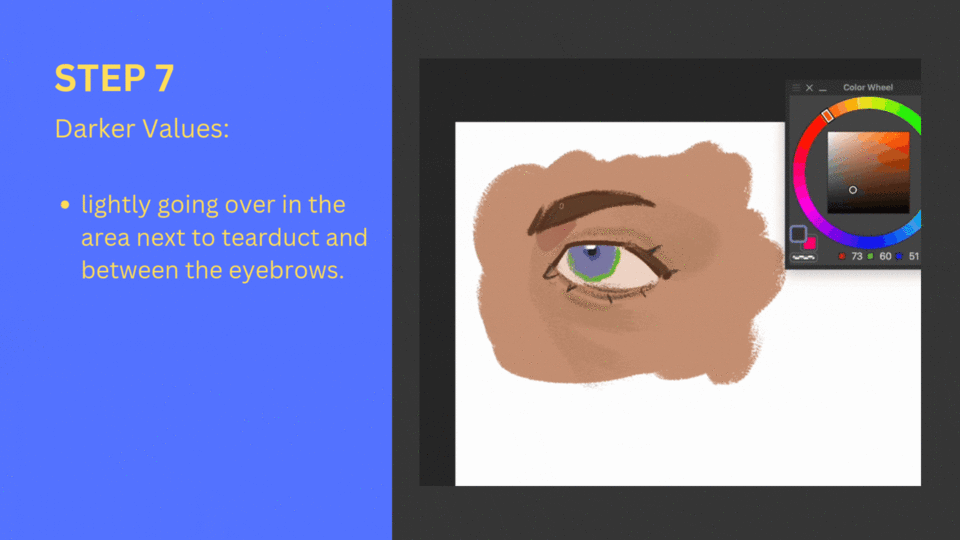
Step 7: First, I just added some strokes for the eyebrow. Then, I added depth to the colours next to the tear duct, once again using a more colour of a darker value and a redder hue. I added this colour next to the eyebrow as well. (the area between eyebrows is commonly a darker value than the forehead or top section of the nose bridge.)
I also made the bottom lid darker at the edge and added red to the cheek. Make sure that your strokes near the eye will curve along the shape of the eye.
Step 8: For the iris, I made the top of the iris darker, making small strokes similar to spokes of a wheel. I also added a darker value to the sclera at the corner to show it’s shape. I will go more into detail on how the sclera is coloured in the next parts.
Since the colour that I used for the sclera is a desaturated version of the skin colour, I can use the shadow colour for the tear duct as well.
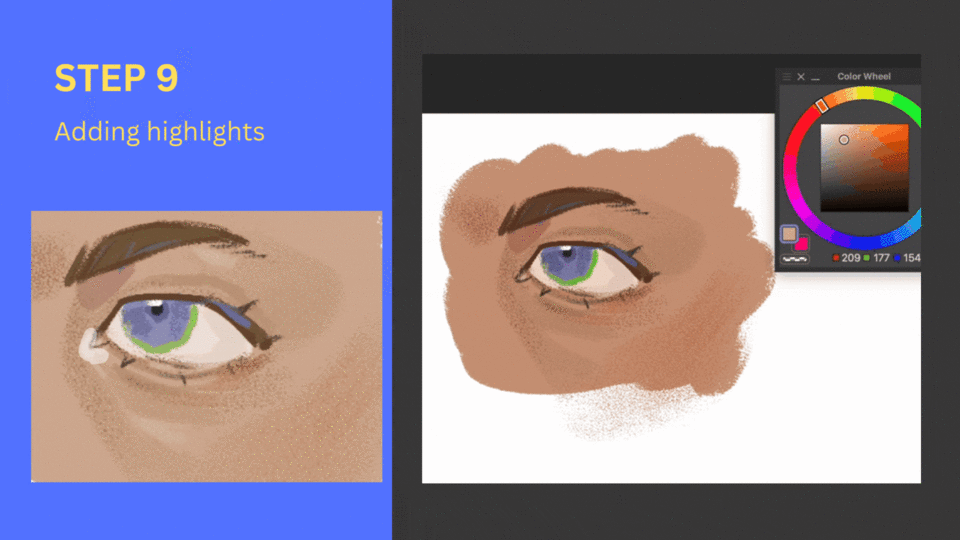
Step 9: I added the highlights, similar to the way shadows were added. Recall how I mentioned that the shadows work in similar ways whether or not the eyebrow is present, hence the highlight under the eyebrow is at the edge here. The edge of the eyebrow, for this character is where his eyebrows would have curved downwards.
Step 10: Using midtones or the base skin colour, you can blend the shadows to look more natural.
Step 11: Building on the previous step, I added a warmer saturated colour lightly over the more “gradient” or sparsely textured areas. Then, I went over the same areas with the skin colour. This makes the skin look more human and gives it a subtle warm undertone.
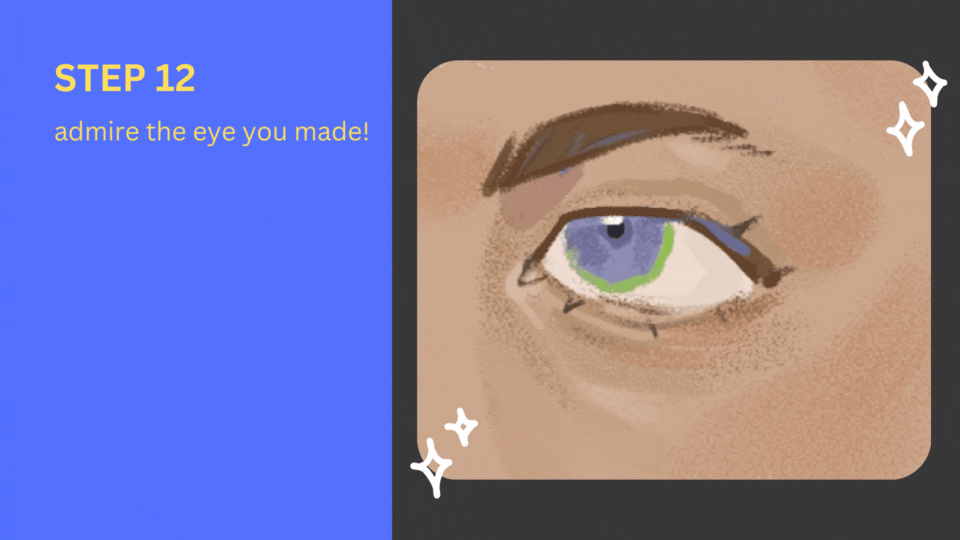
….and with that we’re done with Part 3! (almost) I hope that you were able to learn something new from my drawing process :)
Next, We’ll be amping up the rendering game by shifting to using round brushes and layering even more to build up the colours.
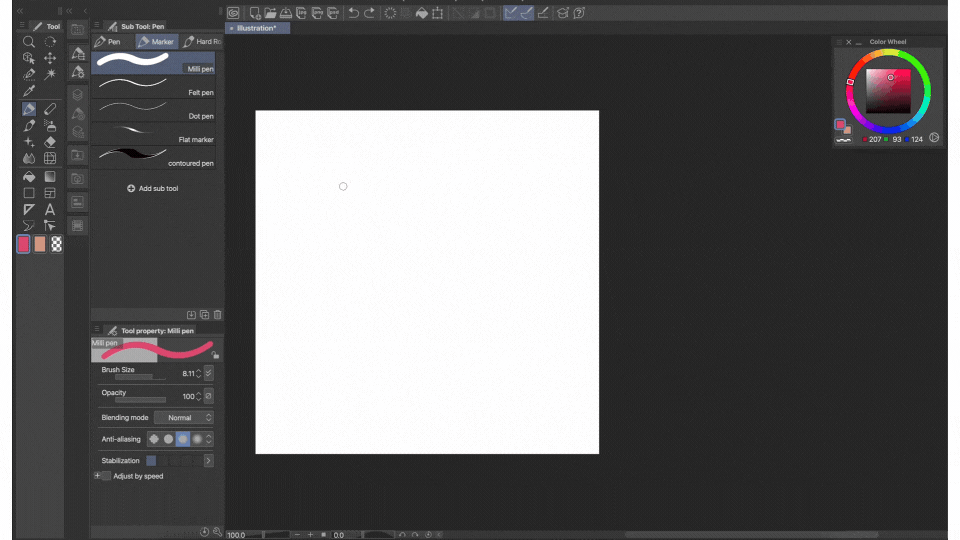
Brush Settings: Pen Pressure for Opacity
Written Steps:
Select your brush > Go to Window > Select “Tool Property [brush name]” OR click the small spanner/wrench Icon at the bottom right. This will open a “Sub tool Default” window. Here, go to “Ink” and click the icon next to opacity to open the “Opacity Dynamics” Window. Here, check the “Pen Pressure” option and adjust the minimum value according to your preference.
To reset these settings, you can either click the icon next to the spanner or in the “Sub Tool Defaults” window, click the first option at the bottom that says “ Reset all Settings to Default”.
PART 4: Painting (Medium Effort)
In this section of the article I will be sharing my process for painting eyes for more rendered illustrations. I prefer working on one singular layer, the same way we would in traditional paintings, so as mentioned earlier, my process will not be completely linear.
For reference, painting this eye took me around 8 minutes, whereas painting the eye for Part 5 took around 30-35 minutes.
As done in Part 3, the right hand side will have the speed paint playing, while the right hand side have each step explained.
Let’s start!
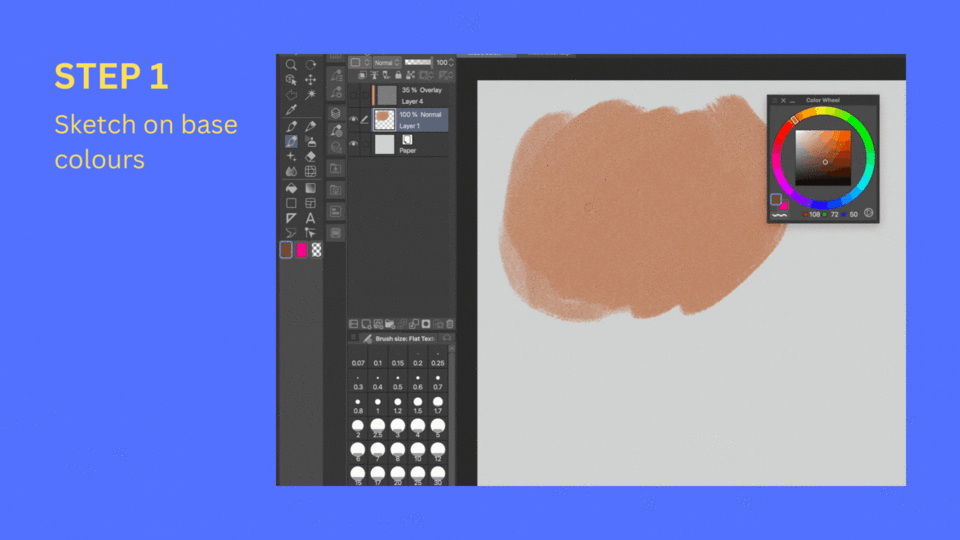
Step 1: Sketch out the base. This time I used the “outline brush” for the sketch.
Step 2: As mentioned in the gif above, the sclera is spherical in shape, hence it’s coloured in the same way. The section visible, which is not covered by the skin (eyelids) has curved shadows, the same way a sphere would. One or both corners, hence, may be darker than the centre of the eye. Further, the roundness of the strokes conveys this shape.
My colour selection remains the same as before, although this time I used a colour of even more darker value than the one I had used in part 3, since the eye is rarely lit that brightly. Although, choice of colours depends completely on you as an artist, depending on your preferences.
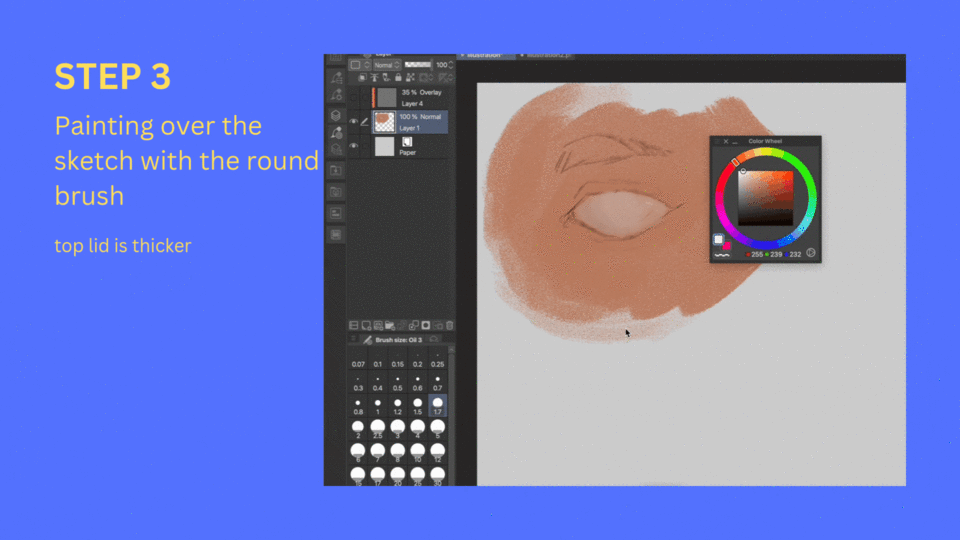
Step 3: I painted over the sketch of the eye, making the top lid thicker and darker through multiple layers. I also coloured the tear duct in, since I will eventually be going over that with a lighter colour later on.
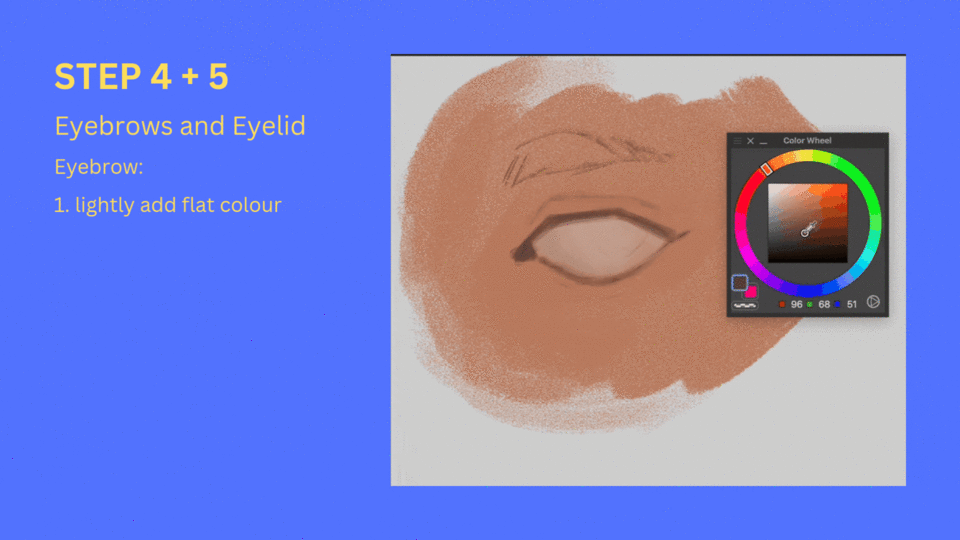
Step 4: For painting eyebrows, I first lightly colour in the base colour. Next, I take a desaturated version of the skin colour or the hair colour and lightly go over the edges of the eyebrow. In most cases, from my observation, the rim of the eyebrows, or the part where the hair decreases, appears to be more desaturated. Adding this colour gives the illusion of the hair becoming sparse and blending into the skin.
After this step, I fill in the eyebrow with the intended hair colour.
Step 5: For the eyelid, with a larger brush size and darker colour, I simply drew/went over the sketched crease, the same way we did for the top lash line. (The gif for Step 4 of Part 5 shows an isolated example of painting over a sketch line.)
Once the sketch has been brushed over, I clean the part above the crease line using the skin colour, since the crease casts a shadow below, same as the eyebrow.

Step 6: As always, I paint in the shadows, this time even lighter than usual, quickly blending into the skin. Next, I added the highlight near the tearduct and used the same colour to paint it in.
( While the Part 5 uses the same base as we have drawn by this step, the next steps after this one will be different in it.)
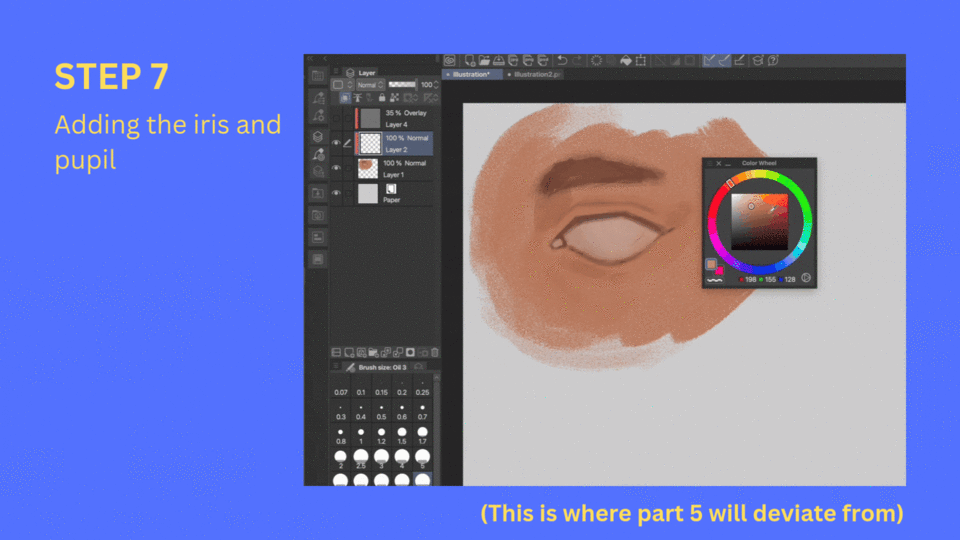
Step 7: I painted the iris in, going over the border again lightly to subtly blend it into the sclera’s colour. Using a slightly darker version of this colour, I added the pupil and then later made the centre of the pupil even darker. This process is the same as the one I shared in Part 3, except this time I am using a translucent brush and making my strokes less geometric.
I also made the top lash line or top lid darker and added the eyelashes using the sharp opaque brush. The shine in the eye is also sharp to make it more striking.
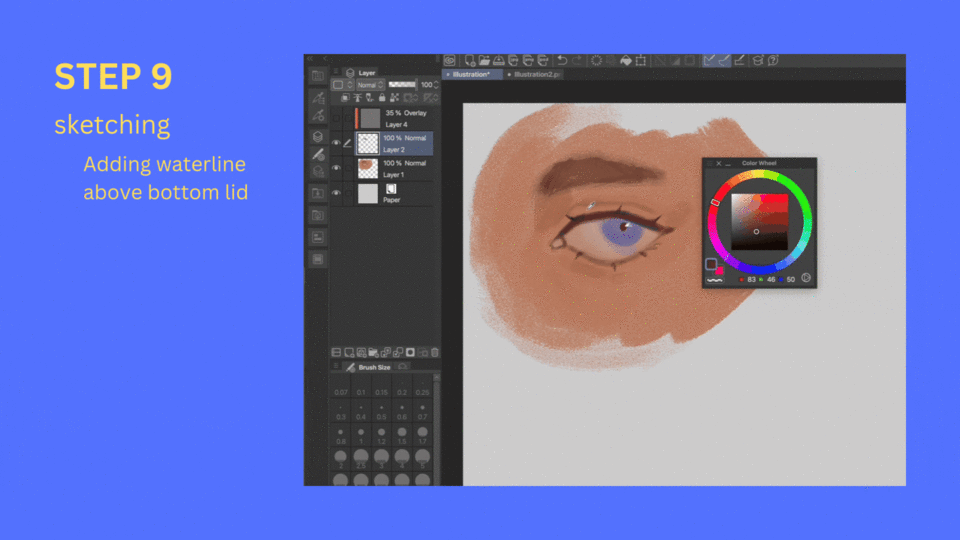
Step 9: I called this this step sketching as this is the part where I go over the illustration with the sharp opaque brush to add contrast and make the illustration more clear or sharp.
I began by adding a border lighter colour over the bottom lid/bottom lash line, and then drawing a line with a darker colour to separate this colour from the sclera. This is our waterline!
Next, I redrew the crease and added a few lines into the eyebrow to show the the hair. Some of these lines will be softened by the round brush in the next step.
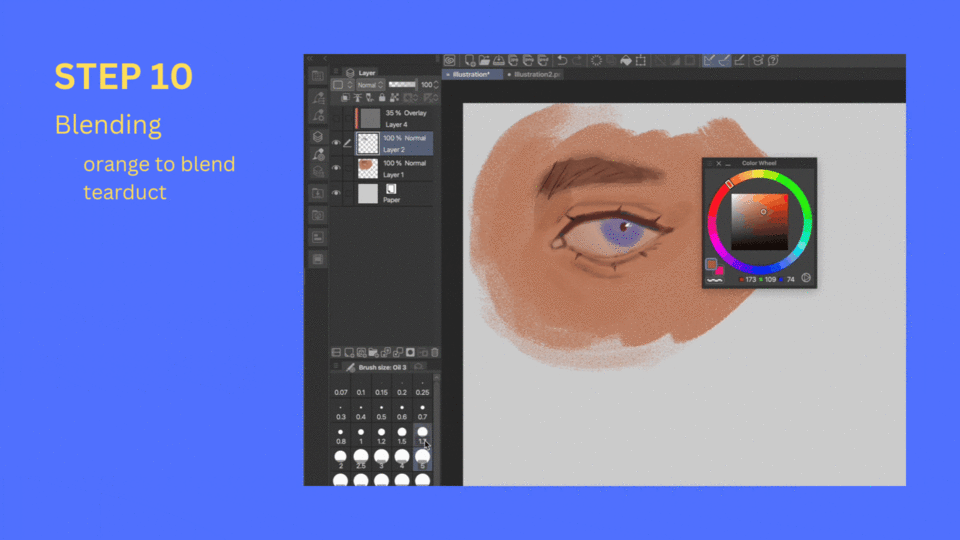
Step 10: To bring more colour and life, I added an orange to the top of the tearduct. Next, as mentioned, I softened up the eyebrow as well.
Step 11: Finally, I went over the shadows once again, in the same areas as we did in the previous parts. These include:
- The shadow under the eyebrow softly shifting into the skin following a path along the tear duct and then curving with the shape of the eye.
- More emphasis on the shadow at the outer edge of the eye, rounding towards the centre of the eyelid.
- A darker colour under the corner of the eye as the skin curves around the structure.
- Additional layer of the shadow between the top eyelid and top lash line, moving towards the centre on one end and curving towards the brow on the other. This looks similar to the shape of a wing drawn with an eyeliner.
- Finally, I brushed over the bottom eyelid to give it more depth as well, once again make a flattened ‘U’ shape under the eye.

Step 11: We’re still not done with the shadows! I continue to make the old shadows darker, using blue to achieve the same.
I also made the corners of the iris darker as well during this step.
Following the area between the eyebrow and eye, where the centre is the brightest, I added a lighter brown to the centre of the top lash line as well.
And…
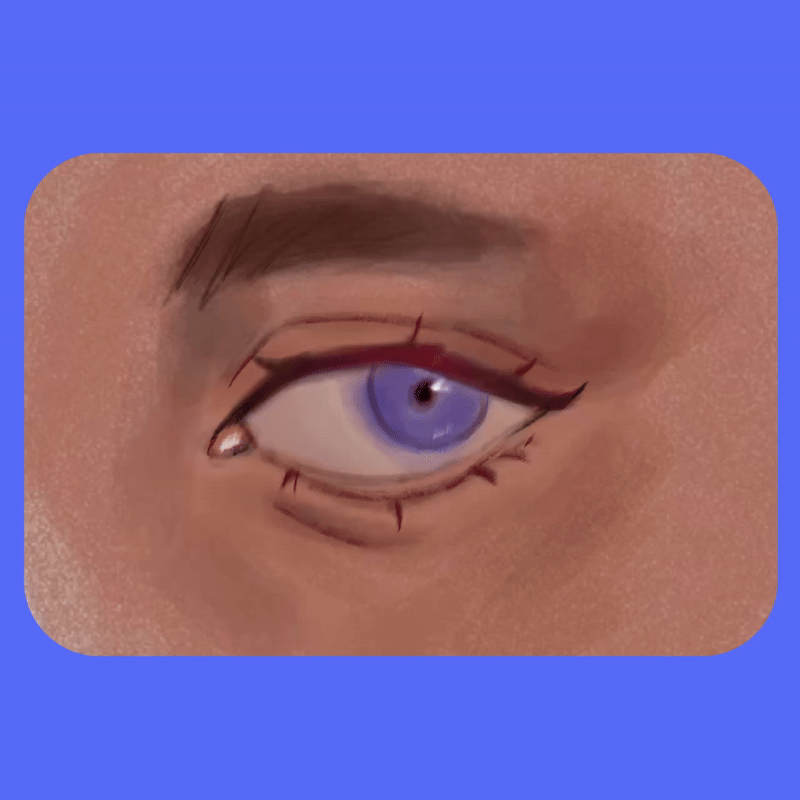
Voila! You have decently fancy looking eye!
Bonus:
You can make this eye stand out even more simply by adding darker lines in places like the creases, eyelashes or the pupil.
You’ll also notice that in this part I did not put as much focus on the highlights. This was because personally I tend to skip over the the lighter parts under the eyebrow or in the lower eyelid if the eye is not too detailed. It is simply a stylistic choice on my behalf.
PART 5: Painting (Higher Effort)
Using everything I have shared previously and building on it further, In this part I will be going in more detail for painting the iris, drawing the eyelashes and checking values!
To save you some time, I will not spend too long explaining parts that we have already gone over. Nevertheless, I hope the slowed speedpaints will give insight into the the process, even if I believe that a certain part might not be as important.
The first few steps, until we painted the Sclera will remain the same as they were for Part 4. You might’ve alread y noticed but, the whole process is essentially the same in all the parts, the only difference is the time spent on rendering out each detail.
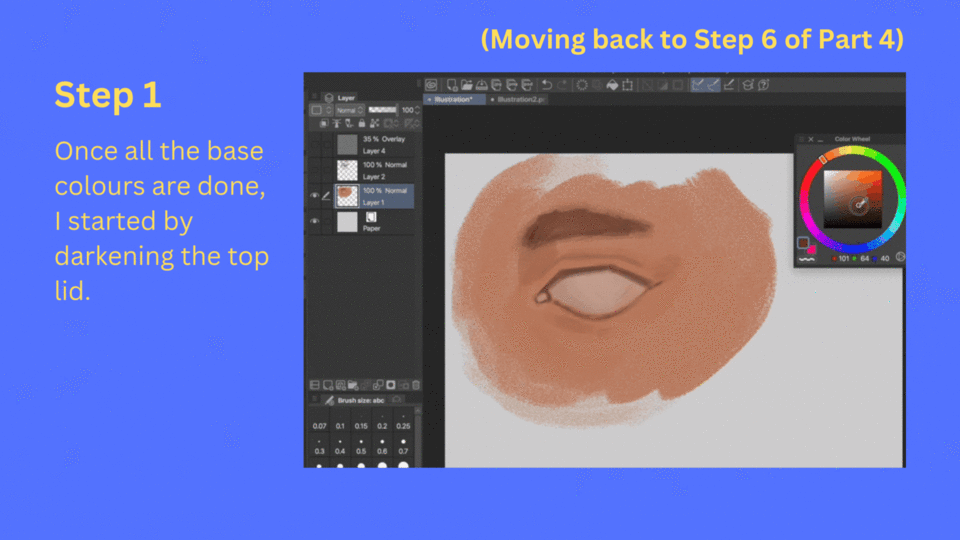
Step 1: I started by darkening the top lash line.
Step 2: Using the default airbrush tool, I added the iris in a colour opposite to the actual colour of the eye ( stylistic choice)
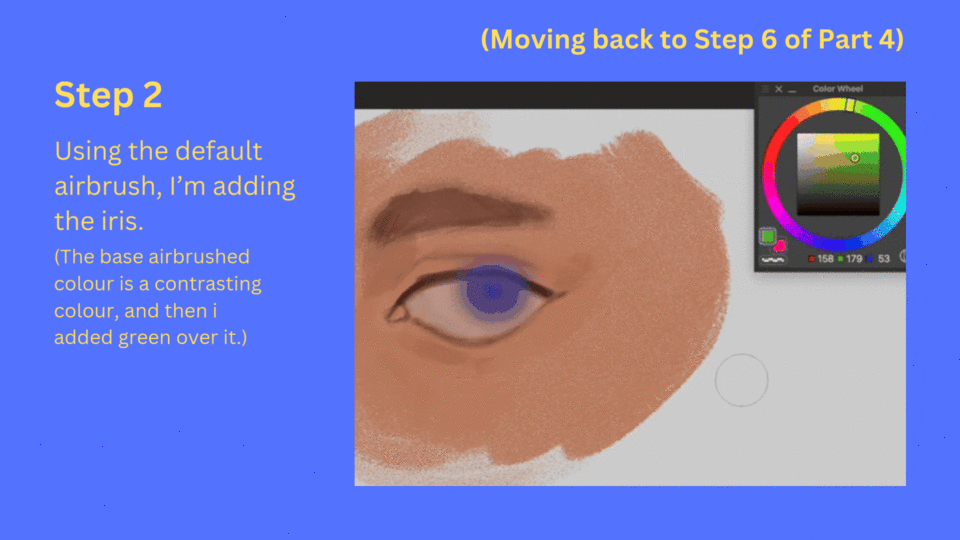
Step 3: I went over the blue with the intended eye colour and then cleaned up the top eyelid which was now green.
Next, for Step 4, I sketched an outline to the eye and went over it with the roundbrush, similar to the process for the crease in the previous steps.
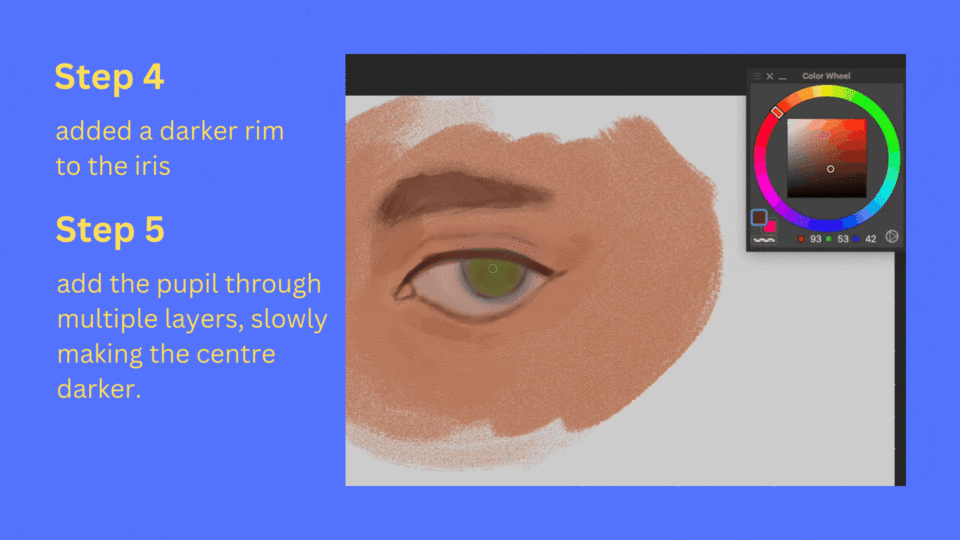
Step 5: By going over the same area multiple times, gradually decreasing the size of the area covered, I made a base for the pupil. Following this, I drew a sharp small almost black dot in the middle.
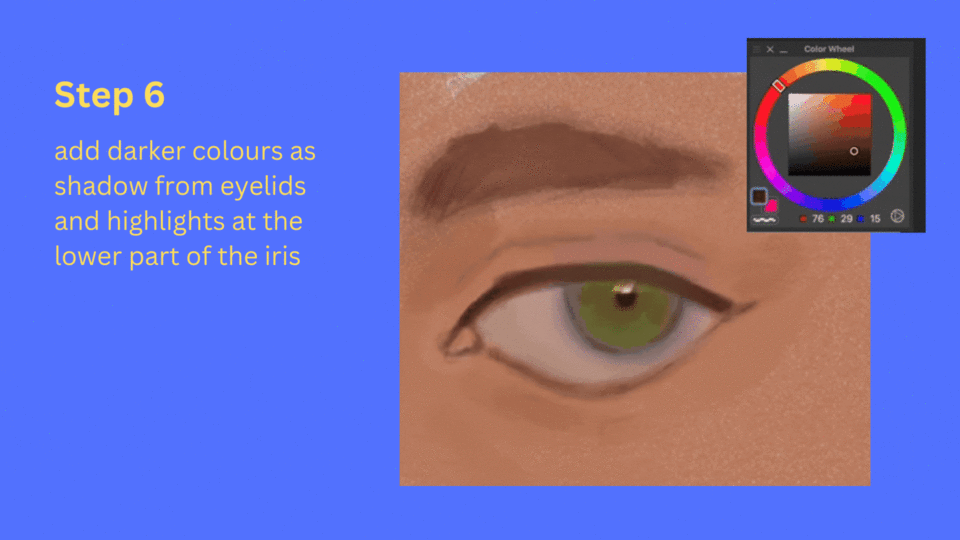
Step 6: Working further on the iris, I added a darker colour at the top of the eyelid to show it’s shadow. Next, using colours between the sclera’s colour and the blue that we airbrushed earlier, I slowly blended the edges of the eye with the Sclera.
Then I layered the highlights, going over the centre more times in comparison to the corners in order to make that part the brightest.
It is important to note that usually the brightest highlight, the shine at the top in this case, is usually in the darkest part of the eye.
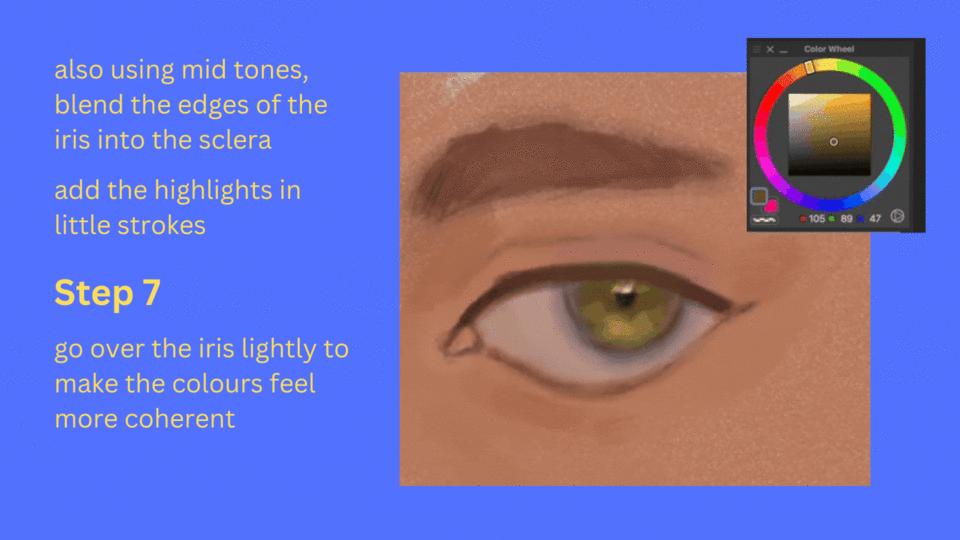
Step 7: To blend in the colours, I lightly went over the whole area with the eye colour. Then, I made the shadows darker again to make them stand out more. Consequently, I added sharp highlights at the bottom as well.
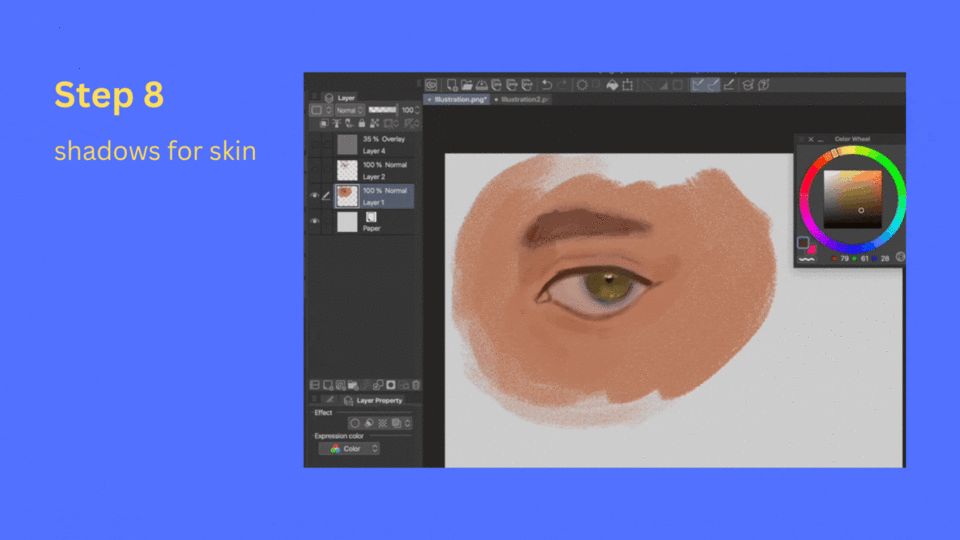
Step 8: As done in previous parts, I added the shadows, making sure to blend them into the skin.
Step 9: Using the method of part 3 and 4, I painted the waterline. The colour I used first was a light red, which I then followed up by the skin colour to give the skin an undertone.
Finally, i outlined the edges once again to make sure that they don’t blend in too much.
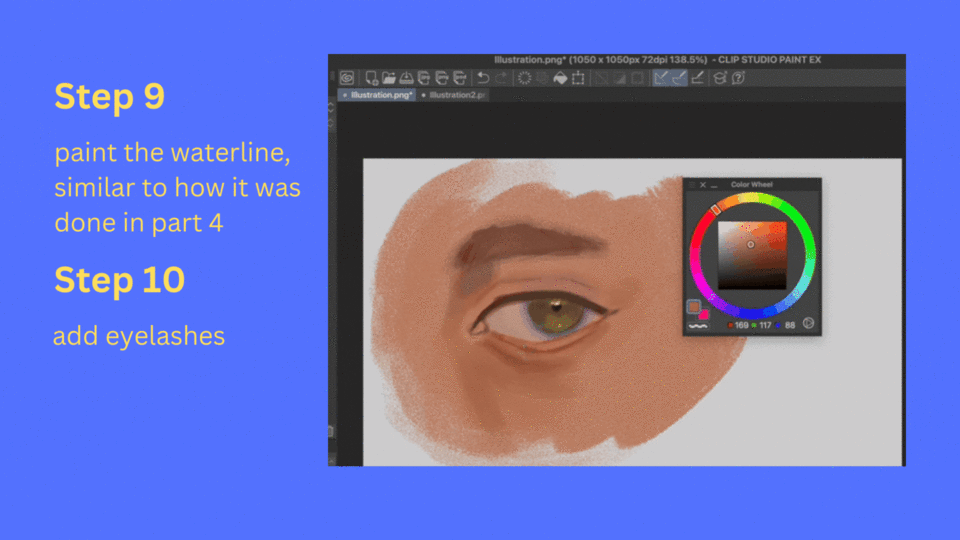
Step 10: Draw the eyelashes, curving along the lash line. For this eye, I took a slightly different approach. I started by drawing small spikey shapes attached to the waterline for the lower eyelashes. Then I outlines them with the hair colour. I also added some stray lashes.
For the top lashes, I kept them thicker and coloured the insides of the central eyelashes with a lighter brown, for the same reasons as we discussed in the previous parts
Extra Step:
Next, I added more shadows, making the crease, eyebrows, cheeks and eyelid darker. These are the same areas that we focused on in the last part, although this time i focused on blending them even more.
I also added highlights again to the areas that were getting overshadowed (get it? because of the shadows? I’ll see myself out…)
Checking Values
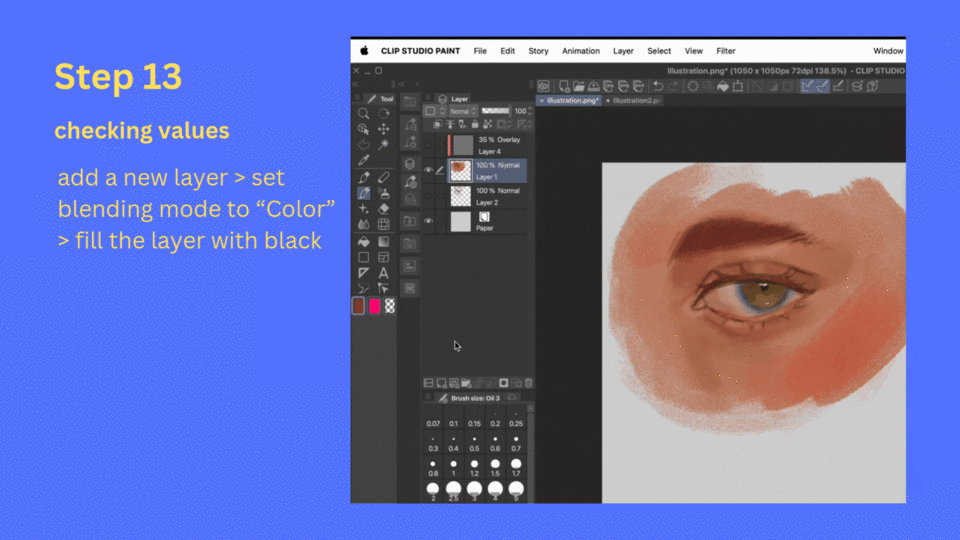
Step 13: Values are a very important part of an illustration. Lower contrast in values can make illustrations look dull which is something that I want to avoid. So, I make a new layer and set it’s blending mode to “Colour”. Next fill the layer with black. This will allow you to clearly see the values and adjust them as necessary.
The process for adjusting them is really easy because you can just go to Edit> Tonal Correction> Tone curve, and adjust the graph according to your preference. Above you’ll be able to notice what a huge difference that makes!
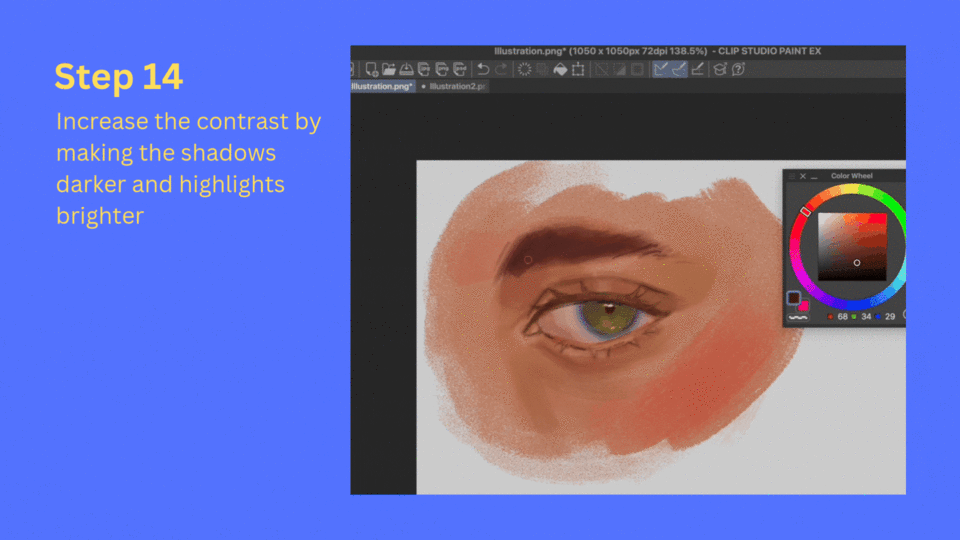
Step 14: I decided to do this step manually by going over the highlights and making areas darker. This process consists of a lot of trial and error, so I would just recommend taking your time with it and going back and forth to check the colours using the colour layer that we made earlier. Developing an eye for creating contrast in values can really improve your painting skills!
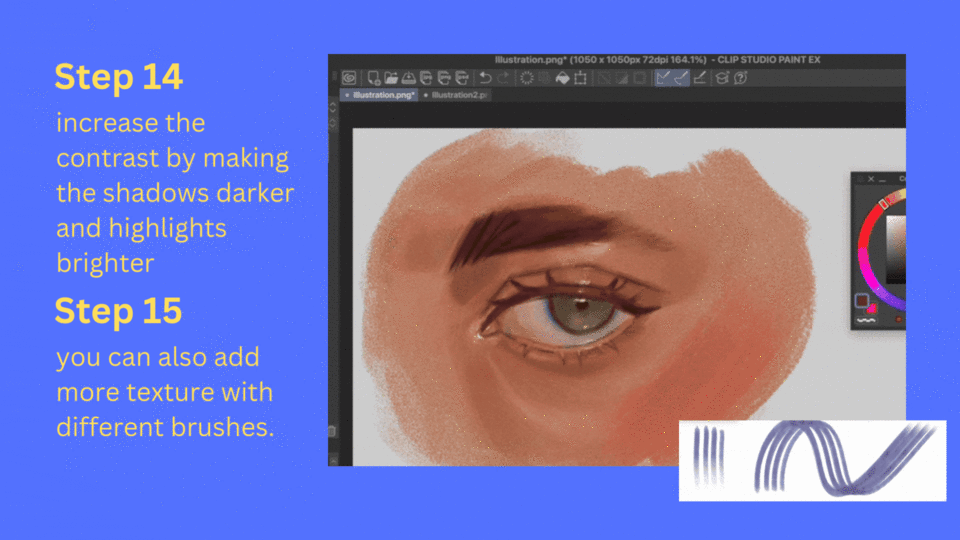
Step 15: You can give texture to the skin using one of the many amazing texture brushes available on CSP! Personally, I prefer to use a hair brush that consists of three strokes along with a noise layer.
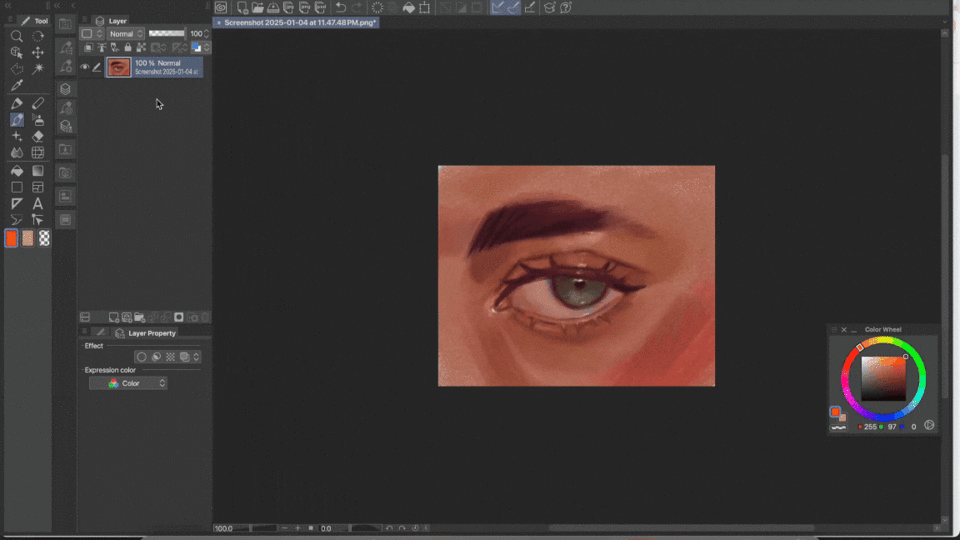
You can add noise by making a new layer and then go to "Filter" > "Render" > "Perlin Noise." Adjust the settings to your liking. I prefer to set the blending mode of this layer to “Overlay”.
You can also keep this layer on throughout the entire process by locking the layer and changing the colour picker settings to exclude locked layers.
The video showing each step is attached below :)
Step 16: I added a new colour layer and airbrushed blue in the eye and eyebrow along with a skin colour on the skin, just because it felt like a fun thing to do. Then, I set that layer’s opacity to 26%.
Step 15’s How To:
And there we have it! Another cool eye!
That's all Folks!
I hope that this article helped you learn something new! I only shared my process for painting one eye shape in one lighting condition, since I wanted to share my process, with details on each step which turned out to be quite lengthy by itself, so I’ll save my understanding of lighting for some other time. Nevertheless, I hope the breakdown of each step will make it easier for you to paint different eye-shapes under different lighting scenarios through the process of blocking shadows and simplifying shapes.
If there is anything that I can help with, please drop a comment and I’ll do my best to answer properly :)
I think the best part of illustration is that there are so many artists who you can learn from! Even for me, Below you can see a bunch of eyes that I drew while trying to learn how to draw eyes by looking at cool art that I saw on Pinterest. Eventually, I picked parts that I liked and ended up with the last two eyes (that say “me!”) that were a complete amalgamation of everything I learnt from different sources. So, my biggest advice would be to let yourself learn from others and to have fun in the process!
Thank you so much for your time <3
See you in the next article!
Love,
Tosh
P.S : special thanks to my sibling for always cheering me on


Comentario