
Intro
The focus of this tips is not necessarily the general use of perspective rulers, but rather cylindrical objects or Ellipses in perspective.
This tutorial assumes you understand the basics of the 1 and 2 point perspective rulers and does not cover manipulating the handlers.
Set up the Perspective Ruler
Create a new perspective ruler layer by going to layer - ruler frame - create perspective ruler.
All of the examples will be using 2 point perspective, but you can really apply it to any. While learning the following techniques 2 point perspective is recommended.
Up creation your ruler will look a lot like this. Feel free to manipulate it into pretty much anything you like.
Draw a Ground Plane
Any time I'm using a perspective ruler I like to do all of the drawing on new layers. This helps me keep things tidy and let's me hide or move layers without affecting the ruler.
On a new layer, I draw a very basic ground plane. I try to keep my grid evenly spaced, but it does not matter if it's not completely perfect.
Create the Container for Your Shape
To make sure our ellipses line up the way we want them to, we need to draw a "container". Pretty much anything can be drawn inside of a cube.
I pick out a square on the grid and draw a cube.
TIP:
If, at any time, you need to draw freehand, you can disable the ruler by right clicking on the icon in the layer window and selecting "show ruler" so it is unchecked.
Draw the Guide Lines for the Ellipse
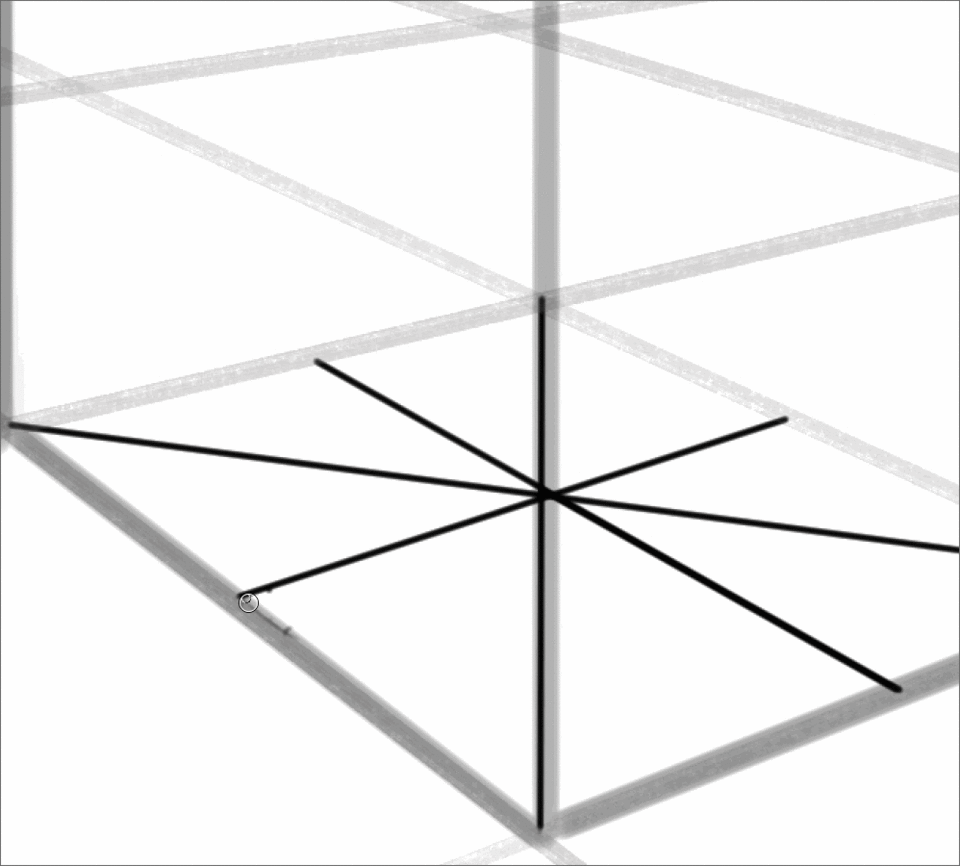
Now we need to find the center of our square. You can do this on any "face" of the cube, but we are starting with the bottom so we can get the bottom of our shape, and then will work our way up.
You can use a line tool if you like. I prefer to click where I want to start my line, hold shift, and click where I want to end my line.
Draw a line from opposing corners. Where the X intersects is the center of your face.
Two lines are actually drawn over each other here so it is kind of hard to see the X.
With the corners connected, draw a line from the middle of one parallel side to the other that also intersects with the cross hairs.
Add one more line for the other parallel side. The result is a lot like a pie shape.
This is our guide.
Use the Guide Lines to Draw the Ellipse
Now we can round out that pie (or pizza) shape.
Disable your ruler, or hide the layer. Connect the lines that divide the parallel edges with a smooth contour.
You can tell I had no stabilization on. This would be a "sketch" or under drawing so it's ok for it to be messy.
This is an old technique and is very useful when you have objects in a scene that are not all lined up neatly. You can rotate your "cube" and freehand the ellipses as needed.
Create More Ellipses To Complete the Shape
Find another place within your cube and draw another intersection. I chose a spot that was already on the grid but you may need to draw more guides as you go. I create more guides later in another section of this article.
Freehand the pizza again, trying to line up with the cross hairs. You can see how the perspective has changed with this new "higher" ellipse.
It's honestly pretty rough looking though, even for a sketch. Still if you love that hand drawn look, instead of the the sometimes overly mechanical feeling you get when using shape tools, this method is very nice.
Use Shape Tools for a Cleaner Result
The shape tools in Clip Studio Paint are very useful. One of their major benefits is that they can snap to any of the rulers.
We are focusing on ellipses though so select the ellipse tool of your choice. I like to use the default, with my sketch brush registered to it.
Even though the shape tools snap to the rulers, our drawn guides will still be incredibly useful. They will help to get everything lined up properly.

Click in one of the corners of your pizza square, and drag to the opposing corner.
See the box that appears while you are dragging? Line that up with your guide! This is the most accurate way of setting an ellipse in place.
Draw more guides if needed, and drag the ellipse over them as before. With this method, you actually only need a square/rectangle drawn in the perspective you want your ellipse to be in.
Once your ellipses are in place you can finish out the shape!
This simply meant to be a starting example so it's just a basic cylinder.
Feel free to continue reading if you'd like to see some more complicated examples using these methods!
Goblet Example
I personally love goblets, but they can be difficult to get looking like they fit within the background.
Start out with your box container.
If you would like your goblet to have a smaller base than the top, you just need to bring your bottom square in a bit as I've shown above.
Once you have the places the size that you want, drag the ellipses over them.
I started with the top and bottom faces to help mark out the beginning of the shape.
More guides!
I wanted my goblet to have a fat cup, that stuck out more than the rim of the glass. So I created a new layer, and drew a new box that lined up with my first box.
I used "layer color" to change the colors of my containers so I could easily tell the lines apart.
Eventually everything starts to overlap as things go farther into the distance so it can be confusing to only work over grey or black.
Mark out guides as needed so you can place the ellipses.
Make sure you are drawing your ellipses on a layer that is separate from your guides.
I created yet another container at the bottom to mark out the part where you hold the goblet.
I made another container for the bottom of the cup so I could see how the glass curved from the handle up.
I needed to zoom in a lot here so I could actually see my guides!
Draw out as many ellipses as you feel comfortable with. You might need more, or less, than I have used here.
Once they are in you can really start to see the shape! (this might also make a nice tree lol)
Here I have disabled the ruler and lowered the opacity of everything, including the ellipses.
On a new layer I roughly sketch my shape. It's totally fine if your ellipses don't fit within your drawing. Getting things perfectly lined up when they are snapping to the ruler can be very finicky so there is some room for error.
Make corrections as you feel are needed.
I hide all of my guides, lower the opacity of my sketch, and ink the goblet.
Overall I think it came out ok! The perspective is much better than if I had free handed the whole thing.
Now let's see how we might apply these techniques to a quick background.
Background Example
This time I move the handles on the perspective ruler and draw a new ground plane.
I block in a wall with, what will be, archways, and a sidewalk.
I try to very loosely make guides for the planned ellipses.
I change the color of my guides so I can work over them.
I draw my ellipse from the bottom of the square I marked and drag up. The top of this arch is off of the canvas so there is no top to my guide.
Since the wall is not paper thin, I have to draw the back face of the arch.
I do this on a new layer so I can erase where they overlap, and in the places that you would not see the edges.
On yet another layer (I recommend making a folder!) I draw the straight lines of the arch way and erase the parts you should not see of the ellipses.
I then begin to draw the next arch way.
I merge the parts I'm happy and create a new layer for the back wall and for drawing the side walk details.
I decided to add a round window in the wall between the arches. I mark this off with a box inside the wall, and drag my ellipses over each face. If you have trouble telling the front face apart from the back face, you may want to make these guides on separate layers using different colors.
I erase the parts of the ellipse you wouldn't see just as I did with the top of the arch.
With that the basic structure is done!
I complete my background with details in the stone work, bars for the window, some light foliage, and simple shading.
Closing Thoughts
That's it!
I hope you can use these techniques to help you draw all things circular in a 3D space~!
Please let me know if you have any questions!
About the Author
My name is FalyneVarger. I have been drawing for most of my life. I started working commercially about 10 years ago and have created artwork for books, games, comics, and more non-commercial commissions than I can remember.
I'm @falynevarger in most places, but you can find me online at any of the links below!
Les utilisateurs qui ont aimé cette publication


Commentaire