Uniform Fashion & Design Paper Dolls
Hi there, this is Grace and welcome to my Uniform Fashion & Design Paper Dolls!
Are you prepared with all the skills needed to succeed as a designer in the fashion industry? Learn how to create uniform for your paper dolls as a starting point, use Clip Studio Paint's 3D figures (mannequins) and other must-have skills for fashion designers with my step by step tutorials!
I'm not expert in fashion design and this tutorial wouldn't even dare to replace the genuine fashion design classes out there. What I'm doing here mostly give you a glimpse of designing the uniform using Clip Studio Paint tools & techniques, so I hope you'll learn something along the way and become a true fashion designer yourself!
Chapter I : Introduction
[ Difference between Fashion Drawing & Fashion Illustration ]
The term Fashion Illustration refers to sketches of fashion garments and accessories. Technically, the term Illustration refers to "a picture illustrating books and newspaper".
In Fashion, before photography took over, fashion drawings were used in store catalogs to illustrate available apparel designs, and came to be commonly referred to as "fashion illustrations". Although today fashion terms "fashion illustration", "fashion sketches" and "fashion drawing" are often used interchangeably; there is a difference.
"Fashion Illustration" refers to the purpose of a picture or image, whereas "Fashion Drawing" describes the attributes of a type of illustration. Fashion Illustrations can actually include any image related to fashion- such as fashion drawings, fashion sketches, photographs, paintings, and so on. Now with these terms in your mind, let's move into our first and foremost skill to learn: the anatomy of human body.
Chapter II : The Human Body with 3D Mannequins
Before we create the human body, let's just create a new document to work. As per usual, I will use the [ Illustration ] and type the File name.
( 1 ) File name can be anything, I type: 'Fashion_Illustration_Grace_001' as a start.
( 2 ) You need to click on A4, it will automatically change the Width & Weight into 2480 x 3508 and the resolution should be as minimum as 300.
( 3 ) The [ Paper color ] can be different for everyone, I am not starting with white because my eyes sore pretty fast by looking into my graphic tablet's screen (Surface Pro) while drawing, so I make the #C8CFE4 as my colored paper. Another function for colored paper; if you add quick marking with white as the highlights, it can be visible.
[ II - A ] - Set up 3D Mannequin
( 1 ) Click [ Window ] and go find the [ Material ] -> [ Material (Body type) ]
( 2 ) And the 'somewhat hidden' window over there will pop up. And it will show you the [ Body Type ] under [ 3D ] material.
( 3 ) For this tutorial, I select the [ 3D Drawing Figure Ver. 2 - Female ] then press and hold down your [ left mouse ] button, simply drag and drop it into the canvas.
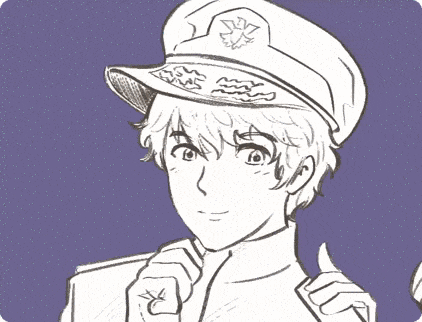
Before going any further with the 3D mannequin of female body, do you still remember this chibi character below?
If you're new, you might need additional info on how to create your own [ Turnaround Character Design ] with my previous tutorial with the link below:
[ II - B ] - 3D Mannequin Control
GIF below will try to show you (for about 1 minute) how to manipulate your 3D mannequin's position, it's easy and you don't need to be afraid to rotate, scale, move, and do anything that you wish. Please notice that I'm still not touching the figure because moving the hands, head or any other body parts will be explained later.

[ II - C ] - Change Mannequin's Height & Weight
After you play with the camera's position (or let me just describe it as mannequin's position), now you have a chance to increase the height as well as change it's body shape. Yes, body shape from skinny to fat can be changed on your will to make your character design looks specific plus the extra push to the height. You need to see GIF below to learn how to manipulate the look of your mannequin. Don't worry, I will explain more of that later.

[ II - D ] - Change Mannequin's Light Source
An optional guide. Check it out from GIF below: how to change the mannequin's light and cast shadow simply by drag and rotate the light ball. Yes, I don't know what's better name of it.

[ II - E ] - Change Mannequin's Style
GIF below shows us how quick we can achieve for different standing poses before drawing your fashion illustration, especially to make efficiency of your time this option is a must.

First, go to [ Window ] -> [ Material: Entire Body ]
Choose any standing pose you wish, use the navigation icons to rotate your mannequin (please be gentle with it, so it will not break. Hahaha!)
Next, you can experiment with the icons on the bottom of navigation, it has the ability to [ Flip the Pose Horizontally ] so the left and right position of the mannequin will be changed according to your preference.
Also another icon [ Specify Camera Angle ] for you to easily change the position of camera too. It's all that I can say for now, you need to experiment by yourself and it will make your artworks stand out from the crowd!
Chapter III : From Posing To Coloring 3D Mannequins
Now in this chapter, we'd like to take a furthermore for the Fashion Illustration using our 3D mannequins. You can try to modify your own 3D mannequins for free, for this tutorial only, let me lend you the modified mannequins' positions (both male and female) with actual poses that will represent our final image or design.
Below is my rendered mannequins (as JPG image) so you could probably start from using this as your image reference while tracing it to create your own Fashion design.
Here's what I've done to create an overlay or traced images using the 3D mannequins' poses.
[ III - A ] - Sketching
( 1 ) Using images from internet references (honestly it took me around 30 minutes to pose those two mannequins!) will be better for you to get the idea of what's actual Pilot or Captains for the fleet uniforms look like. Since Clip Studio Tips will not allow us to post references that not from our own, basically you could find them yourselves from various sources.
( 2 ) This is my sketch, of course I'm doing it on top of 3D mannequins with a [ New Raster Layer ] and [ 100% Normal Blending Mode ] then rename it to Sketch Layer.
( 3 ) Using [ Real G-Pen ] to create the outline image, I modified a lot of anatomy; first changing the heads position, especially drawing their face then modifying the awkward male Pilot's right hand position to fit the chin. You'll see the clearer sketch rendering later.
Important: You might getting distracted by the 3D 'ruler's while trying to trace. In order to trace the mannequins easily without getting distracted by the overlapping lines; simply using this keyboard and mouse combination [ Shift + Left click ] into those icons (red circles) then you can see clearer.
( A ) With 'annoying' 3D rulers.
( B ) Without 3D rulers, tracing images gonna be easy!
You can probably might not need it anyway, but in case you need them back; you could turn it on again by doing the same [ Shift + Left click ] on your mouse to those icons.
[ III - B ] - Color Blocking
You probably notice that I'm using the same method for color blocking (for those who already know my previous tutorials) so here I am repeating again; but for the coming sub-chapter of Indonesian Policeman Uniform; you'll learn my new technique to block easily - that I found during my tutorial session.
But first, here's the simple steps for those who're new to my most common blocking techniques:
( A ) Create a [ New Raster Layer ] on top of [ Sketch Layer ] is a must. Using [ Turnip Pen ] and especially with [ White ] color or any bright colors that you like, I used to follow the outside line of my sketch. But before that, please use any dark background (obviously) to see the blocking of your white Pen.
If you already finish with the outline, I use [ Fill ] tool to make the whole outlined lines filled with the white inside of it as you can see on the right image ( B ).
( B ) Now, this is the last step, just change the order of your [ Blocking ] layer (red arrow) and place it below your [ Sketch Layer ] to see your image fully blocked, beautifully presented with white - if there's any mistakes, simply erase them (that probably goes out of the sketch lines).
[ III - C ] - Coloring Exercise
Image above is dedicated for whoever wants to color it either using traditional method with markers, color pencils, watercolor paints, or digitally with Clip Studio Paint. You can either download it with [ Right Click ] and [ Save Image As... ] or just hold [ Left Click ] drag and drop to your desired location.
For those who wants to follow how do I color my artwork, here's my simple steps with default brushes that I found very suitable to have a quick coloring to approach Fashion Illustration style. What you'll need to start the exercise:
[ Design Pencil ] for coloring.
Nothing else. Yes. Nothing. Here's the example:

Try it yourself, you can simply understand how powerful this default brush [ Design Pencil ] if you can actually use it within your own 'self-control' and 'patience' when using it.
- 1 Pressure GO:
It means you just need to drop the color, then use big single stroke if possible, hold the pressure and never let it go until you think it's enough.
- Dynamic Pressures :
Like the name suggest, every pressures that you use (with your strength) will add variation of tones to the color depending on the pen pressure of yours.
It seems that you're able to put the color from lighter tones, then add medium tones if you're doing it intentionally in the same spot/place where the color runs only by the strength of yours.
Happy trying. :)
Chapter IV : Paper Doll Creation from 3D Mannequins
[ IV - A ] - Introduction of Paper Doll
Paper dolls as artifacts illustrate the social expectations for women at particular moments in time. As products of both popular culture and mass marketing, paper dolls are intentionally designed to reflect that society's idealized version of womanhood. The dolls' little paper wardrobes communicate a wealth of information about the ideal woman of the past.
Before we design our Paper Doll and illustrate the clothes (uniforms) as one of the most interesting element, let us learn about 'how to quickly adjust our 3D mannequin'. With previous 'how-to', I hope you'll get an insight or two about manipulating the 3D mannequin's camera positions with slight modification for its posture, height and weigh.
Now we're going to manipulate the mannequin's pose with a quick method as well as turn them into Paper Doll assets that can be useful for indoor activity (might be fun for the kids) especially during quarantine time.
Simply use the body of male for our first mannequin, drag and drop into the canvas. Then select the [ Feel Dizzy ] pose. Because it has the basic position adjusted for the mannequin to put the left arm on the wrist. Now, it's time for you to experiment by yourself!
Use your skills to rotate, move, even twist the mannequin's joints from head till toe so it will be shown with the same position on the figure ( A ). You can either satisfy enough with the half-front view or you can choose the basic angle ( B ) with the camera in front of the mannequin before dropping your sketch on top of it.
If you wish to had a difficult but dynamic angle, choose ( C ) instead. It appears from semi top-down camera angle, especially action panel for manga or comics, maybe anything else you'd like! But honestly, for designing the Paper Doll and its fancy uniforms, option ( A ) would be the best for this tutorial and creating useful and reusable assets for the future.
[ IV - B ] - Tracing The Mannequin
( A ) Using the half-front view as a start, I'm beginning to create [ New Raster Layer ] and also choose my preferred color for the sketch with #56439D as my tip of [ Design Pencil ] while sketching. To me it feels a bit more classy, of course you could use another color.
( B ) Obviously your 3D layer (with the mannequin) supposed to be below the current sketch layer and you could lower its opacity around 25 - 30% to let it visible enough for you to trace.
( C ) When it's done, it supposed to be like this. As you might notice, I create the 'uniform' somewhat seems like an underwear. It's with a solid reason and purpose, you'll understand later. But some of you might already know where we're going.
[ IV - C ] - Coloring The Mannequin
( A ) Now as you can see, This is the inked version of my Paper Doll Design, I will begin to color my artwork after put the white blocking below the [ Ink Layer] for the rest of my tutorial.
( B ) Using the versatile [ Design Pencil ] will help us through the coloring process pretty fast and easily; reduce headache to create fully rendered image asset that will not suitable to fit the theme of Paper Doll. As you will see from quick video process later (for Astronaut part); as a prove of only using the power of [ Design Pencil ] default brush.
( C ) A little addition (an optional, but also recommended process) with purplish shadow to make our character design getting more visual impact. This is not mandatory, as it will be just part of my artistic venture to gain more experiences while teaching through the steps.
[ IV - C ] - Creating The Indonesian Policeman Uniform
Now for your record, I will not be able to produce image references here, as it will become a trouble for me and against Clip Studio TIPS policy: so I went to Goggle to find 'Indonesia Police Uniform' as my reference. Also I type 'Kapolri' or even 'Polisi Indonesia' to gain better pictures.
You might want to search your own country Police uniform. I bet their design working uniform should be interesting to be drawn into a Paper Doll.
( A ) After collected enough pictures as my personal references, then I create [ New Raster ] layer, decrease the character's Opacity around 25% and begin my quick drawing with [ Real G-Pen ] to draft with red line #FF005D color.
( B ) This might be new (even for myself); I create another layer on top of my draft layer (red lines) and carefully retrace the lines with brown #564930 color. Here's my Pro Tips: do NOT trace all the details of the uniform, just the outside line first.
[ IV - D ] - Magic Wand + Fill Tool Tips Combo
( A ) First, you need [ Magic Wand ] to select areas inside the outline, as you can see. This is very crucial for you to develop quick fill before adding details of the Policeman uniform. I've never been so glad to come up with this idea. And it was a fool of me not to discover this technique sooner!
( B ) Now, you just need the [ Fill ] tool to drop the white color into a [ New Raster ] layer below your outline. And it will be the 'blocking' layer for you to go into next step. Remember, you should fill the white below the outline, it's going to be easier for you.
And here's my version of color, only use the technique of [ Design Pencil ] to achieve quick rendering that looks messy at first but in the end it's good enough for print.
Disclaimer: The design I made based on Indonesian Police Uniform, I'd be honest with you; this is 3 stars rank officer and it's quiet difficult to follow every details of the medals as well as Police's badges of achievements all over his uniform.
So to put it simple, I just scribble some-kind of fantasy elements into it, I apologize if anyone of you know much more about Police ranks and find it a bit weird and with all due respect; that's the best I can do to mimic the real badges and ranks - not to make it looks different or ridiculous. I hope you will understand my opinion as an artist.
Therefore I give you an example of inked image below without color, so you'd probably find it useful to practice your coloring with [ Design Pencil ] or any other brushes that suits you. Of course the size will be the same both JPG below and PNG above, you could combine these two images into one Clip Studio Paint file altogether and the PNG will be in the center of it.
Feel free to modify all elements in the uniform, as long as you know what you're doing and not use that image with bad intention in your mind. I know you won't - but people have to be sure, right? :)
Chapter V : Astronaut Uniform (Spacesuit)
Since many Clip Studio Talented Individuals & Artists already explain another type of uniforms, ranging from Fireman, Cops, etc; here I go presenting my... Once upon a dream job: an Astronaut.
This chapter will be focusing on how to create quick drawing and forming techniques to capture Astronaut's detailed uniform using the same Paper Doll Design and pose.
[ V - A ] - Drafting
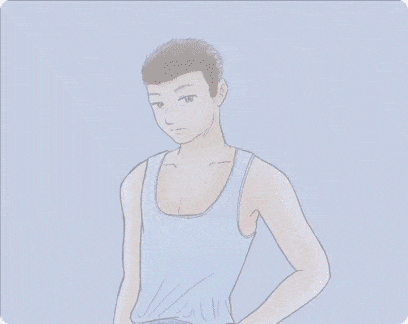
Here's what I had in mind, naturally we'd look for reference. It's quiet obvious, you need to see detailed references from many sources before you jot down essential parts of the spacesuit and use combination of those images to create your own version.
Using [ G-Pen ] and with your chosen color, as for me: #FF005D - I begin to put my draft and start to fill my Paper Doll Design & pose. And here's the result:
It seems pretty messy but it's okay. In fact, everything even for famous book that has been written all over centuries start from simple scribbles on paper. So don't be afraid at this point to drop any ideas you had for the Astronaut spacesuit. It could be fantasy, like characters from animated movies such as Buzz Light... Yeah, you know it.
[ V - B ] - Inking Outside Only + Helmet
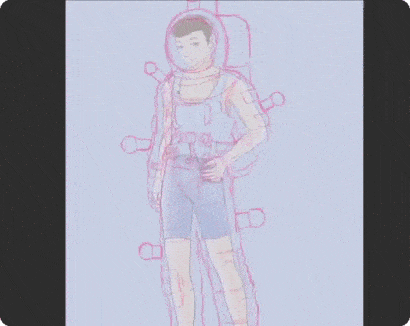
[ V - C ] - Detailing Astronaut Uniform (Spacesuit)
This part will show you how to establish details for the spacesuit. It seems not necessary at first but if you look further into it, it's how I can come of with folding approach for the suit only with simple stripes or strokes.
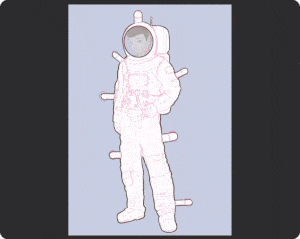
[ V - D ] - Shading to Ease Your Form
Next, as I've been telling you to use [ Design Pencil ] for the practice, but to be able use it wisely on every aspect of rendering clothes; please do yourself a favor by practicing on my image above. And you could probably use the same technique that I did with the GIF below, it's a simple pressure work with the default brush, not secret tricks or any magic over there.
Only with your pen pressure, either press it lightly or harder when giving a stroke of paint.
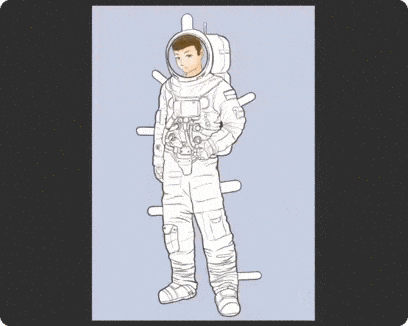
So as you can see result below, you can try to get it done just within several minutes. As far as I could remember, doing the line work (outline) took more time than rendering for the uniform with this quick technique. Try it yourself, but do remember to put extra patience and relax your arm a bit before stroking the brushes lightly.
[ V - E ] - Simple Color Choices
I don't put a lot of color for the Astronaut uniform, because I am not able to use any picture from the internet here to show you; but to tell you the truth; only fantasy type or cyberpunk astronaut has many colorization to its suit. Meanwhile I am simply googling for the common astronaut with his/her spacesuit to follow the color guidance.
Red and white for its arm were the Indonesian flag. The blue in the chest area supposed to be the logo of space program or government organization. And the tubes with blue colors were... I don't exactly know what those pipes use for; probably for breathing through the oxygen? Well, let it be the monotonous color choices that represent our Astronaut design, shall we?
[ V - F ] - Simple Chef Uniform
Compared to Astronaut, drawing a Chef with his uniform must be easier. Especially there will be less folding on the clothes. But the technique will be same, with simple strokes then add another layer of strokes and it's done. It will be pointless for me to share step by step from scratch while drawing this Chef uniform. So please understand that I just show you this PNG so you can compare the complexities from the Astronaut better.
Chapter VI : Paper Doll Time with Grace Tjahyadi
[ VI - A ] - Pretty Paper Playthings
Paper dolls were popular playthings from the mid-19th century to the mid-20th century. Technological advances in the 19th century dropped the cost of printing and made reproducing pictures much easier, leading to an explosion of illustrated, paper ephemera including prints, books, magazines, and cards.
The first American paper doll commercially produced as a children's toy was Boston-based J. Belcher's “The History and Adventures of Little Henry” in 1812. The dolls accompanied a children's book and were designed to act out various scenes as the narratives unfolded.
Paper dolls only grew in popularity over the century. Newspapers and magazines published paper dolls both as playthings and as vehicles to illustrate current fashions for girls and women.
Children learn through play, using toys to try out different roles. For little girls, the appeal of paper dolls lay in their extensive wardrobes and the many different scenarios a doll could play out. The dolls and their wardrobes depicted the ideal aspirational lifestyle for their time.
Dolls of older teenagers or young adult women encouraged girls to project themselves into that next phase of life. As with most playthings, paper dolls encouraged girls in fantasy role play, but the roles were defined by the dolls' clothing and accessories. Based from what I can try to make, here's the simple A4 printable version of what I've done till now using Clip Studio Paint, my digital media to transfer idea into life. Below is my tools of trade to make our Paper Dolls!
A scissor is mandatory.
A double tape, can be interchangeable with a glue stick.
A cutter or if you prefer; an art knife but be very careful when use this.
A clip (for me to arrange things especially these paper prints)
An Art Foam is also mandatory! This one can be bought from any online store or art store.
A cup of coffee or tea.
A patience heart and soul. :)
Last two were my best suggestion so far in order to make great things!
And here you go, image below can be downloaded for free and it's my hi-resolution printable paper doll template if you wish your kids would probably needed to chew some free time:
Paper dolls from different decades send a message about the role of women at the time and what society valued. Twentieth-century paper dolls' wardrobes expanded the various potential roles for girls, from college student to movie star to World War II WAC. In this, they reflected an expanded horizon of women's opportunities that aligned with what women were doing in real life. For this, I will hand over your ability to create your personal paper dolls, as far as I know; many artists out there had their interest for princess paper dolls, you can find it easily but these type of uniform design that I made; might not be easy to get from online resources.
My current paper dolls would send a message about a job that most men will and will not take down the route: a policeman, a chef, and even an astronaut. It's my appreciation to those people who had dreams to be one of those occupation in the real world: salute to you!
If I do have an obvious step by step, that would be:
1. Cut the most interesting part of your design first. Take patience.
2. Hold a deep breath and using a cutter or an art knife for difficult area (especially with the area between the arm and body) then release your breath after it's done. Probably will take around 1 minute or more to do that, depending on level of details.
For this part: I recommend the stick glue as we will be working with an art foam. To stick your paper doll with thick material for its back, glue stick has no match with double tape, but once again it's come into your personal preferences; which one will be better for you to use.
Let the glue dry and then continue to cut the rest of uniform. It will be a simple task to consume almost 2 hours, I try to keep a record of time, it took me that long since I aim to get the best and beautiful result. The more you can spend time to cut with patience, the better it will be.
This is one of my trick to save glue or double tape. By using this art foam as our base place to put the uniform. So first, I give some marks; using a pen or fine marker for a place to cut according to the flaps (those things you might already know or have questions about) that I prepared from the beginning, please see the better image pointer below.
As you can see from image above, those stripes will be marked as the place for flaps. Cut the stripes slowly and carefully using an art knife (if available) or a cutter. Then you are able to put inside those flaps (please see the images below); as for my own preference, I am able to save a lot of glue by doing so. But it can be attainable with other method by using double tape for those flaps, that's why it will be a matter of preferences for everyone.
So there you go! An Astronaut, a Policeman, and also a Chef for our Paper Doll Design and Illustration. It'd be delighted to see what's going to be your design for working uniform.
There you go with this template below; please be creative with the uniform design. I know this is especially for the male figure. I will include the female version as well for your own study and reference.
Chapter VII : Thank You Notes
In this and other tutorials, there are no experts. Some like to pose as experts but we are all learning. I am an avid learner. This might sound like a surprise to you but I write to learn.
There are many subjects I have learned about because I made up my mind to write a tutorial about them. When I made the decision to write or teach on the subject, I may know nothing about it. But my research towards writing this fashion design and illustration with Paper Doll technique educates my mind and also a good tool to keep children occupied.
Sometimes I produce knowledge from my mind that I was not previously conscious about. So, I am a lifelong learner. Always remember that there are no experts in this tutorial field. In other words, don’t doubt yourself.
Thank you for taking this journey from start to end. Honestly; making this tutorial kind of difficult to me through pandemic situation - since I keep on remembering that many people might've lost their job due to the circumstances: especially pilot and flight attendants. However, please do take a moment to cherish your current occupation; whether it has been impacted by Covid-19 or not and do yourself a favor by stay at home if it's possible to work from home.
We do have to pay respect and pray for our 'heroes' - the medical team - who fights face to face with the deadly virus, novel corona virus until now :
As a tribute for Doctors, Nurses, any other job that we call 'Heroes of Humanity' so here's what I wish to share as well; companion tutorial I made 2 months ago (first time lock-down in Indonesia and work from home) with a theme about Chinese Painting & illustrations.
For those who're new to my recent tutorials, please visit the link below :


Commentaire