Drawing hair with screentones ready for manga prints!
HELLO, WELCOME TO THIS TUTORIAL
With this tutorial you will learn how to draw hair for manga using the airbrush (yes, you read right ) and Tones whitout moire!
It’s an easier way than selecting every tone you want to use and pasting it into the image.
Video tutorial:
If you want to skip the explanation you can see the full video process with the tutorial here.
In the video I will show you step by step the process of drawing hair ready for a manga print using the screentone layer function and the airbrush.
Pros of this way of drawing hair for manga:
You will avoid moire.
You don’t have to worry about screentones overlaping or not being visible when printed.
You will achieve an even better light and dark screentones for your hair in an EASY way.
You will be able to add a lot of details to your characters hair.
It’s PRINT-READY, you won’t have gray, only Black and White dots.
Tools used:
G-PEN. For lineart.
Maru PEN and Bucket for Black tone.
Airbrush (for screentones).
Smudge tool (for screentones) (don’t worry it wont smudge the dots!)
Layer properties:
- The grayscale layer option:
- The Effect button to create ScreenTones:
This way, we will be able to work with the airbrush in order to paint and the gray will be converted into Black and White screentones!
STEP ONE - Creating a black and white comic canvas
First, open a new canvas set to comic properties (only black and white).
You can use these presets or the default ones. But, remember, the color expresion has to be Monochromatic (black and white).
STEP TWO - Drawing your character
Draw your character.
(You can use this one if you don't want to draw one now)
STEP THREE - Drawing the hair lineart
Draw the lineart of your hair in a new layer.
TIPS:
Remember to follow the skull line of your character!
Keep in mind the Big, Medium and Small rule to make the hair strands interesting and not repetitive!
Look for references if you are out of ideas!
Keep it simple, we will add more details later on!
STEP FOUR - Painting the base of our hair
Fill everything with pure black, you can use the bucket tool in order to do it faster!
Also add some more details to the hair strands with the maru or g-pen!
Tip: Change the size of your pen to make them more interesting!
STEP FIVE - Selecting the layer properties
Duplicate the layer where your hair is. Hide one of them. We will use it later on!
Use the selection tool and select the hair!
Go to selection properties and reduce the selection to 2 or 3 pixels.
Go to color expression and change the option from monochromatic to grayscale!
Just above that option, select the screentone option in order to make the layer into a screentone one:
With this options, we have created a screen tone that we can manipulate with the airbrush in order to do the hair!
If you want, you can change the setup options of this screentone effect, but I will let the default ones for this tutorial.
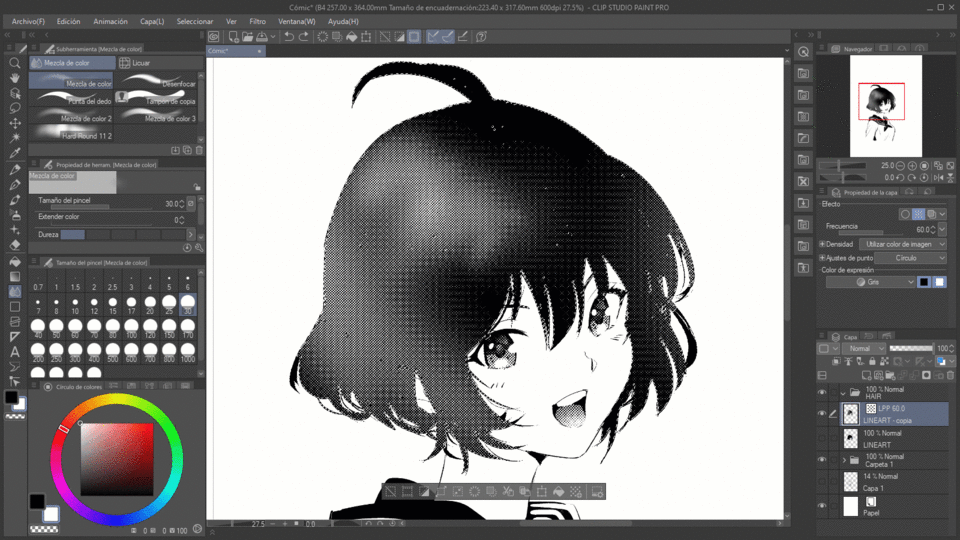
STEP SIX - Painting the light with airbrush
Grab the airbrush and select the color WHITE.
If you don't want to go full white just yet, you can use a gray color as long as it is whiter than the black we used for the hair. You can use different shades of gray and then smudge them with the smudge tool (step seven) in order to create a nice gradient that will be the base of our hair.
Start putting some light into the head (don’t worry if it looks weird now, we will smudge it later).
Remember to use a big airbrush, the bigger the better, you want to create a gradient!
STEP SEVEN - Blending the edges and using the smudge tool
Use the smudge tool in order to blend the White and soften the edges, this way the gradient will look better!
Don't worry, the smudge tool won't ruin the screentones, they will still be there!
Combining the airbrush and the smudge tool you will achieve nice gradients for your hair, don't fear experimenting with these tools.
Also, if you feel you went to white in some part, select a darker tone and use the airbrush to modify the gradient and make some parts darker.
STEP EIGHT - Drawing the shadows
Use the Maru Pen or G-Pen to draw the shadows in the hair and different strands.
Be creative, have in mind where the light comes and where the shadows should be in the hair.
In my drawing the light comes from the left of the image, so the right side of the hair has less light.
STEP NINE - Adding details
Add more details creating another layer with the same options (grayscale and screentone effect):
Make use of the lasso tool and soften the edges with the smudge tool.
Don't worry, the smudge tool won't turn everything into gray, the screentone dots will remain there!
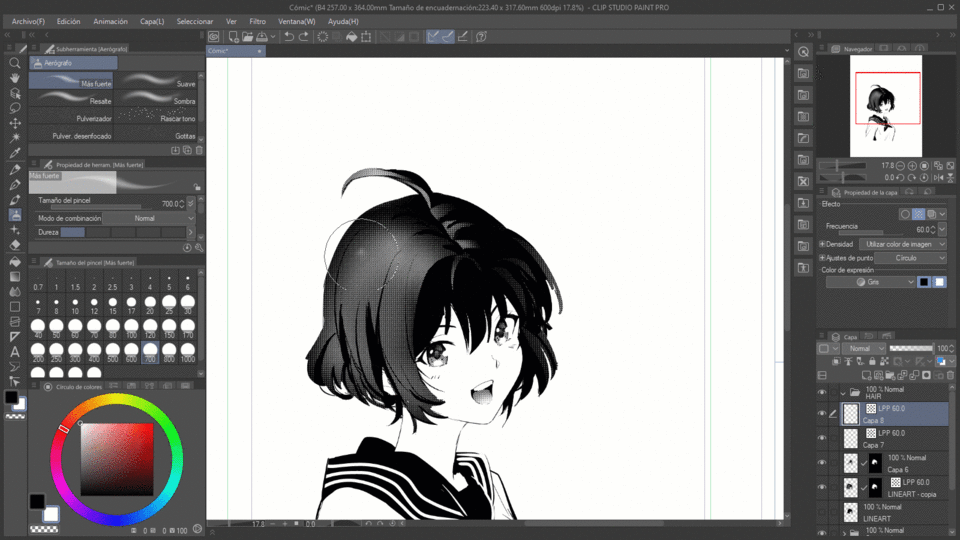
STEP TEN - Adding stronger light
Create another layer (with the same properties: grayscale and screentone effect).
Grab the airbrush, select the White color and add a strong white effect reflection on the hair.
You can use the smudge tool to make it softer!
STEP ELEVEN - Adding more light effects and reflections
You can keep adding more details repeating the same process!
Remember, just create another layer on top and use the grayscale and screentone effects!
Add as many details and light reflections as you wish. Here I added more light on the back on the head and more light with the airbrush in the forehead hair!
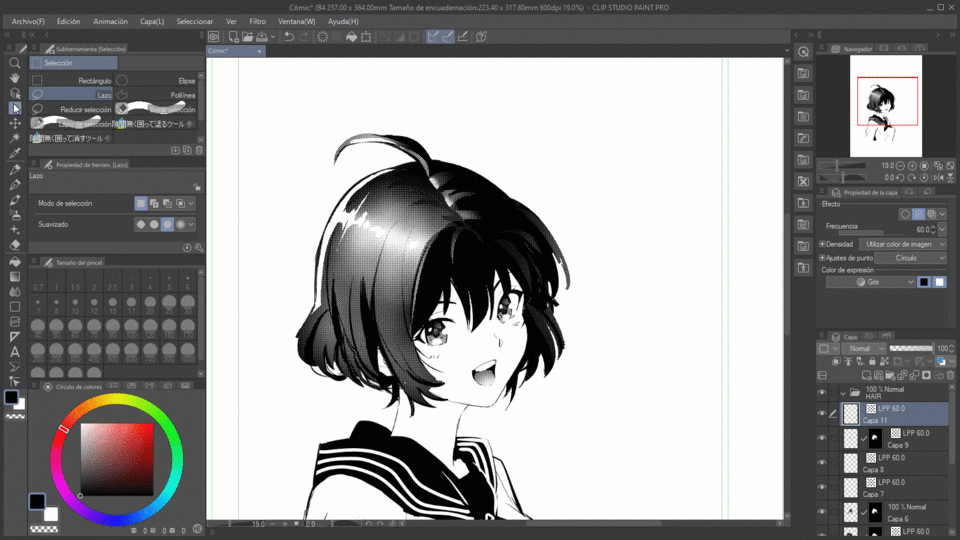
More light in the forehead to make the contrast between the hair and the skin softer using the lasso tool and the airbrush.
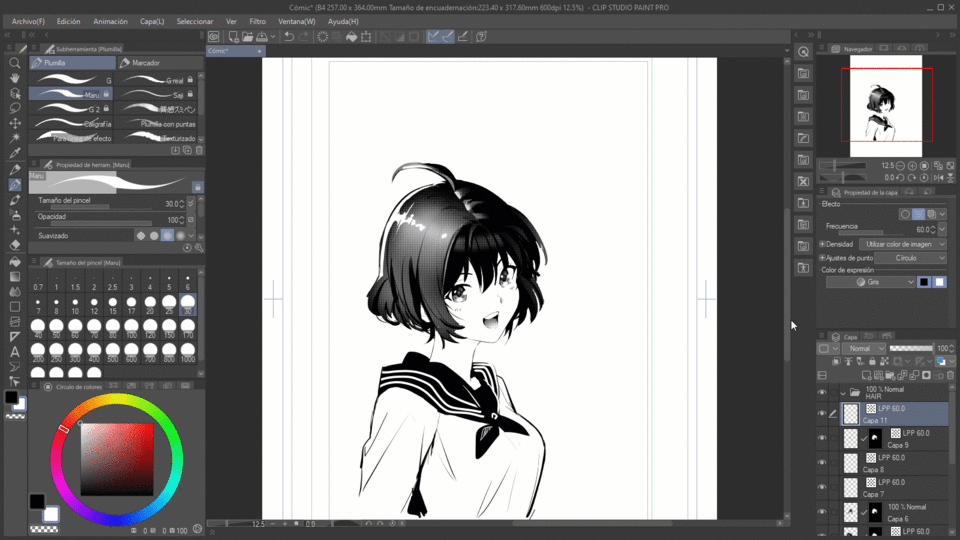
PRINTED RESULT
As you can see in the printed versión, the screentones are working perfectly! They won’t overlap or create moire!
Also, the gradients you can achieve with this method are better and easier than just overlapping different screentones from the menu.
Hope you liked this tutorial! If something wasn’t clear, remember to watch the video or ask anything in the comments and I will try to answer your questions!
Have fun with drawing!!
See you!






Commentaire