How to use 3D models for character drawings!
Indroduction.
Hi there!
Welcome to my tutorial on using 3D models in Clip Studio Paint!
Are you a digital artist looking to take your illustrations to the next level?
Do you want to add depth and dimension to your artwork without spending hours drawing complex perspectives?
Clip Studio Paint's 3D model feature is a game-changer for artists, allowing you to incorporate customizable 3D elements into your work easily.
In this tutorial, I'll show you how to import, customize, and integrate 3D models into your Clip Studio Paint projects.
Whether you're a beginner or an experienced artist, this tutorial will cover the basics and beyond, helping you unlock the full potential of 3D models in Clip Studio Paint.
Let's get started and take your art to new dimensions!
Here's how to use 3D models for character drawings!
As an Illustrator Clip Studio Paint stands out as the premier software for incorporating 3D models into illustrations, offering unparalleled flexibility and control!
With its advanced 3D model features, artists can easily import, customize, and pose 3D characters, objects, and environments to match their vision perfectly.
The software's seamless integration of 3D models allows for effortless referencing, enabling artists to focus on the creative aspects of their work!
1. How to add a 3D model to the canvas.

To incorporate a 3D model into your canvas, simply access the Materials tab and select the 3D option. For convenience, you can also add frequently used materials to your Favorites bar, allowing for quick and easy access to the assets you need. This streamlines your workflow and saves time, making it easier to focus on creating your masterpiece!
You can simply click and drag your material onto your open canvas to begin using it!
2. Model Camera and Field movement options.

Conveniently located at the top of every 3D model layer, you'll find the camera and model movement tools. These intuitive tools empower you to adjust the view and perspective of your model with precision, allowing you to:
- Move the camera to change the angle and perspective
- Move the model itself in any direction, relative to the field of view
With these tools, you have complete control over the placement and orientation of your 3D model, making it easy to achieve the desired composition and focus in your artwork
You can use to pan, move, and gesture your 3D model in any way you prefer
From left to right you have the:
1. Move Camera tool (You can pan the camera around all directions of your 3D model.)
2. Move Camera tool, up, down, left and right.
3. Move Camera tool, forward and backward.
4. Move object tool, forward, backward, left, and right.
5. Move object tool, (You can move your model around anyway relative to the 3D space.)
6. Move object tool, (360 Degrees clockwise or anticlockwise relative to the center of the model.)
7. Move object tool, (You can spin your object in 360 Degrees clockwise or anticlockwise relative to the center of the model.)
8. Move Object tool, parallel directions.
9. Snap function, When this is turned on, 3D materials can be moved, scaled, and rotated according to the size and position of other 3D materials.
3. How to move the model's limb's or parts.

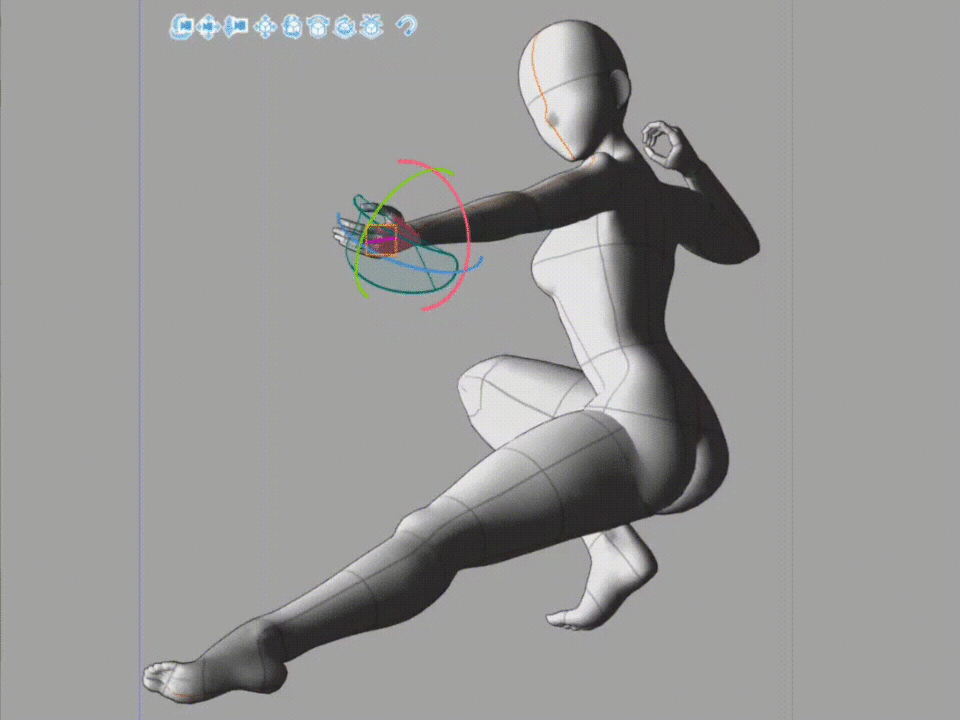
Moving a limb on your 3D model is effortless in Clip Studio Paint Version 3.0.4. Simply click on the desired part and drag it to the desired position or angle.
One of the standout features of Clip Studio's 3D models is the precise control they offer - only the selected parts move, allowing the model to react naturally to your adjustments.
What's more, each selected limb or part comes with a set of intuitive tuning gears, providing you with even more flexibility to pose the model exactly as you envision. These gears enable you to fine-tune the model's movements, giving you the power to create precise and detailed poses with ease!
4. Lighting.

One of the standout features of Clip Studio Paint's 3D models is the additional tools available in the Tool Properties panel. These hidden gems can greatly enhance your modeling experience, with one of the most notable being the lighting feature. This powerful tool allows you to simulate lighting conditions, providing an invaluable aid for shading and lighting your model.
By utilizing the lighting feature, you can use it as a guide for light placement during the rendering process, ensuring your model looks its best. To access this feature, simply click on the shear icon and drag to gesture the light source accordingly. This intuitive control makes it easy to adjust the lighting to your liking, further streamlining your workflow.
5. Posing your model.

When it comes to posing your 3D model, you have two convenient options. You can either manually pose the model using a reference pose or apply a pre-made pose from the 3D Poses section in your Material List.
To apply a pre-made pose, follow these simple steps:
1. Select your 3D model or the specific part you want to pose.
2. Choose the desired full-body or hand gesture pose file.
3. Click and drag the preferred pose onto your model.
The model will instantly adopt the new pose, saving you time and effort. This feature allows for quick and easy experimentation with different poses, enabling you to find the perfect fit for your artwork!
PS: If you do not find the pose that you want you can always look into the Clip Studio Asset store for many free and cool poses that you can download for your 3D model!
6. Adding More 3D Objects

One of the standout features of Clip Studio Paint's 3D models is the ability to add multiple models to a single 3D layer. This feature is a game-changer for artists, as it allows for unparalleled flexibility and creativity.
Not only can you pose individual models, but you can also place and pose various objects within the 3D space to your liking. This makes it incredibly easy to arrange complex scenes and compositions, streamlining the illustration process and taking your artwork to the next level!
7. Time to illustrate using our 3D model!
When it comes to guiding the viewer's attention in my illustrations, I often employ the golden ratio spiral as a compositional tool to help me create perspective and more dynamic poses. This technique helps direct the audience's gaze to the main focal point, which in the case of character illustrations, is often the face.
The face is typically the first thing that draws the viewer's attention, so I use the golden ratio spiral to create a visual flow that leads the eye to this crucial element!

With your 3D model in place, you can now begin the exciting process of transforming it into a 2D illustration! Once you're satisfied with the model's position and pose, simply lower the opacity of the 3D layer and create a new layer for sketching. On this new layer, you can trace over the 3D model, using it as a guide to help you capture the proportions and details. From here, you can start the lining and rendering process, bringing your illustration to life!
Remember, the 3D guiding layer is just that – a guide! Feel free to experiment and deviate from it as you see fit. You can use other tools, like the liquify tool, to bend, warp, and expand on your illustration, adding more interest and creativity to your final piece. Don't be afraid to get creative and make it your own!
Conclusion.
In conclusion, I hope this tutorial has shown you the incredible potential of using 3D models in Clip Studio Paint to elevate your illustrations. As a valuable tool for reference and guidance, 3D models are especially helpful for beginners looking to improve their skills.
By incorporating 3D models into your workflow, you can achieve more accurate proportions, dynamic poses, and detailed textures, taking your artwork to new heights. Thank you so much for joining me on this tutorial journey! I hope you learned a lot and had fun exploring the possibilities of 3D models in Clip Studio Paint.
Don't hesitate to experiment and incorporate them into your future projects – I promise you won't be disappointed!
Happy creating!
Here is the link to the additional 3D object that I used which is the war hammer it’s not my material, I just used it as a reference when posing my models, please check it out it’s really cool!
Thanks again!
Bye!


コメント