❖ VFX Techniques for Digital Illustrations ❖
It doesn't matter whether you are a designer, an artist or an amateur learner – at some point you need to improve the visual quality of your digital illustration.
You may want to retouch and enhance your digital paintings and make it look better, more spectacular and more engaging to look at. It could be for personal or commercial use. Most of us know how to edit and enhance the digital images using our favorite image editing software.
But when it comes to skills development itself, to render your vivid imagination to blank digital canvas, to imitate the lighting from natural environment to fantasy realms; the technique requirements are completely different from that of classic image editing.
・ This month of July, I present various of mini tutorials for visual effect (VFX) techniques ONLY with Clip Studio Paint and DEFAULT tools + brushes that will hopefully teach you how to create impressive elements, tips, and tricks which can accompanied you through the adventure of your digital illustrations.
🔥🌊⚡🌏
【1】 Let There Be FIRE 🔥
Drawing fire is essential for any digital artist.
❓ But HOW will be the first-typical question.
❓ WHICH TOOLS could be the next.
So, for the fresh start; let's warming up with these 4 easy GIFs to follow as well as the explanations when you feel the GIF somehow too fast (because of uploading limitation, I sped up the drawing process with 3x speed and divided the GIF into 4 parts).
Tools needed:
1. Lasso selection.
2. Chinese Ink brush.
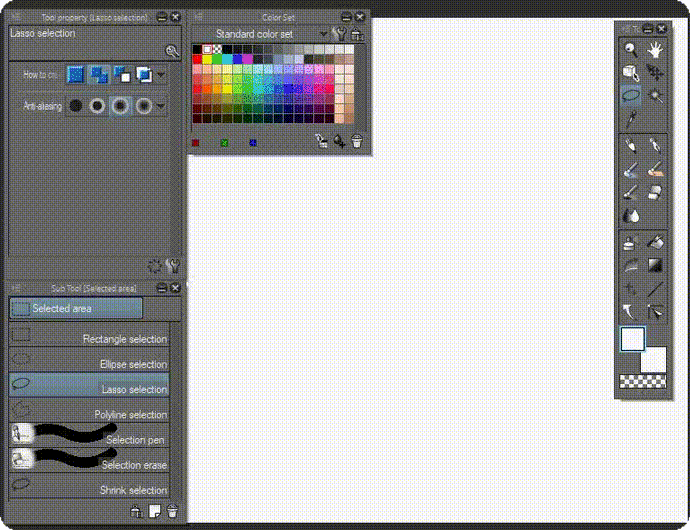
➊ I use〚 Lasso selection 〛to start the shape of fire. This is not mandatory, because any artists have different kind of approach to draw. After that, I press & hold ALT + BACKSPACE to auto fill the basic shape with dark red color.
➋〚 Chinese Ink 〛➡〚 Rough or Smooth 〛brushes can be used to drop red color,〚 Lighter ink 〛with orange and yellow a little bit here and there to spread and make dynamic colors.
➌ Adding yellow with〚 Rough 〛can also be the focal point of fire or 'reset' the blurred parts.
🔥 This is the CORE part to make your fire glows! 🔥
Tools needed:
1. Air Brush: Highlight with Add (Glow) Blending mode.
2. Air Brush: Droplet with Normal Blending mode.
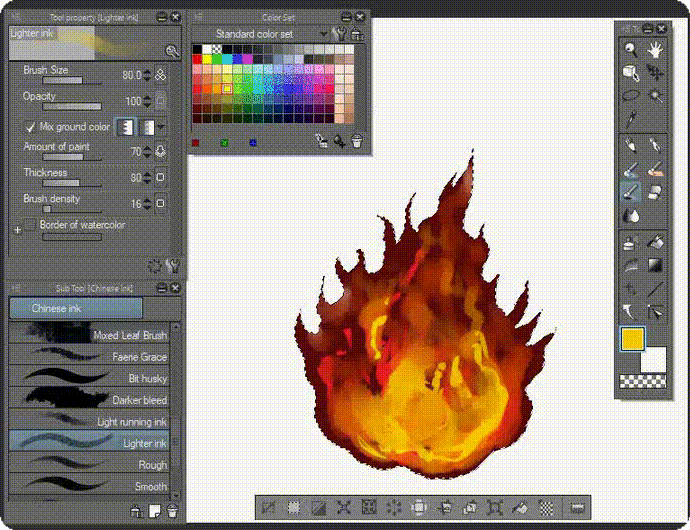
➊ First of all, use〚 Air brush 〛with〚 Highlight 〛and make sure the Blending mode: Add (Glow) sets and choose the light colors such as yellow. And different size of brushes to define the fire-ball effect or CORE (big for covering large area, small for details of brightness).
➋ After that, adding ember of fire with〚 Air brush 〛➡〚 Droplet 〛with red color to add values of burning ember around the core.
📌 TIPS: Play along with Blending Mode of〚 Droplet 〛and changing it from Normal Blending Mode to Add (Glow) will have some sort of bright or burning ember effect.
🔥 Let's make your fire HOTTER than ever! 🔥
Tools needed:
1. Chinese ink: Lighter ink.
2. Color mixing: Finger tip.
3. Air Brush: Droplet with Normal Blending mode.
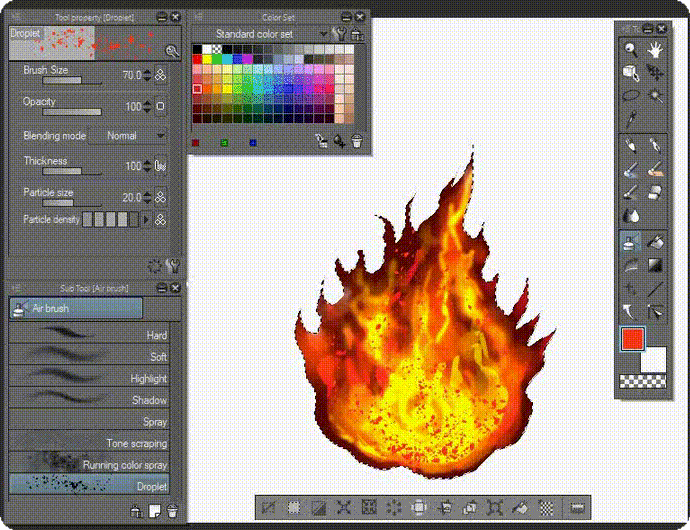
➊ Since I am painting the fire effects inside; it helps me to focus on adding colors without any distraction. But now it's time to smudge the outside of fire; I press CTRL + D.
➋ Then I use〚 Lighter ink 〛from〚 Chinese ink〛brush to add some 'smoke' effects around the edge of fire.
➌ After done with the smoke, I use〚 Color mixing 〛➡〚 Finger tip 〛to smudge all over the tip of fire, even to some ember particles inside the core.
📌 TIPS: adding some ember particles after done with the smudging will also help for later purpose. It's usually my habit to leave some of the ember particles remain sharp for aesthetic. I change the background to dark grey so you could see the fire effects better.
🔥 Fire in the hole! 🔥
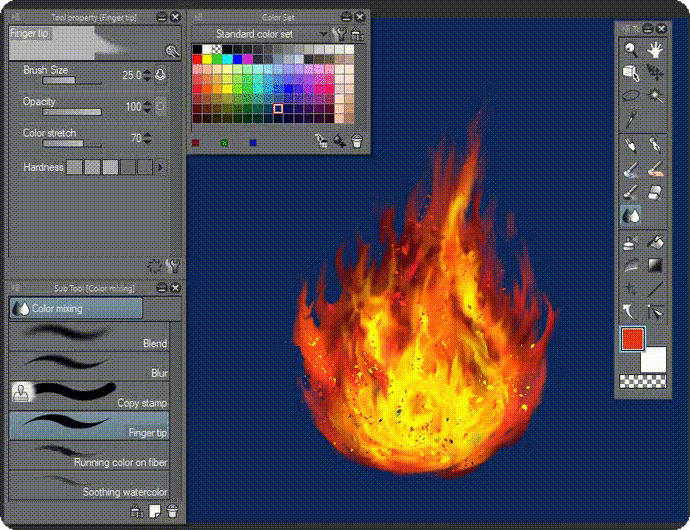
🔥🔥🔥 BONUS Technique:〚 Filter 〛➡〚 Blur 〛➡〚 Radial Blur 〛you can choose either Front or Back for the〚 Position to blur 〛- Also the 'x' position can vary depending on which 'point of interest' needs to be selected.
By doing so, you'll have the ability to enhance the direction of fire-ball movements before impacting the ground like a meteor.
📌 TIPS: don't leave everything blurred; add some particles, remain sharp for some particles; smudges only when it's necessary with〚 Color mixing 〛➡〚 Finger tip 〛
🔥🔥🔥🔥🔥🔥🔥
【2】 Unleash The WATER 🌊
Water comes in all kinds - mirror-smooth, clear as glass, murky, turbulent or tempestuous. And in all forms - rain, waterfalls, waves, rivers and much more. Depicting this diverse element is always exciting.
・ Obviously, when we talk about water; some of us might think how to do the waves, the splashes, or maybe the particles before go deep into how to make a rain, even thunder on the next chapter!
These quick steps with GIF will show you how I manage to do all watery elements in one go from quick sketching using〚 Chinese Ink 〛default brushes with the chosen〚 Intermediate Color 〛palette to help maintain the values until giving water particles and smudging all over it.
Tools needed:
1. Intermediate Color.
2. Chinese Ink brush.
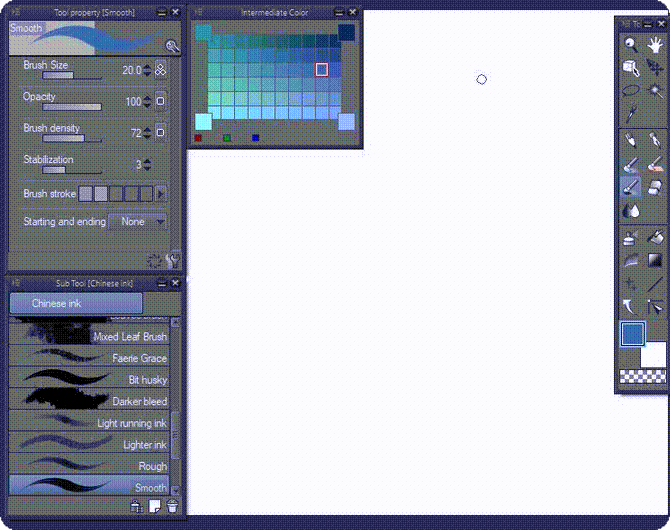
➊ Based on some colors I pick and put them into Intermediate Color
➋ I use the dark tone first to draw the first wavy objects. After that, using my favorite〚 Chinese Ink 〛➡〚 Smooth 〛along with mid tone to collide with the mid tone as the initial wave 'construction'.
🌊 Part where ocean SURGE to your painting! 🌊
Tools needed:
1. Chinese Ink brush: Rough.
2. Chinese Ink brush: Lighter ink.
3. Chinese Ink brush: Light running ink.

➊ Using〚 Chinese Ink 〛➡〚 Lighter ink 〛with light tone will be good for smudging over the hard edges of waves. By doing so, you need to be careful or else it will turn into smoke.
➋ I use the dark tone and〚 Chinese Ink 〛➡〚 Rough 〛brush again along with mid tone to emphasize some areas that already being smudged over.
➌ Then〚 Chinese Ink 〛➡〚 Light running ink 〛to saturate the color with light tone. Try to use these 3 combination of brushess by yourself and you will notice their powerful blending modes.
🌊 Part where TIDE rises! 🌊
Tools needed:
1. Pencil: Pencil R1.
2. Chinese Ink brush: Lighter ink.
3. Color mixing: Soothing watercolor.
4. Color mixing: Running color spray.
5. Air brush: Droplet.
6. Hue/Saturation: +30
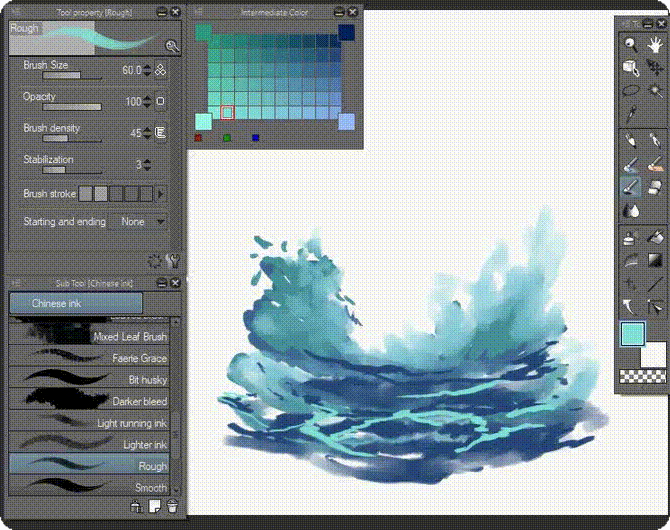
➊ Using〚 Pencil 〛➡〚 Pencil R1 〛with light tones will separate the dark tones with mid tones. Usually I'm doing so to increase the values of waves.
➋ I use〚 Color Mixing 〛➡〚 Soothing watercolor 〛to wash out some areas so it won't appears with only hard edges.
➌ Finally, I use〚 Hue/Saturation 〛➡〚 Hue: 30 〛to change its color base, as you can see; this option will make the entire color changes to your desire. If you want to make a poison-like water; try green or even purple/pinkish one. It's also can turn into lava if you use the red one!
📌 TIPS: using〚 Air brush 〛➡〚 Droplet 〛combining with〚 Running color spray 〛might creates the water turbulent all over the piece. Play along with all these methods of brushes will make you happy with your own experiments! It's what I called happy accidents.
🌊 Final part where ocean RISE & SHINE to your painting! 🌊
Tools needed:
1. Pen: Mapping pen.
2. Airbrush: Highlight
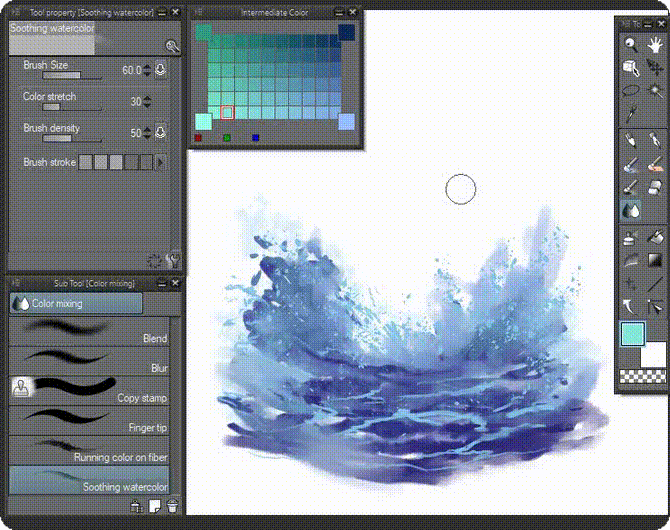
➊ Using〚 Pen 〛➡〚 Mapping pen 〛with tiny size of brushes (depends on what you prefer) will be useful to add some scattered waves with strong strokes. By doing so, I use white color, or any light colors you wish; a gentle reminder, of course you need to stop or minimize blurring out the sharp strokes in order to maintain its purposes of being drawn there.
➋ I use〚 Air brush 〛➡〚 Highlight 〛brush with light blue or sometimes mid tone to emphasize the areas that reflect the sun or moon. Or any other light sources. The color reflected should be the same with the light sources; for example sun could be reddish or orange a little bit. Moon could be the same with process picture above.
🌊🌊🌊🌊🌊🌊🌊
【3】 Invoke The THUNDER ⚡
I've always had a passion for lightning or thunder; I love to design its 'deathly stroke' that look like a creature's claw! I had to figure out a way to squeeze them into the canvas without disrupting any other elements such as clouds or even rain.
So, these quick 3 steps of GIF definitely will be my quickest way to represent the lightning bolt techniques! Naturally, I will go with detail explanations, but as I'm near the deadline of challenge; I try to make it as quick as lightning- but without you being lost in the following steps.
Tools needed:
1. Lasso selection.
2. Chinese Ink brush.
3. Air brush.
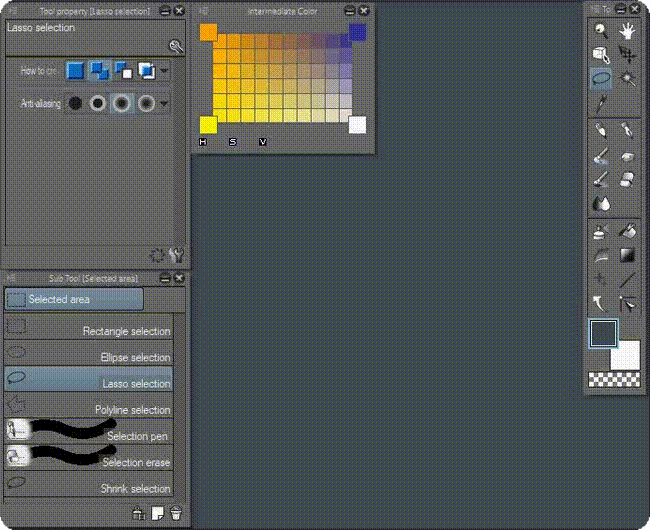
➊ I use〚 Lasso selection 〛to start the shape of thunder - the same technique I use for doing fire. This is (again) not mandatory, because you might want to do that with another brushes that fits you. After that, I press & hold ALT + BACKSPACE to auto fill the basic shape with dark orange color.
➋〚 Chinese Ink 〛➡〚 Smooth 〛brushes can help with tiny or small details of flickering thunder (or if you had better name like sparks or Pikach* bolt - be my guest),〚 Lighter ink 〛with orange and yellow a little bit here and there to spread and make dynamic colors.
➌ Adding〚 Air brush 〛➡〚 Highlight 〛with yellow will emphasize the color a little bit. Then if you wish to add some shiny things to brighten lightning effects: I recommend using〚 Soft 〛brush on several areas.
⚡ The FLASHY part to render your thunder! ⚡
Tools needed:
1. Color mixing: Running color on fiber.
2. Color mixing: Finger tip.
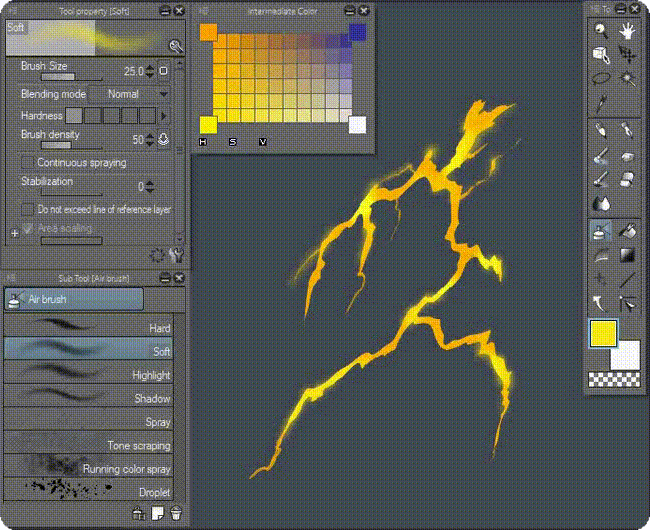
➊ On this part, I use〚 Color mixing 〛➡〚 Running color on fiber 〛to reshape some of lighting's edges. It will become sparks for later technique, but as for now leave it be.
➋ Now it's time to do the trick! Occasionally I use〚 Color mixing 〛➡〚 Finger tip 〛with HUGE brush size. In order to make it looks flashy, you could reduce the size into small area then smudge over some lightning strokes.
➌ Adding〚 Chinese ink 〛➡〚 Smooth 〛for areas that already smudged over too much will strengthen its shapes. Remember, blurred strokes are supposed to be sort of 'movement' while sharp strokes represent the thunder shock. Balancing these two techniques will make you feel excited!
⚡ The SPARKY part to blast your thunder! ⚡
Tools needed:
1. Pen: Mapping pen.
2. Color mixing: Finger tip.
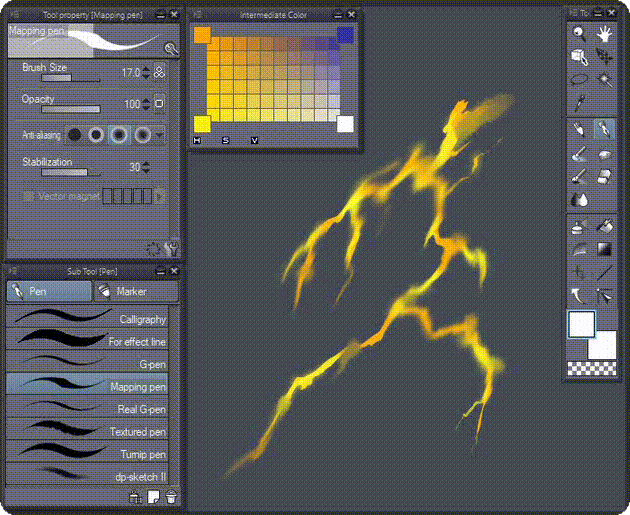
➊ Using〚 Pen 〛➡〚 Mapping pen 〛with tiny size of brushes (depends on what you prefer) will be great to add some thunder bolts with strong strokes. By doing so, I use white color, or any light colors you wish (but preferably yellowish or 'broken' white); thunder needs to be sharp nonetheless and that's why adding this white will emphasize that.
➋ I use〚 Air brush 〛➡〚 Soft 〛brush with white to give a strong feeling of flash for the areas which reflect the thunder sparks. The color reflects should be the same with the chosen areas of your initial color.
➌ Smudging some areas with〚 Color mixing 〛➡〚 Finger tip 〛would definitely makes the white contour ended up blurred: I suggest to paint over with〚 Pencil 〛or even〚 Pen 〛brush to give back the white or yellow sparks!
⚡⚡⚡⚡⚡⚡⚡
【4】 Make EARTH rocks! 🌏
🔰 This section will be my nature representative to share how I make a simple rock along with its grass. In this tutorial, I prefer stone/rock than a tree because I already talked about making trees, bushes, other visual elements on my previous tutorial below:
There is a well-defined symbolic role to be played by landscape, and rock is its backbone, defined by the forces that went into shaping it. Whichever world one has at hand is underpinned by this, and the nature of rocks should be harmonious with the world they crop out of.
Tools needed:
1. Lasso selection.
2. Chinese Ink brush.
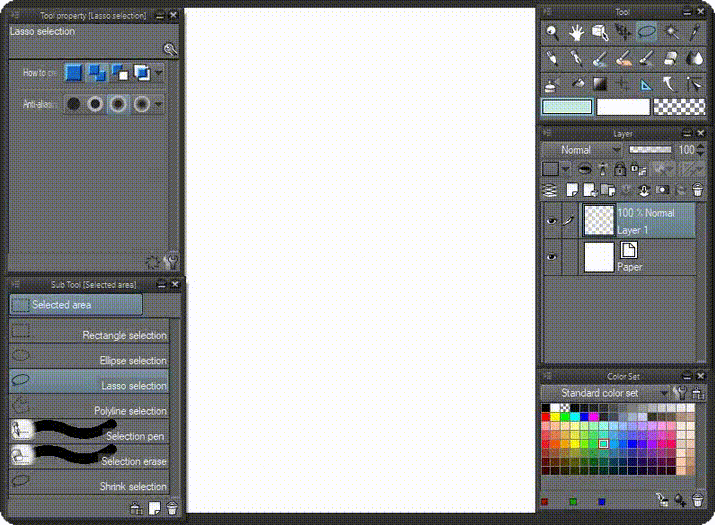
➊ I use〚 Lasso selection 〛to start the shape of rock - once again, its the same technique I use for doing fire and thunder. This is (once again) not mandatory. After that, I press & hold ALT + BACKSPACE to auto fill the basic shape with medium brown color based on〚 Color Set 〛➡〚 Standard color set 〛- The paper could be filled with any color. As long as it's quite dark. Mine is dark grey.
➋〚 Chinese Ink 〛➡〚 Smooth 〛brushes will help us to divide the mid color with dark color, then I choose〚 Lighter ink 〛with light tone. Using your graphic tablet's pen pressure; Lighter ink brush is quiet powerful to blend those hard edges. But if you want to achieve back the sharp edges; just go back to Smooth.
🌏 The SHINY part to render your thunder! 🌏
Tools needed:
1. Chinese ink: Lighter ink or Smooth
2. Pen: G-pen.
3. Oil painting: Oil Pastel
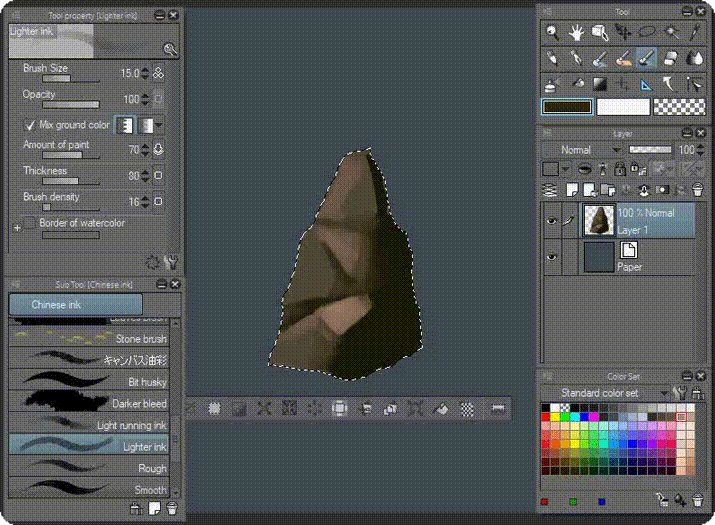
➊ For coloring, I use〚 Chinese ink 〛➡〚 Lighter ink 〛to begin with light purple. Try to loosen your strength when you're coloring as it will blend the dark brown with light purple smoothly. Whenever I need a create a sharp edge, I will once again choose〚 Chinese Ink 〛➡〚 Smooth 〛then switch back to Lighter ink for blending.
➋〚 Pen 〛➡〚 G-pen 〛brush will help you define the light sources as well as sharp reflected lights for the rocky surface. For our tutorial purposes, I will go for light purple and light yellow as my main colors for lighting.
➌ Now it's time to refine the blending mode with the help of〚 Oil painting 〛➡〚 Oil Pastel 〛because of its somewhat 'wet' characteristic, I prefer to polish every edges with oil pastel. But once again, the mixing techniques shall be different with every pressure of different graphic tablets.
📌 TIPS: using keyboard shortcut〚 CTRL + D 〛➡〚 Deselect 〛will release the Lasso selection of your current layer. I did that when I try to define light sources and painting with Pen tool. Clicking on Layer 1 by HOLDING down CTRL button (CMD on Mac) will select the whole pixels (including the light sources) once again.
🌏 The NATURAL part for your plants to grow! 🌏
Tools needed:
1. Color mixing: Running color on fiber.
2. Pen: G-pen.
3. Chinese ink: Lighter ink
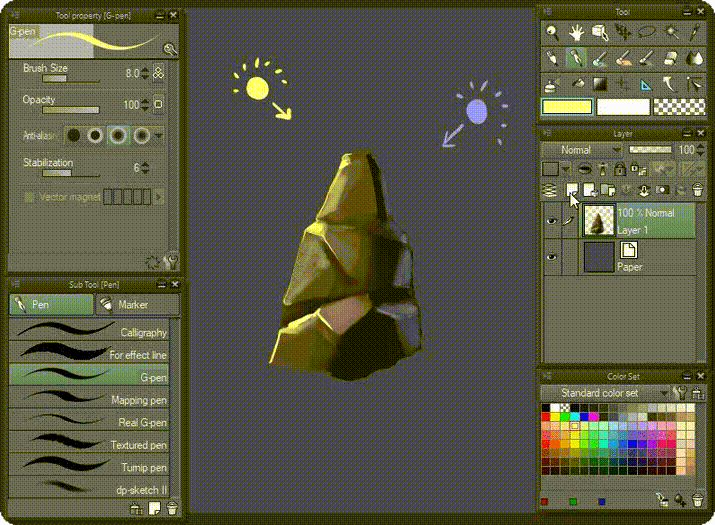
➊ New layer on top of stone layer. By using〚 Pen 〛➡〚 G-pen 〛to add details of plants which cover the foundation/ground of the stone; usually I prefer to use small size of Pen brush. But if you think it's too sharp and you're not comfortable with that; you could either use Pencil brush or anything else.
✤ Mine was downloaded from Clip Studio Assets then search for ➡ 〚 Pencil R1 〛and it's made by famous Red Juice.
➋〚 Chinese Ink 〛➡〚 Smooth 〛brushes with dark green color combining with〚 Lighter ink 〛using light green will eventually add up variation of colors suitable to create a grass. Holding CTRL and left click on Layer 2 where I put plants to bring up the selection, then I darken the entire tone with dark green; until it's good enough, I deselect the selection using CTRL + D.
📌 TIPS: try adding〚 Pencil 〛➡〚 Pencil R1 〛after deselecting the Layer 2 with yellow color and also dark green on the other side to make the grass looks dynamic.
🌏 Extra part to TURN the day into night! 🌏
Tools needed:
1. Chinese ink: Lighter ink
2. Clipping mask.
3. Pen: G-Pen.
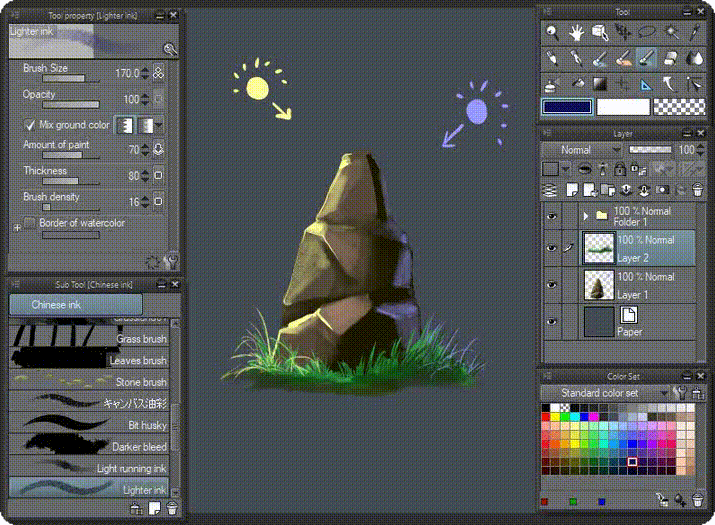
➊ Create a new Group〚 Folder 〛then, create a new layer and rename it with NIGHT MODE.
➋ Important step: Clip to layer below. Change its layer mode to〚 Multiply 〛with 80% opacity. Drag Layer 1 & Layer 2 inside the folder.
➌ After that, I choose〚 Chinese Ink 〛➡〚 Lighter ink 〛brush with dark blue color, paint it directly on NIGHT MODE layer. Notice that it will NOT go over the area of image inside the Folder 1 - because it's already been masked with clipping mask!
📌 TIPS: try adding few more details with〚 Pen 〛➡〚 G-pen 〛on top of NIGHT MODE. As it will become the highlights for reflected moonlight.
🌏🌏🌏🌏🌏🌏🌏
【5】 VFX Gallery 🎨
▲ Fiery Mountain of Ruby 🔥
Image above is one of many VFX illustration, landscape painting I did for my personal project: upcoming web-comic concept art done everything inside Clip Studio Paint.
As you can see from the picture, I emphasize the fiery lava and the Japanese word of fire: ⽕ into the painting with ruby stones all over the piece. All techniques explained with FIRE as well as EARTH elements from chapter 【1】 & 【4】- (Apologize, because I need to teach my students at school, so I am unable to finish step by step guide for this Mountain of Ruby piece).
▲ Frozen (not from the famous Disney movie) Citadel ❄
Image above represents my experiment doing a landscape painting with only limited choice of color pallet of dark blue hues. I hope one day I could share you guys the steps, consider this as the 'upcoming' tutorial.
▲ Pin up Artworks
Two of my best (or at least the sexiest) images I've done to represent my character design personal & commercial artworks done with only Clip Studio Paint default brushes. These two images focus on the powerful〚 Color mixing 〛➡〚 Finger tip 〛tool as well as〚 Oil painting 〛➡〚 Oil Pastel 〛for their hair ornaments and Succubus' bloody eye.
🌞 AFTERWORD 🌑
You've just experienced a small part of my tutorial journey for VFX Techniques. I say small part because on top of everything you've seen, there were thousands of images & ideas that sadly couldn't fit in. Hopefully one day you'll get the chance to see these missing pieces to the complete guide of VFX Techniques by Futopia.
✤ I still remember how exciting it was as a boy to see behind-the-scenes from various art-books that I collected, and dream of one day working on a movie or animation. I hope this compilation of mini tutorials will do exactly the same and inspire future artists, animators, even Visual Art students around the world while using Clip Studio Paint.
・ If you think 'I could never do that', just remember, no one starts life as an adult. Everyone who worked on every animation/films/movies was once a kid and probably had the exact same dream as YOU. Just because people say it's impossible doesn't mean you can't make it happen.
Best wishes and cheers.
Thank you | ありがとう | 謝謝 | Terima kasih
🐰 ABOUT FUTOPIA 🍅
Yohanes Tenggara
From research and strategy to design and implementation, Fu created deeply connected brands, services, and artistic products that enable powerful relationships between people and business with his knowledge in digital design and illustrations.
✤ If you wish to learn more about me (especially if you're an Indonesian student, living near Kelapa Gading, Pantai Indah Kapuk or Tzu Chi School area) you can find my workshop (currently closed - opening class soon!) by following this link below! ▼


댓글