
Introduction
Hello! I'm uchuubranko, a digital art/ comic artist with a love for fantasy.
https://www.deviantart.com/uchuubranko
This tutorial focuses on painting a variety of shapes with Clip Studio's basic watercolor set. It's perfect if you'd like to have a paintery feel without the use of textured brushes, although any blending brush can be used. It's also perfect if you have a preference for a small amount of layers. This painting can be completed in 3-5 permanent layers.
Used materials:
Dense, Watercolor Brush
Blur, Airbrush
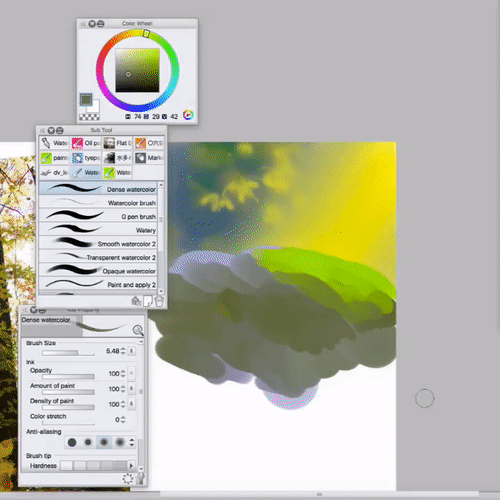
Painting on 5 layers for a complete background
1. Composition
Sketch out a general idea and how you'd like the elements to be placed.
Then make a new layer, [Base] fill it with either white or your preferred colour, and place it below the Sketch.
Make a third layer, which will be the first [BG] or Background. Leave it above the [Base] layer. In this [BG] layer, we'll decide the general colour distribution over the piece, as shown below.
I choose my colours after the light source, shadow and colour of objects. I chose a fall forest setting.
It might be useful to enhance or edit the colours with an overlay layer. Be sure to clip all adjustment layers to your [BG] layer, then merge.
After you're done, be sure to merge the [Base] with [BG].This is so you won't have any empty pixels on your painting.
From now on, the painting will be Layered. Closer objects, such as trees, will be on the [BG 2/Tree] layer. Lock the layer and briefly choose light/shadow colours, as shown below.
The next layer will be [Character] and will focus on what's closest to us. The character has a darker palette as he's shadowed by trees, and a light hair colour because I want him to blend into the forest.
Below is a screenshot of my current layers! Pretty simple, right? :D
2.a Brushing Volume with Brush
I have prepared few examples of how to easily brush elements with the watercolor tools, in just one locked layer.
Below is an image I took in a forest a while ago. It's important to study textures when painting, but it doesn't have to be realistic.
[Tool Property] : I brush with 100% on just about everything because I need sharp brushes when creating shapes, as shown below.
Start by locking the tree layer. Pick a colour darker than the tree and start brushing. We'll have several darker tones because the tree is backlit by the sun!
Usually you don't need to blend much when colour stretch is at 0. That is favourable for clear textures and shadows, as shown below. I simply moved the brush up and down several times, and repeated with multiple dark shades.
Afterwards I proceeded with defining the shape with strong light lines.
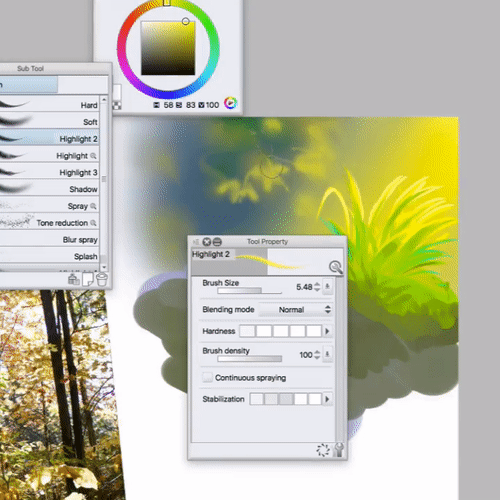
For leaves, I made a new layer, locked it, and used airbrush to darken the shadowed ones. Added strong light lines to them as well.
Here's another brushing example which follows the same steps!
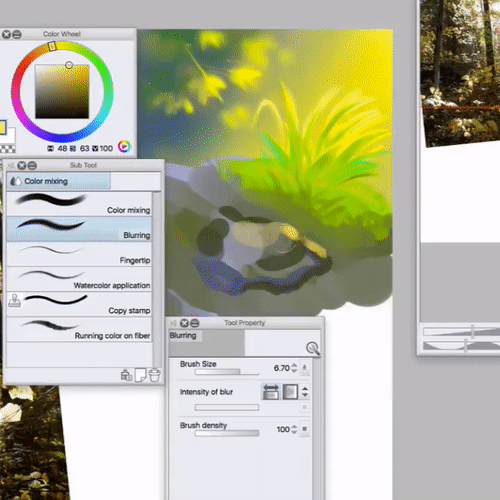
2.b Brushing with Airbrush, Pen, Blur
The airbrush and blur tools are used for softening tones, and sometimes you can even draw directly with an airbrush!
Next, let's have a look at pen shading:
Use any pen tool at Low Opacity to build your object.
Add colours according to your light/shadow source.
I keep on "blending" the shape on low opacity and "define" it with high opacity. To soften the shadows and lights, use the Blur tool, as shown below. I usually draw on it again after the blur, so that the stone won't end up looking fluffy.
This is an example of foggy light (airbrush/blur) vs. dense light (pen/brush).
2.c Drawing Leaves
There are two parts in this process. First is to draw the leaves behind trees, which I do in the [BG 1] layer.
[Additionally, you can just copy & paste & hide your layers before you paint, in case you're unsure of the result.]
Start by drawing coloured dots, or mini leaves.
We're not using leaf brushes, but we have a way to ease the job, shown below. When I draw forests, 70% of leaves are hand-brushed on [BG], while around 30% are copied from the same batches.
Make a new layer -> Draw few leaves -> Copy & Paste -> Rearrange
[I don't recommend enlarging the leaves, as it'll cause pixelation]
Merge all the leaf layers into one, and even into the [BG] and create new batches for variety!
This is the final product of the [BG] leaves:
There's really no ending to details though. More time = more leaves!
2.d Drawing Trees
As seen above, we go by the same principle of shadow, base, and light source. Remember to Lock the [BG 2/Tree] layer while you're brushing the inner parts.
I use airbrush to add patches, blobs, and irregular shapes of light.
2.e Drawing Grass
[Dense Watercolor] The grass is done either on the [BG2/Tree] layer or [BG 1].
You can see below how it changes its light side depending on where it is situated.
1 - Grass isn't so visible in full light, so I Define it with a green contour.
2 - Grass isn't visible in deep shadows, so I Define it with a light orange/yellow contour.
3 - Grass in such deep darkness needs a bit more than a contour! I gave it a shine!
Here's the finished grass!
The character is no different from the trees or grass we painted. His cloth folds are the perfect place to apply some blur, just like I did with the stone in the gif above.
Lock the [Character] layer and start brushing with tones by picking some neighbouring colours in order to blend in.
Since he is lying in purple shadows, he'll have both purple shadows and lights as contour/ afterglow.
[Dense Watercolor] The hair is basically just wavy grass! I defined it with light yellow at the end in order to make it stand out, as seen below.
I like applying shadows that can easily show the hair's shape and volume:
After adding some layers on top of the trees by making a [new layer], it's almost done! This is how it looks when I hide each layer:

3. Adjustment Layers : Picking Colours
For last adjustments, I use Overlay & Add(glow) Layers to enhance the colours. But what colours fit best on such layers? This is how an overlay layer looks if I turn it back to [normal] mode.
The colours look very pale, but when changed back on Overlay, they truly bring a different radiance. If a drawing has super bright colours from the start, it's best to try adjusting them with more mild overlays like above.
On the contrary, If it's full of greys and you want more vibrance, then the [upper right corner] of the colour wheel is for you!
This is how a minimal Add(Glow) layer looks like:
I wanted a more striking glow on trees and hair, and these oranges were more than enough. :)
Closure
That's about all I do when painting a background in layers! Normal brushes can be just as fun as textured ones, especially since you get to create the shapes by yourself.
I hope it helps, and thank you for reading!
이 게시물에 '좋아요!'를 누른 사용자


댓글