
Hello guys , In this tutorial I'm gonna talk about different ways I use file objects feature in clip studio paint in my illustration as well as to create simple character animations . So lets get started .
WATCH THE VIDEO FOR BETTER VISUAL EXPLANATION .
CREATING A FILE OBJECT
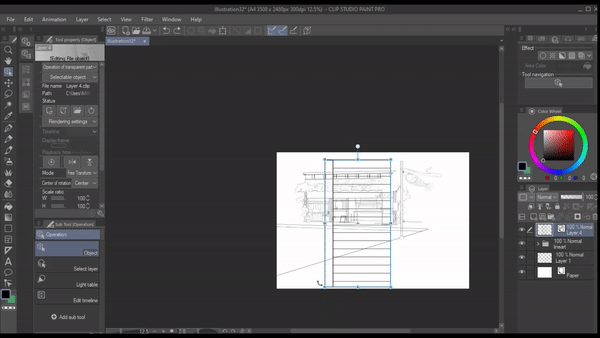
Here , I have already created a line art of what I am working on . For this illustration I want to create a pathway . For that I'm gonna create a new layer and use a 'figure tool' to create a simple pathway . I'm gonna make sure this is all in one single layer .
Now I'm gonna convert the layer to a File object .
-----------------------------------------------------------------------------------------
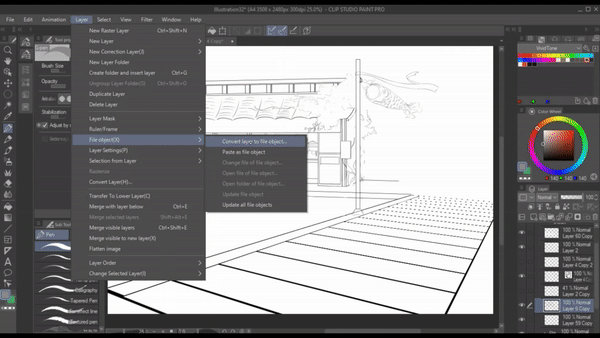
1. - Make sure you’re on the layer which you want to convert to a file object .
- Click on layer icon , from the list of options click on “file object(X)” and then select “convert layer to file object ".
2. - Make sure you’re on the layer which you want to convert to a file object .
- Select “layer” from the menu , click on “file object(X)” and then select “convert layer to file object “.
A “convert layer to file object “ dialogue box is shown . Under the area option make sure its on “drawing area “
-------------------------- -If enabled , the paper setting on the canvas will be exported with the file object .
- If disabled , the paper setting on the canvas will not be exported with the file object .
-----------------------
-If you enable it , the original layer would be unchanged . Instead a new duplicate layer of the original layer will be created and will be converted as file object layer.
-If you disable it , the original layer will be converted as a file object without creating any duplicate layer .
I don't want any of these to be enabled so I'm just gonna click ok and save the layer . If the file object layer icon appear on the respective layer then we have now successfully created a file object .
------------------------------------------------
--------------------------------------------------
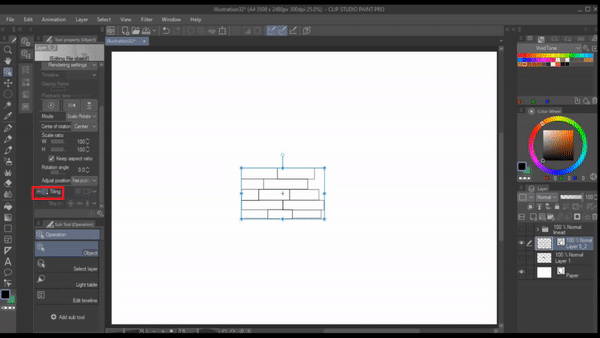
So for adjusting the pathway I'm gonna Click on “operation” . Under “mode” we are provided with a drop down box with 7 options to select any desired transformation mode. For this pathway I'm gonna select “ free transform “ .
and use this transformation tool to adjust the pathway according to the reference . This way, instead of drawing in perspective you can edit the FO accordingly.
Now I click on [menu] file > open > layer . A new canvas window of the pathway layer will be opened , in this new reference layer any changes to be made , after saving will be reflected on the original file .
For example
Here if I erase the pathway on the reference file , it will be reflected on the original file after saving [ (menu)File > save )]
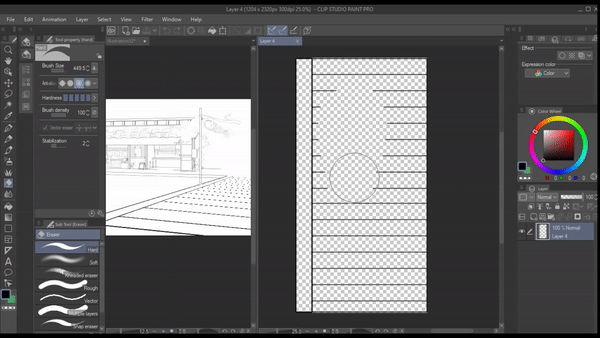
Likewise we can create as many layers as we want in the reference file but it will be shown as one single file object in the original file . This helps us to keep the layers to minimal in original file
----------------reference layer -------------------------------------------- original layer ------------------
-------------------------------------------------------------------------------------------------------------------
TOOL PROPERTIES
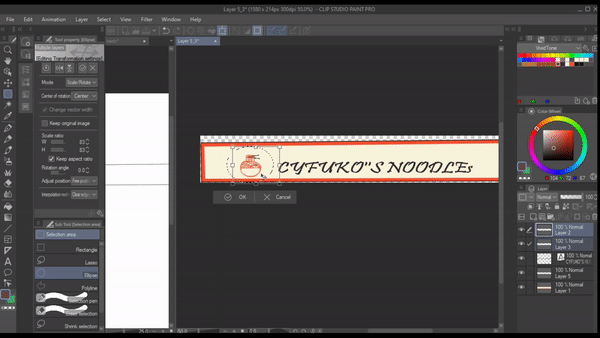
For the shop I wanna start by making a banner . For that I create a new layer and traced the banner outline and convert it to file object . Now in “editing file object” under “status” we have 4 options , these are like shortcuts .
1. Change file - using “change file” we can change the drawn content in the current layer to .This allows you to change the content in the current layer to any other file . it could be png , jpeg or csp . The file you choose to change with, will automatically be converted to file object too .
2.Open file - This opens a new canvas window of that particular file object layer , Allowing us to edit the drawn content of that particular layer in a separate file . Any changes made in this file will be updated in the original layer by saving the file {menu} file > save .
3.Open folder - open folder takes us to the folder which contains our file object that we saved . This helps us to save time and not mix up our file objects .
4. Update file object - when you click on “ update file object “ any changes made on the reference layer will reflect on the original layer .
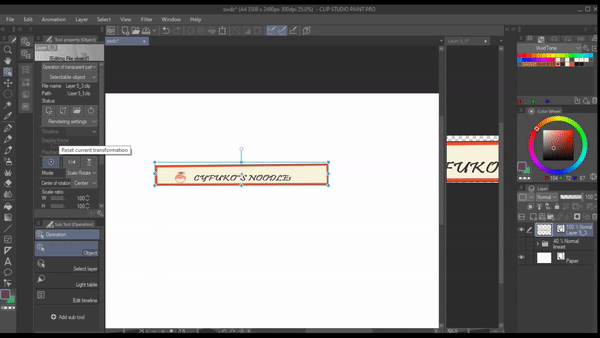
Using the status tools I mentioned above I'm gonna create a banner for the shop
Same options are available under [menu] layer > file object .
Moving on down here we have “reset transform “ which resets the transformation .
Flip horizontal - flipping horizontally according to the center of rotation. If the center of rotation is changed it will flip according to it .
Flips vertical - Same as horizontal one except it flips vertically .
Then we have “ center of rotation “ which gives us the option to change the center of rotation of the object . For example: if we select “ bottom right “ the object will make it as center and act according to it .
Scale ratio is to for adjusting the scaling (i do have something to write but idk how to put it in words )
Rotation angle “ is like a manual rotator .
Now I'm just gonna create separate file objects to color and modify the rest of the illustration using all the tool properties mentioned above . The main benefit is that I can add small details to my illustration and it keeps the layers in the original file to minimal .
Result :
-------------------------------------------------------------------------------------------------------------------
TILING : reverse , repeat , flip
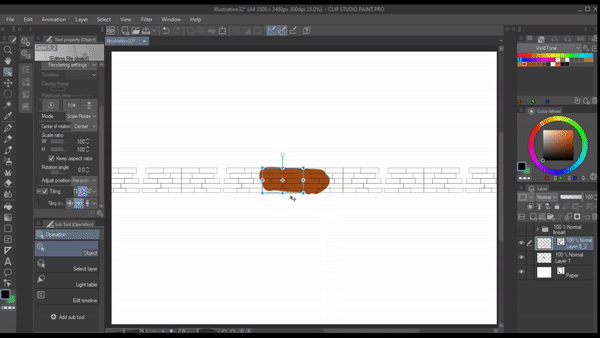
Now here in this kitchen I want to create a brick pattern for that I'm using tiling in file objects to create a seamless brick pattern. First I'm gonna color the kitchen counter and then create a new layer above it and create some bricks use the ‘figure’ tool and then convert this layer to a file object
Now I'm gonna enable tilling . Here we have ‘ repeat , reverse and flip ‘ and under tiling direction we have “ horizontal and vertical “ , “ horizontal “ and “ vertical “. So for this illustration I'm gonna use reverse and horizontal
Then I'm gonna clip this layer to below layer and do some adjusting using the tool properties like Mode and scale .
----------------
SIMPLE ANIMATIONS
You can use file objects to make simple animations which can be a huge timesaver and will also keep your timeline clean. Let me show you how I did this character animation easily using file objects.
---------------------------------------
Animation:
1- Create a new animation folder.
2- Copy paste the first pose into the folder
3- Click on a frame of your choice on the timeline and select specify cell icon.
Note: These are vector layers so they must be linked using the specify cell feature.
4- In the specify cell dialog box, select the respective pose, name it and save it.
5-Now add a new animation cell for the pose, to make it appear on the timeline and delete the copy of the layer made.
6- Repeat the same for all the poses
7- Save the changes made and you are done with the animation.
-----------------------------------------------
In order for the File Object animation to work, you must IMPORT it into a document that has a timeline present in it with the required play back time.
1- Go to File menu -> Import -> Create a File Object and select on the animation file object from the folder.
--------------------------------------------------------------------------------------------------------------
That's it for this tutorial . Thank you for reading and watching the video !
===================================================================
이 게시물에 '좋아요!'를 누른 사용자


댓글