
Hello everybody! In the CLIP STUDIO PAINT 1.10.10 update, [Double Brush] has been added to the brush customization settings. This function allows us to combine two brushes in a single stroke to obtain diverse and interesting results.
We can also experiment with the way the brushes interact with each other to change the effect of the brush.
■ From simple textures to full color special effects, in this short tutorial I am going to introduce you to the double brushes function and show you some examples to start creating your own brushes or combine some of our favorites obtaining unique and original results.
1. Introduction to dual or dual brush
To quickly understand the new feature let's look at some of the new materials added in version 1.10.10 that use Dual mode.
■ Experimenting with these professionally created brushes can give us insight into the potential of this new feature and get inspired to make our own materials.
I suggest you read this official guide to familiarize yourself with the function and terms. ▼
■ [1] One of the most common and useful uses for dual brushes is to create textured brushes. In this example I have a main brush with an organic shape, opacity and size variation with the pressure of the tablet, but as you can see it has no texture.
• [1.1] In the tool property palette, press the wrench icon to open the sub-tool detail menu with the brush settings.
We select D- Brush shape to see the double brush settings.
• [1.2] If we activate (Double Brush) we can see that the preview of the stroke changes and now it has a bit of texture. The blending mode is multiply, the most common for adding texture with dual brushes. Each mode generates different results, based on the characteristics of the 2 brushes and how they are combined, it is important to experiment with each blending mode to get an idea of what results we can expect from each one.
• [1.3] In the D-Brush tip submenu we can see the shape of the second brush and its characteristics. This tip is combined with the original shape of the main brush, in this case it "erases" part of the original stroke to generate the pastel texture.
• [1.4] The final result of the double brush gives us a more interesting stroke thanks to the texture that simulates a traditional crayon or pastel.
Although it is a simple method and the most basic use of the double brush, this technique is very versatile, modifying the parameters of the second brush, changing the tip or playing with the blending modes, we can create infinite variations for our brushes, obtaining results more personal, unique and original.
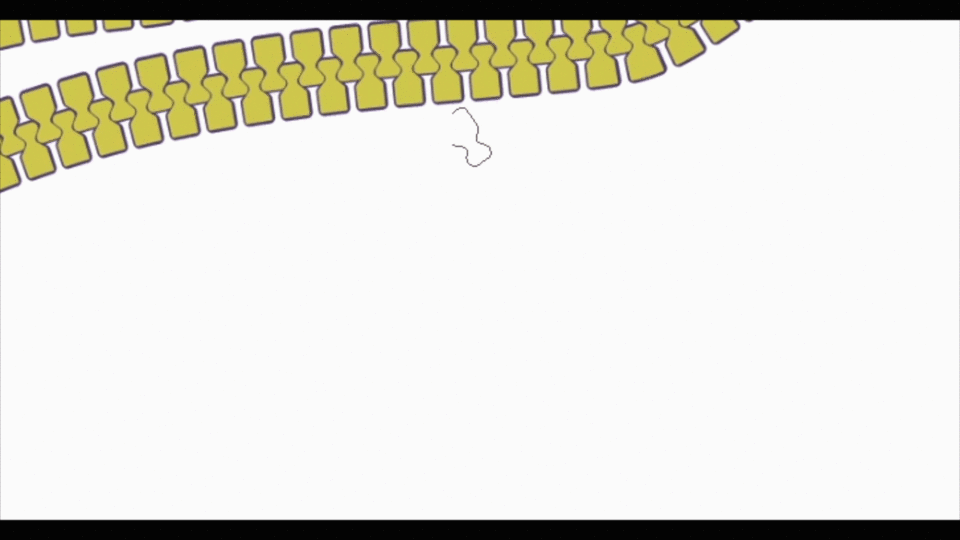
■ [2] Let's take a look at how some decorative brushes that use the dual function work.
The brush (Zipper) Combine 2 tips to create the accessory. If we deactivate the double brush we can paint each individual part and if we activate it we can paint the closed zipper.

■ [3] In this rose brush we can see another basic use of the function. We have a brush with different tip variants, in this case some flowers with color variations.
• [3.1] In the double brush we have a leaf brush also with a variant of tips. If we pay attention, the combination mode is (Normal). In this way we combine the brushes in 2 layers obtaining a more complex result in a single stroke and in a single layer.
• [3.2] The brush (Braid) consists of two parts: Brush 1 defines the base of the braid in lines.
Brush 2 adds shadow and texture.
The blend mode is Normal, but this time [Apply RGB Values] is active.
[Apply RGB Values]: If this active, the color or monochrome value of the second brush is applied, it is necessary if we have color brushes. If it is not active, the Alpha or transparency value is applied.
• As the brushes are separated, we could for example reduce the density of the second brush to make the shadow and texture effect more subtle. ▼
• [3.3] Another example of [Apply RGB Values] the chains brush, with the double brush disabled we have a simple chain without details. second brush adds shadows and glow to it with Burn (Linear) mode
• [3.4] If we deactivate [Apply RGB Values], only the transparency of the second brush is applied and the result obtained is not as expected.
• [3.5] (Glitter) another brush that uses [Apply RGB Values], in this case with the blend mode [Add (brightness)] the overlapping parts light up randomly, it's a lot of fun to paint with this brush and see how the points change color.

• [3.6] An important parameter to take into account is that we can combine spraying for both the main and secondary brush, this opens up even more possibilities for us to be creative with our combinations.
We can take the example of the official materials to [Diffuse lights] This material uses spraying on both brushes. With the first we create a cloud of organic and diffuse color.
The second in Subtract mode, erases parts of the original stroke generating a completely different climate.
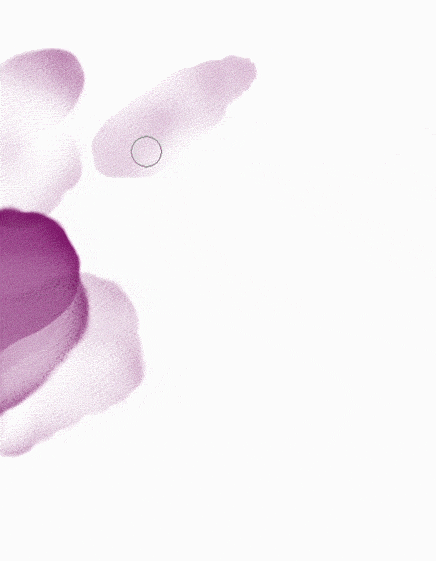
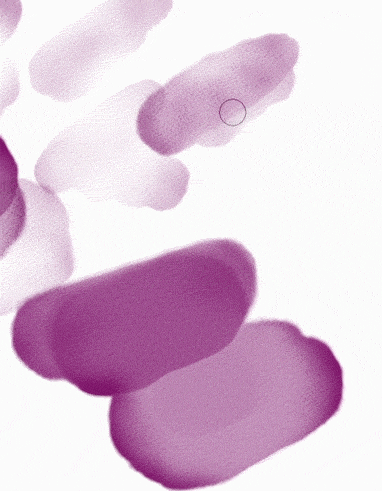
■ [4] By taking advantage of the interactions between the two brushes, we can create organic effects by imitating traditional materials such as wasted watercolors.
In this case, painting with low pressure the second brush "washing" the paint, if we add pressure we have a greater amount of dye.
Now that we have seen the possibilities that double brushes offer us, we are going to create our own.
2. How to combine brushes
The easiest way to create our own brush combinations is to choose two brushes that we like. One is going to be the main one and the other the secondary one.
■ [1] Let's first register the secondary brush as the default. For the first example, I chose as a secondary brush the new tool [cloud]
• [1.1] As we did before we open the [Sub tool detail] palette from the wrench icon at the bottom of the [Tool Property] palette
• [1.2] In the [Brush shape] tab, we select [Register as preset] to define the brush properties so that we can use them later.
■ [2] We select our main brush and if necessary we duplicate it.
• [2.1] In the [Sub tool detail] palette> [D- Brush shape] Activate double brush
• [2.2] We select the [Cloud] preset that we created in the previous step and click [Adopt Brush Shape] to apply the preset to the secondary brush
• [2.3] With the double brush in multiply mode we can see how an organic cloud texture is generated in our stroke.
• [2.4] An easy way to vary the result is to change the size of the secondary brush. We experiment until we find a balance that is pleasant to us and then we select [Apply to the size of the main brush] in this way we maintain the proportion between both brushes when we modify the size of the main brush
• [2.5] Another interesting option is to change the blending mode and see what results we get.

■ [3] To finish the brush we can use other customization parameters.
• [3.1] In this case in the [Color variation] tab I activated [Random in each stroke] with a value of Hue: 5 and Luminosity: 10. This results in that each stroke changes a little in color and intensity, making the effect still more natural.
• [3.2] To finish I added a general texture to the main brush. You can also add texture to the secondary brush.
And this is the result of our brush with textured watercolor style with clouds. ▼
■ Whenever we create a double brush we first register the shape of the secondary brush as a preset.
3. Simple Special Effects
I'm going to show you a couple of examples of useful brushes to create magical effects, for you to take as inspiration.
■ [1] I start with a smoke brush
• [1.1] In this case I am going to use the same brush as a secondary one. So I register the shape as a preset.
• [1.2] I activate double brush and select the preset I created just now.
• [1.3] I modify the size of the second brush a little smaller than the primary one, and add pressure and random modifiers to it to obtain the same brush as the original.
• [1.4] I select the Add (brightness) mode and activate [Apply RGB Values]. By using the same brush as the primary but in a smaller size, interesting highlights are generated in the areas where they overlap.
• [1.5] By modifying the size of the secondary brush we obtain infinite variants of the effect
• [1.6] Here we can appreciate the subtlety of the effect if we compare the double brush on and off. It is a simple but versatile effect, and we can use it as a base to create different magical effects.
■ [2] The second example is even simpler to perform
• [2.1] I selected a lightning brush as secondary therefore I registered the shape as a preset in the same way we did before.
• [2.2] The main brush is a simple soft airbrush
• [2.3] Activate double brush and assign the ray as shape.
The blending mode is again Add (brightness). By adjusting the size and density of the secondary brush we get a simple effect with some highlights in the overlapping parts.
4. Advanced control
If we analyze the new tool with double brush [pencil] we can see that by tilting the stylus of the tablet we change between the main brush and the secondary brush. This type of advanced control opens up possibilities for us to create more complex relationships in our dual brushes.

We are going to create a transition between smoke and particles.
• [1.1] Register this particle brush as a sub brush preset.
• [1.2] The main brush is this one of smoke that we used before.
• [1.3] We configure the double brush in normal mode with the particles.
• [1.4] We define a curve in the density of the secondary brush. Particles only appear when we press the stylus very hard.
• [1.5] To generate the transition, in the density of the primary brush we apply an inverse curve, that is to say that when we press gently we will paint the smoke and when we press harder we change the particles. This is a simple example to understand the process. We can experiment with relationships similar to this to obtain various effects.

5. Color texture and borders.
We can also use double brushes in the [Shape], [Vignette Border] and [Speech Bubble] tools. In this example I defined a textured subbrush in subtract mode and a soft primary brush. Again Modifying the size of the secondary brush we obtain different effects.
I registered a full color metallic textured brush as a preset. To use this brush it is important to use [Apply RGB Values].
We can apply this texture to both frames and chain brushes and other variants. Experimenting with blending modes to change the textures obtained.
I hope this brief introduction to dual brushes will encourage you to create your own.
Keep creative!
Thank you for reading.
Users who liked this post


Comment