
Hello! welcome to a new tutorial, in this case I will be showing you my step by step to design a combat character, here is the video tutorial:
1. Who is this character
The characters tell stories through their design, which is why before jumping to draw we have to define what story we want to tell.
The premise of the character is that he is a warrior but that is not enough information to start designing, we can get to know our character better through several basic items:
• Who is this character
What is your personality? What do you like? What do you dislike? What aspirations do you have?
• Origin of the character
This item is to know where the character comes from, not only geographically but culturally and socially, everything we do and are is marked by the society in which we grew up and the culture to which we have been exposed, knowing this information from our character will already give us a solid base from which to start.
•Combat
What is the character fighting for? Do you have a gun? Do you have a power? Strengths and weaknesses on the battlefield? do you have scars? do you have wounds? Do you have a tattoo or markings on your skin of any kind?
• Symbology of the character
Here we are going to define 2 to 3 main elements that we want to add to our design and from there we can build its most relevant characteristics, I do not recommend more than that number of elements since we do not want to overload the character design. In this case the first and most important element is that it is a Warrior, the other elements that I chose are: Tiger and tribe.
There are other items to investigate such as: family background, friendships, couples, important events in their life, relationship with their gender and sexuality, among others.
It is not necessary that you write a 40-page essay about the character, by writing a couple of paragraphs with the most basic things you will be able to define the essence of the character you are creating.
1.2 References and mood board
Intertwined with all of the above, is the phase of research and search for artistic and historical references, it will serve to build the character's history, if the character I am designing is based on a specific time or culture, I put myself in the task of make a mood board of it and investigate what society was like in that context, in this way I am not designing blindly but with an adequate guide.
Even if your character belongs to a fantasy world, the same and historical references can help you make a more solid creation.
As this is a combat character, do not forget to look for references about the weapons, powers and armor that your character can have, if you base your character on a specific culture you can investigate what weapons are used within them as well as their design.
2. What the character will look like
Shapes
Shapes have their own language, usually squares represent stability and solidity. Triangles can give a sense of action and tension, even aggression and circles have a soft and gentle feel, they can also represent power and energy in their movement.
Taking into account the above, we are going to think more consciously about the shapes that we add to the character, for example:
The character on the right looks much less threatening than the one on the left, the right looks smooth and curved while the left evokes tension and aggressiveness, not only because of the spikes but the lines within the design are in tension. We can use this to our advantage when designing, if we want to create characters that look intimidating by adding these little details or, on the contrary, we want them to look friendly and approachable.
Not only does it apply to the clothing, but also the shape of the hair, eyes, etc. In the following example, in the girl on the right, the tension and pointed shapes, rather than generating hostility, generate a feeling of energy and determination while in her left feels more passive by comparison.
In summary:
• Triangles and points = energy and aggression.
• Circles and curved shapes = Smoothness and ease of movement
textures
to make our design look more interesting we can add different textures to your clothing, it can be metal, fur, different type of fabric; In addition to this we can add details such as wear on the materials, an example is the armor of a character who is frequently in battle, after many confrontations the armor will not look like new but will at least have some scratches and wear.
This also applies to the fabric, it will not always be immaculate, it may have some stains or even tears, this of course varies from story to story but it is a good detail to keep in mind.
If you like, you can leave the wear detail for the end and with it you can give the final touch to the design of your combat character.
2.1 First sketches
Now yes, to draw!
The next step consists of creating several sketches to test the idea you have in mind, first you have to define what type of physical constitution the character will have, this is intertwined with the previous step, since depending on its history we will know its characteristics. Physical, since he is a combat character, he most likely has a muscular body, right? maybe not, since if his power lies in mental and not physical strength, maybe he is a character that has a fairly poor physical condition, however one of the best combatants since he has great mental strength, it all depends on what kind of character we are designing and its history, that is why the step of knowing our character is so important, that gives meaning to all the other steps.
Once we are satisfied, we continue with the sketch of the clothes, for this I usually make a simple base and begin to capture the characteristics that I want the character to have, after this I continue with a more complex drawing, I also do this sketch to give myself an idea very general of forms of which the design will be composed.
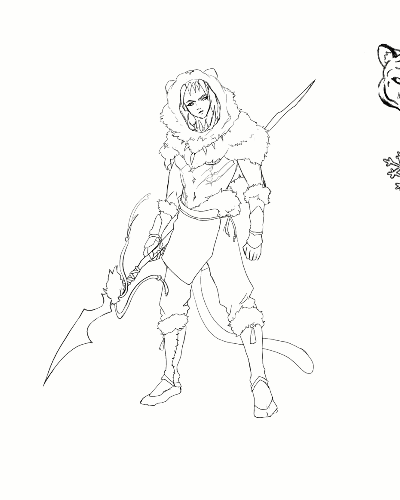
Taking into account the history of the character and the symbology that I defined for the character (warrior, tiger and tribe) these were the resulting sketches:
As you can see, they are simple and quick sketches, it is not necessary to give too much detail, I prefer it this way, the ideas come and go very quickly in my head but this way I can capture it before it disappears.
Make as many sketches as you want, try and change the proportions of the elements, maybe you like only specific parts of several sketches as it occurred to me this time, you can always mix those elements in a new sketch, continue sketching until you are satisfied with a design.
3. Bring the character to life
It is time that we finally see the design in a clearer way, starting from the sketches of the previous stage now if we will make a drawing with details.
Pose
For the pose, our main objective is that it shows the essence of the character, something that reflects his personality, for example if a character is shy, it can be drawn with a more closed body expression and with a not so confident look, if a character it's energetic and daring, it's going to have a more open and dynamic pose, when doing a pose for your character make sure it's a pose that the character would do naturally either because of their personality or their environment, if a character who is essentially serious and reserved, drawing him with a heart cane and a magical girl pass may not be the most appropriate.
In the following examples we can make a reading that communicates the pose and expression of each character:
1- Calm character, who enjoys his serenity.
2- Outgoing and friendly character, likes to make friends.
3- Energetic character who is ready for action.
4- Somewhat shy character, perhaps he doesn't feel as much as in his own skin.
information that can be read by observing a little the pose and attitude of the character, use this tool in your favor.
Remember that if you want to make a drawing of the character that works as a reference, choose a pose where it does not hinder the visibility of the character's clothing, and it is better if they do it full body.
If you want to improve your poses and make them look dynamic, I recommend you see this other tutorial that goes deeper into that matter:
Once the pose is ready, we can start adding the character's clothing, don't forget the textures and details such as scars or wounds.
In my case I added fur texture, various fabrics, seams and animal teeth of different proportions.
4. Color
The color communicates things about your character, for example, say that we are designing a lava mermaid, its natural habitat is the volcanoes, seeing the drawing that will appear below, which one do you think fits more with the previous description only because of the colors?
they are exactly the same mermaid, but one fits more than the other, the one on the right, not only because of the similarity to the colors of their environment (volcano and lava), but also that palette we associate with warmth the same as we associate their habitat.
In this order of ideas, the colors you choose will always be associated with something, be careful when selecting them so that you communicate what you want, you can investigate further what colors would suit your character better, as reference material in terms of the emotions that colors evoke I like to use Robert Plutchik's "Wheel of Emotions" another way of approaching it would be as in the example of the mermaid, due to the temperature of the colors and the place of origin of the character, a series that handles this perfectly is Avatar the Last Airbender, the colors of each nation are in perfect coherence with the colors of their element, culture and geography.
The color palette I try to keep it simple, I usually like to work with 3 base colors, the first two I use throughout the design while I reserve the last one to paint details and emphasize parts of the design, maybe I need more colors for the design , in that case I like to mix the first 3 with each other, in addition to playing with the luminosity and saturation,
In my case I want the predominant colors to be: white, blue and dark gray, this we add to their skin color, which unlike the previous ones is a warm color to add temperature contrast. I chose the colors actively thinking about the culture and geography of my character.
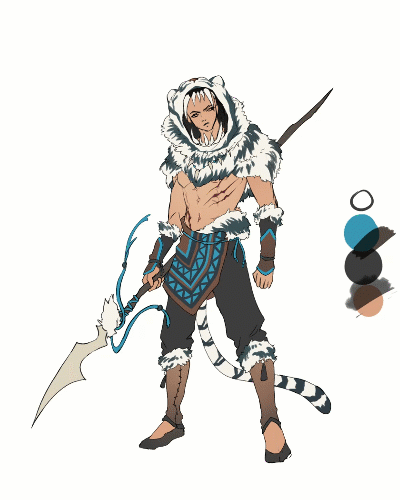
I want to emphasize that in my case when making this drawing I included his main weapon within the design, but it is not necessary to do it this way, although something that I do recommend is that when the colors are being applied to the character's design, you have the character's design. weapon also ready to add color, since putting color on both at the same time makes it easier to create a color balance, so the colors of the weapon will go hand in hand with those of the character and it will not feel like something alien to the character but something that complements it.
5. Props
One of my favorite parts is the design of props, which are the objects that our characters use, a prop can be a ring, an elixir, cards, it can be anything! If you can't think of what props your character has, think about your character's day-to-day on and off the battlefield, so you'll discover what your character needs to have with them.
the prop depending on its origin varies the design and color, all the props of my character originate from their culture so it will correspond to that color palette that is associated with it, but if, for example, a prop comes from a different culture , whether the character got it through some sort of trade, gift, etc, we can play around with their design and color palette to imply this.
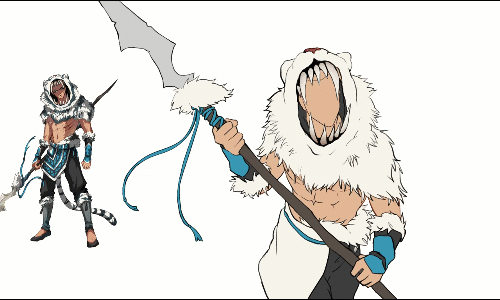
The props of my character:
5. 2 Weapons
To design a character's weapon we will take into account which weapon is in tune with the character's environment and the battles he will face. A character with a firearm in an environment where this type of technology does not exist may not be the most logical, these rules can be broken but you have to try to maintain consistency within the universe to which your character belongs.
For example, my character's spear is a widely used weapon in his tribe, the spear has two uses as a defensive weapon and as a cane for better stability on difficult terrain.
Remember that a character's weapon is a complement and tool of the character, the design itself should not overshadow the character's, let's remember to use references and consciously choose the shapes within the design.
6. Finishing touches
In general our design is ready, from here you can dedicate yourself to perfecting the design, maybe you want to do a turn around, to have the basic views of the character: front, side and back.
You can also draw parts of the design that you want to explain better and add annotations to the character reference sheet
As a plus we can make extra drawings of the character.
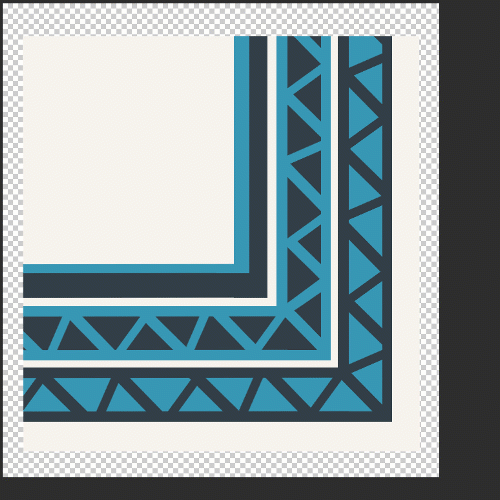
A good trick that you can use if your character uses complex patterns in his clothing is: draw the pattern in a large file, we save it all in one layer and when you need it you will not have to draw the pattern again but with this image and with With the help of the “maya transformation” tool you can adapt the pattern to what you need. You can also use this tip if your character has a scar or a tattoo.
End and thanks
Thanks for coming this far, I hope the tutorial has been helpful, I would love to see the characters you design with this little guide.
See you in the next tutorial!
Users who liked this post


Comment