
Welcome to my post on the things I wish I knew when I first started my webtoon and the tools I would have utilized right from the beginning. Although there are many things I wish I had known, I have narrowed it down to what I think are some of the most important for anyone who wants to start their own comic. Below is a video version if you prefer that over text!
1 - Create character reference sheets
One of the most important things to have other than the plot is character reference sheets. Your character designs will evolve and improve as you continue creating your comic, but having a reference sheet that you can easily refer back to will serve you greatly as a guide.
You can find various character template sheets online but usually what most people include in them is the following:
Characters' full body from the front, back, and side
3 - 4 headshots with expressions that fit your character’s personality
Color palette
Character traits/emotions
You can create an actual color palette and save it but what I do is pull up the image in the subview and just tap the color I want to color pick (I just found out about color picking this way recently actually and it’s so much faster than using a color set).
2 - Utilize features that speed up your process - Bucket fill & Convert to Lines and Tones
The bucket fill tool is the best tool to use to quickly fill in your base colors. Depending on your art and what brush you use for line art, you will have to play around with the close gap, area scaling, and tolerance features.
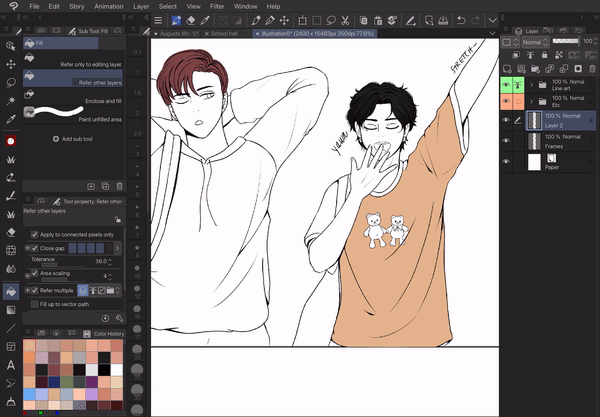
Common problems with this tool are having white spaces or it overflowing so if that happens all you need to do is modify the area scaling and tolerance until it works. If you use it and it fills your whole canvas that means there’s a line you need to close (sometimes it’s because your area scaling is too high).
The convert to lines and tones feature is only available with the EX version, and you don't necessarily need this feature, but if you plan on using a lot of 3d Objects in your backgrounds it’s very useful. Basically what this feature does is turn your 3d models into lines so if your comic uses line art then having a background also with lines will make your characters blend into their environment better. If you use thick/thin or a different color line art you can make your background match using this feature.
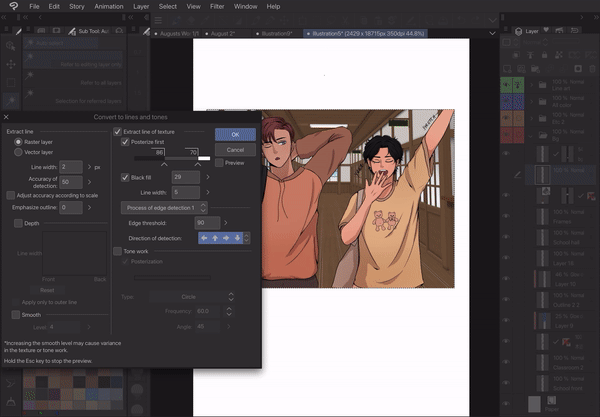
Once you drag in a model you want to use for your background and position it, you click layer > convert to lines and tones. I like that this feature keeps the original 3D object layer so you don't even have to color it, just adjust the saturation and add lighting effects to fit your comic! (I have 2 videos that go over this in detail if you want more detailed instructions)

3 - Save your most used assets as materials
CSP comes with a lot of materials but you can also create and save your own. When you create anything in Clip studio, you can register it as a material which will show up in the All materials tab or whatever folder you save it to [window > material > all materials].
Anything you use a lot you should register as a material which you can do in edit > register material > image.
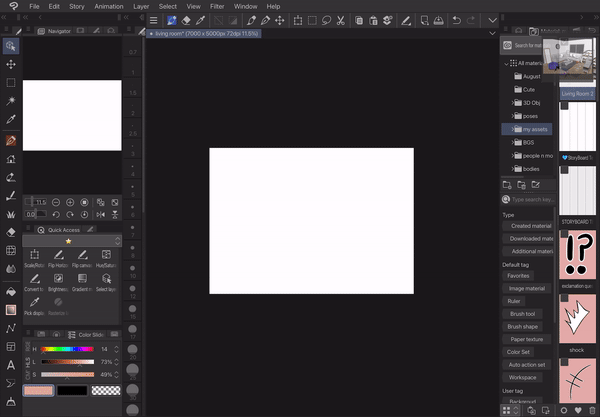
I created this living room from 3d objects and registered it as a material so I can easily drag and drop it whenever I need it.
As you continue to draw your comic, what I did was whenever I drew my character in a new pose or facial expression, I’d save it as a material in a folder with their name.
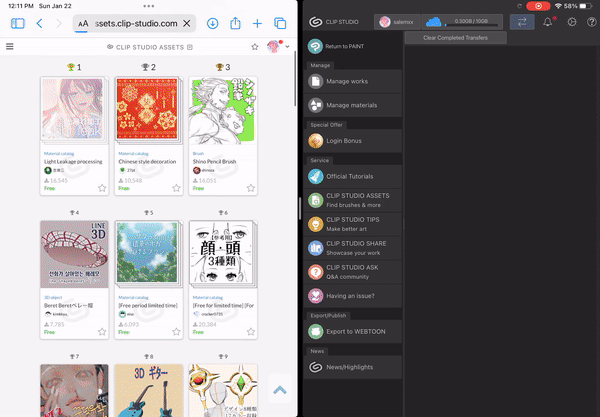
4 - Check the CSP store often (daily)
The Clip Studio Asset store is a treasure trove of any material, brush, and background you can think of. (Especially the Top free!)
Hundreds of materials are uploaded every week so it’s a good idea to check often.
If you are ever looking for a reference pose and you can’t find it on Pinterest or Google you will definitely find it on the asset store.
When you download something it will show up in your downloaded materials folder.
Pro-tip, if you’re using an iPad and downloading a lot of materials at once, put your CSP app and Safari window side by side to avoid constantly going back and forth between apps.
If there’s a material you want but it costs Clippy, you can upload your own materials and get Clippy points which you can then redeem for Clippy. For materials that cost gold, you can just buy gold.
5 - Organization & Preparation is KEY
This one kind of encompasses the last 4 but organization and preparation is KEY. Clip Studio makes it really easy to keep things organized but it's also easy to get carried away and download hundreds of materials and end up not being able to find what you’re looking for later.
Here are some ways that I stay organized and I recommend doing these before starting and during your comic!
Organize your: Workspace, Quick Access settings, Command bar settings, and Keyboard Shortcuts. Categorize your: Brushes, Materials/material folders. I keep my most used pens in one tab, then I have tabs for special effects, clothing patterns, and other things. Be prepared with Character sheets, at least a couple of chapters written/storyboarded, and a schedule you can stick to.
For example, this was my schedule (twice a month):
Sat - script touch up & storyboard
Sun - line art
Mon - line art
Tues - base colors
Wed - backgrounds & rendering
Thurs - typeset & SFX
Fri - publish!!!!!!!!!!!! and relax
You don’t need to do all of this at the very beginning because a lot of the time your process will change but it’s good to keep them in mind!
6 - The most important step of all
Lastly, this isn't a step but very important, is take care of yourself, and take breaks so your hands and eyes have a chance to rest. There are so many injuries you can get from drawing so it’s better to take precautions to prevent them. Set a 40-50 minute timer and make yourself get up and do wrist exercises. Also, make sure to be aware of your posture!
A last side note is that your comic won’t be perfect so don’t delay it due to perfectionism or not being able to draw as well as you want because that’s what I did and it made me regret not starting it sooner.
Just start and if you have an amazing story you don’t want to start because you lack the drawing abilities for it, then I’d recommend just creating another shorter story first. This way you can get the feel for the process of creating a webtoon without the huge commitment of wanting to make it amazing. But you can also just go with your first story and redraw the first chapters later.
Anyways that’s all that I have, I hope it was helpful in any way. Now exit out of this tab and open Clip Studio and start your reference sheets!
Users who liked this post


Comment