
Hello, in this tutorial I will show my way of drawing faces in different angles and I will give you some tips that work for me since some of us can find it difficult to start drawing in this way.
Structure
First we have to know what the human face is like, I have based myself on the Loomis method to structure the face since simple shapes are used when building the bases of the sketch.
This is an example image.
What we will take as the base of the face will be the circle.
1. The first point that I consider to be important is the vertical line in the middle of the circle that represents the symmetry of the face. (which will be important in all the sketches when doing different angles)
2. The horizontal line that divides the circle is at the same height as the eyebrows. (important to take into account.)
3. The horizontal blue line that is on the edge of the black circle is another circle that is used to make it look deeper and more three-dimensional, only that the face is facing forwards, it is not possible to see it completely due to perspective.
Perspective
Perspective is important when making faces at different angles due to the proportions of the face.
An example of bad proportion is this image (some of the errors are in the jaw and eyebrows).
Personally, I recommend that you see many references and practice drawing lines like the one in the examples to better understand the proportions.
When making faces at different angles the vertical line of the circle or in other words the line that divides the middle of the face also changes depending on where you are looking at the face.
Another important thing to note is that the proportions such as the eyes, eyebrows, mouth, and nose change depending on the position of the face (their size and appearance depending on where they are viewed from).
We start with the circle and inside we draw another circle but with perspective depending on how we want the face to be. (Although if you find it easier you can do the vertical and horizontal lines of the base circle first)
In this image it is possible to see more clearly the change in the proportions of the face such as the nose; Another important thing is that part of the head comes out of the main base (the circle) and this happens because the head itself is not circular, it has a more oval shape.
To understand more about perspective we will make an example from scratch.
I divide the purple circle into 4 parts based on perspective and I divide the black circle in the same way.
The lines that form a triangle within the space of the eyes is the separation between the eyebrows.
examples
In this image we will draw the bases of the structure as an example when making a face.
When dividing the purple circle, the horizontal line should protrude from the circle to where the eyebrows are.
Then we draw the triangles, one that separates the eyebrows and another two where the nose and mouth are located. (the mouth and nose are always close to the limit of the base circle)
(Remember that they have to be drawn in perspective)
So it would be without the background drawing.
2. Example
View from below
This face is more difficult due to the angle and perspective because other parts such as the jaw and neck can be seen more.
In this case the face is viewed from below so the blue circle has to be drawn differently.
We do the same as in the previous one to draw a horizontal line that protrudes from the blue circle.
We divide the black circle in half based on perspective and do the same to identify the separation of the eyebrows, nose and mouth.
As the face is seen from below, the jaw and neck can be seen, when this happens we draw the jaw with a curved shape because the face looks different from below.
(One fact is that the ear is always near the edge of the blue circle.)
Here are some examples of the jaw seen from below.
3. Example
(I will only put the result and the sketch)
drawing from scratch
In this case we will start with the sketch first.
We do the same to draw the two circles and identify the important parts.
We draw the eyes, eyebrows, nose and mouth.
The hair
And we do the final touches.
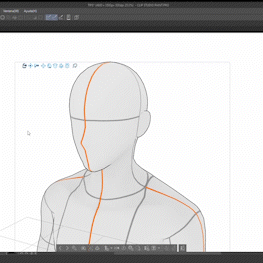
3D models as extra help
On occasions where it is difficult for us to draw angles, we can use 3D models to facilitate the process.
Thanks for reading until the end, I hope you find it helpful and keep improving!
Users who liked this post


Comment