
I. INTRODUCTION
Hi there! Just wanted to give you a little heads-up. This is a tutorial and a guide on how to draw side profiles based on my experience.
It is designed primarily for beginners, but artists of all levels are welcome to join in!
I'm going to share with you a quick and easy tutorial on how to draw a simple head profile and it's also a guide to help you understand more about the side profile. It is a pretty simple guide/tutorial.
- About drawing side profiles:
Each person’s head has a unique shape - so every face and side profile will be different. Another thing is stylization, it can be different depending on the artist’s style too. So be sure to have your drawing references.
*NOTE*: A single standard of facial aesthetic is not appropriate for application to diverse racial and ethnic groups.
Here’s an example to show what I mean by using Clip Studio Paint EX head model.
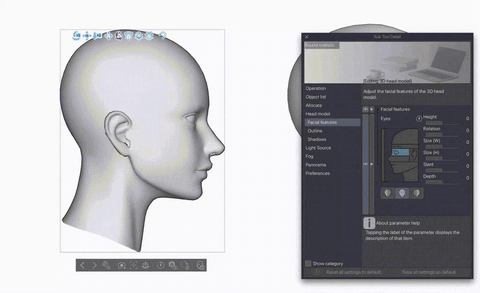
With the head model available in Clip Studio Paint EX, you have complete freedom to adjust the facial features as per your preference.
II. SIDE PROFILE FEATURES
When it comes to the side profile, there are a few key things that stand out. Some of these include the shape of your jawline, how prominent your chin is, the height of your nose, and even your hairline. There are a handful of features that can define what you look like from the side.
More examples:
Eyebrow socket shape
Upper lip height
Ear positioning and shape
II. SIDE PROFILE FEATURES
1. The guidelines
It's handy to have a guideline when you're new to drawing a side profile. It helps you get familiar with the process and makes it easier to start off on the right foot.
Using a guideline when you’re starting is a very useful tool when you are just being familiar with drawing a side profile.

Start with the basic shapes:
First step is the construction of the face. My starting point is to sketch out a rough circle first. Usually, it’s never a perfect circle, but you just need something that resemble a circle
From then on, I’ll sketch in a cross ( + ) (The cross: It is the point where the brow line crosses the middle of the face, and a vertical line splits the circle down the ear and to the chin.) across the circle, then the jaw line and eye/ear line.
After that, I draw the nose at the eye line and the ear in the middle of the circle.
In the following, I sketch the eye, eyebrow and also some more details for the ear.
Finally, I erase the guidelines and draw more over the sketch I made.
2. The differences between masculine and feminine features of a profile
- The shapes and lines: Sharp, soft, round, hard conner, ect…
When it is about 'feminine' and 'masculine' lines in design. We refer to the different qualities they possess. Generally, masculine lines are more sharp and abrupt, while the latter boasts a more softer and smooth flow.
But the truth is, these lines aren't mutually exclusive - they can coexist in the same design! Think of it as a spectrum, with different combinations of traits. Some lines may be sharp and abrupt but also ease into the next. Others may be angular, but not entirely. At the end of the day, the possibilities are endless!
Basically:
Straight lines and sharp corners for the masculine side profile
Rounded curves and softened corners for the feminine side profile
*NOTE* : It can combined however you what.
III. DRAWING A SIDE PROFILE
3. Proportion / Stylization / Same face syndrome
It is prudent to keep in mind the principles of proportion, stylization, and avoiding the same face syndrome while designing.
Nonetheless, one should not fret about adhering to them stringently. Our visual perception is attuned to objects that appear harmonious and authentic, hence it is advisable to rely on our innate instincts.
With slight adjustments to the placement of guidelines, you can create a multitude of facial variations.
Just by changing the guidelines, you can already make different kinds of faces.
Don't be afraid to mix it up! By playing around with different techniques like changing face proportions and using shape guidelines, you can bring a fresh and unique feel to your artwork. Open yourself up to new shapes, like rectangles, triangles, and circles, and have fun experimenting with them in your side profile drawings.
TIP: To add diversity to your art, consider exploring various shapes such as rectangles, triangles, and circles in your drawings.
IV. FINAL WORDS/ CONCLUSION
Drawing a side profile is all about embracing uniqueness and experimenting with your style - there's no right or wrong way to do it! But if you want to see real progress, you need to learn how to practice effectively. This saves you time and sometimes it can guarantees better results.
You should study many artists works, to see how do make it. When studying professional artwork, don't just trace it - take the time to break it down into its fundamental components. This will help you identify the big and small shapes that make up its essence.
So keep honing your skills and perfecting your craft. I hope this guide has given you some helpful tips for starting your journey to creating amazing side profiles. Remember, have fun with it and don't be afraid to try new things! 😽
TIP: Don’t be afraid to use references, use a lot of them.
Users who liked this post


Comment