
Intro
Hi everyone,
My name is Daniel but am common known on all social media by my art name (Ado_draw), to those who are new to using CLIP STUDIO PAINT (CSP) softwares, hardwares and are also using CSP tip site for their first time I bid you all welcome to an article with me, taking you on a journey to understanding how to use CLIP STUDIO PAINT 3d figure models, and today's course is titled:
Tips on how to 3d figure pose to create fun characters as newbies.
🔸🔸🔸🍿🍿🍿
Today's tutorial article is going to be of help to both the new users (newbies) know the names and functionality of most of the CSP 3d figure features and it will also server as a method of welcoming them to hole new and easy world of digital art, Meanwhile to the old users, it will server as an eyes open to the hole new and easy possibilities of CSP 3d figure features.
Now as newbies, new to drawing digitally, we most often times struggle or fined it challenging to draw out some complicated characters structures like say human, animals, hybrid creatures or even object for example.
🔸🔸🔸
With this thought of artists struggles in mind did CSP created the 3d figure features, to help both new and old artist alike to easily structure their characters with the various desire poses in mind.
🔸🔸🔸
Now, with the above explanation out of the way, we now know why the 3d figure was created but questions now lays on
“ How do we use it to make our work as digital artist easier? ”.
🔸🔸🔸
And with that question in mind, our emphasis should now be on the "How" in the questions thought of as noted above.
🔸🔸🔸
Now to properly or effectively utilize the CSP 3d figure to it full potential, this 3 simple concepts most be meet and they are as follows;
• Knowing how the CSP 3d figure works
• Knowing how to apply or add other figures to an already existing CSP 3d figure
• Knowing how to apply or change the pose of the CSP 3d figure
Concept number 1: How to get the CSP 3d model figures
3D reference models a set of three dimensional figures (this is why it is called a 3D model) which give the artist a full reference detail on the structure and pose of this subject, acting as a guide.
🔸🔸🔸
Note: that today's tutorial will be carried out on a tablet device but can be replicated on both the smartphone and system devices.
With the 3d reference model, we don't need worry about anymore cause the 3D reference models get the right pose and the right proportions every time with Clip Studio Paint's 3D reference models, head model, photo scanner, and hand scanner.
🔸🔸🔸
As a beginner, locating the place where the 3d models are tend to come as a hassle but we can easily get them in the settings called [Material], which can be located by doing the following:
Open the canvas, click on the [window] indicated (1) at the top of the canvas, a mini dashboard will be displayed, below it when we scroll down we will locate the [Material] option indicated (2), click on and we will see another mini dashboard with the recent runnings operation, we can then select any selection option indicated (3),
🔸🔸🔸
and the [material] dashboard will appear which by default should be by the left on the [palette bar] (indicated 1),
In the mini dashboard are the following selection options (- All materials - color pattern - monochromatic - manga - image materials - 3D - Download and favorite), but for now we will just be making use of the 3D option which when selected another mini dashboard will appear with the various sets of 3d figure which are as follows;
- A 3D character head only - shape objects - full character body - hand and some much more.
🔸🔸🔸
When ever CLIP STUDIO PAINT [CSP] is set up even for the first time, their are several default 3d figure which come with it like for example the Cube, sphere, cylinder, pyramid, character figures and so many others,
Now with the 3D reference models located, we can now drag the one we one onto the canvas importing it onto the canvas, we can also replicate this process for more materials (such as A. Cube, B. Pyramid, C. Prism and lastly D. Sphere) which we can then use them as guides for our drawings.
🔸🔸🔸
That's how to locate and import the 3D reference models known.
Moving on,
Concept number 2: How the CSP 3d figure works
Now I note this aspect is based off on two part the formality and functionality.:
◾ Notation things on 3d model
3D characters figure are a suit of dummies or doll figure, they can not move unless move or adjusted. They tend to come in different varieties such as some may come a their pose giving which can also be adjusted or some may come without pose at all.
🔸🔸🔸
Also, CLIP STUDIO PAINT (CSP) 3d model figure tend to come in different kinds like I did say before in the above mentioned, some as human dummies, animal dummies, objects or even hybrid creatures dummies and so much more.
🔸🔸🔸
And this 3d model figures are of different versions, which are as listed below.
• 3d drawing figure (for male and female)
🔸🔸🔸
Point🔹drag the 3D model from the [materials] dashboard onto the canvas, of which it will be imported onto the canvas.
• 3d drawing figure- very. 2 (for male and female)
🔸🔸🔸
If you want to effectively detail all the notable features on the character use want to draw or you want it to look very realistic then [3d drawing figure] which is the older version is the right choice, but say you want you character to look more like cartoon or an anime character with less detailed features then [3d drawing figure- very. 2] which is the newer version is the one for you. Both having their unique ways of amplifying your character drawing.
🔸🔸🔸
Point🔹the following which makes the 3d drawing figure more realistic than it's later due to their more detailed like (eyes, ears, mouth, ribs and also the body mass) then to be inform of a human like.
And say maybe you want to create a school like character for either an illustration or webtoon, CSP have a school boy and girl 3D model with already created school uniform, the 3d model is known as [School boy or girl ver 3].
🔸🔸🔸
With all the formality out of the way let move on to how the different part of the 3d figure works.
◾3d model Basic presets responsible for movements
On this Note, I like to pointing out that I will be use the human 3d figure to explain the entire 3d figure posing process but add others as I go along.
This aspect involves the ways which the various 3d figure features and positioning uses in adjusting the character giving it a different sets of poses. Now firstly, I would like us to first look at how the various camera positionings work,
When ever we use the [Move] sub tool
🔸🔸🔸
To select or click on the 3d model figure some features appear, those various features are know as the ANIMATION POINT and PRESET FEATURES.
🔸🔸🔸
• The Camera Movement Presets
The camera movement presets as the name implies allows users easy adjust the camera positioning with ease. When any of the camera movement manipulators icons is selected, the camera can only move in the administer or selected camera movement.
There are seven sets of camera movement which can be located at the top of any selected 3d model,
🔸🔸🔸
Which means it only appears whenever the 3d model is selected.
And when ever the 3d model is selected, the color turn from light blue to dark blue.
🔸🔸🔸
1. Rotate camera icon
When enable, the 3d model can only be Rotated along the 3D layer camera vertically and horizontally.
🔸🔸🔸
2. Translate camera icon
When enable, the 3d model can only moves on the 3D layer with camera moving up and down, and left and right in a translating format.
🔸🔸🔸
3. Move camera back and forth icon
When enable, it makes camera move back and forward.
🔸🔸🔸
4. Move on plane icon
When enable, it makes the 3D models and their parts move on the invisible plane facing the camera.
🔸🔸🔸
5. Camera view rotation icon
When enable, the 3D models and their parts can be easily rotated around the X, Y and Z axis on a plane facing the camera.
🔸🔸🔸
6. Plane rotation icon
When enable, the 3D models and their parts can be rotated to either the left or right side ways on a plane facing the camera.
🔸🔸🔸
7. Rotate in 3D space icon
When enable, the 3D materials and their parts can be rotated horizontally in the 3D space.
🔸🔸🔸
8. Snap and move icon
When enable, the 3D models and their parts can be easily moved while snapping to the base of the 3D space (floor) and nearby 3D models.
🔸🔸🔸
• The Joints Movement Manipulators
When ever we select or click on any part of the 3d model, there are some round colored lines which tend to appear in form of a ring, they are called the (Root Manipulators).
The Root manipulators are of three sets of color lines, which are used for adjusting the 3D model;
• The X axis manipulation line which is in red color.
• The Y axis manipulation line which is in green color.
• The Z axis manipulation line which is in blue color.
• The red line which is the X-axis manipulator line allows user to be able to turns the 3d model to be adjusted according to the align direction of the red ring like line.
In a similar way,
• The green line which is the X-axis manipulator line which allow the 3d model to be adjusted according to the align direction of the green ring like line.
Same thus,
•The blue line which is the X-axis manipulator line which allow the 3d model to be adjusted according to the align direction of the blue ring like line as shown in the below image.
🔸🔸🔸
When we click on the 3d figure the root manipulator rings (which is in red, blue and green colors) will appear at the particular point selected with a round thicker circle on top of the rings, which is used to increase or reduce the size of the 3d model.
🔸🔸🔸
On that note,
They are two different aspects or mode you may call it to which the CSP 3d figure can be adjusted.
The first is the fixed joints and the second is the releasing joints.
▪️◾◼️ For the Fixed Joints,
All the part the body part which can either move axially or can rotationally become linked to one another given form to 7 sets of fixed joint points (which are the top of the head, neck, wrist, both hands and both legs) points of adjustment,
🔸🔸🔸
Whereby, when one of the points is moved the rest linked points in a steady flowing format follow along making it look like the adjusted points is pulling the entire body of the 3d figure. Now this various fixed joint points can be adjusted as due in the following process;
1. For the head adjustment point,
When adjusted, it causes the head to turns it's focus to where the point is place as shown below with the point place on the right hand side and the head turning there as well .
🔸🔸🔸
▪️◾ Tip ◾▪️
Adjusting the head root manipulators line of movement, we can see that it has all three colored rings, so it can freely move to any position except backward imitating what the real human head can do and cannot do.
2. For the neck adjustment point,
This point allows users adjust the 3D model from the neck with the other part of the figure slight tilting along as demonstrate when I move the neck to the left side.
🔸🔸🔸
▪️◾ Tip ◾▪️
Adjusting the Neck root manipulators line of movement, we can also see three colored or dimension lines, which means that the neck joint points can be rotated, bend and tilted as well.
3. For the waist adjustment point,
Allows user twist and turn the hip joint with the rest of the other parts of the figure following along as demonstrate below with the point moved towards the side, down and up.
🔸🔸🔸
▪️◾ Tip ◾▪️
Adjusting the Waist root manipulators line of movement, we can also see three colored or dimension lines, which as well means that the waist adjustment joint points can be adjusted by either rotated, bend and tilted as well.
4. For the both hands adjustment point,
This point allows the user easily adjust the both hands of the figure to the pose he/her wants as demonstrate below with the move from the bottom upward.
🔸🔸🔸
▪️◾ Tip ◾▪️
Adjusting the both Hands root manipulators line of movement, we can also see three colored or dimension lines, which means it can be rotated, bend and tilted but that's not all, for if we look more closely we can also locate another added red colored root manipulator line at the ankle point.
This second root manipulator line which is red in color allows user to rotate the hand from ankle point.
And lastly,
5. For the both legs as well.
Lastly, This point allows the user easily adjust the both legs of the figure to the pose he/her wants as demonstrate below with the move from the bottom upward.
🔸🔸🔸
▪️◾ Tip ◾▪️
Adjusting the both legs root manipulators line of movement, we can also see three colored or dimension lines, which means it can be rotated, bend and tilted but that's not all; for if we look more closely, we can also locate another added colored root manipulator line although the time the added color is green at the knee cap joint.
This second root manipulator line which is green in color allows user to rotate the hand from knee cap joint.
Now, using the various points like that of the head, neck, both hands and both legs, I was able repose the 3D to form any dynamic or action pose such as the ballerina dancing poses for example.
🔸🔸🔸
▪️◾◼️ For the Releasing Joints,
It is an entirely different scenario, the various body parts moves independently and also adjusted independently according to what the are designed to represent,
Now, the releasing joints method of adjusting the 3d model has different parts which can be adjusted on like that of fixed joints which only have 7.
I do advise as beginners we should use the of fixed and only use that of releasing joints only when necessary.
But what we can take note of when we ever want to make use of the releasing joints method on the 3d model,
Some parts for the releasing joints of the 3d model tends to have different number of colors (such as 2 or 3) depend on whether the joint point select is capable of the rotation, bending or even tilting movements,
Like for those which can only bend and have only 1 manipulator such as the fingers and toes,
🔸🔸🔸
Or say for the ankles and knees can only be bent rotate and slightly bend (meaning the pose only 2 manipulator rings)
🔸 🔸🔸
And for some others are capable of rotating, bending and even tilting, there by having the 3 manipulator rings, such as the head, chest, shoulder, wrist and more.
🔸🔸🔸
With that said, we can now move to the next aspect.
Concept number 3: How to apply or add other figures to an already existing CSP 3d figure
CSP 3D model is one powerful tool that every day I seem to be discovering new features in it.
Now this aspect we have cover a little aspect of in terms of the various movements of the joint points and camera positioning.
On this particular part, we will solemnly be looking at the 3 main aspects to which we can given the 3d figure a pose which are as follows;
• Download the different 3d figure pose from the CSP asset store
• Make use of posemanaiac
• Adjust the 3d figure yourself manually
1. Download the different 3d figure pose from the CSP asset store
This aspect we have cover a little also but let's go over it again. When a new canvas is created click on [Material]>[CSP logo],
🔸🔸🔸
>Click on the [search engine] at the top of the CSP assets store, and then type in what you want to download, which for this tutorial is [3d pumpkin]
🔸🔸🔸
> Click the icon of the set [3d pumpkin] of material you want to download,
it will tend take us to another page where we will then locate the download button, click on the [download] button and we will then be redirected to the CSP app, the 3d figure will then download,
🔸🔸🔸
And we can then make use of it.
🔸🔸🔸
2. Make use of posemanaiac
We are done [importing], click on the arrow pointing downward on the bar below the 3D model figure indicated [1], a new dashboard will appear with various options, select that of [3D pose (Posemaniacs)] indicated [2].
🔸🔸🔸
Note🔸 before we do the above mentioned, we need to turn on our data connection on.
With the 3d pose (Posemaniacs) Click on, we will be redirected to the posemaniacs site indicated [1], you can sign up to the site which I did indicated [2]; below the site page, we tend to see different styles of pose figures but the one I am looking for is a running pose figure, so I just clicked on the little arrow pointing downward by the right indicated [3].
🔸🔸🔸
A new dashboard will be displayed with different sets options for different sets of figure pose styles and looking down below is running pose option which I am looking for, I click on it,
🔸🔸🔸
And we will be taking to another dashboard with the running poses, I browse through them until I found the one that suit what I wanted, I then click on it which is for the female model.
🔸🔸🔸
And with all of that done onto the figure indicated [1], I can now send it to CLIP STUDIO PAINT by clicking on [open] indicated [2].
🔸🔸🔸
As a new user, you will see a pop-up stating [launch] button, click on clip studio paint icon, it will then automatically run the CSP app or software,
🔸🔸🔸
After the above is done, the pose of the 3D model figure in CLIP STUDIO PAINT will be adjusted to the one at [Posemaniacs].
🔸🔸🔸
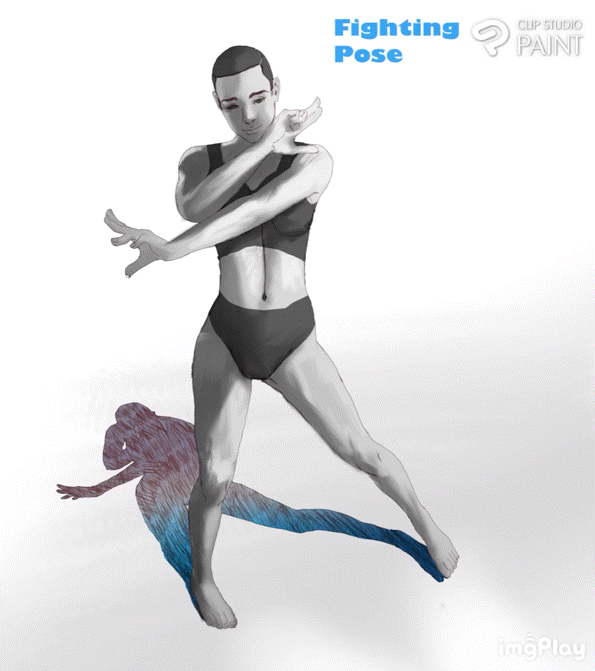
With the pose gotten through the use of the 3d model,
When I want to drawing the line art of the 3d model I first of all reduce the [Opacity] of the 3d model to 30% or less,
🔸🔸🔸
Then, enable the [Layer color] to change the color of the 3d model to a pale color (blue or any other).
🔸🔸🔸
So that when I draw on another layer above it, I can be able see my drawn lines there after, we can then use It as a guide to draw our character in a fighting pose.
🔸🔸🔸
3. Change the pose of an imported 3d model using another 3d model
3d model also another build in feature that allows users use the pose an already existing 3d model onto and import model,
They are some few methods to achieve the above mentioned, the first method is by selecting the [use 3d pose material] icon indicated (1) location on the lower bar at the bottom of the 3d model, a mini dashboard will appear, we can now either double tap the icon of the 3d model pose or click the Ok button indicated (2) after we have selected the pose we want.
🔸🔸🔸
And the pose will extract to the current 3d model already imported onto the canvas.
🔸🔸🔸
The second method is by opening the material dashboard and dragging the kind of 3d model we want from the collection onto the one on the canvas, the pose will then also by extracted onto the imported ed model on the canvas.
🔸🔸🔸
And say we want to change the hands gestures, we can also drag the hand gesture we want (like the symbol of peace) from the [Material] dashboard onto the 3d model on the canvas, it will then be extracted onto the both hands of the 3d model,
🔸🔸🔸
But if we want it to just affect one hand only, we can first select the hand we want it to affect an then drag the hand pose from the [Material] dashboard onto the 3d model, the hand pose will only affect the hand selected.
🔸🔸🔸
As we can see in the below image, the hand pose only affect only the selected hand.
🔸🔸🔸
4. Adjust the 3d figure yourself manually by use of images
t's say as a Beginners using CSP for his/her first time, we want to draw a our character using the 3d model and we don't want to go through the hassle of browsing and browsing searching through the asset store and posemanaiac for the pose we want.
We can just snap ourself and just scan the the pose to our import 3d model figure and to so,
We start by first, importing the 3d model, click on the arrow pointing downward on the bar below the 3D model figure indicated [1], a new dashboard will appear with various options, but the following four options:
~Pose scanner (photo library)
~Pose scanner (image)
~pose scanner (camera)
~Hand scanner (camera)
Which are indicated [2].
🔸🔸🔸
• Pose scanner (photo library)
Selecting this particular style of pose scanning, allows users to into their photo library and extract the kind of pose the want onto the 3d model.
🔸🔸🔸
• Pose scanner (image)
Selecting this particular style of pose scanning, allows users to go into their stored image in the CSP app or software dashboard and extract a pose the want onto the 3d model.
🔸🔸🔸
• Pose scanner (camera)
Selecting this particular style of pose scanning, allows users take photo of the pose they want on the spot, and extracting the pose onto the 3d model.
🔸🔸🔸
• Hand scanner (camera)
Selecting this particular style of pose scanning, allows users take photo of their hands on the spot, and extracting that pose onto the 3d model.
🔸🔸🔸
With the style of the fingers set, we can adjust the hand to suit the pose as done below.
🔸🔸🔸
Next,
Concept number 4: How to adjust 3d model using it settings to giving my image a fun like appearance
As have point out before, 3D model are useful tool that help us easily draw out our objects and characters are like with less stress, Also it helps give our objects and characters the accurate positioning, details and proportion.
Now say for example as beginner, we want to dive into illustration making or concept character making... or maybe you want to dive into comic or webcomic making but find it difficult draw characters with a good body proportion and a nice perspective, 3d model can easily make your work faster, easier and fun.
We have seen how the part presets and manipulators can be used to adjust the 3d models, now let's look at how the few notable 3d model settings can better add dynamism and nice expression to the appearance of our characters.
1. Creating Concept character using 3d model,
As a beginner, say you want to create characters with different faces and expression but you find it challenging to create out of the blue, you can use some CSP 3d model creative features to help you get started:
🔸🔸🔸
🔷 3D Head model settings
This model involves the head body part of the 3d model.
▪️◾[Head model settings]
Like for starter using the 3d basic head model, we can create different styles of face by using the [Head model] in the [Sub tool detail] settings which we will see in the dashboard 9 sets of the facial adjustment. Using this set of settings we can get infinite number of facial expressions.
🔸🔸🔸
Whereas, if you want the character to have a kind of [cartoon - (soft)] facial appearance, then select number 1 and adjust the percentage which is from (0 to 100%) till the facial appear is suited to what you want,
🔸🔸🔸
Or say you want the character face to have a kind of [amine - (soft)] appearance, then select number 2 and adjust the percentage which is from (0 to 100%) till the facial appear is suited to do just that,
🔸🔸🔸
Or maybe you want the character face to have a kind of [realistic - (soft)] facial appearance, then select number 3 and adjust the percentage which is from (0 to 100%) till the facial appear is suited to do just that,
🔸🔸🔸
Or maybe you want the character face to have a kind of [chibi - (soft)] facial appearance, then select number 4 and adjust the percentage which is from (0 to 100%) till the facial appear is suited to do just that,
🔸🔸🔸
▪️◾Tip◾▪️
This aspect is often used in movies, comic and webtoon creation to make mature characters look like child in a section of a scene but with a big head and a fun expression on the chibi character faces.
Selecting that of Number 5 reset the facial appearance of the 3d model back to it's original facial appearance.
🔸🔸🔸
Or maybe you want the character face to have a kind of [skeleton] facial appearance, then select number 6 and adjust the percentage which is from (0 to 100%) till the facial appear is suited to do just that,
🔸🔸🔸
▪️◾Tip◾▪️
This aspect is often used in creating sickly and unhealthy characters.
Or maybe you want the character face to have a kind of [cartoon - (sharp)] facial appearance, then select number 7 and adjust the percentage which is from (0 to 100%) till the facial appear is suited to do just that,
🔸🔸🔸
Or maybe you want the character face to have a kind of [anime - (sharp)] facial appearance, then select number 8 and adjust the percentage which is from (0 to 100%) till the facial appear is suited to do just that,
🔸🔸🔸
And lastly say maybe you want the character face to have a kind of [realistic - (sharp)] facial appearance, then select number 9 and adjust the percentage which is from (0 to 100%) till the facial appear is suited to do just that,
🔸🔸🔸
Now that's not all,
We can also make adjustments to the different facial features to give our character a hole new looks use the settings called FACIAL FEATURES.
▪️◾[Facial features settings]
Located in the [Sub tool detail] settings>[Facial features], in this setting the face is sub divided into Sections like the (head, brows, eyes, nose, ears, mouth and neck sections).
We can adjust the various part of the Facial features to give our character their own unique expression using the different sections of the [Facial features], take for example:
🔸🔸🔸
Pointer🔹This particular settings is must useful when we want to design our original characters unique emotional expression.
Now moving on,
🔷 3D Drawing figure model settings
This model involves the entire body part of the 3d model.
▪️◾[3d Drawing figure]
Located in [Sub tool detail] settings indicated (1)>[3d drawing figure] indicated [2],
In the dashboard will see a little plus sign indicated (3),
🔸🔸🔸
Note🔹Full body settings has the following functions;
In the square side, the top is the [Muscular body section], the bottom is the [Slender body section], the left is the [Skeleton body section] and the right is the [Fat body section].
On top is a [red square], clicking on it will reset very adjust to it's default setting, and the [blue square] at the bottom are the vertical and horizontal adjustment settings use for adjusting the plus sign.
Now, the various numbers below indicates the body parts as follows:
1. Head, 6. Waist
2. Neck, 7. Palms
3. Chest, 8. Legs
4. Torso, 9. Foot
5. Hands, 10. The entire body
🔸🔸🔸
So as when we can use the plus sign to decrease and increase the size of the entire and individual parts of the 3d model figure.
🔸🔸🔸
We can this setting to change the body appearance of our characters by giving each of them their individual but unique body proportions.
🔸🔸🔸😳
▪️◾[Light source settings]
Located in [Sub tool detail] settings>[Light source] indicated [1],
This settings allows users change the direction of the light source on the 3d basic head model using the sphere icon like take for example the light is coming from the bottom right corner onto the 3d model but if we turn the sphere left, the light will then reflect the 3d model from the bottom right corner as shown below.
🔸🔸🔸
Concept number 5: How do 3D models help in improving me as an artist.
At this point in time, I believe we by now have fully grasp what CSP 3d figure is all about and the various ways to which we can use it,
Clip studio paint 3D model features comes as a very useful tool to artist all over the world and most importantly, it is handy tool which do help beginners start off their digital artist with a good foundation on dynamic poses, give a good arrangements of composition ability and final it helps build a good foundation for Proportionality.
Now, this various above are know ELEMENTS of art, and understanding of this various elements help make your art interesting to viewers and it gives you a sound foundation, making you fall in love with art over and over again in every illustration. Now how does CSP 3d model help build (as a beginner) or work any issues (as a old user) I may have in implementing the various Elements.
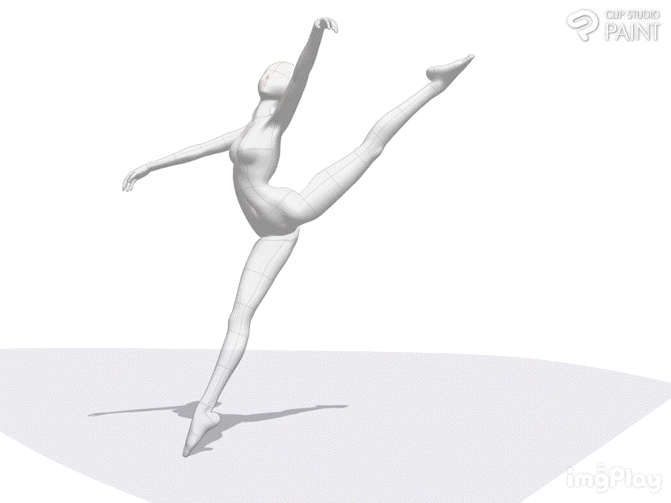
1. Dynamism
As we artist do know, dynamism refers to the sense of energy, motion, and change that your character conveys, artist ability to freely draw out your character with a good dynamic posture gives views the sense of realism and the regular used of the 3d model help artists in the developing of their dynamic abilities. Furthermore, it also gives artist limitless availability dynamic pose like take for example the below pose of the female dancing character.
🔸🔸🔸
And also base on the 3 dimensionality of the model figure, we can easily view our selected or created pose from any any of our choose.
🔸🔸🔸
This particular element explanation is bulk which I can't go into, but below a some articles that can help out, I advice further studies for better understanding of dynamism.
🔗 🔗 🔗
Now another aspect which then to pose as an issue to young artists is know as alignment objects which then takes us to the next aspect,
3. Proportionality
referring to the relationship between the different sized components within one whole composition. Proportionality can be used to make a composition appear more realistic or more stylized or even change the age representation depending on the type of proportion used, say for example a normal 3D model figure size is reduce it will change to a child character.
🔸🔸🔸
▪️◾Tips◾▪️
When you are use the 3d model to draw your characters Avoid drawing wobbly or rough lines, or even drawing outside the outline of the 3d model as shown in the left side image below,
But instead drawing your lines with a steady stroke and making use of the outline of the 3d model only deviate when very necessary like when drawing out the cloths as shown in the Right side image below.
🔸🔸🔸
As you draw your character body and cloths, use the proportional lines on the 3D model as a guide to get a good body proportion of your character as shown below.
🔸🔸🔸
Now we further discuss how the chibi 3d model figure tend to add to our artwork.
Also I advise further studies on this aspect as well.
🔗 🔗 🔗
On to the next aspect.
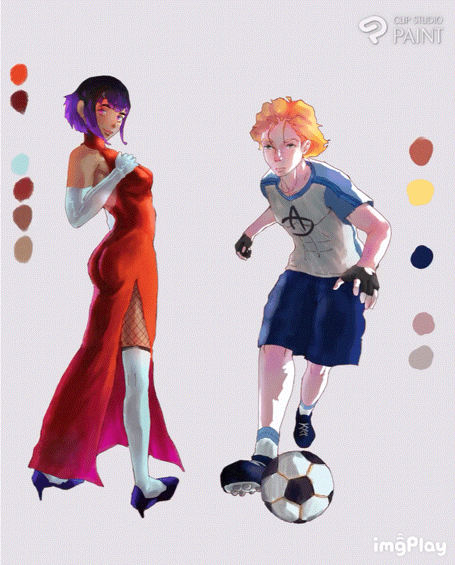
4. Easily creating of illustration
Making of illustration has never been more easier, as we have already seen in the previous concept on the various ways to which we can create diversity face of different age groups for our original characters. Now, we will be making use of one of the female and male face to create an illustration.
🔸🔸🔸
To start with, we first import the two sets of 3d model, give them the various poses using the concept previous mentioned, also adjusting the perspective and manga settings to give the 3d figure a kind of magnifying appearance,
🔸🔸🔸
Then, we reduce the Opacity of the 3d model also change the color blue and use the 3d model as guide to draw out our [Original character] with the administer poses,
🔸🔸🔸
Add our details like the hairs, cloths and the base colors, and that's all the is for the illustration, below is the finish work.
🔸🔸🔸
5. Making webtoon creating more fast
Using 3d model tends to make webtoon creation more fast,
Say we have a first scene where a girl is toward one of her friend which is a boy and the second scene the boy turn his face slightly backward, then third scene she then hug him from behind. We can you the 3d leg, head and entire body model to draw out the three different scenes.
Firstly, we properly place the different 3d model in the designated panels and adjust the manipulators or use any of the above mentioned process to give the 3d models their poses,
🔸🔸🔸
Afterwards, we reduce the [Opacity] indicated (2), next go to the [Layer] indicated [3] and enable the [Layer color] indicated [4] to blue so that when we are drawing we can easily understand and know where to please our lines without getting confused due to the much saturation.
Next, we can then draw our characters using the 3d models as guides for the poses,
🔸🔸🔸
And with above done, we can add in our base colors and we are done with the webtoon.
🔸🔸🔸
Outro
Thanks everyone for going through this tutorial article, I just hope it has been helpful to you in more ways than one, I hope to see you all at the next one thanks again and byeee!!!
Users who liked this post


Comment