Mini guide to oily digital art
Intro
Digital oil painting is fun! Whether you want to revive the old oil paintings in a modern way, or you just want to experience a different style of art.
But trying to do it might not end up with the desired classical look.Let's not worry about that, because in this article I'm going to explain how to achieve the traditional look of oil painting with some cool tricks, mainly using ClipStudio Paint!
Note: This can work in other digital art programs like IbisPaint.
Texture
Adding textures is really important to make your artwork look realistic and give it a traditional look.
We're going to be using textures for:
Canvas.
Paintingbrush.
Canvas
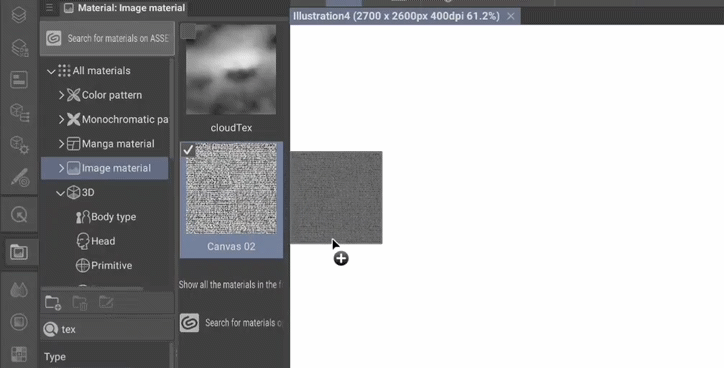
In order to make the paper look like a canvas, add a canvas texture under the paper layer, and change the blending mode of your paper layer to “overlay”
You can play around with the texture layer’s opacity and size, and the paper layer's color until you're satisfied.
In ClipStudio Paint, you can simply do that by going to the material icon, in image material, scroll down until you find a good texture and drag it to your canvas

Go back to the layer icon. In layer property, click the “Overlay texture” and “Layer color” icons to turn them on.
You can adjust the texture color and strength like shown below:
Brush
Brushes have a lot of settings that can be adjusted, but I'll only explain what we need here.
I'll be using CSP’s oil painting brush.
Texture
The brush I'm using has the same texture as my canvas by default. You can change the texture by pressing the used texture’s name. If you can't find the texture in the shown settings you can press the buttom icon to access to all the tool’s settings.
You can also change the texture's scale ratio to match your canvas by going to “texture” and adjust the bar under “scale ratio”
Thin paint
To add a thin layer of paint, lower the color stretch, and slightly increase the texture density
If you want to make it look a little dryer, increase the amount of paint and the density of paint.
- Thickpaint(colorblending)
To add a thicker paint layer with color mixing:
Decrease the amount of paint and the density of paint. Increase the color stretch settings, and decrease the texture density.
Check the example below:
You can play around with those settings until you're satisfied with the result.
Also, if you want to keep your settings as a new brush, go to sub tool and press the icon below to make a new brush out of the edited version of the original brush. (This won't be replacing the orginal brush, and resetting the original brush’s settings won't affect the new brush)
Blending tool
Blending tool can add a nice touch to your painting. It can also be used for mixing and blurring.
Increasing the brush density of the blending tool can increase its effect.
Here's an example of how the tools we mentioned can be used:
Color mixing
Since we mentioned blending and mixing before, let me show you a cool tool available in CSP
This is the color mixing tool. It allows you to pick more than one color and mix them together. This really helps giving a good graduation of colors when drawing and painting
The icons shown under the default colors below are: (left to right)
Color: you can adjust your chosen color there.
Clear: used to clear the color mixing canvas.
Undo & redo.
Blend & brush sizes.
Canvas Brush: Same subtool as canvas.
MixerBrush: default brush of color mixing tool.
Blend: tool for color blending.
Eyedropper: turning it on will let you use the color mixing tool for color picking only.
Outro
Now that we reached the end of this article, I hope this tutorial has added more fun to your art journey.
Thank you for taking the time to read through my article.
Happy painting〜


Commentaire