
𝙶𝚛𝚎𝚎𝚝𝚒𝚗𝚐𝚜, 𝚕𝚊𝚍𝚒𝚎𝚜 𝚊𝚗𝚍 𝚐𝚎𝚗𝚝𝚕𝚎𝚖𝚎𝚗.
𝙵𝚘𝚛 𝚝𝚑𝚒𝚜 𝚖𝚘𝚗𝚝𝚑, 𝙸 𝚝𝚑𝚘𝚞𝚐𝚑𝚝 𝚝𝚑𝚊𝚝 𝙸'𝚍 𝚍𝚘 𝚊 𝚙𝚛𝚎𝚜𝚎𝚗𝚝𝚊𝚝𝚒𝚘𝚗 𝚘𝚛 𝚊 𝚙𝚒𝚎𝚌𝚎 𝚘𝚏 𝚜𝚙𝚎𝚌𝚞𝚕𝚊𝚝𝚒𝚟𝚎 𝚒𝚗𝚍𝚞𝚜𝚝𝚛𝚒𝚊𝚕 𝚍𝚎𝚜𝚒𝚐𝚗 - 𝚌𝚘𝚖𝚋𝚒𝚗𝚒𝚗𝚐 𝚊 𝚏𝚞𝚝𝚞𝚛𝚒𝚜𝚝𝚒𝚌 𝚊𝚞𝚝𝚘𝚖𝚊𝚝𝚘𝚗 𝚖𝚊𝚌𝚑𝚒𝚗𝚎 𝚠𝚒𝚝𝚑 𝚜𝚎𝚕𝚎𝚌𝚝𝚒𝚘𝚗 𝚘𝚏 𝚜𝚘𝚖𝚎𝚝𝚑𝚒𝚗𝚐 𝚎𝚡𝚝𝚛𝚊𝚘𝚛𝚍𝚒𝚗𝚊𝚛𝚢 𝚏𝚛𝚘𝚖 𝚝𝚑𝚎 𝚗𝚊𝚝𝚞𝚛𝚎. 𝙸 𝚑𝚘𝚙𝚎 𝚝𝚑𝚊𝚝 𝚜𝚘𝚞𝚗𝚍𝚜 𝚒𝚗𝚝𝚛𝚒𝚐𝚞𝚒𝚗𝚐. 𝚂𝚘, 𝚜𝚑𝚊𝚕𝚕 𝚠𝚎𝚎 𝚜𝚝𝚊𝚛𝚝 𝚠𝚒𝚝𝚑 𝚝𝚑𝚎 𝚋𝚛𝚒𝚎𝚏?
𝚂𝚒𝚗𝚌𝚎 𝙸'𝚖 𝚏𝚊𝚜𝚌𝚒𝚗𝚊𝚝𝚎𝚍 𝚋𝚢 𝚛𝚎𝚙𝚝𝚒𝚕𝚎 𝚋𝚘𝚍𝚢 𝚌𝚘𝚖𝚙𝚘𝚜𝚒𝚝𝚒𝚘𝚗; 𝚑𝚘𝚗𝚎𝚜𝚝𝚕𝚢 𝚊𝚝 𝚏𝚒𝚛𝚜𝚝 𝙸'𝚖 𝚐𝚘𝚒𝚗𝚐 𝚝𝚘 𝚍𝚎𝚜𝚒𝚐𝚗 𝚊 𝚜𝚙𝚊𝚌𝚎𝚌𝚛𝚊𝚏𝚝 - 𝚊 𝚖𝚘𝚝𝚑𝚎𝚛𝚜𝚑𝚒𝚙; 𝚋𝚞𝚝 𝚌𝚘𝚗𝚜𝚒𝚍𝚎𝚛𝚒𝚗𝚐 𝚝𝚑𝚊𝚝 𝚜𝚘𝚖𝚎𝚘𝚗𝚎 𝚊𝚕𝚛𝚎𝚊𝚍𝚢 𝚍𝚎𝚖𝚘𝚗𝚜𝚝𝚛𝚊𝚝𝚎 𝚑𝚒𝚜/𝚑𝚎𝚛 𝚜𝚑𝚒𝚙 𝚍𝚎𝚜𝚒𝚐𝚗 𝚊𝚑𝚎𝚊𝚍 𝚘𝚏 𝚖𝚒𝚗𝚎; 𝙸 𝚝𝚛𝚢 𝚝𝚘 𝚜𝚠𝚒𝚝𝚌𝚑 𝚖𝚢 𝚒𝚗𝚒𝚝𝚒𝚊𝚕 𝚒𝚍𝚎𝚊 𝚝𝚘 𝚊 𝚐𝚛𝚘𝚞𝚗𝚍 𝚖𝚊𝚌𝚑𝚒𝚗𝚎 𝚋𝚊𝚜𝚎𝚍 𝚘𝚗 𝚊 𝚛𝚎𝚙𝚝𝚒𝚕𝚎 𝚏𝚘𝚛𝚖 𝚊𝚗𝚍 𝚊𝚋𝚒𝚕𝚒𝚝𝚒𝚎𝚜.
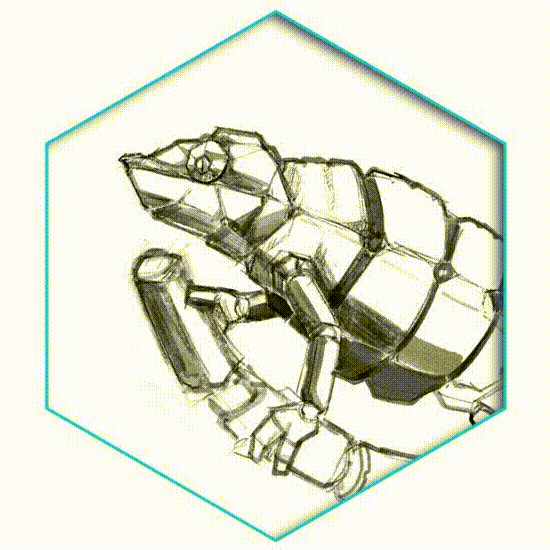
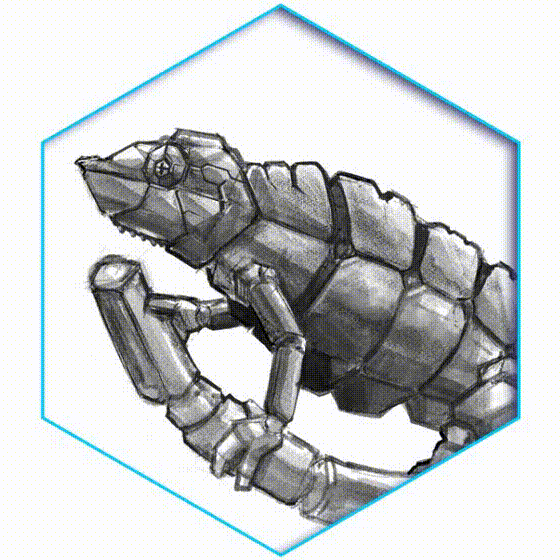
𝙰 𝙲𝚑𝚊𝚖𝚎𝚕𝚎𝚘𝚗 𝚒𝚗𝚜𝚙𝚒𝚛𝚎𝚍 𝙼𝚎𝚌𝚑𝚊 𝚑𝚊𝚜 𝚋𝚎𝚎𝚗 𝚌𝚘𝚗𝚜𝚝𝚛𝚞𝚌𝚝𝚎𝚍. 𝙰𝚗𝚍 𝙸 𝚌𝚊𝚕𝚕𝚎𝚍 𝚒𝚝:
𝐌𝐞𝐜𝐡𝐚𝐦𝐞𝐥𝐞𝐨𝐧 𝐂𝐒-𝐏𝟎𝟕
𝙲𝚊𝚖𝚘𝚞𝚏𝚕𝚊𝚐𝚎 𝚂𝚝𝚎𝚊𝚕𝚝𝚑 - 𝙿𝚛𝚎𝚍𝚊𝚝𝚘𝚛 🄋➆
〘 1 〙Inspiration and Concept
To help me draw reptile and machinery, I need to find some reference imagery. A quick hunt for my personal library of books; I've collected some useful images. Whether it's about reptiles (chameleon), robotics, drones, everything that I need to absorb and assemble into an artwork.
/// 𝚋𝚎𝚌𝚊𝚞𝚜𝚎 𝚘𝚏 𝚌𝚘𝚗𝚏𝚒𝚍𝚎𝚗𝚝𝚒𝚊𝚕 𝚖𝚊𝚝𝚎𝚛𝚒𝚊𝚕𝚜 𝚊𝚗𝚍 𝚖𝚒𝚐𝚑𝚝 𝚊𝚐𝚊𝚒𝚗𝚜𝚝 𝙲𝚕𝚒𝚙 𝚂𝚝𝚞𝚍𝚒𝚘 𝙿𝚊𝚒𝚗𝚝 𝚙𝚘𝚕𝚒𝚌𝚢, 𝚠𝚒𝚝𝚑 𝚜𝚒𝚗𝚌𝚎𝚛𝚎 𝚊𝚙𝚘𝚕𝚘𝚐𝚢, 𝙸 𝚊𝚖 𝚗𝚘𝚝 𝚊𝚕𝚕𝚘𝚠𝚎𝚍 𝚝𝚘 𝚜𝚑𝚘𝚠 𝚢𝚘𝚞 𝚝𝚑𝚘𝚜𝚎 𝚛𝚎𝚏𝚎𝚛𝚎𝚗𝚌𝚎𝚜 𝚘𝚏 𝚖𝚒𝚗𝚎_
But you could always have your reference starting points from search engines. Google and find it on Pinterest; search it on Instagram, Pixiv, CGSociety; anything else if necessary.
Then...
I create my canvas with:
Width: 3000
Height: 1500
Resolution: 300
I try to make it simple because the result obviously will be a horizontal concept art, focused on rendering cybernatic, machine-like kind-of imagery.
〘 2 〙Rough Sketch Phase
Using collage of images as my inspiration, I called it 'brainstorm-troopering'; I presented my unit plan, explained that in my school as 𝚅𝚒𝚜𝚞𝚊𝚕 𝙰𝚛𝚝 𝚃𝚎𝚊𝚌𝚑𝚎𝚛 collaboration with my International students; asking their opinions while sharing mine to create the flow of design thinking process.
/// 𝚟𝚒𝚜𝚞𝚊𝚕 𝚊𝚛𝚝 𝚌𝚕𝚊𝚜𝚜 - 𝚌𝚛𝚎𝚊𝚝𝚒𝚗𝚐 𝚌𝚘𝚗𝚌𝚎𝚙𝚝 𝚊𝚛𝚝 𝚏𝚘𝚛 𝚖𝚎𝚌𝚑𝚊𝚗𝚒𝚌𝚊𝚕 𝚍𝚎𝚜𝚒𝚐𝚗_
We work out some simple thumbnail drawings on paper, based on our chameleon reference on projector. I want the war machine to be small and agile, like a real chameleon.
Based on my tutorial section above and what I taught in my class, I always mention about:
𝚈𝚘𝚞𝚛〚 𝙸𝚖𝚊𝚐𝚒𝚗𝚊𝚝𝚒𝚘𝚗 〛 + 𝚢𝚘𝚞𝚛〚 𝙲𝚘𝚗𝚌𝚎𝚙𝚝𝚞𝚊𝚕𝚒𝚣𝚊𝚝𝚒𝚘𝚗 〛=〚 𝚅𝚒𝚜𝚞𝚊𝚕𝚒𝚣𝚊𝚝𝚒𝚘𝚗 𝚘𝚏 𝚂𝚑𝚊𝚙𝚎𝚜 〛
So we start our visual approach using simple and basic shapes from our daily-life surroundings before going to the fantasy realm and beyond.
/// 𝚊𝚕𝚠𝚊𝚢𝚜 𝚋𝚊𝚌𝚔 𝚝𝚘 𝚋𝚊𝚜𝚒𝚌 𝚜𝚑𝚊𝚙𝚎𝚜: 𝚌𝚢𝚕𝚒𝚗𝚍𝚎𝚛, 𝚝𝚘𝚛𝚞𝚜, 𝚘𝚟𝚊𝚕
Using 〘 𝚁𝚎𝚊𝚕 𝙿𝚎𝚗𝚌𝚒𝚕 〙with Clip Studio Paint, I begin to put shapes of ovals, cylinders, to create the rough sketch phase.
〘 3 〙Refining Sketch
Once I'm happy with the overall layout in rough form, I go ahead and carefully draw up some sections and work out some shadows with〘 𝚁𝚎𝚊𝚕 𝙿𝚎𝚗𝚌𝚒𝚕 〙to visualize the body of a Mechanical things. Beautiful rendered images always come from blue-printed version of sketchy ideas.
On this stage, you only need two things to keep in mind:
/ 𝚜𝚎𝚙𝚊𝚛𝚊𝚝𝚒𝚗𝚐 𝚜𝚎𝚌𝚝𝚒𝚘𝚗𝚜 𝚘𝚏 𝚋𝚘𝚍𝚢
/ 𝚊𝚙𝚙𝚕𝚢𝚒𝚗𝚐 𝚜𝚑𝚊𝚍𝚘𝚠𝚜
⮤ With〘 𝚂𝚝𝚊𝚗𝚍𝚊𝚛𝚍 𝙲𝚘𝚕𝚘𝚛 𝚂𝚎𝚝 〙that I use most of the time while adding values, simply I start with dark grey to light grey, separating values as I go paint and render some detailed areas.
With only standard brush〘 𝙳𝚎𝚜𝚒𝚐𝚗 𝙿𝚎𝚗𝚌𝚒𝚕 〙to fill up the values of dark grey and light grey, there is no secret technique there because my painting process generally starts with dark to light then apply color later through brushes and another type of layer mode〘 𝙾𝚟𝚎𝚛𝚕𝚊𝚢 〙or blending modes.
🡣 Below is the refined sketch with values applied all over the Mechameleon, it's really useful to go back and forth from the references prior to attempting a concept art; they enable you to resolve the design simply, without worrying about wander too far with your imagination.
It has believable forms although it emerges from your imagination & fantasy.
⮦ 𝚟𝚊𝚕𝚞𝚎 𝚜𝚔𝚎𝚝𝚌𝚑 𝚝𝚘 𝚍𝚎𝚝𝚎𝚛𝚖𝚒𝚗𝚎 𝚝𝚑𝚎 𝚘𝚟𝚎𝚛𝚊𝚕𝚕 𝚜𝚑𝚊𝚍𝚘𝚠𝚜 𝚊𝚗𝚍 𝚑𝚒𝚐𝚑𝚕𝚒𝚐𝚑𝚝𝚜
〘 4 〙Blocking with Silhouettes
For this kind of painting, I like to work dark to light on the subject and retain plain, pale background.
But before doing that, usually I make a new layer and then use〘 𝙿𝚘𝚕𝚢𝚕𝚒𝚗𝚎 𝚂𝚎𝚕𝚎𝚌𝚝𝚒𝚘𝚗 〙to block and separate between Mechameleon and the cybernetic tree branch.
⮦ Next I fill it with dark grey and de-saturated green. As you can see from GIF below, it looks like a silhouette before I change it from normal to〘 𝙾𝚟𝚎𝚛𝚕𝚊𝚢 〙blending mode.
〘 5 〙Material Thinking
Now for the rendering of machine itself, what materials should we choose? Well it's an android type of machinery. It should reflects with some shiny parts like a metal or others with matte.
So I'm going to make it predominantly out of metal - and more specifically polished aluminum. This is mainly because I like that feel of old WWII bombers, Blackhawk or even most of the tanks material has interesting lighting properties that I can explore.
As ever, it's useful to have good reference, and as I'll reproducing the complex lighting relationships inherent to the subject it's essential here. I choose a few relevant pieces of photo reference from Google, then using these photos as an impromptu palette; I can select appropriate colors from them as I work my own artwork.
A brief word on photo reference; I don't restrict my search on the subject at hand; but think beyond it to subjects that may be unrelated in the wider world, but whose material properties are similar. For instance, a can of Coke and an F-16 fighter are largely made of the same material; aluminum or aluminium.
Many movie spaceship interiors and exteriors have that scratchy look and sometimes corroded metals. In this case, why not take a photo or look up to motor or car exhaust and imagine it into your creation? The results may surprise or horrify you; there's no guarantees when you put your wild imaginations on regular artwork into play.
〘 6 〙Texturing with Unconventional Way
Since this image is a design representation, I don't need to worry about the complexities of mood, character elements, action or background detailing. I'm just concerned with material, color, and light.
I have steps in 4 separated GIF images below, to show you (most of the time) I only depend on traditional way of texturing with brushes provided by Clip Studio Paint rather than having tons of textures to be applied like most of the artists either using multiply or overlay blending mode.
It is NOT about "right or wrong" method to achieve rust or corroded metals for our painting, but having too much choice of textures will limit myself to work efficient even faster.
🛸 Bottom line:
YOU DON'T NEED IMAGES FOR OVERLAYING TEXTURE (if you have no internet connection to find it online); you only need Clip Studio Paint default brushes & some tricks.
So... (ಠ‿ಠ) check this out 🡣

⬣〘 𝚁𝚎𝚊𝚕 𝙿𝚎𝚗𝚌𝚒𝚕 〙to block some of the shadows, the reason: it has details of texture that I need. So I don't bother to find another brushes or modify ones. Just using pressure while drawing and changing brush size to achieve different results.
⬣〘 𝙿𝚘𝚒𝚗𝚝𝚒𝚕𝚕𝚒𝚜𝚖 〙from〘 𝙾𝚒𝚕 𝚙𝚊𝚒𝚗𝚝 〙to emphasize and blending textures. The metal looks like rusted ones if you apply precise colors, playing with brush size will make the dynamic of rough metal details.

⬣ Detailing some blurred areas with〘 𝚁𝚎𝚊𝚕 𝙿𝚎𝚗𝚌𝚒𝚕 〙while mixing with〘 𝚁𝚞𝚗𝚗𝚒𝚗𝚐 𝚌𝚘𝚕𝚘𝚛 𝚘𝚗 𝚏𝚒𝚋𝚎𝚛 〙will also add some matte version of the metal.
⬣ Using〘 𝙵𝚒𝚗𝚐𝚎𝚛 𝚝𝚒𝚙 〙and blend it altogether will also had a feel of polished metal.
To achieve a good result, I just need to follow some simple rules. This shot is low lit, so a fairly uniform top-down lighting model works best. Surfaces facing up receive the most light from whatever lighting the machine. So these will appear brightest of their given local color (the color of the material under neutral light).
⬣ Vertical surfaces will give a medium tone, so it follows that downward facing surfaces should obviously be the darkest. But those areas are receiving bounce light from the cybernetic light source (blue pale) branch.
So the actual darkest area on a given convex surface is at the point which receives the least light from the main light source and the reflected light of cybernetic light combined, it's pretty simple method actually to paint convincing convex bodies.
〘 7 〙Brushed Metal + Highlights
In this step, I also need to show you how to render brushed metals for the Mechameleon body.
With unconventional method, I found that having an ability to know which unusual Sub Tool such as〘 𝙳𝚎𝚌𝚘𝚛𝚊𝚝𝚒𝚘𝚗 〙can also help me to discover the exact brushed metal effects. But be sure to change or modify its〘 𝙱𝚕𝚎𝚗𝚍𝚒𝚗𝚐 𝚖𝚘𝚍𝚎 〙from Normal to Overlay or Soft Light, depending on your need.
🡣
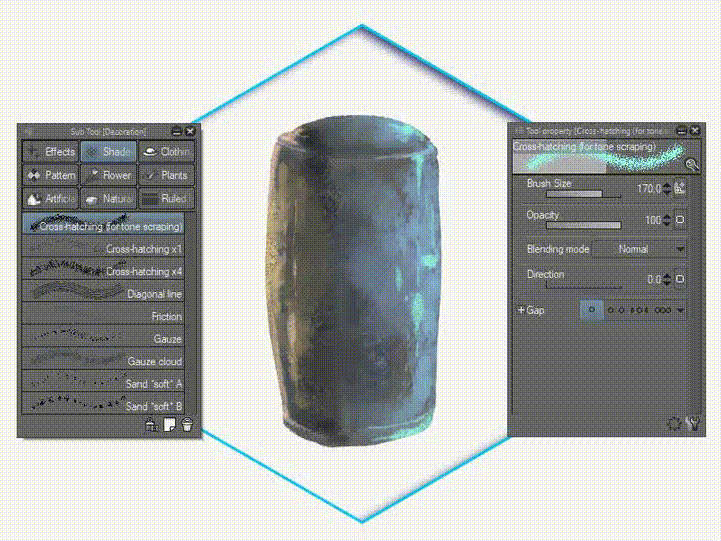
⬣ I'll never know before I tried it by myself that, by using〘 𝙲𝚛𝚘𝚜𝚜𝚑𝚊𝚝𝚌𝚑𝚒𝚗𝚐 𝚏𝚘𝚛 𝚝𝚘𝚗𝚎 𝚜𝚌𝚛𝚊𝚙𝚙𝚒𝚗𝚐 〙and its Blending mode; will allow me to achieve multitude of unique scratchy effects of metal. Especially with Multiply mode and darker tones, I use dark green to apply greenish look for Mechameleon body. Adding Soft light to get softer and richer color.
At this point I'm looking at the painting and thinking that the material specularity is off; it lacks the signature hard-edged shine of polished alumunium and that's easy to fix. I just harden up the lower edge of the highlighted area of the surface and we're there.
The basic rule is this - the more reflective the object, the harder the highlight. The less reflective the object, the softer the highlight.
〘 8 〙Cracks & Broken Parts
Playing with different of〘 𝙳𝚎𝚌𝚘𝚛𝚊𝚝𝚒𝚘𝚗 〙brushes will be useful to point out the crevices and holes or some dirty parts.
I used to paint over the whole area first with〘 𝙶𝚊𝚞𝚣𝚎 𝚌𝚕𝚘𝚞𝚍 〙and〘 Multiply 〙blending mode to define the darkest parts of the object and also more saturated for their given local color. We also need to consider shadows cast across the object and some cracks with broken parts.
⮦ Below is how I achieve cracks as I paint on some areas of Mechameleon body. You could do it with any other way, such as using Pen brush; but in my opinion; it's too sharp. I always try to add some darker area for the holes with〘 𝚁𝚎𝚊𝚕 𝙿𝚎𝚗𝚌𝚒𝚕 〙brush and add lighter parts as well with color picking near colors within the layer..

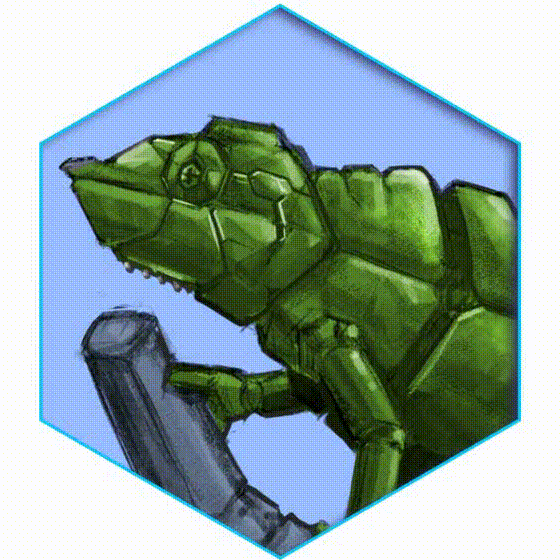
〘 9 〙Splashes of Colors
Okay, that's the base coat done; but it's looking a bit too uniform. All that unbroken, polished aluminium is starting to look bland; so I decide to give it a lick of paint - purplish and turquoise paint.
To do this without losing existing detail I use the brush blending mode to Overlay, then choose a purple and paint in the color scheme. I try a few options, erasing those that don't work, adjusting and refining the ones that do.
Painting in splash strokes and using the Opacity of current brush to tidy up later, give more brighter and saturated highlights on another layer in Normal mode.
〘 10 〙Decals & Details
Nearly there. Now I add final details such as bluish cybernetic L.E.D light, the separating colors for body, and overall background noise. Then I work around the whole piece with a Pencil brush and some nice bright turquoise. Adding highlights and rum lighting to soften the whole thing and make it feel less clinical. Play with this technique if you like; I do.
Here and there the bodywork of the machine is getting lost in the background. I make a copy of collapsed image and make it darker using Curves, then erase back to the original to leave a subtle vignette look to the image.
Finally I give the whole thing a blast red eyes and some strokes with the Pen to sharpen the edges of its mechanical eyes and cybernetic veins 🡣
⮤ You can see the better and clearer image if you download my last image (Left click then save image as). It's 3000 x 1500 with 300 dpi of image. Hi-resolution enough for your pleasure to see detailed rendering of Mechameleon CS-P07.
I apologize because I have got no time to explain in further details, because it's based on simple things like developing ideas, value sketches, and applying unusual tricks for texturing in just two days. Working as Visual Art Teacher for 12 classes and other department meetings and such exhausted me. But I'm quiet happy with I did for this tutorial so far.
Approximately done the Mechanical Design Tutorial for 18 hours of work (3 hours of image rendering till finish with more or less than 15 hours of explaining with video & typing).
That said, computer + technology + imagination by far the best artistic tools I've ever gotten my hands on of course with Clip Studio Paint; life of digital artists will always be much more easier!
Thank you very much for your attention! And hope it'll inspire you to do faster and efficient work as an artist, students or fellow aesthetic users.
この投稿を「いいね!」したユーザー


コメント