
Introduction
Hello everyone! I'm steel andIn this tutorial, I will explain to you how blur filters work, and how to play around with their setting. and teach you how to create a variety of effects like bloom, glow, outline, shadow and more.
Explain how Blur filters works and how to use them
Before we get into how to use these blur filters in our artwork. I think It's good that I gonna introduce each major filter to beginners, who just get starting or someone that doesn't similar to using these blur filters.
In this heading, I will show 3 blur filters that I consider to be used very useful filters. I will show you guys how to play with the basic settings, show you how they differ from each other, and show you a little bit of trick with how I use the selection tool and quick mask with these blur filters.
Let's begin!
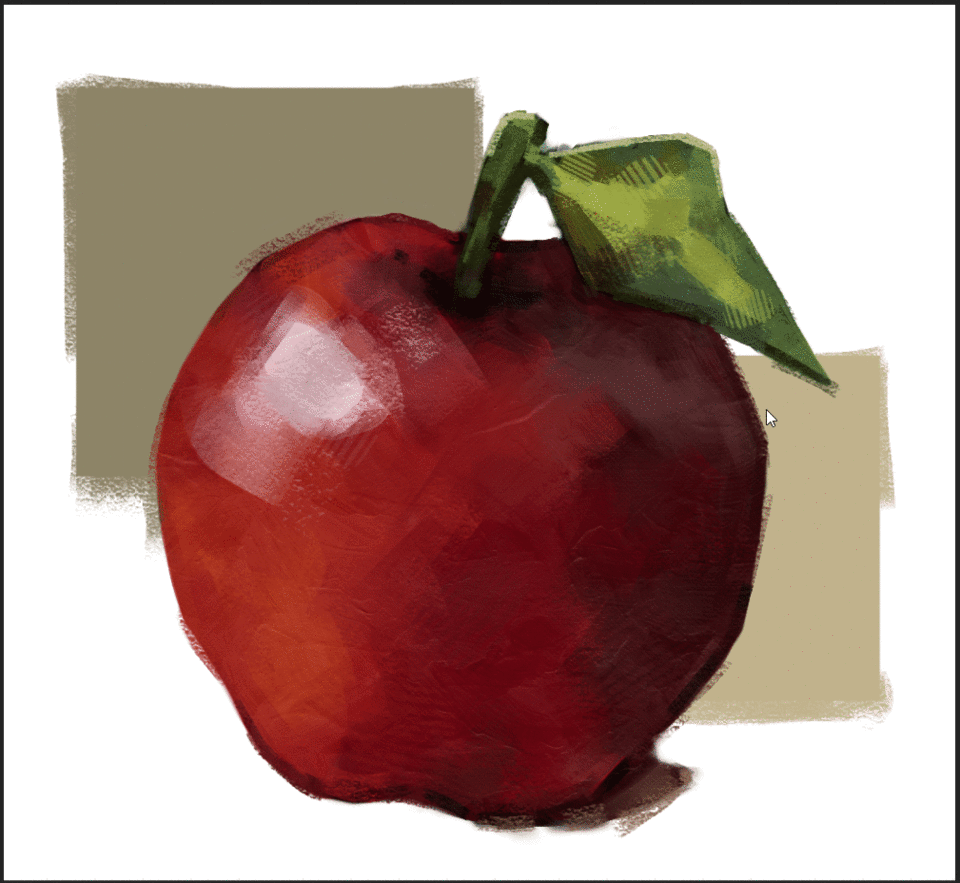
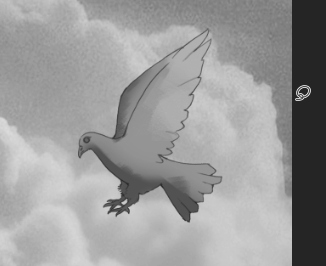
This is an apple that I've painted. I will use this apple as an example for each one of the blur filters to show what difference between them. yes, you will see this very same apple for the rest of this heading, I'm sorry that I only have one example for you for now. but don't worry one apple is more than just enough.
In this tutorial, I'm gonna talk about 3 filters that I think that we gonna use frequently in our work. but for now, I'm gonna explain what they can do, and try to teach you guys to understand the tools setting that clip studio paint provides us
1. [Gaussian Blur] is the main protagonist in this tutorial. they create a blurry hazy effect and most importantly, they are really really easy to use! and later we gonna use this blur filter a lot compared to other filters that we have right now
2. [Motion Blur] second blur filter that can really rely on. they blur a picture in a sharp area of the image in a specified direction at a given intensity. it's gonna get a little bit tricky because we need to play around with settings in order to use them well.
3. [Radial Blur] and last we last Radial Blur. This filter blurs that creates a blur that moves in one circular direction. the setting is kinda similar to motion blur so if you don't have a problem understanding those setting, Radial Blur will have no problem for you! But for me personally, I don't use them that much.
Well, we have a brief explanation of what each filter can do. I think it's time to let's go and talk about what they can do in the setting for a more in-depth explanation.
We gonna start with [Gaussian Blur] first. The Gaussian Blur filter quickly blurs a selection by an adjustable amount. Gaussian refers to the bell-shaped curve that generates when it applies a weighted average to the pixels. The Gaussian Blur filter adds low-frequency detail and can produce a hazy effect.
After you click the filter, a dialogue box will appear on your screen.
1. Strength of the blur you gonna applies to your selection. you can set a specific number in the box on the right, or gonna use a slide to strong the strength of your filter.
2. If you check the Preview box, the image on the canvas will preview the result on your screen before you applied the real filter to your selection. but they can get pretty slow If the Image quality is too high or your computer processor is too slow, so keep that in mind.
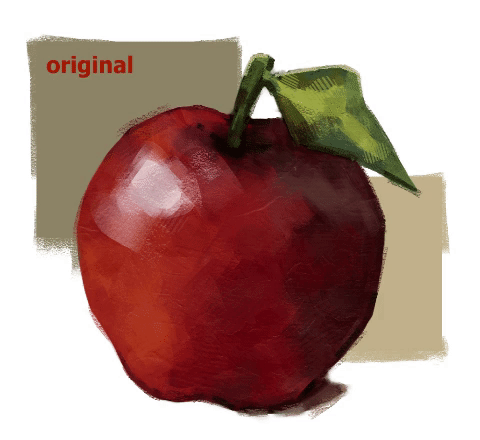
After choosing the setting that you want click ok to apply filter into your selection. the result is on the left side of the example picture
NOTE* be careful that after you applied the blur filter into your work. you cannot change anything about them at all including the strength of the blur and the original resolution of the selection. so don't forget to back up your work before applying the blur filter, if something goes wrong or you don't like the result so you can come back and fix them again without a problem.
you also can use [Selection Tool] to select specific areas to apply the blur filter into your work. In order to blur select the area with [Selection Tool] after that the line will show up and highlight the selected area. Next, you can use a blur filter as you normally do.
or you can use [Quick Mask] to apply the blur into your selection area. this method is better than the recent method because when you select the area you can use brush pressure to apply opacity of select area and allowing you to easily create selections with complex shapes.
In order to active this function go to [Select] > [Quick Mask] or simply use the shortcut [Ctrl+M]
After that, Layer Quick Mask will show up on the [Layer] palette.
When you draw into your canvas everything in the selection is displayed in red and those red will represent the selection area before you confirm the selection.
the brush that I'm gonna use is [Airbrush] > [Soft] to draw the selection area.
After I have already drawn the selection area that I want. I try to make the selection smooth as I can to show you how [Quick Mask] is different from the normal selection tool instead of hard-edge selection.
Later, you can click [Quick Mask] again or simply use it shortcut [Ctrl+M] to confirm the selection.
After confirming the selection area, the line that covered the selected area with a highlight will show up. but be careful the selection area does not entirely show the whole selection area especially when you applied the selection area with a soft brush.
Then I've applied gaussian blur into the selection area. you can see the blur pretty smooth compare to the hard edge from using the normal selection tool.
I've already shown you 2 methods of how to use a selection tool to blur the area. and later in the tutorial I gonna show you how to use [Layer mask] my favourite method, combine with blur filter to create an artwork.

and now we have [Motion Blur]. is the apparent streaking of moving objects in a photograph or a sequence of frames, such as a film or animation. It results when the image being recorded changes during the recording of a single exposure, due to rapid movement or long exposure
[Motion Blur] is the ability to blur a picture in a particular direction at a given intensity. It can sometimes look like the blur that you see when an object is moving very fast. and now, I gonna explain the setting that is the difference from gaussian blur
1. Sets the Angle degree of an image
2. When selecting the direction you can choose from [Both directions], [Forward], and [Backward].
3. You can select [Box] and [Smooth] from Mode.
It's kinda hard to explain these with only words. so I make an example for each setting down below.
These options use when you want your object or your selection area to move in a specific direction to create a dynamic and tell the story.
[Box] Averages the values of each pixel and its surrounding pixels.
[Smooth] Assigns more weight to central pixels and averages the values of pixels.
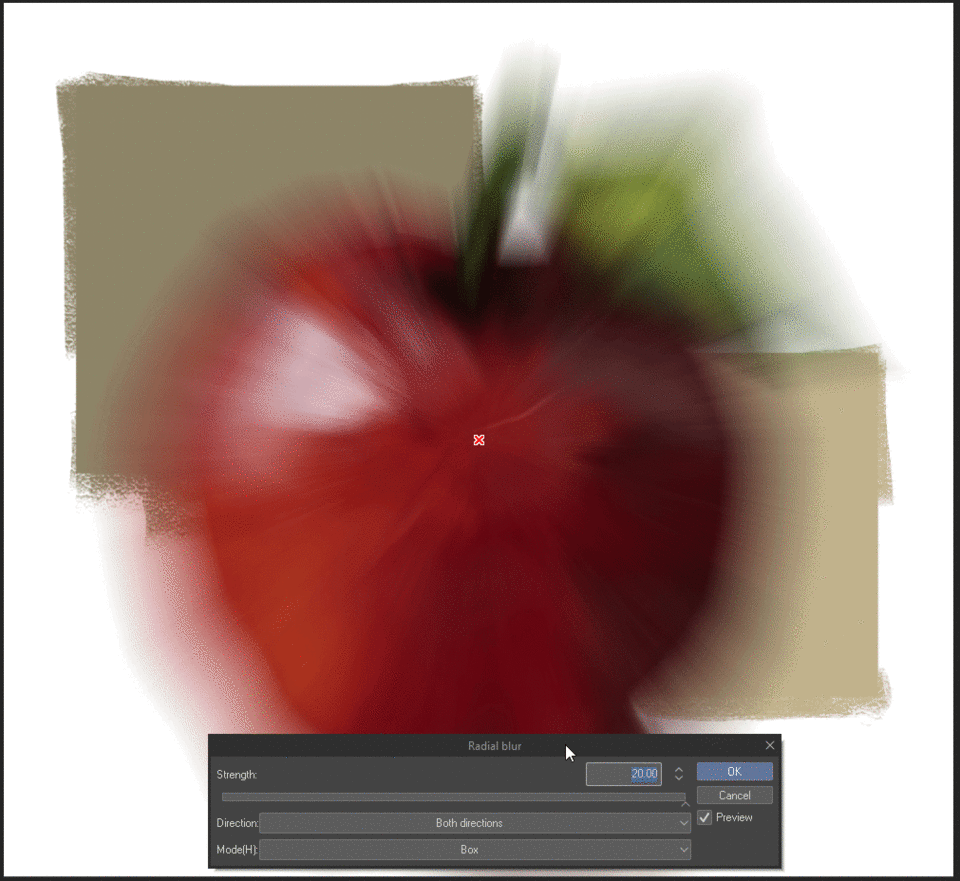
Radial Blur creates a blur that moves in a circular direction, either using Spin mode (as if the image were spun around a certain point) or in Zoom mode. This Blur filter is used to create a circular distortion around an object, which can be targeted or applied to the entire image with a red cross [x] to set the centre of a blur.
1. Set the direction to blur from [Both directions], [Outward], or [Inward]. just like the motion blur but instead of right or left it's outward or inward. an example will be down below.
2. You can select [Box] and [Smooth] from Mode.
[Box] Averages the values of each pixel and its surrounding pixels.
[Smooth] Assigns more weight to central pixels and averages the values of pixels.
It's good to have the ability to control center of the radial of the blur by moving the red cross [x] around the canvas.
Well, we just going through all three of the main blur filters of Clip Studio Paint. what do you think about it here is the GIF that shows the difference between each blur filter.
Sadly in this tutorial, I'm only gonna use only two blur filters [Gaussian Blur], [Motion Blur] only. but don't worry two filters is already enough to create a good artwork If you use them properly. But now we learned how each filter work, then we gonna move to the next step! but we will gonna start with something easy to understand like using [Gaussian Blur] to create a focal point in artwork.
Create depth of field with Gaussian blur
After I just finished explaining to you guys how each one of them works differently. Now, I gonna show you how to use Gaussian blur to create focal points and depth of field in our artwork. This gonna be very simple and straightforward, but instead of getting and applying the work into our work. I would like to briefly explain and I think we really need to understand what is the basic principle? how they actually work in real life? and more.
I gonna use this photo as an example and to explain how to create depth of field with gaussian blur. You can see in the picture that we have 1 camera and 3 objects place right next to it. each object has its own distance that tells how far away they are from the camera, as you can see we have foreground midground and background.
all the photos you see will always have focal point or sometimes it does not really have it at all. we can have many focal as much as we want. but in the heading, I'm gonna use only 1 focal point for a more simple solution a lot of focal lead to confusion and it is hard to and lead the viewer into the image.
when you look at the photo something needs to lead the viewers into something important that we trying to tell our viewers through our art right? there all so many methods that can create focal points in our pieces but in this head, we gonna mainly talk about depth of field and we gonna achieve it with gaussian blur.
depth of field is shallow, “having a plane that’s in focus, and everything else is out of focus,” the in-focus position becomes narrower, and the out-of-focus part becomes blurred, and the farther the distance is, the larger the blur. as you can see in the example image.
the camera is focusing on the front object and keeps focusing on it cause the other 2 objects to be blurred. and The further the subject is from the background dramatically decreases the depth of field as I said before.
why do we need to blur the image? because sometimes images can have too much information in one piece. when it is too much our eyes start to get confused and hard to lead into the piece. so in order to create focal points sometimes, we need to blur unnecessary parts and lead the view to the point we want.
Now, I'm gonna create a shallow depth of field into my piece here. as you can see instead of the side view, I gonna try to represent to you how to create them in my artwork.
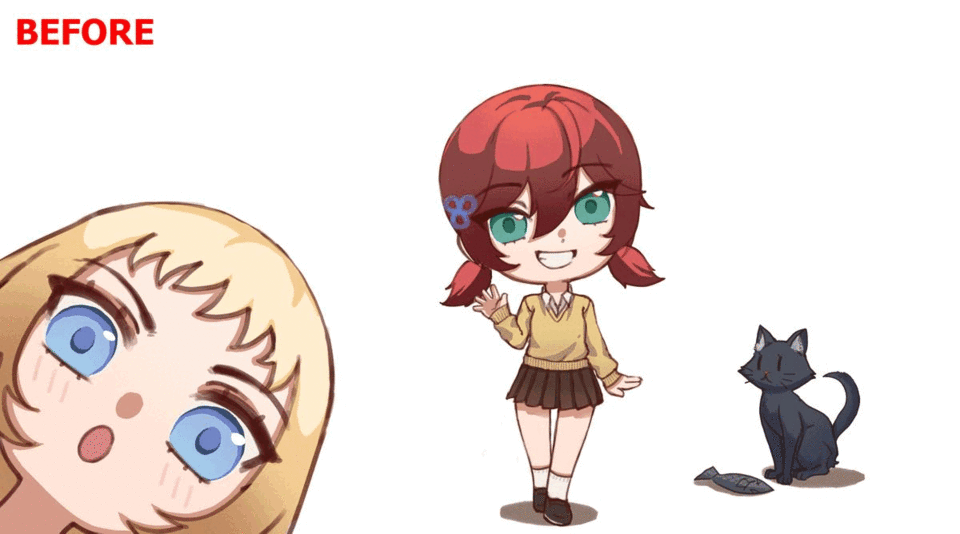
We have 3 main layers Foreground as blonde hair girl, midground as red hair girl, and lastly a cat as a background. and each layer will represent its distance from the camera.
this time a blonde hair girl will be standing on the front and will be our main focusing point of the camera. so the other 2 will apply with a gaussian blur filter depending on their distance from a camera.
I start with red hair girl that standing in the midground, I go to [Filter] > [Blur] > [Gaussian blur] click on it and a dialogue box will appear. I choose blur strength around 15 and click ok to confirm it make sure not to overdo it otherwise it will make your object look too far away from reality.
After that, I moved to the next one that is a lonely cat that sitting further away in the background.
the subject will become more blur the farther the distance is. so I apply Gaussian blur into the cat's layer and set blur strength to be around 25.
before and after the original one and the one that I've added the depth of field into the Image. it actually looks good then I expect it. but I think this kinda method is gonna work even more if there is a background behind the focused object.
Now, let's try to move our focus position into midground. as you can see in the photo when the focus is already movie to midground the front that used to be our focus point is blurred but the one in the background become more clear because it places closer to the focus position than before.
So I've applied gaussian blur strength around 15 to all the objects around the focus point. and here is the result.
and the last on I gonna move the focus position to farther away to the back. as you can see, the blur in the foreground becomes stronger because it's too far from the focus point cause it the focus.
and here it is, the result. and now we're done with this heading is not hard at all right? once you figure the depth of your object, there will be no problem at all when you try to add the blur into your piece. In the next heading we going to some similar but instead I will do on portrait and demonstrate how to create a focal in my artwork.
Use Gaussian Blur to create a focal point in Portrait
In this heading, I'm gonna show how I use Gaussian Blur to create focal points into your piece and some small effect that can enhance your artwork! and most importantly these are so easy I'm pretty sure that you guys not gonna have a problem trying to follow through the tutorial at all.
Let's get to it!
I've already prepared the portrait that I made for this method. but before I gonna create a focal point and add depth of field into my portrait, I gonna add a little trick into my work first. Adding Chromatic Abberation, Yes that's what we gonna do with this portrait first
First, I've merged all the layers of my character into one. then duplicate 2 more of the original layers with [Ctrl+C] and [Ctrl+Y] two of them will use each to create Chromatic Abberation.
After that, make sure to select the duplicate layer that stays on top first. then go to [Edit] > [Tonal Correction] > [Level Correction] and dialogue box will appear.
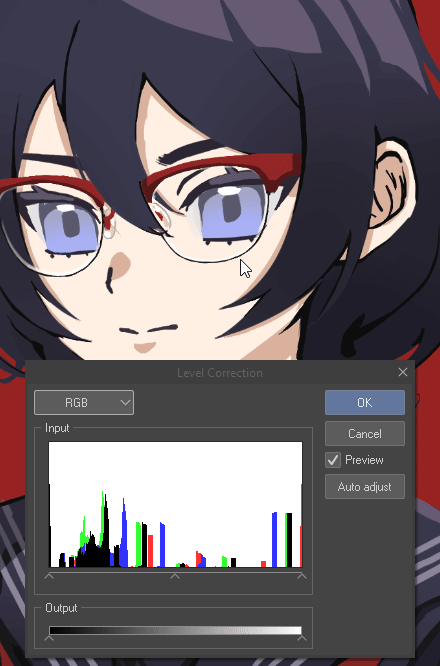
I'm not gonna explain how [Level Correction] works now. but all you need to do now is select color channel [RGB] > [Red]. After that, go to output down below the dialogue box. you can see in the output slide down below that both sides will have small arrows from each side. the left slide is represented Shadows output and the right side is Highlights.
Then select the arrow on the right side and drag the way to the left. you will see your portrait color change into blue-ish color after that. click ok to continue in the next step.
Then, hide that blue layer for now before we gonna go for the next one. Click on the layer below and do the same process, Go to [Edit] > [Tonal Correction] > [Level Correction]

This time will be like the first one, choose channel [Blue] and drag the Highlight arrow output all the way to the right. and repeat the same with [Green] channel.
Now, we already have 2 layers! The Blue one and the Red one. I gonna unhide the blue one first before going to the next step.
make sure that you are already selected Blue layer. Then, go to [Blending Mode] > and choose [Screen]
Now we have almost done. Next, go to tools [Move] > [Move layer] and make sure that you already selected the Blue layer before you move the layer with the [Move layer] tool.

Use the [Move layer] tool to move a layer into one specific direction don't have to either right or left only. you can drag them about 45 degrees too. But for now, I gonna drag them either right or left first. the more you move the layer the more you get the Chromatic aberration effect and make sure to not overdo it!
And now we got Chromatic aberration in our portrait! Let's move into the next one.
after we've added Chromatic effect into our portrait I back up the folder and merge it all together.
In order to merge the layer, [Ctrl+Click] and click each layer. after you've selected all the layers that you want to merge. [Left Click] somewhere [Layer] windows and choose [Merge selected layers].
when you already merge the layer that you've selected. duplicate one of them again before adding the blur into your portrait. After that, click the top layer and go [Filter] > [Blur] > [Gaussian Blur].
A dialogue box will show up, I think I gonna select Blur Strength around 25 because I don't want to over blur it. but the blur density depends on you. Click ok to apply blur filter into the layer.
Next, go to [Layer] > and select [Create Layer mask]. The layer mask will show up beside it selected layer. This is the method that I like the most when I use gaussian blur combined with a layer mask.
Next, we gonna prepare a brush with transparency or eraser tools to remove a portion of the mask. hide part of the image on a layer that we don't want. but first, we gonna need tools for that. I recommend using a soft edge brush like [Eraser] > [Soft] or [Air brush] > [Soft] you can use these instead of an eraser to remove the part while using transparent color.
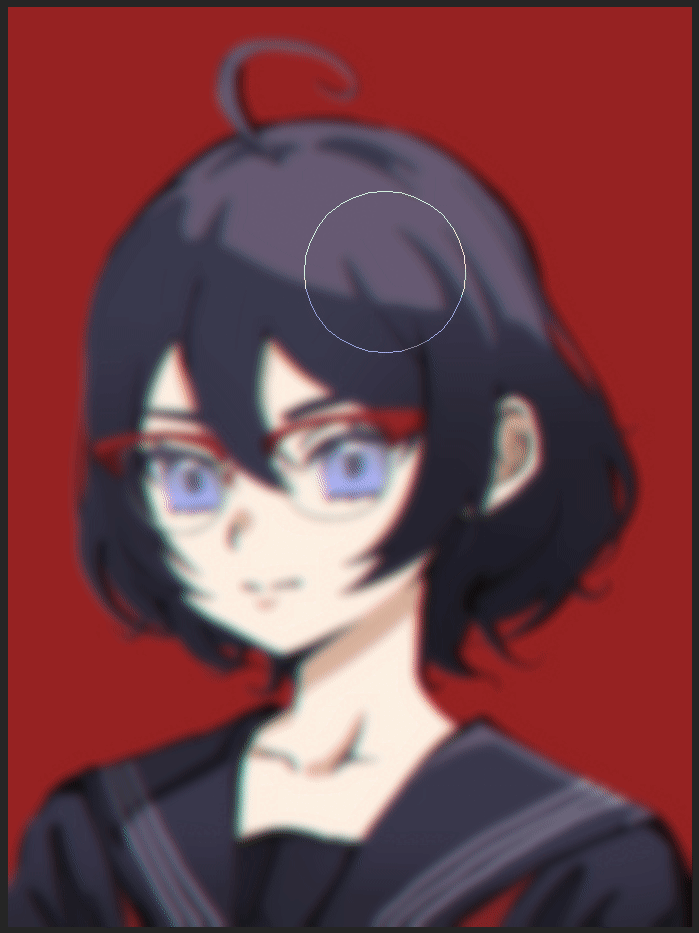
After that, I start to remove and hide unnecessary parts with soft-edge tools on the layer mask. make sure to select layer mask, not just the layer itself when you want to adjust the mask layer.
I remove the mask layer around the face area to create a depth of field, well you don't the face part to be blurred don't you. the good thing is Layer Masks can be adjusted and deleted at any time when you mess up.
After I've done with creating focal in my portrait. Then I think I will add a little bit of color and contrast around the canvas. [Right-Click] at the [Layer] > [New Correction] > [Tone Curve]. the reason that I use [New Correction] it's that you can get back and fix the effect until you satisfy.
I've tried to play with [Tone Curve] for a while until it I satisfy with the result.
and when you applied the [Tone Curve] don't forget to clip to the layer down below too! because I don't want [Tone Curve] to mess up the color in the focal point of the portrait.
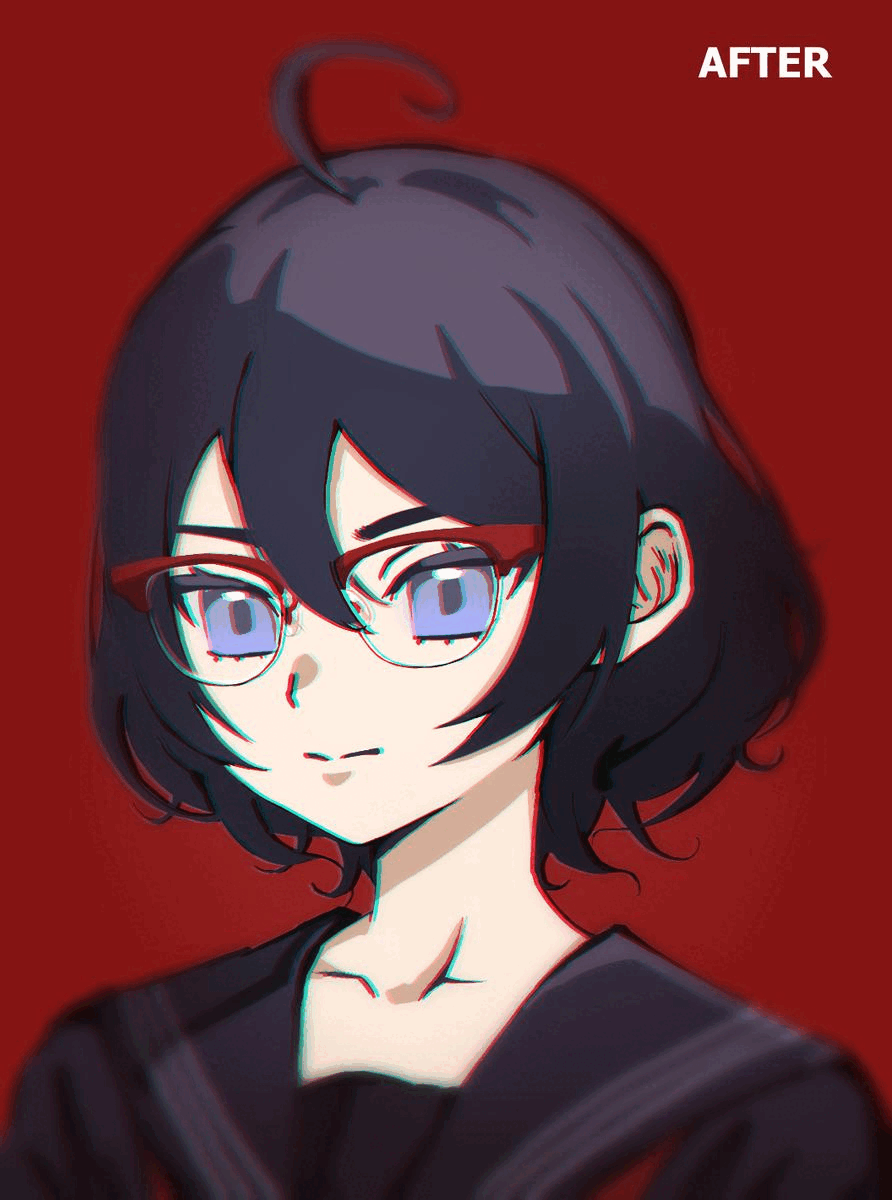
Here is the GIF before and after. What do you think?
There you go! It's all done. but you can play around with [Tonal Correction] change hue, create more contrast, gradient map you can do it your way, but I think I'm kinda like the result that came out. so, a single tone curve is more than enough for me.
Let's move to the next one!
How to use Blur filters to enhance your artwork
In this heading, I'm gonna you how to use blur filters and other tools to create an artwork. I've already prepared the art for this heading! and I hope you guys don't mind If I gonna do artwork In greyscale since it's easier to create a piece (lol forgive me I'm lazy)
unlike the previous one that I use a blur filter just once. but in this piece, I will use blur filters to their full potential.
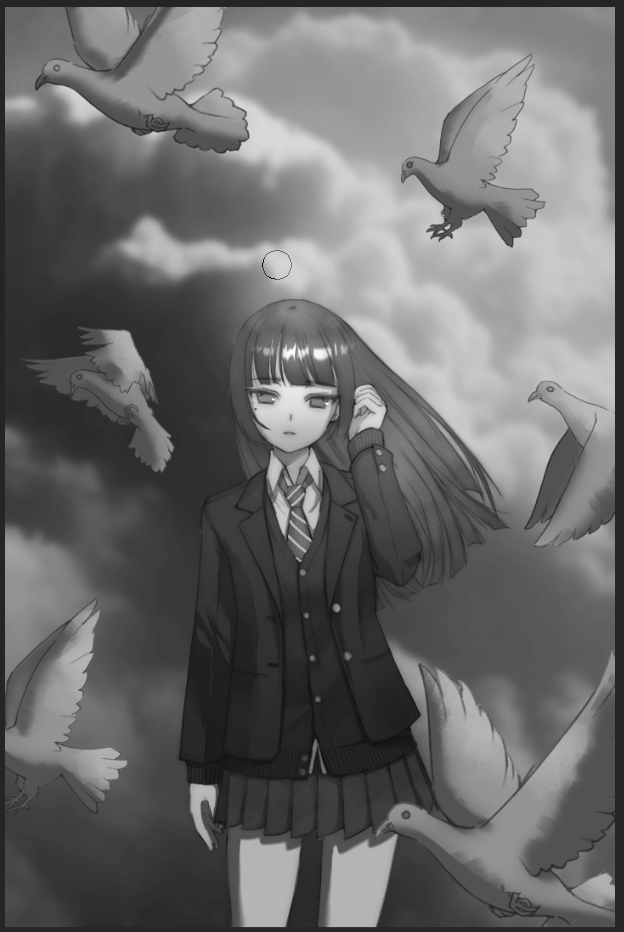
Let's see what do have in this piece... doves that flying around a girl and we have the sky as a background. but I think first I gonna give life to our line art first kinda like the bloom effect. before that let me organize the layer, etc a little bit to make life easier!
I minimize the minimum layers that I have to a small number, so when I try to use filters or anything else will don't get confuse me too much.
I duplicate the line art layer, and put it on top of the original layer After that, I selected the girl line art layer. and go to [Filter] > [Blur] > of course, our [Gaussian Blur].
Then the Dialogue box shows up in the canvas, I choose Blur Strength value of around 25 seems like a perfect fit for me. but I do recommend playing it around with the setting Strength and Opacity of the layer.
Seem like there it's nothing change at all. well, I don't blame you since I either don't see the difference lol. joke aside gaussian blur that we just apply into artwork creates a bloom effect around the Line art layer.
It's kinda hard to see the difference when there is a lot of detail behind it. so I just gonna show you only the line art layer and the blurred one. bloom effect that I've created with gaussian blur is actually adding a little mood into our line art!
Okay, I think we are okay with the line art now. let's move to the next one.
Now, what we gonna playing with are the sky behind the girl and those doves. I gonna use method like the previous heading with [Layer Mask] and [Gaussian Blur] to blur unnecessary or blur unwanted parts of the background.
I go ahead and duplicate another layer of our background and click [Create layer mask] preparing for the next step.
After that, I blur the duplicate layer with [Gaussian Layer]. but I only apply small blur strength to the sky, because I like to let some detail beseen not just the unblur part.
Then, I use a soft-edge brush to delete unwanted parts of the layer mask as we do in the previous one. I want the cloud part that reflects the light to be more clear and the dark part to be blurred.
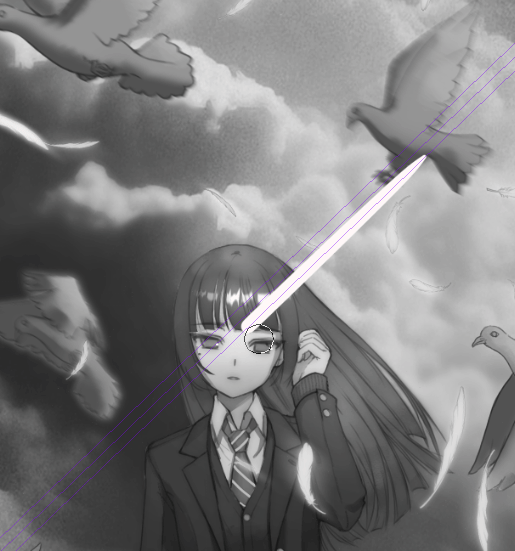
After satisfying with the result of my background. I'm gonna move on to the doves that flying around. and you can see from the picture above, I'm trying to sort out how each dove distances from the camera point of view. by using red color to indicate how far they are.
I create 3 group layers after sorting them out. with foreground, midground, background.
and now it's the time that motion blur will come into action! I selected the dove that is sorted in the foreground folder. then go to [Filter] > [Blur] > [Motion blur].
The dialogue box will show up and it's time to tweak with the motion blur setting a little bit. after that, I choose the strength around 7 because I don't want to break a detail on this dove too much and also don't this dove to look like it flying at a high speed. so it's good to keep blur strength low.
for the angle of the blur, I want to be around 30 degrees and I choose [Forward] as a Direction of the blur. to show that the dove is flying forward. and of course with the [Smooth] mode to make motion much smoother.
After I'm done with the first dope, I think it's will be good if each dove have its own speed and blur. so I decide to use [Lasso] tool selection to blur each one of those doves.
I select the area with the [Lasso] tool to each one and apply blur to the individual dove. I keep doing to every dove in the background but also leave some dove unblurred as well.
After applying motion blur to all doves in the background except from those two that are flying in the middle ground, so I decided to leave the way they are. Motion blur really gives the mood and the story very well as you see, we can feel that those doves are actually flying to something instead of frozen in the air.
but I have to admit that using motion blur is very hard compared to something simple like a gaussian blur. it's really hard to pull out a very good work that uses motion blur technique. well, I guess that's why we need to keep practising!
I just noticed that the dove are actually hard to see with the dark background behind them. so I think it's already to give this dove some outline to make them more visible from the darker background.
I use the [Lasso] tool again to select that dove. Then, I duplicate the layer and paste them.
After that, I want to change color of that dove to pure white. In order to do so, I change the color to white or any color that you want. Then go to [Edit] > [Convert to drawing color] click it to change the drawing color.
Now we have the pure white shape of that dove. Well, I selected the layer and use [Gaussian blur] to blur that shape to some degree.
After I've applied the blur into that shape, I lower layer opacity to around 50% and drag them down below the original layer. you can see the shape that we've blurred have become something like the outline glow like effect for that dove. make it more invisible to the eye.
If we talk about birds we need to think about feathers right? now I'm adding some feathers around the canvas to create something more interesting. I'm not gonna draw each feather into my canvas that gonna take too much time.
Then I go and take a look in clip studio assets to find a feather base brush in there. and I found this. this brush will help me create those feathers that I want. this brush will select primary color as the outline and secondary color as the main color. but before we gonna draw these feather brushes into our work. first, I need to tweak and play around with the setting first.
Mainly we gonna play with 3 settings
1.Particle size : this setting will set how large is your large feather is. don't get confused with the brush size because that only applied to the area of effect not the actual size of the feather itself.
2.Particle density : set density of the feather. the higher you have the more feather you get.
3.Spray deviation : with this setting, you can configure the degree of concentration of the spraying effect by the brush tip hair.
trying to play with these first until good enough not oversize, not too much density. and then you will use it in your canvas.
After playing around with the setting, I start to paint feathers around my canvas. I trying not to add those feathers because later I gonna apply a blur filter to make these feathers blur.
Then, I duplicate the layer of these feathers and put it on top of the original layer. change to drawing color to white with [Edit] > [Convert to drawing color] as we did before.
After I have duplicated the layer and already change the layer color to pure white, then I go to [Filter] > [Blur] > [Gaussian blur] blur as much as you want to create a glow effect on top of the original layer.
But I not gonna stop there, I gonna make this feather even more blur! with help of the Motion blur combined with gaussian blur.
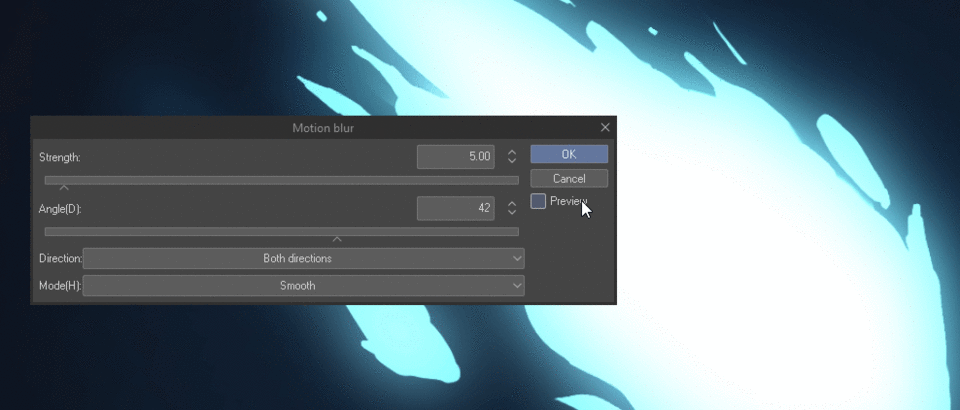
I Duplicate the blurred layer of the feather and place it on top of it. go to blur filter and choose [Motion blur]. I set that I use is 30 strength and blur into both directions and of course, smooth mode.
it's looking good, is it? at first, I don't think that motion blur combined with gaussian blur will help improve the glow effect this much. very impressive. this piece is almost finished, only one more thing to do ''adding the sunlight ray''
Well, In order to make the line lined up together, I'm gonna use [Special ruler] that will help us guide each line I draw. After, you selected the ruler drag in the canvas to set up the direction of the line you want to be.
*NOTE don't forget to use [Snap to Special ruler] or simply [Ctrl+2] before you draw otherwise your line not gonna snap with the guideline.
The example when your ruler is looking properly gonna be like this your guide need to be purple in color and and tick [Snap to Special ruler] while drawing.
After that, I draw a chunk of white color from the direction that sunlight comes from. then, I use a Soft-Edge brush to delete the hard edge of the chunk. make sure the edge of your sunlight is smooth enough before we process to the next step.
If you think it's good enough. then, go top [Layer] > [Blending mode] > [Glow dodge] to make everything that under that layer effect by the chunk of sunlight that I drew on top of them.
After changing the layer's blending mode, I go to [Filter] > [Blur] > [Gaussian blur] to blur the sunlight. I gonna set the blur strength around 60 would be perfect. and now our white color chunk is looking more and more like the sunlight that reflects on the canvas!
Then, I lower the opacity of sunlight to 25% in order to not make it too bright.
and now we finished!
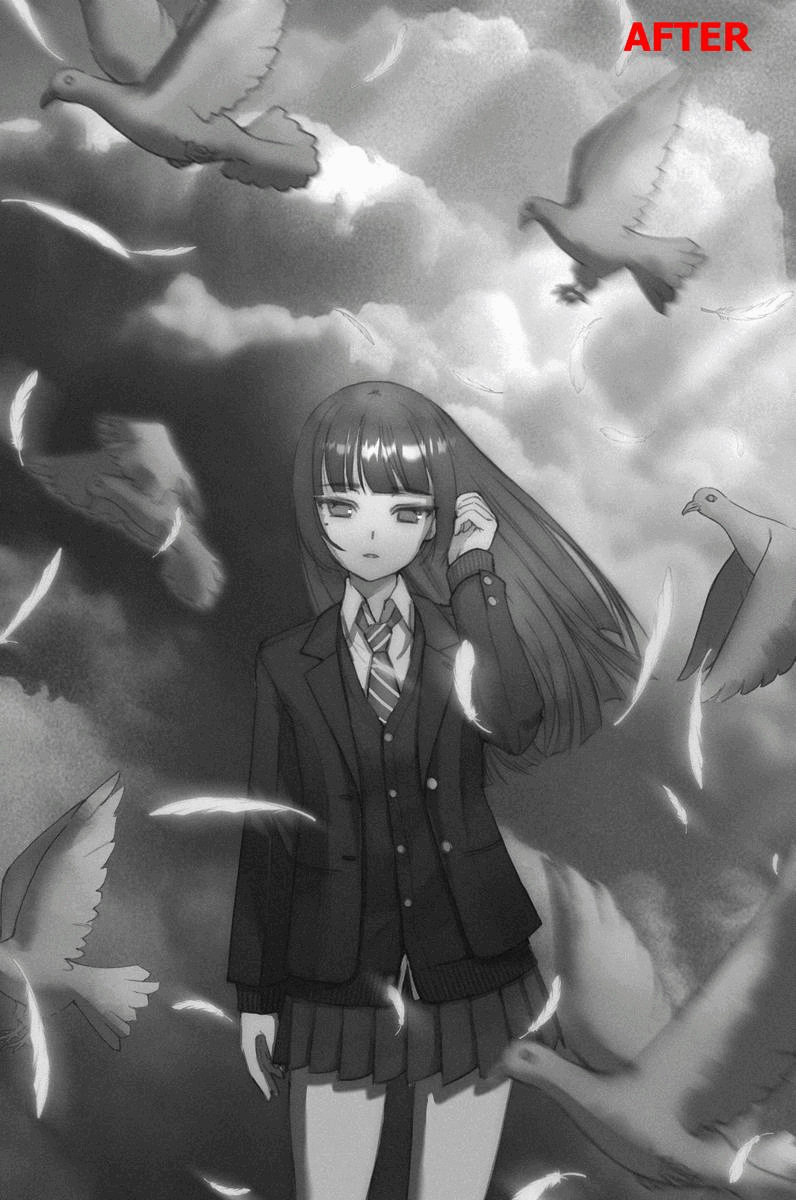
This before and after before I applied all blur filters and effects into my artwork! actually, I can add a lot more into this artwork something like more glow into some area or add contrast into the piece. but that is not the point of the heading, I only show you how I use a blur filter with my art to its full potential. I hope you guys like it!
Add Glow effect to your art with Blur filters
After I use some of the blur filters to create a glow-like effect in the previous heading. now in the heading, I'm gonna show you what method I actually use with blur filters to add a more advanced glow effect into my art.
If you want to create something that glows, It's better to let that thing glow in the dark to make a strong contrast between them. I will use Turquoise green as my glow color (I maybe change the glow color later) and choose a dark blue background that is almost as dark as black color. and I will use the brush with a hard edge to draw the shape of my object.
Now, after I've already drawn a shape in my canvas, I copy the original layer and paste them on top of the original. Then, I gonna go to [Filter] > [Blur] > [Gaussian blur] and choose blur strength around 120, and click ok to confirm.
After I've applied gaussian blur into my object, and go to [Layer] > and change [Blending mode] to [Glow dodge] this mode will give us a result that’s much lighter than the original color.
But If you think the glow is not strong enough, you can duplicate the layer and paste again and again until you satisfy with the result.
now, let's get back to the tutorial. I don't kinda like the look of the color after I've changed the layer mode to [Glow dodge]. so I decide to change the base color. I go to [Edit] >[ Tonal Correction] > [Hue/Saturation/Luminosity] to change the color with hue slide on top.
After that, I create a new layer and change [Blending mode] of the layer to [Glod dodge] or [Add glow ]. then I prepare a soft airbrush to paint around the canvas to enhance the glow effect of the glow.
and I start to paint around the glow to make the glow looks better overall.
I think I will add a little bit of blur filter to make them look better. so I chose motion blur to apply into my base glow layer first of all the glow that I made looks like a ball of fire moving in one direction anyway so I think it is good to add a little motion blur to them.
and I decide to add a dot of light to my object to it more interesting. these effects I will use both Gaussian blur and Motion together. so I gonna divide them into 3 steps.
1. I use a hard edge g pen to draw a little dot and a line around my glowing light
2. After that, I duplicate and paste them on top of the original one. change the color to white, use gaussian blur to blur it.
3. I duplicate the gaussian blur layer and place it on top again like the first step. but this time I gonna blur it again with motion blur. I chose the angle of blur to be the opposite direction of the glow, for example, my glow is like moving from 42, then I set dot glow to be -42 to create a cross light to make it more pop.
Summary : I have one base layer, one gaussian blur and the last one is motion blur.
My work is almost done the last thing is that I want to want is the Noise in the background of my work. so I go find brushes in clip studio assets. and found this! I'll place the link to the brushed here. and I will brush that call Hairy lines, and I paint this brush around the glow in the background.
I tried to use the brush to create a gradient especially around the brightest area of the piece around the front of the glowing fireball. The noise brush that I just painted in the background it's kinda hard to see, but it actually creates noise around the glow If you pay attention to it closely.
and now it's finished! here it's the gif before and after to see how much it improve from the start! If you are still not satisfied with the color of the glow, you can try to use [Tonal correction] to help you with that problem. but for now it's all good enough for me now.
(Bonus) Layer Blending mode with Gaussian blur
I have a small bonus to tell you guys before I end this tutorial. well, the technique is not that amazing, but I will actually help you in the future for sure. In this head, I'm gonna talk about how can you layer blending mode with blur filters. and I will shared you some small tip trick before I go.
we meet her again! that red hair girl that stands in the middle of the photo! in this heading, I gonna use her to create an example of how the blender mode layer will affect our character. we will go through this very fast, since If you guys still reading from the start. you will be able to predict the pattern of how I use blur filters right? then. let's begin!
well, start with a duplicate the layer and place it on the top as we always do.

I click and that layer and use [Gaussian blur] to see a blur strength value around 50. however this depends on your preference.
after I've applied the blur filter and set the layer opacity to 50% as you can see the result it make the bloom affect around our character!
after that, you go to [Blending mode] and change to [Overlay] and let the layer take effect. now my character is applied with a bloom-like effect and overlay blending mode that boost the saturation color of my character to a brighter tone. well, of course, you can play around with setting adjust the opacity, layer mask to delete the place where you don't want to be effect by that layer like the face of a character.
this is the example when I applied the gaussian blur to everyone but the only difference is they have a different layer blending mode. that's all I want to tell you guys! that's a quick one, is it? because throughout the tutorial I only use [Glow dodge] with blur filter. then I think It's good to let you know that another bleeding mode is worth trying to use too!
now we're done with the layer blending mode. I gonna talk the other around that we can use gaussian blur to make the bloom effect without affecting the color on top of the character. every simple you ask? yes, just place it on the bottom of the base layer! that's all. lol
but they're still working in different scenarios too! let's see it down below.
you can change to layer color as you wish with this function! [Edit] > [Convert to drawing color] well we have done this before with the dove that we use this method to create an outline for the object.
I've changed the layer to green color! well, that's all a lot better. but choose your color wisely too If you do it correctly you can make your character more stand out for sure.
If you think the glow effect around the character it's not strong enough. then all you need is to duplicate them and stack them up again and again until you satisfy. with this, you can create a strong solid outline around your character too!
Author's word
Finally, we came to an end. for those who read until the end. thank you so much for being patient with my English. even I know that some spot in this tutorial is so confusing but at least I've tried my best during making this tutorial. thank you again, and see you guys in the next tutorial!
この投稿を「いいね!」したユーザー


コメント